Flaming Flavor ignites culinary creativity by transforming ordinary dishes into extraordinary experiences through the artful use of a culinary torch. Harnessing the controlled flame to master searing perfect crusts elevates the taste and texture of foods, unveiling complex flavors that only fire can coax.
Prep and Cook Time
Preparation: 10 minutes
Cooking: 15 minutes
Total: 25 minutes
Yield
Serves 4 people
Difficulty Level
Medium – Perfect for adventurous home cooks eager to refine their torch skills
Ingredients
- 4 thick-cut ribeye steaks (1.5-inch thick, room temperature)
- 2 tablespoons olive oil
- 2 teaspoons kosher salt
- 1 teaspoon freshly cracked black pepper
- 4 sprigs fresh rosemary
- 4 cloves garlic, smashed
- 2 tablespoons unsalted butter
Instructions
- Season steaks generously with kosher salt and black pepper on both sides. Pat dry with paper towels to ensure your sear will be crisp and flavorful.
- Heat a heavy skillet (cast iron preferred) over high heat until smoking hot. Add olive oil and quickly place steaks in the pan. Sear each side for 2 minutes to develop an initial crust.
- Remove steaks from the pan and rest briefly on a cutting board. This pause helps juices redistribute before the finishing touch.
- Using your culinary torch, hold the flame about 3 inches from the steak surface, moving steadily to evenly sear. Focus on building a deep mahogany crust-avoid burning by controlling flame distance and movement.
- Flip steaks and repeat torch searing on the other side until your desired crust is achieved, approximately 2 to 3 minutes total.
- Return steaks to the skillet with butter, rosemary, and garlic. Spoon melted butter over the steaks to infuse flavor and moisture as they rest for 5 minutes.
- Slice against the grain and serve immediately with your preferred sides.
Tips for Success
- Ensure steaks are at room temperature before searing-this promotes even cooking and better crust formation.
- Use a dry surface for your meat; moisture creates steam and inhibits crust development.
- Control your flame intensity; a torch set too high can burn rather than sear, creating bitterness.
- If you don’t have a cast iron skillet, a stainless steel pan is a good second choice.
- Practice proper torch safety by keeping a safe distance and never pointing the flame at flammable objects.
- Make-ahead tip: Season and torch sear steaks, then refrigerate. Reheat with a quick torch sear just before serving for that perfect fresh crust.
Serving Suggestions
Present your perfectly seared steaks on a warm platter garnished with fresh rosemary sprigs and a light drizzle of garlic-infused butter. Pair with crispy roasted potatoes or a refreshing arugula salad tossed in lemon vinaigrette to balance the smoky richness. A bold red wine like Cabernet Sauvignon complements the flavor notes beautifully.
| Nutrient | Per Serving |
|---|---|
| Calories | 520 kcal |
| Protein | 45 g |
| Carbohydrates | 1 g |
| Fat | 38 g |
Recommended Culinary Torches for Mastering the Art
Investing in a quality culinary torch makes all the difference when exploring the Flaming Flavor technique. The Bernzomatic Gourmet Culinary Torch offers adjustable flame control and ergonomic design, ideal for detailed searing. For home enthusiasts starting their torch journey, the Iwatani PRO2 Butane Torch provides consistent powerful flames with user-friendly ignition. Always purchase from reputable sources to guarantee fuel quality and safety features.
Essential Safety and Maintenance
- Never leave your torch unattended while ignited.
- Keep a fire extinguisher or baking soda nearby when torching indoors.
- Store butane fuel canisters in a cool, dry place away from heat sources.
- Regularly clean the torch nozzle to prevent clogging and maintain steady flames.
- Follow manufacturer guidelines for refilling and usage to ensure longevity.
Discover more techniques to amplify your kitchen creativity in our Guide to Kitchen Flame Techniques, where you’ll find recipes and safety tips curated for culinary torch enthusiasts.

Q&A
Q&A: Flaming Flavor – Unlocking the Magic of a Culinary Torch
Q1: What exactly is a culinary torch, and why has it become a kitchen essential?
A1: A culinary torch is a handheld, flame-emitting tool traditionally used for caramelizing sugar on crème brûlée. Beyond its classic role, it has erupted onto the culinary scene as a versatile gadget that adds smoky, charred nuances and crispy textures, transforming ordinary dishes into extraordinary experiences. Essentially, it’s the kitchen’s little flame magician, sealing flavor and creating spectacle.
Q2: How does a culinary torch unlock new flavors in cooking?
A2: The torch introduces direct, intense heat in quick bursts, caramelizing sugars, melting cheeses, and charring edges without overcooking the underlying food. This method releases complex Maillard reactions and smoky aromas, enhancing depth and creating a layered flavor profile that’s both bold and nuanced. It’s like painting your plate with fire for a gourmet finish.
Q3: What dishes can benefit from a culinary torch besides crème brûlée?
A3: The possibilities are endless! Think searing sushi toppings like aburi-style salmon, crisping roasted vegetables, melting cheese on French onion soup, charring the skin of peppers or tomatoes for easy peeling, finishing meringue toppings, and even bringing a subtle toast to cocktails or marshmallows. The torch invites creativity, turning everyday ingredients into culinary fireworks.
Q4: Are culinary torches safe and easy to use?
A4: Absolutely, with a little respect, a culinary torch is a safe, user-friendly kitchen companion. Most have adjustable flame settings, safety locks, and ergonomic designs. The key is always to follow manufacturer instructions, keep a fire extinguisher handy, and never use the torch near flammable materials or directly at your hand. Once mastered, it’s like wielding a fiery wand with precision and delight.
Q5: How can beginners start experimenting with a culinary torch?
A5: Begin small-try caramelizing sugar on mini crème brûlées or crisping breadcrumbs atop mac and cheese. Observe how the flame changes the texture and aroma, then graduate to more adventurous dishes like torching fruit for desserts or adding charred highlights to meats and seafood. With each flicker, you’ll unlock new layers of flavor and confidence.
Q6: What tips can elevate your torching technique to chef-level?
A6: Keep the flame moving steadily to avoid burning one spot, hold the torch at a 45-degree angle for even caramelization, and adjust flame intensity depending on your target-higher for quick sear, lower for gentle toasting. Patience is key: let the flame do the work without rushing, and always taste as you go to perfect the magic balance between char, crisp, and caramel.
Q7: Where can one purchase a quality culinary torch, and what features should be prioritized?
A7: Culinary torches are widely available online and in kitchenware stores. Look for butane-fueled models with refillable tanks, adjustable flame control, safety locks, and an ergonomic grip. Brand reputation and user reviews can guide your choice. Investing in quality ensures reliability, safety, and the joyous flame-play your creative cooking demands.
Unlocking the magic of a culinary torch means unleashing a fiery artistry that elevates flavor, texture, and presentation. With just a flicker, you invite warmth, crunch, and caramelized bliss to your dishes-turning everyday cooking into a blazing passion.
Future Outlook
As the final flicker of the culinary torch’s flame dances away, it leaves behind more than just caramelized sugar or perfectly seared edges – it ignites a spark of creativity in every kitchen it graces. Unlocking the magic of this fiery tool transforms ordinary dishes into extraordinary experiences, where flavor and flair collide in a burst of warmth and wonder. Whether you’re a seasoned chef or an adventurous home cook, embracing the culinary torch invites you to explore a world where food is not only tasted but truly illuminated. So, light up your next meal with a touch of flame, and watch as ordinary ingredients blaze into unforgettable delights.
Unlocking the Magic of a Food Mill begins with appreciating its ingeniously simple yet multifunctional design, allowing you to transform fresh produce into silky smooth purees and velvety sauces effortlessly. As a culinary enthusiast, I’ve found that the food mill elevates even the humblest ingredients, turning them into sumptuous textures that no blender or sieve can quite mimic. Whether crafting rustic tomato sauce or delicate apple butter, this kitchen tool becomes an indispensable ally for the creative cook.
Prep and Cook Time
- Preparation: 10 minutes
- Cooking: 25 minutes
- Total: 35 minutes
Yield
Serves 4
Difficulty Level
Easy to Medium
Ingredients
- 3 cups ripe tomatoes, quartered
- 2 cloves garlic, minced
- 1 small onion, finely chopped
- 2 tbsp extra virgin olive oil
- 1 tsp sea salt
- 1 tsp fresh basil leaves, chopped
- 1/4 tsp freshly ground black pepper
- Optional: pinch of red chili flakes for heat
Instructions
- Sauté Aromatics: Heat the extra virgin olive oil in a medium skillet over medium heat. Add the minced garlic and chopped onion, sauté until fragrant and translucent, about 5 minutes, stirring regularly.
- Cook Tomatoes: Add the quartered tomatoes to the skillet. Cook for 15 minutes, stirring occasionally, until the tomatoes are soft and release their juices.
- Prepare the Food Mill: Set up your food mill with the medium disc in place. This size provides the perfect balance for a smooth sauce without losing texture.
- Mill the Tomato Mixture: Transfer the tomato mixture to the food mill. Using the hand crank, gently process the tomatoes, allowing the mill to separate skins and seeds, creating a silky puree.
- Season and Finish: Return the milled puree to the skillet. Stir in sea salt, chopped basil, black pepper, and red chili flakes if using. Simmer for another 5 minutes to meld flavors.
- Serve Warm: Pour the sauce over freshly cooked pasta or use as a base for your favorite dishes.
Tips for Success
- Selecting Your Food Mill: Choose a model with interchangeable discs to allow versatility-fine, medium, and coarse-to match your recipe’s texture needs.
- Ingredient Prep: Always cook fibrous or tougher produce until tender before milling; this ensures smoother purees.
- Cleaning Ease: Clean right after use. Soak the parts in warm soapy water to loosen stuck bits for effortless washing.
- Texture Control: Adjust processing speed. Slow, even turns of the crank prevent clogging and yield a finer puree.
- Creative Uses: Beyond sauces, try pureeing roasted vegetables, potatoes for gnocchi, or even fresh fruit for sorbets.
Serving Suggestions
Drizzle your fresh tomato puree over homemade pasta, garnish with a sprinkle of parmesan cheese and a few fresh basil leaves for a vibrant, elegant presentation. Alternatively, ladle it over grilled chicken or baked fish, finishing with a touch of extra virgin olive oil and cracked black pepper. For a rustic twist, serve alongside crusty warm bread for dipping-each bite bursting with garden-fresh flavor.

| Nutrient | Amount per Serving |
|---|---|
| Calories | 90 kcal |
| Protein | 2 g |
| Carbohydrates | 12 g |
| Fat | 4.5 g |
Curious to explore more culinary magic with versatile kitchen tools? Check out our Best Kitchen Toys for Home Chefs post for deeper insights. For further inspiration on perfect sauce textures, visit Serious Eats’ guide to tomato sauce.
Q&A
Q&A: Unlocking the Magic of a Food Mill – Your Kitchen’s Secret Tool
Q1: What exactly is a food mill, and why is it considered magical in the kitchen?
A: A food mill is a classic, hand-cranked kitchen gadget designed to puree and strain foods effortlessly. Its magic lies in its simplicity and versatility-turning chunky fruits, vegetables, and cooked ingredients into smooth sauces, soups, and baby food, all while effortlessly separating seeds, skins, and fibers. It’s like having a culinary wizard that transforms your ingredients with just a spin!
Q2: How does a food mill differ from a blender or food processor?
A: While blenders and food processors rely on sharp blades and electricity to chop and puree, a food mill uses a rotating blade pressed against a perforated disk to manually mash and sieve food. This means it gently preserves texture, removes unwanted bits (like tomato skins or seeds), and avoids over-processing, giving you a silky, refined texture without the fuss or noise of machines.
Q3: What types of foods can I prepare with a food mill?
A: The possibilities are vast! Use it to make luscious applesauce, silky tomato sauce, velvety mashed potatoes, smooth pumpkin puree, or even fresh baby food. It’s ideal for any cooked food that needs mashing and straining-think soups, jams, and pie fillings, where smoothness and texture matter.
Q4: Is the food mill difficult to use or clean?
A: Not at all! Using a food mill is as simple as placing it over a bowl, adding your cooked ingredients, and cranking the handle. The pureed food passes through the holes, leaving skins and seeds behind. Most food mills come apart easily for thorough cleaning, and many parts are dishwasher-safe-making the magic quick and tidy.
Q5: Can a food mill help improve my cooking results?
A: Absolutely. By removing seeds and skins naturally, your sauces and purees become silkier and more flavorful, without bitterness or texture issues. Plus, the gentle mashing keeps delicate flavors intact, making your homemade favorites taste like they came from a high-end kitchen.
Q6: Are there different sizes or types of food mills? How do I choose one?
A: Yes! Food mills come in various sizes-small (for baby food), medium (perfect for everyday use), and large (for big batches). They also feature interchangeable disks with different hole sizes, allowing you to control the texture. Choose based on your cooking habits: a medium size with multiple disks is a great all-rounder for a busy kitchen.
Q7: Can a food mill replace other kitchen tools, or is it best used alongside them?
A: A food mill complements rather than replaces other tools. It excels at creating smooth purees and removing fibers, while blenders and food processors are better for chopping or mixing raw ingredients. Incorporate it into your cooking toolkit to add finesse and texture control to your culinary creations.
Unlocking the magic of a food mill means embracing a timeless tool that elevates your cooking with minimal effort. Spin your way to smoother sauces, richer purees, and kitchen creations that taste like a warm hug-no wizardry required.
Future Outlook
As you welcome the humble food mill into your kitchen arsenal, you unlock a world where texture, flavor, and tradition converge effortlessly. This unassuming tool transforms humble ingredients into silky sauces, velvety purees, and delightful jams-all while preserving the essence of natural goodness. Whether you’re a seasoned chef or an enthusiastic home cook, the food mill is your secret to culinary magic, bridging the gap between rustic charm and refined technique. So next time you prepare a meal, let your food mill work its subtle wonders and watch as ordinary dishes become extraordinary creations with just a turn of the handle.
The Art & Science of Sourdough: Young vs Mature Starters Explained
The art & science of sourdough: young vs mature starters explained is a fascinating journey into the heart of fermentation, where microbial orchestras craft flavors and textures unlike any other bread. Whether you’re twirling a fresh, lively young starter or savoring the deep nuances of a mature colony, understanding their unique traits is your ticket to bakery-level sourdough mastery at home.
Prep and Cook Time
- Starter preparation: Varies by age – 4 to 12 hours for young starter readiness, 8 to 24 hours for fully mature starter activation
- Dough mixing and bulk fermentation: 4 to 6 hours (depending on starter maturity and temperature)
- Shaping and final proof: 2 to 4 hours
- Baking time: 40 to 50 minutes
- Total: Approximately 12 to 24 hours including resting and fermentation (active working time around 30 minutes)
Yield
Makes one rustic loaf, approximately 800g to 1kg depending on hydration.
Difficulty Level
Medium – ideal for home bakers ready to deepen their understanding of fermentation dynamics.
Ingredients
- 500g bread flour, preferably high protein for strong gluten development
- 350g water, lukewarm (about 75°F / 24°C)
- 100g sourdough starter (young or mature, active and bubbly)
- 10g fine sea salt
- Optional: 1 teaspoon honey (to boost microbial activity in younger starters)
Instructions
- Mix the starter and water in a large bowl until fully combined. This initiates enzymatic action crucial for flavor extraction.
- Add the bread flour and stir with a wooden spoon or spatula until no dry patches remain. The dough will be shaggy and sticky – this is perfect.
- Cover tightly with a damp towel or plastic wrap and let autolyse for 30 minutes. This resting phase hydrates the flour and develops gluten gently.
- Sprinkle the salt evenly over the dough, then fold it in by hand, pressing and stretching the dough for 3-4 minutes until the salt is fully absorbed.
- Bulk ferment at room temperature for 4 to 6 hours. During this time, perform gentle stretch-and-folds every 30 minutes for the first 2 hours to strengthen the dough’s structure.
- Shape the dough on a lightly floured surface into a taut boule or bâtard. Be gentle to preserve the gas bubbles formed during fermentation.
- Place the dough seam-side up in a floured banneton basket or a bowl lined with a tea towel. Cover and proof for 2 to 4 hours, or refrigerate overnight for a longer, slow proof enhanced by mature starter complexities.
- Preheat your oven to 475°F (246°C) with a Dutch oven or baking stone inside to capture radiant heat.
- Carefully transfer the loaf onto parchment and score the surface with a sharp blade to direct oven spring.
- Bake covered for 25 minutes to trap steam, then remove the lid and bake an additional 20-25 minutes until the crust is deep golden brown and crackling.
- Cool on a wire rack for at least 1 hour before slicing to lock in moisture and let flavors mature further.
Tips for Success
- Feeding young starters: Young starters benefit from frequent, smaller feedings every 12 hours to encourage a robust microbial population and flavor depth.
- Recognizing maturity: Mature starters show consistent bubbling, a pleasant tangy aroma, and double in size predictably, delivering more complex flavor profiles and elasticity.
- Adjust hydration: Young starters often yield stickier doughs requiring slight water reduction (by 5-10%) for easier handling.
- Experiment with temperature: Slightly lower fermentation temps (68°F / 20°C) favor mature starters’ flavor complexity, while warmer (75°F / 24°C) is ideal for speeding up young starter activity.
- Store your starter: Mature starters thrive when refrigerated with weekly feedings; young starters require daily care at room temperature.
Serving Suggestions
This loaf shines best fresh, slathered with creamy butter and a pinch of flaky sea salt. For a gourmet touch, top slices with smashed avocado, heirloom tomato slices, and a drizzle of good olive oil. Complement with sharp cheeses or a bowl of rustic lentil soup for a cozy meal experience.

| Nutrient | Per 100g |
|---|---|
| Calories | 280 kcal |
| Protein | 9g |
| Carbohydrates | 55g |
| Fat | 1g |
Harnessing the art & science of sourdough: young vs mature starters explained empowers you to tailor every loaf to your taste and texture preferences. For deeper insights and recipes on fermentation, explore our comprehensive guide to Sourdough Fermentation Techniques. To learn more about the health benefits and science of sourdough microbes, consult this resource at Science Daily.
Q&A
Q&A: The Art & Science of Sourdough – Young vs Mature Starters Explained
Q1: What exactly is a sourdough starter?
A: Think of a sourdough starter as a living, bubbling orchestra of wild yeast and friendly bacteria. It’s a naturally fermented mixture of flour and water that captures wild yeast from the environment, creating the magic that makes sourdough bread rise and develop that signature tangy flavor.
Q2: How do young and mature starters differ?
A: A young starter is like an enthusiastic apprentice-newly awakened, still building its microbial community, and full of raw potential but inconsistent performance. A mature starter, on the other hand, is a seasoned maestro-stable, balanced, and confidently producing delicious, reliably leavened bread with a rich depth of flavor.
Q3: What happens in the early days of a starter’s life?
A: During its infancy-the first week or so-a starter undergoes a microbial wild party. Initially, natural yeasts and bacteria coexist in a chaotic dance, with the environment selecting the strongest players. The pH drops, acids develop, and eventually, the yeast and lactobacilli form a harmonious, symbiotic community that fuels consistent fermentation.
Q4: Can I bake with a young starter?
A: Absolutely, but with caveats! Young starters may produce uneven rise and unpredictable flavors-they’re still finding their groove. Experimentation is key: use them for lighter, quicker fermentations or pancakes until they mature. The best loaf often comes when the starter has aged at least 7-14 days and displays reliable bubbling and aroma.
Q5: Why does a mature starter produce better bread?
A: Over time, a mature starter develops a stable population of wild yeasts and lactic acid bacteria that work in concert. This balance creates a steady rise, a complex flavor profile (with subtle sour notes), and a robust gluten structure. The mature starter’s predictable activity means baking becomes both an art and a science you can trust.
Q6: How do I know if my starter is mature?
A: A mature starter doubles or even triples in size within 4 to 6 hours after feeding, is bubbly with a pleasing tangy aroma, and passes the “float test”-a spoonful floats easily in water, hinting at the abundant gas inside. If your starter has been regularly fed for at least two weeks and behaves consistently, congratulations-it’s mature!
Q7: How can I nurture my starter to maturity?
A: Feed it regularly with fresh flour and water, keep it at a cozy temperature (around 70-75°F or 21-24°C), and be patient. Avoid adding any antimicrobials (including chlorinated water). Stirring and discarding a portion before feedings keeps the culture vibrant and prevents it from becoming overwhelmed.
Q8: What flavor differences come from young vs mature starters?
A: Young starters often create milder, less complex breads-think gentle hints of sourness and fresh grain characteristics. Mature starters bring a layered flavor palette with tangy acidity, subtle fruitiness, and deep umami notes, painting your crust and crumb with a true artisanal soul.
Q9: Can I keep a starter indefinitely?
A: Yes! A sourdough starter can live for decades if properly cared for. Many bakers have “heirloom” starters passed down through generations, capturing local terroir and history in every loaf.
Q10: In short, what’s the takeaway?
A: The journey from young to mature starter mirrors that of any great artist: from fledgling enthusiasm to seasoned expertise. Understanding this evolution empowers bakers to harness sourdough’s living essence-turning flour, water, and time into masterpieces of taste and texture.
Embrace patience, feed your starter well, and watch as science and artistry rise together in your sourdough adventures!
To Wrap It Up
In the intricate dance of sourdough baking, understanding the subtle nuances between young and mature starters transforms a simple loaf into a living work of art. The science behind their activity, flavor development, and resilience unlocks endless possibilities for creative expression in your kitchen. Whether you’re nurturing a vibrant newborn starter or a time-honored mature culture, each stage offers unique gifts that shape the character of your bread. Embracing both the art and science of sourdough not only deepens your connection to this ancient craft but also elevates every bake into a testament of patience, passion, and natural magic. So, nurture your starter with care, and let the timeless story of fermentation unfold slice by slice.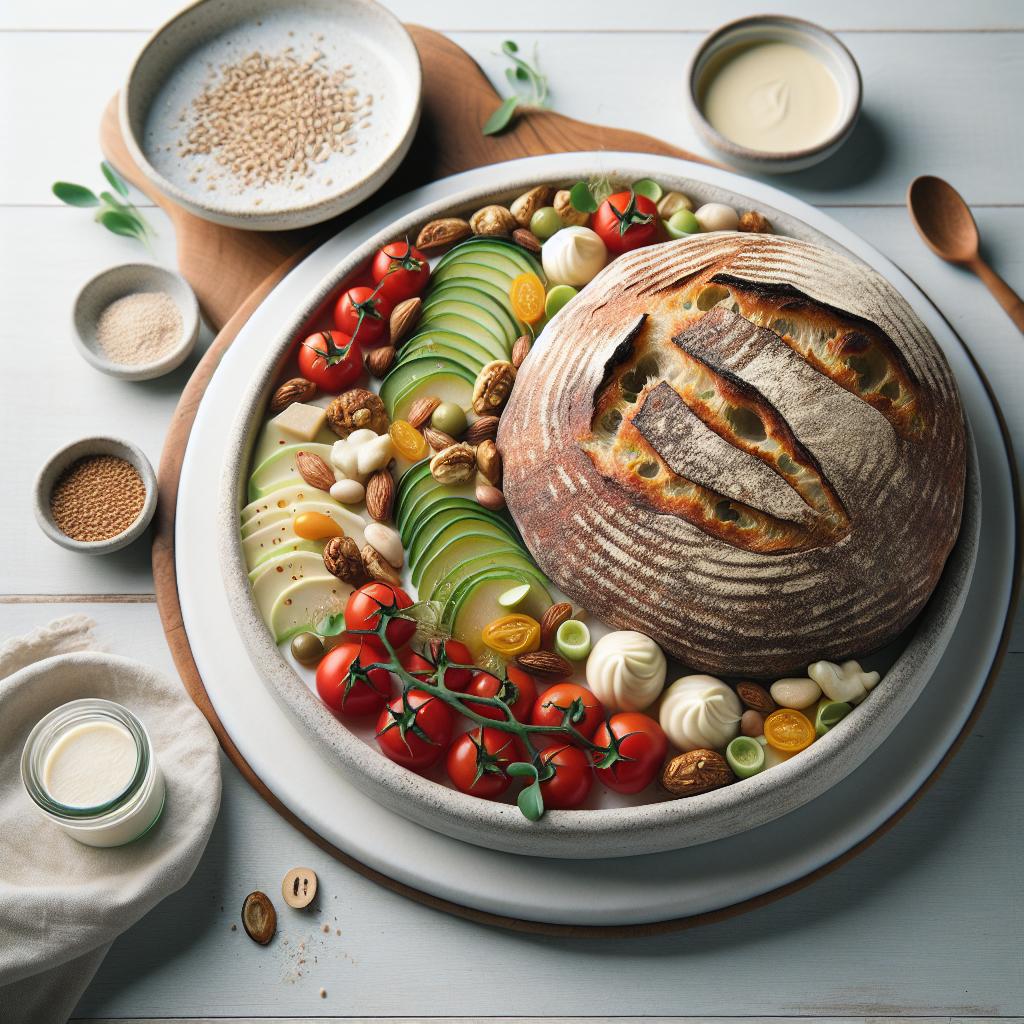
Understanding Milk Kefir Grains and Their Magical Role
Crafting Creamy Magic in your kitchen begins with the enchanting world of milk kefir grains, tiny living communities of bacteria and yeast that transform ordinary milk into a probiotic-rich elixir. These gelatinous grains are not grains in the traditional sense but are living symbiotic cultures that thrive on lactose, fermenting milk into a tangy, creamy beverage bursting with health benefits and complex flavors.
Originating from the Caucasus Mountains, milk kefir grains carry centuries of heritage and microbial diversity, making your homemade kefir an artisanal jewel. Their gentle fermentation process naturally balances tartness with subtle sweetness, creating a culinary canvas that invites endless creativity.
Prep and Cook Time
- Preparation: 5 minutes
- Fermentation: 18-24 hours (depending on temperature and desired tartness)
- Total Time: Approximately 24 hours
Yield
Approximately 1 quart (about 4 cups) of milky, creamy kefir.
Difficulty Level
Easy to Medium – A welcoming project for beginners and a refined art for enthusiasts.
Ingredients
- 2 tablespoons fresh milk kefir grains (live and active)
- 1 quart whole milk (preferably organic, raw or pasteurized)
- Optional: filtered water to rinse grains
Instructions
- Prepare your fermentation jar: Use a clean glass quart jar, rinsed with warm water but not soap, to preserve beneficial microbes.
- Add the kefir grains: Gently place 2 tablespoons of fresh milk kefir grains into the jar.
- Pour the milk: Pour in 1 quart of whole milk, leaving about 1 inch of headspace to allow for expansion during fermentation.
- Cover the jar: Use a breathable cloth or paper towel secured with a rubber band to allow airflow while keeping out dust and insects.
- Ferment at room temperature: Place the jar in a cozy spot, between 68-78°F (20-25°C), avoiding direct sunlight. Let it ferment for 18-24 hours – the longer it ferments, the tangier and thicker it becomes.
- Strain the kefir: Once the milk has thickened and smells pleasantly tangy, strain out the grains using a plastic or stainless steel sieve to avoid metal damage.
- Store your kefir: Transfer the strained kefir to a glass bottle with a lid and refrigerate. It’s best enjoyed within 7 days.
- Care for your grains: Immediately feed the grains with fresh milk for continued use or store them temporarily in a small amount of milk in the fridge.
Tips for Success
- Keep your grains happy: Avoid exposing kefir grains to metal utensils or containers to prevent damage; glass or food-grade plastic is best.
- Adjust fermentation times: Warmer temperatures speed up fermentation but can yield a more sour kefir; cooler temps slow down the process for a milder flavor.
- Milk choice matters: Whole milk produces the creamiest results, but you can experiment with goat’s milk or sheep milk for unique profiles.
- Troubleshooting: If your kefir smells off or the grains seem slimy, pause use and rinse grains gently, ensuring freshness and quality of milk.
- Resting the grains: For short breaks, store grains submerged in milk in the fridge for up to a week. For longer single-use pauses, drying or freezing protocols are advised.
Serving Suggestions
Enjoy your milky creamy kefir chilled as a refreshing probiotic tonic, or transform it into smoothies, salad dressings, and breakfast bowls. For a bit of flavor alchemy, add fresh fruit purées, a drizzle of raw honey, vanilla beans, or aromatic spices like cinnamon and cardamom. Garnish with fresh mint leaves, toasted nuts, or edible flowers for a visually stunning presentation.
Pair kefir with hearty granola, soaked oats, or as a base for cold soups like cucumber gazpacho. Its velvety texture and lively tang make it a versatile ingredient across sweet and savory dishes.
| Nutrient | Per 1 Cup (240ml) |
|---|---|
| Calories | 150 |
| Protein | 8 g |
| Carbohydrates | 12 g |
| Fat | 8 g |
For a deeper dive into probiotic fermentation, check out our related Guide to Probiotic Fermented Foods.
Learn more about the scientific benefits of milk kefir grains at the National Center for Biotechnology Information.

Q&A
Q: What is milk kefir, and why is it called “creamy magic”?
A: Milk kefir is a fermented dairy beverage crafted using kefir grains-tiny, gelatinous clusters of bacteria and yeast. The “creamy magic” comes from its velvety texture and rich tang, born from the symbiotic dance of microbes transforming milk into a probiotic powerhouse. It’s like turning ordinary milk into a lively elixir that nourishes both body and palate.
Q: What exactly are kefir grains, and how do they work?
A: Kefir grains aren’t grains like wheat or oats; they’re living colonies of beneficial microbes-a mixture of bacteria and yeast-that resemble cauliflower florets. When you submerge them in milk, these microorganisms feast on lactose, creating lactic acid, carbon dioxide, and a bouquet of flavors, which results in the creamy, effervescent kefir. Think of them as tiny alchemists performing a fermentation sorcery.
Q: How do you start making milk kefir at home?
A: Begin by obtaining fresh kefir grains-often from a friend or a trusted supplier. Place the grains into fresh milk (cow, goat, or even sheep’s milk works) and leave the mixture at room temperature, covered loosely to allow airflow, for about 24 hours. During this time, the grains work their magic, producing a creamy beverage with a gentle tang and a hint of fizz.
Q: What types of milk can be used for making kefir?
A: You can experiment with various milks-traditional cow’s milk is most common, but goat, sheep, or even buffalo milk create distinct flavor profiles. Full-fat milk tends to yield a richer, creamier kefir, enhancing that “magic” feel. Just note that plant-based milks need special attention and don’t ferment the same way since kefir grains thrive on lactose.
Q: How do you know when your kefir is ready?
A: Kefir is ready when it thickens slightly, smells fresh with a tangy, yeasty aroma, and has a pleasantly tart flavor. The milk will transform from sweet and fluid to creamy and mildly effervescent. Over-fermentation can lead to separation into curds and whey-still edible but more sour-so timing is key to capturing that perfect creamy magic.
Q: Can kefir grains be reused indefinitely?
A: Yes! One of the wonders of kefir grains is their ability to multiply and regenerate endlessly with proper care. After straining your finished kefir, simply rinse the grains gently with clean, cool water (if desired) and plunge them into fresh milk for the next batch. They’re your perpetually living keys to creamy magic.
Q: What health benefits does milk kefir offer?
A: Milk kefir is a probiotic treasure trove packed with beneficial bacteria and yeasts that can support digestion, boost immunity, and promote gut health. Its creamy texture belies a complex community of microbes working behind the scenes to help balance your internal ecosystem-making it as nourishing as it is delicious.
Q: How can you incorporate milk kefir into your daily life?
A: Drink it straight for a refreshing probiotic boost, blend it into smoothies for silky texture, or use it as a tangy base for salad dressings and marinades. You can even bake with kefir to add moisture and a gentle lift to breads and cakes. It’s a versatile, creamy companion to many culinary adventures.
Q: Any tips for beginners to avoid common pitfalls?
A: Absolutely! Use fresh, high-quality milk and avoid metal utensils or containers, as kefir grains prefer glass or food-grade plastic. Maintain a consistent room temperature near 68-78°F (20-25°C) for optimal fermentation. Start with small batches to get a feel for timing, and don’t worry if the flavor varies-that’s just the grains expressing their magic.
Q: How do you store milk kefir once it’s made?
A: Once fermented to your liking, strain out the grains and transfer the kefir to a sealed container in the refrigerator. Chilling slows fermentation, preserving the creamy texture and flavor. Consume within a week for the freshest experience-though some aficionados enjoy the evolving tastes of kefir as it continues to mature slowly in the fridge.
In the alchemy of crafting creamy milk kefir, you hold the power to summon a living beverage filled with ancient microbial wisdom and modern zest. With a little patience and care, milk kefir grains transform humble milk into a sparkling potion of health and flavor-a true creamy magic worth experiencing daily.
The Way Forward
As you embark on your journey with milk kefir and its living grains, remember that each batch is a small, bubbling universe of nourishment and tradition. Crafting this creamy magic is more than a simple fermentation process-it’s an art form rooted in biology and culture, waiting for your hands to bring it to life. With patience and curiosity, you’ll transform humble milk into a tangy elixir teeming with probiotics, offering a delicious gateway to gut health and culinary adventure. So, nurture those tiny grains, experiment with flavors, and savor the ever-evolving story that each jar of milk kefir tells. Cheers to your new craft-where science meets comfort, and every sip is a celebration of life’s microscopic wonders.
The fizzy chemistry of carbonation is the heart and soul of that sensational crackle and pop you experience with popping candy. This delicate dance between temperature, humidity, and sugar crystals unlocks an effervescent texture that captivates both young and old alike, turning a simple treat into a whimsical sensory celebration.
Prep and Cook Time
- Preparation: 15 minutes
- Cooking: 10 minutes
- Total Time: 25 minutes
Yield
Approximately 6 servings (about 60 grams per serving)
Difficulty Level
Medium – requires careful temperature control and timing
Ingredients
- 2 cups granulated sugar
- 1/2 cup corn syrup
- 1/4 cup water
- 1 tbsp baking soda (for light carbonation)
- 1 tsp citric acid (provides tang and activates popping)
- 1/4 cup powdered glucose (to control crystallization)
- Carbon dioxide gas cartridge (optional for professional carbonation)
- Food-grade flavor extracts and colors (optional)
Instructions
- In a heavy-bottomed saucepan over medium heat, combine granulated sugar, corn syrup, and water. Stir gently until sugar dissolves completely.
- Bring the mixture to a boil, using a candy thermometer to monitor temperature closely. Cook until it reaches 320°F (160°C), the hard crack stage.
- Remove from heat and quickly stir in baking soda and citric acid. The baking soda will release tiny bubbles within the candy, creating the popping effect.
- Immediately pour the hot candy onto a silicone mat or greased baking sheet, spreading thinly to cool.
- Once semi-cool but still pliable, sprinkle powdered glucose evenly on top. This helps regulate sugar crystal growth, providing ideal popping texture.
- Now comes the secret carbonation step: either tap the candy surface with a CO2 cartridge tool or, if unavailable, let it sit in a controlled dry and cool environment (below 65°F and 40% humidity) for 24 hours to capture natural carbonation.
- Break the candy into bite-sized shards after full cooling and carbonation. Store immediately in an airtight container.
Tips for Success
- Maintaining low humidity is crucial; moisture softens sugar crystals and dulls the popping sensation.
- Temperature control during cooking prevents premature crystallization and ensures a glassy texture that cracks cleanly.
- Use food-grade acid and baking soda for safe, well-activated carbonation bubbles.
- Experiment with different flavor extracts like raspberry or lemon to complement the tangy pop.
- Store candy in airtight jars with resealable lids to preserve fizz longer.
- If your environment is humid, use a silica gel pack inside the container during storage.
Serving Suggestions
Present popping candy as a sparkling garnish atop creamy desserts such as panna cotta, mousse, or artisan cupcakes for a playful burst of texture. You can also mix it into cocktails or sprinkle over frothy hot chocolates. Use transparent glass bowls or jars to visually showcase the candy’s crystalline sparkle and capture guests’ curiosity before the first satisfying pop.
| Nutrient | Per 10g Serving |
|---|---|
| Calories | 39 kcal |
| Protein | 0 g |
| Carbohydrates | 10 g |
| Fat | 0 g |

For a deeper dive into the fascinating role of sugar crystallization, check out our detailed guide on The Science of Sugar Crystals. To explore professional uses of carbonation in confectionery, the Journal of Food Chemistry offers excellent insights.
Q&A
Q&A: The Sparkling Science Behind Perfect Popping Candy Magic
Q1: What exactly is popping candy, and why does it pop?
A1: Popping candy, sometimes called “pop rocks,” is a sugary treat filled with tiny pockets of pressurized carbon dioxide gas. When the candy dissolves in your mouth, the candy matrix melts away, releasing the trapped gas bubbles with a satisfying snap, crackle, and pop – like edible fireworks dancing on your tongue!
Q2: How do candy makers trap carbon dioxide inside the candy?
A2: The secret lies in a high-pressure cooking process. Sugar syrup is heated and carbon dioxide gas is injected under high pressure. As the mixture cools and hardens rapidly, the gas becomes trapped in microscopic bubbles inside the candy. Once pressure is released and the candy breaks, those bubbles burst, creating the iconic popping effect.
Q3: What scientific principles make the popping so dramatic?
A3: It’s all about the physics of gas under pressure. Carbon dioxide is dissolved into the candy at around 600 pounds per square inch – that’s almost 40 times the pressure of a car tire! When the candy cracks, the gas rapidly expands from high pressure to atmospheric pressure, causing those explosive little pops.
Q4: Can the popping effect be controlled or customized?
A4: Absolutely! By adjusting factors like how much gas is injected, the size of the candy pieces, or the sugar composition, candy scientists can fine-tune the intensity, duration, and volume of the pops. This means some popping candies fizz gently, while others crackle like mini fireworks.
Q5: Is there any chemistry behind the flavor release during popping?
A5: Yes! As the candy dissolves and pops, the sudden gas release helps to rapidly disperse flavor molecules across your taste buds. The effervescence also tickles sensory receptors, amplifying the perception of sweetness and fruitiness, making the experience not just audible but deliciously immersive.
Q6: Are there any cool, lesser-known facts about popping candy’s creation?
A6: Here’s a sparkling secret! Early attempts at creating popping candy date back to the 1950s, but it wasn’t until clever packaging and marketing that the candy became a global sensation. Also, the candy needs to stay dry – moisture causes the tiny bubbles to escape prematurely, making the magic fizzle away before you try it.
Q7: Why does popping candy sometimes lose its fizz if left out?
A7: Moisture is the nemesis of popping candy’s bubbly magic. When the candy absorbs humidity, it dissolves the sugar shell protecting those gas pockets, causing the carbon dioxide to slowly leak out. That’s why airtight packaging is essential to keep popping candy fresh and lively.
Q8: How does popping candy inspire food innovation beyond candy itself?
A8: The captivating science of encapsulating gases in solids inspires chefs and food scientists to create dynamic textures and sensory surprises in all kinds of dishes – from sparkling cocktails to fizzy desserts – adding playful elements of surprise and delight to the dining experience.
In essence, popping candy is a dazzling marriage of confectionery art and physics, where tiny trapped bubbles turn sugar into a miniature fireworks show for your mouth. Next time you hear that pop and crackle, you’ll know – it’s pure science sparkling away!
Key Takeaways
As the fizzy crystals dance and crackle on your tongue, you’re not just tasting childhood nostalgia-you’re experiencing a brilliant concoction of chemistry and confectionery art. The sparkling magic of popping candy is a dazzling demonstration of how science can transform simple ingredients into an electrifying experience. Next time you hear that delightful snap and pop, remember: it’s not just candy, it’s a symphony of carbon dioxide bubbles, sugar crystals, and a pinch of scientific wonder, all sparkling together to create a moment of pure joy.
Grinding Genius: The Science Behind Meat Grinder Augers & Plates unveils the intricate mechanics that transform raw cuts into culinary masterpieces. Whether you’re crafting delicate sausages or robust burger patties, understanding how auger mechanics synchronize with plate design can elevate your kitchen creations beyond mere preparation into art. This blend of engineering and flavor science invites you to optimize textures, retain essential juices, and unlock nuanced tastes with every grind.
Prep and Cook Time
Preparation: 15 minutes
Grinding & Cooking: 20-30 minutes
Yield
Serves 4-6 depending on recipe and portion size
Difficulty Level
Medium – requires familiarity with meat grinders and basic kitchen tools
Ingredients
- 2 lbs fresh beef chuck, trimmed and chilled
- 1/2 lb pork shoulder, chilled
- 1 tablespoon kosher salt
- 1 teaspoon freshly ground black pepper
- 1 teaspoon smoked paprika
- 1/2 teaspoon garlic powder
- 1/4 teaspoon red pepper flakes
- Optional: 1/4 cup finely diced onions for moisture and subtle sweetness
Instructions
- Prepare your meat: Cut beef chuck and pork shoulder into 1-inch cubes; place in the refrigerator to keep cold. Cold meat prevents fat smearing and ensures efficient grinding.
- Select your auger and plate: For a medium grind texture, use a standard auger with a 4.5 mm plate. This balance fosters aeration while preserving juiciness.
- Assemble the grinder: Secure the auger into the grinder housing, followed by attaching your chosen plate firmly. Double-check all components for tightness.
- Grind the meat: Feed chilled meat cubes slowly into the grinder throat, using a tamper if needed. Aim for a steady pace to facilitate clean cuts and consistent texture.
- Season the ground mixture: Transfer ground meat to a bowl; incorporate kosher salt, pepper, smoked paprika, garlic powder, and red pepper flakes uniformly.
- Rest and re-grind (optional): For ultra-fine texture, let the mixture chill for 15 minutes, then grind again using a finer plate (3 mm), enhancing mouthfeel and flavor integration.
- Use immediately or refrigerate: Shape into patties, sausages, or other forms. If not cooking right away, wrap tightly and refrigerate for up to 24 hours to develop flavors.
- Cook carefully: Pan-sear or grill your creation over medium-high heat until internal temperature reaches 160°F (71°C) for safety and optimal taste.
Chef’s Notes
- If moisture is a concern, consider adding ice-cold water or crushed ice cubes during grinding to prevent excessive friction and keep temperature low.
- The choice of plate material matters: stainless steel plates offer durability, while anodized aluminum plates are lighter but less resistant to wear.
- For rich, rustic textures, experiment with larger plate sizes (6-8 mm); for smoother, fine-ground results, choose smaller plates (3-4 mm).
- Thoroughly clean and oil your auger and plates post-use to prevent rust and maintain performance.
- Create signature blends by incorporating herbs or specialty salts before the final grind for deeply infused flavors.
Serving Suggestions
Present your perfectly ground meat as a juicy burger topped with caramelized onions, melted cheddar, and fresh arugula. Alternatively, craft homemade sausages paired with tangy mustard and crusty bread for rustic charm. Garnish with sprigs of fresh thyme or rosemary to mirror the earthiness of the meat. A side of grilled seasonal vegetables or a crisp green salad provides a refreshing contrast to the intensively savory main.

Why Material Choice Impacts Performance
The engineering behind each component – from the spiral auger driving meat forward to the intricately designed plate perforations – shapes the grind’s consistency and flavor extraction. For instance, high-carbon stainless steel components resist corrosion and maintain sharper edges, improving grind uniformity and expediting the process. Conversely, older or softer materials can cause friction, fat smearing, and even flavor degradation. Regular maintenance, including thorough cleaning with mild detergents and quick drying, preserves these mechanical virtues for long-term kitchen success.
Plate Design: Texture and Flavor Under the Microscope
The diameter and number of holes in a grinder plate directly impact the final product’s texture and mouthfeel, which are critical to professional results. Smaller hole diameters (<4mm) produce smooth, fine-ground meats ideal for delicate sausages or pâtés, while larger holes (>6mm) allow for coarser textures favored in chili or chunky burger blends. Creative combinations – like a double grind, shifting from coarse to fine plates – can marry tenderness and bite for an artisan effect. Understanding this science empowers chefs and home cooks alike to tailor textures and flavors precisely.
Expert Guidance for Choosing Your Grinder Components
Experienced culinary artisans emphasize synergy when selecting augers and plates. Match your grinder’s motor power with compatible components to avoid strain or jamming. Opt for plate holes that complement your recipe’s texture goals. And never underestimate the impact of keeping all parts clean and lightly oiled to maintain smooth turning and longevity. Prioritize stainless steel or food-grade anodized aluminum materials for durability and performance. Familiarize yourself with manufacturers’ specs to streamline your choices confidently.
| Component | Material | Benefit | Consideration |
|---|---|---|---|
| Auger | Stainless Steel | Durable, corrosion-resistant, sharp edges | Requires regular cleaning to prevent buildup |
| Plate (Small Holes) | Stainless Steel | Fine texture, ideal for smooth sausages | Slower grind rate |
| Plate (Large Holes) | Aluminum or Steel | Coarse texture, faster grinding | May wear faster if aluminum |
| Lubrication | Food-grade oil | Improves efficiency and part longevity | Must avoid contact with food products |
For deeper reading about optimizing kitchen tool performance, explore this guide from Serious Eats. For an internal dive into flavored ground meat recipes, see our article on Artisan Sausage Recipes.
Q&A
Q&A: Grinding Genius – The Science Behind Meat Grinder Augers & Plates
Q1: What exactly is the role of the auger in a meat grinder?
A1: Think of the auger as the heart of the meat grinder’s operation. It’s a spiral-shaped screw that pulls chunks of meat from the hopper toward the cutting blades and grinding plate. Its twisting motion ensures constant, even pressure, feeding meat smoothly without clogging, which is essential for consistent texture and efficiency.
Q2: How do the design and material of an auger affect grinding performance?
A2: Augers are often made from stainless steel to resist rust and withstand the mechanical pressure. Their pitch-the distance between threads-and diameter are meticulously engineered. A tighter pitch moves the meat slower but can create a finer grind, while a wider pitch speeds up processing but may reduce control. Smooth, polished surfaces reduce friction, helping meat flow effortlessly.
Q3: What makes grinding plates so critical in determining the texture of ground meat?
A3: Grinding plates act like filters dictating meat particle size. They’re flat discs with holes ranging from coarse (about 8 mm) to fine (about 3 mm). The size and shape of these holes decide the final grind. Larger holes yield chunky, rustic textures necessary for sausages or chili; smaller holes produce smoother pastes perfect for spreads or fine sausages.
Q4: Are the materials used in grinding plates important?
A4: Absolutely. Most plates are stainless steel for durability and hygiene. Some commercial models use hardened steel or even titanium coatings to reduce wear and resist corrosion. The sharper and more refined the holes, the more efficient the cut, requiring less force and preserving meat quality by minimizing heat buildup.
Q5: How do augers and plates work together to produce the perfect grind?
A5: The auger pushes meat against the cutting knife, which slices it before it’s pushed through the grinding plate’s holes. This coordinated system ensures clean, precise cutting with minimal muscle fiber damage. The balance between auger speed, blade sharpness, and plate hole size ultimately defines the grind’s texture and consistency.
Q6: Can the wrong auger or plate affect meat quality?
A6: Definitely. Using a plate that’s too coarse for delicate cuts can create uneven textures, while a plate that’s too fine may overwork the meat, increasing temperature and causing fat smearing or dryness. Similarly, a worn or poorly designed auger can cause jams or inconsistent feeding, leading to a sloppy grind and potential safety risks.
Q7: Is there ongoing innovation in auger and plate technology?
A7: Yes! Modern grinders are exploring new materials, precise CNC machining for ultra-smooth finishes, and even adaptive auger designs that adjust feed rates in real-time. These innovations aim to optimize texture, reduce energy use, and preserve the natural flavors and juiciness of meat.
Q8: How can a home cook apply this knowledge to improve their grinding?
A8: By selecting the right plate hole size for your recipe and ensuring the auger is clean and well-maintained, you can elevate your ground meat dishes. Remember to use cold meat to reduce friction heat and sharpen or replace dull blades regularly. Understanding the science behind these components lets you grind smarter, not harder.
Unlock the art and science of meat grinding-because every perfect burger begins with the genius of its auger and plate!
Wrapping Up
As the final morsel makes its way through the tightly wound helix of the auger and squeezes past the precision-forged plates, we’re reminded that meat grinding is far more than a simple kitchen chore. It’s a symphony of engineering, physics, and material science working in harmony to transform primal cuts into versatile, flavorful ingredients. Understanding the intricate dance between auger design and plate perforations not only demystifies this everyday marvel but also empowers chefs and carnivores alike to elevate their culinary creations. So next time you crank the handle or fire up the motor, take a moment to appreciate the genius grinding beneath your fingertips-a blend of form, function, and science that turns meat into magic.
The chemistry behind caramelization is a mesmerizing dance of heat and sugar molecules transforming into a symphony of complex flavors and golden hues. Mastering temperature control is the secret to coaxing out the perfect caramel-its smoky, nutty, and rich undertones elevate countless dishes from humble to extraordinary. By understanding how ingredients interact during this transformation, you can deepen sweetness and add layers of flavor that capture the true sweet science of caramelization.
Prep and Cook Time
- Preparation: 5 minutes
- Cooking: 15-20 minutes
- Total Time: 20-25 minutes
Yield
Serves 6 generous portions
Difficulty Level
Medium – Requires attentive temperature control and timing
Ingredients
- 1 cup granulated sugar
- 1/4 cup water
- 2 tbsp unsalted butter, cut into cubes, softened
- 1/2 cup heavy cream, warmed
- 1/4 tsp fine sea salt
- 1 tsp pure vanilla extract
Instructions
- In a medium, heavy-bottomed saucepan, combine sugar and water over medium heat. Stir gently to dissolve the sugar, then stop stirring once the mixture comes to a simmer. This prevents crystallization.
- Allow the syrup to cook undisturbed, gently swirling the pan occasionally to ensure even caramelization. Watch carefully for the color to shift from clear to a deep amber-this usually happens around 320°F (160°C).
- As soon as the syrup reaches the golden-amber stage, remove it from heat immediately to avoid burning, which lends a bitter flavor.
- Carefully whisk in the butter cubes, stirring until fully melted and incorporated. The butter enriches the caramel with luscious creaminess.
- Slowly pour in the warm heavy cream while whisking vigorously. The mixture will bubble up dramatically-this is the alchemy in action.
- Add the sea salt and vanilla extract, stirring well to harmonize flavors and develop complexity.
- Let the caramel cool slightly in the pan, then transfer to a heat-safe container. Use immediately or store at room temperature for up to a week.
Tips for Success
- Control your heat: Use moderate heat to achieve gradual caramelization-high heat may burn sugar too quickly.
- Prevent crystallization: Avoid stirring the syrup once heated. If crystals form on the pan edges, brush them down with a wet pastry brush.
- Ingredient temperature matters: Adding cold cream directly can cause the caramel to seize. Warm cream blends more smoothly.
- Flavor variations: Infuse cream with cinnamon sticks or star anise for an aromatic twist.
- Make ahead: Caramel sauce can be refrigerated and gently reheated before use.
Serving Suggestions
This velvety caramel sauce is an exquisite companion to vanilla ice cream, drizzled over warm apple crumble, or swirled into coffee for a touch of indulgence. Garnish with flaky sea salt or toasted nuts to add texture and heighten the flavor experience. For a stunning visual, serve in a clear glass jar showcasing its rich amber glow.
| Nutrient | Amount per Serving |
|---|---|
| Calories | 180 kcal |
| Protein | 1 g |
| Carbohydrates | 22 g |
| Fat | 9 g |

For further exploration of sugar chemistry, visit the Science of Cooking. Also, check out our related guide on molecular cooking techniques to expand your culinary repertoire.
Q&A
Q&A: The Sweet Science: Unlocking the Magic of Caramelization
Q1: What exactly is caramelization?
A1: Caramelization is the magical process where sugar transforms under heat, turning from simple sweetness into a complex symphony of flavors and colors. When sugar molecules break down at high temperatures (usually above 320°F or 160°C), they create a cascade of compounds that taste nutty, buttery, and richly deep-anything but just sweet.
Q2: How does caramelization differ from Maillard reaction?
A2: While both create delicious browning and flavor, caramelization involves the direct breakdown of sugars, purely by heat. The Maillard reaction, on the other hand, is a chemical dance between amino acids and reducing sugars, often responsible for the savory flavors in roasted meat and bread crusts. Caramelization is the star in candy-making, Maillard steals the show in baking and grilling.
Q3: What sugars caramelize best?
A3: Not all sugars are created equal in the caramel game. Sucrose (table sugar) caramelizes beautifully and cleanly, making it the caramel king. Fructose caramelizes at a lower temperature and gives a slightly different flavor profile-fruitier and more intense. Glucose is a bit tricky since it tends to burn faster, so it’s often blended for balance.
Q4: Why does caramel sometimes turn bitter or burn?
A4: Timing and temperature are caramel’s delicate dance partners. Too low heat, and it won’t brown; too high or for too long, and the sugars break down beyond caramelization into bitter, burnt compounds. Stirring too aggressively or adding water late can cause crystallization or uneven heating, ruining the smooth texture.
Q5: How can I master caramelization in my kitchen?
A5: Patience is key. Use a heavy-bottomed pan for even heat, and monitor temperature closely, preferably with a candy thermometer. Start with dry heat or add a little water to dissolve sugar evenly, then watch the color change-golden to deep amber signals caramel’s perfect moment. Don’t walk away, because caramel waits for no one!
Q6: What are some creative uses of caramelization beyond candy?
A6: Caramelization isn’t just for sweets-it adds depth wherever sugar is involved. Think caramelized onions transforming simple dishes into savory wonders, roasted vegetables with a natural sweetness boost, or even caramelized fruit toppings that elevate desserts. That golden crust on crème brûlée? Pure caramelized magic.
Q7: Can caramelization happen at home without specialized tools?
A7: Absolutely! While candy thermometers help, caramelization can be achieved with just steady eyes, good quality sugar, and a dependable stove. Many home cooks master caramel sauces, brûlée toppings, and caramelized veggies using simple techniques and careful attention.
Q8: What’s the science behind caramel’s aroma and flavor?
A8: When sugar molecules heat up, they break apart and recombine into hundreds of new compounds. These molecules create the rich bouquet of aromas-from butterscotch and toffee to subtle smoky hints. It’s a molecular orchestra that turns basic sugar into a tantalizing sensory experience.
Unlocking caramelization is like discovering a sweet alchemy-it’s part art, part science, and 100% delicious. Dig in and let the magic caramelize your kitchen creations!
The Conclusion
As the golden hues of caramelization dance across your culinary creations, you begin to see that this is more than just a chemical reaction-it’s a secret language spoken by sugar and heat. Unlocking the magic of caramelization invites you to explore new depths of flavor, texture, and aroma, transforming everyday ingredients into extraordinary delights. So next time you watch that simple syrup darken or hear the gentle crackle of sugar melting, remember: you’re not just cooking-you’re practicing the sweet science that turns the ordinary into pure magic.
Bubbly Bliss: Crafting the Perfect Water Kefir Soda at Home
Bubbly Bliss begins with the careful selection of premium water kefir grains that serve as the vibrant heart of this enchanting fermented soda. These delicate, symbiotic cultures transform simple ingredients into a sparkling, probiotic-rich elixir bursting with effervescent charm and delightful flavor twists. Whether you’re a fermentation aficionado or a curious beginner, mastering this craft will captivate your senses and elevate your homemade sparkling beverages.
Prep and Cook Time
- Preparation: 15 minutes
- Primary Fermentation: 24 to 48 hours
- Flavor Infusion & Secondary Fermentation: 24 to 48 hours
- Total Time: Approximately 3-4 days
Yield
- About 1 liter (4 cups) of sparkling water kefir soda
Difficulty Level
- Easy to Medium: Perfect for beginners keen to explore fermentation as well as seasoned makers looking to refine their craft
Ingredients
- 3 tablespoons water kefir grains, rinsed gently with non-chlorinated water
- 1/4 cup organic cane sugar or coconut sugar, dissolved
- 1 liter filtered water, chlorine-free
- 1 tablespoon lemon juice (freshly squeezed)
- Optional flavor additions for second fermentation: sliced fresh ginger, berries, lemon zest, or dried hibiscus flowers
Instructions
- Bring the filtered water to room temperature if freshly boiled, then stir in the organic cane sugar until fully dissolved, ensuring a pure, sweet medium for the grains to thrive.
- Transfer the sugared water into a clean glass jar. Add the water kefir grains carefully, avoiding vigorous agitation that might damage them.
- Cover the jar with a breathable cloth secured with a rubber band to allow airflow while keeping out contaminants. Let ferment at room temperature away from direct sunlight for 24 to 48 hours, checking for a slight tang and gentle carbonation starting to form.
- Once fermentation primary phase completes, strain out the grains using a non-metal mesh sieve. Rinse them softly with non-chlorinated water, then set aside for reuse in a fresh batch.
- Pour the strained liquid into a sealable bottle, adding your chosen flavor infusions such as fresh ginger slices or berries to the bottle for an enticing second fermentation.
- Seal tightly and leave the bottle at room temperature for another 24 to 48 hours to develop natural carbonation and vibrant flavors. Burp the bottle once daily to release excess pressure and avoid bursting.
- Refrigerate the finished water kefir soda for at least 12 hours before serving chilled and sparkling to perfection.
Tips for Success
- Use non-chlorinated, filtered water to protect the delicate balance of your kefir grains.
- If fermentation stalls, try increasing room temperature slightly or adding a pinch of additional sugar to jumpstart activity.
- Experiment with fruit combos like pineapple and mint or blueberry with lavender for uniquely refreshing blends.
- Always use glass or food-grade plastic containers; avoid metal to prevent unwanted chemical reactions.
- Keep your kefir grains healthy by feeding them regularly and storing them in a sugar water solution during breaks from fermentation.
Serving Suggestions
Present your radiant water kefir soda in tall, clear glasses adorned with fresh herbs like mint or basil, thin slices of lemon, or edible flowers for an irresistible, photogenic touch. Serve it as a vibrant companion to light salads, grilled seafood, or as a refreshing alternative to sugary soft drinks at gatherings. For a festive flair, garnish with frozen berries or a twist of citrus peel that enhances the natural sparkle and complexity.
| Nutrient | Per 8 oz Serving |
|---|---|
| Calories | 40 |
| Protein | 0 g |
| Carbohydrates | 10 g (mainly sugars) |
| Fat | 0 g |
For more on fermentation basics and creative twists, explore our comprehensive guide to fermentation or delve into scientific insights on water kefir to deepen your understanding of this sparkling craft.

Q&A
Q&A: Bubbly Bliss – Crafting the Perfect Water Kefir Soda at Home
Q1: What exactly is water kefir, and how does it differ from other fermented drinks?
A1: Water kefir is a naturally fermented, effervescent beverage made using water kefir grains-tiny symbiotic colonies of bacteria and yeast. Unlike dairy-based kefir, water kefir uses sugar water or fruit juice as a base, making it vegan-friendly and lighter. Its lively bubbles and tangy-sweet flavor set it apart from kombucha and probiotic sodas, offering a gentle, refreshing fizz that’s a probiotic powerhouse.
Q2: Why should I consider making water kefir soda at home instead of buying it?
A2: Crafting water kefir soda at home lets you customize flavors, sweetness, and carbonation levels to perfectly suit your taste buds. It’s also more economical and eco-friendly, reducing plastic waste from store-bought bottles. Plus, the hands-on fermentation process is incredibly satisfying-a bubbling science experiment with delicious results!
Q3: What are the basic ingredients I need to start making water kefir soda?
A3: To begin, you’ll need:
- Water kefir grains (the friendly fermenting microbes)
- Clean, chlorine-free water (spring or filtered water is best)
- Sugar (white cane sugar works well as food for the grains)
- Optional flavor enhancers like dried fruits, lemon slices, or ginger for the second fermentation.
Q4: How do I ensure my water kefir grains stay healthy and happy?
A4: Feed your grains regularly with fresh sugar water every 24-48 hours. Use non-chlorinated water to protect their delicate ecosystem, and keep them at room temperature-ideally between 68-78°F (20-25°C). Give them a gentle swirl daily to distribute nutrients. When resting, store them in sugar water in the fridge and refresh weekly.
Q5: What’s the step-by-step process for making sparkling water kefir soda at home?
A5:
- First Fermentation: Combine sugar water and water kefir grains in a jar. Cover loosely and let it ferment 24-48 hours at room temperature.
- Strain: Remove the grains with a plastic or stainless steel strainer.
- Second Fermentation: Pour the strained liquid into sealed bottles with added flavors like fruit or ginger. Seal tightly to trap carbonation and ferment for another 24-48 hours.
- Chill and Serve: Refrigerate, then open carefully to enjoy your naturally fizzy, probiotic soda!
Q6: Can I experiment with flavors and sweetness?
A6: Absolutely! The second fermentation is your playground. Try berries, citrus zest, herbs like mint, or spices such as cinnamon. For sweetness, adjust the sugar in the first fermentation or add a splash of juice during the second. Each tweak crafts a new bubbly bliss to discover.
Q7: Are there any safety tips to keep in mind while fermenting?
A7: Yes! Always use clean utensils and bottles to avoid unwanted bacteria. Avoid metal containers during fermentation; stick with glass or BPA-free plastic. If your kefir develops a bad smell (like rotten eggs) or mold, it’s best to discard and start fresh. Trust your senses-kefir should smell pleasantly yeasty, slightly sweet, and tangy.
Q8: How can drinking water kefir benefit my health?
A8: Water kefir floods your gut with beneficial probiotics that can aid digestion, boost your immune system, and even enhance mood. It’s a tasty way to support your microbiome without the heaviness of dairy or sugary sodas.
Q9: What’s the best way to store and enjoy my homemade water kefir soda?
A9: Store your bottled kefir in the fridge to slow fermentation and keep carbonation. Enjoy it chilled as a sparkling treat any time-perfect on a sunny afternoon or paired with your favorite meal. Take care when opening since natural carbonation can build pressure.
Q10: Where can I find water kefir grains to get started?
A10: You can find water kefir grains through health food stores, online marketplaces, or community fermentation groups. Many enthusiasts enjoy sharing grains-so ask around local forums or social media groups dedicated to fermentation!
Crafting your own water kefir soda unlocks an artisanal world of playful fermentation-where science meets flavor and your glass bubbles with wellness. Cheers to your bubbly bliss!
The Way Forward
As the final bubbles dance their way to the top of your homemade water kefir soda, you’ll realize that crafting this effervescent elixir is more than just a refreshing pursuit-it’s a celebration of life’s natural rhythms. From nurturing your lively kefir grains to experimenting with vibrant flavors, each step invites a little magic into your kitchen and wellness routine. So, embrace the art of bubbly bliss, let your creativity fizz, and raise a glass to the sparkling joy of home-fermented refreshment that’s as unique as you are. Cheers to your perfectly crafted water kefir soda-where health, happiness, and effervescence meet in every delightful sip!
Carrageenan Uncovered: Nature’s Seaweed Thickening Secret
Carrageenan, a transformative ingredient derived from red seaweed, has long held a revered place in both culinary and industrial arenas. Originating from coastal regions of Ireland and the Philippines, this natural polysaccharide is extracted through a meticulous process that harnesses the ocean’s bounty. Its unique ability to gel, stabilize, and thicken makes it indispensable-from silky dairy desserts to vegan-friendly cheeses and even plant-based milks.
Prep and Cook Time
- Prep Time: 10 minutes
- Cook Time: 15 minutes (plus resting)
- Total Time: 25 minutes
Yield
Serves 6 as a gelled dessert or thickening base
Difficulty Level
Easy to Medium – perfect for home cooks looking to venture into innovative thickening techniques
Ingredients
- 2 grams of carrageenan powder (preferably refined κ-carrageenan for a firm gel)
- 2 cups water (filtered or spring for purity)
- 1 cup full-fat coconut milk or dairy milk
- 3 tbsp sugar (adjust to taste)
- 1 tsp vanilla extract
- Pinch of salt
Instructions
- Hydrate the carrageenan: In a medium saucepan, slowly whisk 2 grams of carrageenan powder into 2 cups of cold water to prevent clumps. Allow it to hydrate for 5 minutes.
- Heat gently: Place the saucepan over medium heat, stirring frequently. As the mixture warms, the carrageenan will dissolve and thicken. Heat until just boiling, about 5 minutes, ensuring constant stirring to avoid sticking or burning.
- Add cream and sugar: Reduce heat to low and stir in 1 cup coconut milk, 3 tbsp sugar, 1 tsp vanilla extract, and a pinch of salt. Simmer gently for another 3 minutes to meld flavors.
- Set the gel: Pour the mixture into a mold or serving dishes. Let it cool at room temperature for 10 minutes, then transfer to the refrigerator for at least 2 hours until fully set.
- Serve beautifully: Garnish with fresh berries, toasted coconut flakes, or a drizzle of dark chocolate for a stunning presentation.
Chef’s Notes
- Substitution tip: You can experiment with different carrageenan types-κ for firm gels, ι for soft and elastic textures, and λ for thickening without gelling.
- Expert tip: Always whisk carrageenan into cold liquids; adding it directly to hot mixtures causes clumping.
- Make-ahead idea: Prepare the gel the day before and store covered to deepen the texture.
- Flavor variations: Infuse herbal teas or fruit purees during cooking to create layered flavors.
Serving Suggestions
Serve chilled as an elegant vegan panna cotta or a decadent stabilizer in mousse-like desserts. This seaweed-derived gel gleams with a delicate translucence that invites a sensual bite. Garnish with edible flowers for a springtime touch, or contrast with zesty citrus segments for brightness. Carrageenan’s neutral flavor makes it a perfect canvas for your culinary creativity.

Understanding Carrageenan’s Role in Food and Industry
Cultivated primarily from species like Kappaphycus alvarezii and Eucheuma denticulatum, carrageenan is extracted by boiling the seaweed in water, followed by filtration and drying. The result is a fine powder prized for its versatility. In food production, it stabilizes dairy and plant-based drinks, prevents ice crystal formation in frozen items, and enhances texture in processed meats and desserts. Beyond the kitchen, it’s used in cosmetics, pharmaceuticals, and even in biotechnology as a matrix.
Health Benefits and Safety Considerations of Carrageenan Use
While widely regarded as safe by regulatory agencies like the FDA and EFSA, carrageenan has sparked debate regarding gastrointestinal effects. It is important to distinguish between food-grade (undegraded) carrageenan used in cooking, which is considered safe, and degraded forms that are not permitted in foods. Its soluble fiber content may promote gut health by supporting beneficial bacteria and improving digestion. Consumers are encouraged to use carrageenan in moderation and sourced from reputable suppliers to ensure quality and safety.
Practical Tips for Incorporating Carrageenan in Culinary Creations
- Measure precisely; small amounts (typically 0.5-2%) suffice for thickening and gelling.
- Combine with other hydrocolloids like agar or xanthan gum to customize texture.
- Use in cold applications like beverages but ensure proper hydration for smooth results.
- Pair with acidic ingredients cautiously, as acid can alter gel strength.
| Nutrient | Per Serving |
|---|---|
| Calories | 80 kcal |
| Protein | 0.5 g |
| Carbohydrates | 6 g |
| Fat | 6 g |
Discover more about innovative natural thickeners and culinary hydrocolloids in our Natural Thickeners Guide. For scientific insights on carrageenan safety, visit FDA’s official food additive page.
Q&A
Q&A: Carrageenan Uncovered – Nature’s Seaweed Thickening Secret
Q1: What exactly is carrageenan?
A: Carrageenan is a natural thickening and gelling agent extracted from red seaweed. This marine marvel has been harvested for centuries and is now widely used in the food industry to improve texture, stabilize emulsions, and add creaminess without altering flavor.
Q2: How is carrageenan made from seaweed?
A: The process begins by harvesting red seaweed from the ocean. The seaweed is then dried and soaked in hot water to extract carrageenan fibers. These fibers are purified, filtered, and dried again to produce the fine, powdery substance that manufacturers use.
Q3: Why do food makers love carrageenan?
A: Carrageenan is a magician in the kitchen! It thickens liquids, stabilizes dairy and plant-based milks, and improves the mouthfeel of processed foods. It’s also vegan-friendly and allergen-free, making it a versatile ingredient across many products, from ice cream to deli meats.
Q4: Is carrageenan safe to consume?
A: Yes, carrageenan is considered safe by major health authorities worldwide when consumed in typical quantities found in foods. However, it’s always good to enjoy everything in moderation and stay informed of ongoing research.
Q5: Are there different types of carrageenan?
A: Indeed! There are three main types-kappa, iota, and lambda-each with unique gelling and thickening properties. Kappa produces firm gels, iota gives soft, elastic gels, and lambda thickens without gelling, allowing food scientists to tailor textures precisely.
Q6: Beyond food, where else is carrageenan used?
A: Carrageenan’s abilities aren’t limited to your plate. It appears in pharmaceuticals as a stabilizer, in cosmetics as a skin-conditioning agent, and even in biotechnology for growing cells. This seaweed derivative truly bridges nature and innovation.
Q7: How can consumers identify carrageenan on ingredient labels?
A: Look for “carrageenan” or its E-number “E407” on packaged goods. It typically appears in dairy, plant-based milks, processed meats, sauces, and even pet food, signaling nature’s thickening secret at work.
Q8: Can carrageenan be sustainably sourced?
A: Absolutely. Responsible harvesting practices help protect marine ecosystems while supporting coastal communities. Many producers now emphasize sustainable seaweed farming, making carrageenan a green choice in more ways than one.
Q9: What makes carrageenan stand out against other thickeners?
A: Its ocean origin is just the beginning. Carrageenan’s unique ability to form diverse textures with minimal calories and no animal products sets it apart, making it a champion ingredient for clean-label and vegan-friendly foods.
Q10: Where can I learn more about this seaweed superstar?
A: Dive into marine biology texts, food science blogs, or even visit coastal seaweed farms if you can. The story of carrageenan is a delightful intersection of nature, culture, and culinary science-always more to explore beneath the waves!
Closing Remarks
As we’ve journeyed through the tides of information, carrageenan emerges not just as a humble seaweed extract, but as a fascinating bridge between nature’s bounty and modern food innovation. This natural thickening marvel, harvested from the ocean’s embrace, continues to shape textures and flavors in ways both subtle and significant. By understanding carrageenan’s origins, properties, and applications, we gain a deeper appreciation for how something so simple can enrich our daily lives-proving that sometimes, the most extraordinary secrets lie hidden beneath the waves.
Unlocking Creamy Magic: What Is a Yogurt Maker? is your gateway to mastering homemade yogurt with precision and ease. Beyond being a simple kitchen appliance, a yogurt maker embraces the fascinating science of fermentation, transforming everyday milk into a rich, creamy delight cherished worldwide. Whether you’re a culinary enthusiast or a health-conscious foodie, understanding how this device works not only elevates your kitchen repertoire but also empowers you to customize flavors and textures tailored perfectly to your taste buds.
Prep and Cook Time
- Preparation: 10 minutes
- Fermentation Time: 6 to 12 hours, depending on desired tanginess
- Total Time: Approximately 6 to 12 hours
Yield
Approximately 1 quart (4 cups) of creamy, homemade yogurt
Difficulty Level
Easy – perfect for beginners and seasoned cooks alike
Ingredients
- 4 cups whole milk (for creamier texture; can substitute with 2% or plant-based milk)
- 2 tablespoons plain yogurt with live active cultures (as starter culture)
- Optional: 1 tablespoon powdered milk (to thicken)
Step by Step Guide to Crafting the Creamiest Homemade Yogurt
- Heat the Milk: Pour the milk into a saucepan and gently heat over medium until it reaches 180°F (82°C). This step eliminates unwanted bacteria and alters protein structure for a thicker yogurt.
- Cool to Incubation Temperature: Remove from heat and let the milk cool to about 110°F (43°C), the ideal temperature to nurture your starter cultures.
- Incorporate the Starter: In a small bowl, whisk 2 tablespoons of live-culture yogurt with a few tablespoons of the cooled milk to loosen it, then stir this back into the pot, ensuring even distribution of bacterial cultures.
- Optional Thickener: If using powdered milk, whisk it into the milk before adding the starter for extra creaminess and firmness.
- Transfer to Yogurt Maker Containers: Pour the mixture into your yogurt maker’s jars or a heat-safe glass container.
- Incubate: Place containers into the yogurt maker and incubate for 6 to 12 hours. The longer the fermentation, the tangier and thicker the yogurt. Maintain a stable temperature around 110°F.
- Chill and Set: Once the incubation time is complete, refrigerate the yogurt for at least 4 hours. This cooling period helps the texture firm up and flavors to mellow.
- Enjoy: Serve your homemade yogurt plain or with your favorite additions.
Expert Tips and Flavor Ideas to Elevate Your Yogurt Experience
Tips for Success:
- Use fresh, high-quality milk and yogurt with active cultures to guarantee lively fermentation.
- Maintain consistent incubation temperature; fluctuations can slow or stop bacterial activity.
- A longer incubation yields thicker, tangier yogurt – perfect for Greek-style favorites.
- For creamier texture, try adding a small amount of heavy cream or evaporated milk.
- Reserve a few tablespoons of your homemade batch as starter for future batches, ensuring a continuous supply.
- If your yogurt is runny, strain through cheesecloth for a few hours to create thick, luscious Greek yogurt.
Flavor Ideas:
- Stir in honey, vanilla extract, or maple syrup for natural sweetness.
- Mix fresh berries, mango cubes, or pomegranate seeds to add vibrant burst and nutrition.
- Sprinkle with toasted nuts or granola for crunch and balance.
- Swirl in cinnamon, nutmeg, or cardamom for warming spice notes.
- Try savory blends like cucumber and dill, or chili flakes with lemon zest for exciting dips.
Serving Suggestions
Serve your homemade yogurt in rustic bowls or elegant glass parfait cups, layering with fresh fruit, a drizzle of honey, and toasted nuts for a visually stunning presentation. Garnish with mint leaves or edible flowers to add a burst of color and freshness. Whether as a breakfast staple, a cooling snack, or a base for vibrant smoothies and savory sauces, homemade yogurt is a versatile canvas inviting endless creativity.

| Nutrient | Per 1 cup serving |
|---|---|
| Calories | 150 kcal |
| Protein | 8 g |
| Carbohydrates | 12 g |
| Fat | 8 g |
For more on fermentation science and tips, explore our detailed Fermentation Techniques Guide. To deepen your knowledge about probiotics, visit NIH’s probiotic resource.
Q&A
Q: What exactly is a yogurt maker, and why should I care?
A: Think of a yogurt maker as your personal dairy wizard. It’s a nifty appliance designed to cultivate the perfect environment for friendly bacteria to transform milk into luscious, creamy yogurt. If you crave control over ingredients, flavors, and consistency-or simply love the charm of homemade goodness-a yogurt maker is your ticket to creamy magic.
Q: How does a yogurt maker work its creamy spell?
A: At its core, a yogurt maker provides gentle warmth to ferment milk infused with live cultures. This cozy temperature-usually around 110°F (43°C)-encourages bacteria like Lactobacillus to consume lactose, producing that signature tangy taste and thick texture. It’s a slow, steady process, like brewing a potion, that turns simple milk into a probiotic-rich delight.
Q: Can I make any type of yogurt with a yogurt maker?
A: Absolutely! From classic plain to exotic flavors like mango or matcha, the yogurt maker is a versatile stage for your creamy creations. You can customize milk types (cow, goat, or plant-based), adjust sugar levels, and add fruits or honey post-fermentation. The magic lies in your imagination and quality starter cultures.
Q: Is a yogurt maker difficult to use?
A: Not at all! Most yogurt makers are designed with simplicity in mind-just mix your milk and starter, pour it into the container, set the timer or temperature, and let the device do its thing. Within hours, you’ll witness the transformation firsthand. It’s science made delightfully easy.
Q: Why not just buy yogurt from the store instead?
A: Store-bought yogurt often contains preservatives, added sugars, and sometimes less active culture than homemade versions. Using a yogurt maker puts you in the driver’s seat-no mystery ingredients, fresher flavor, and far better value. Plus, it’s a satisfying craft, turning kitchen time into a small act of edible alchemy.
Q: Is making yogurt with a yogurt maker healthier?
A: Homemade yogurt often retains more live probiotics and lets you avoid artificial additives, making it a wholesome choice. Plus, you control the fat content and sugar levels, tuning it to your dietary needs. It’s healthful, delicious, and kind to your gut flora.
Q: How long does the yogurt-making process take?
A: Typically, fermentation takes anywhere from 6 to 12 hours. The longer it ferments, the tangier and thicker the yogurt becomes. You can experiment with timing to find your perfect balance of creamy smoothness and tart bite.
Q: Can a yogurt maker be used for other culinary adventures?
A: Indeed! Yogurt makers can often double as incubators for making sour cream, kefir, or even fermenting dough starters. It’s a small appliance that opens the door to a world of cultured culinary creativity.
Unlocking the creamy magic of yogurt with a yogurt maker transforms a humble kitchen task into a delightful ritual-connecting science, flavor, and wellness in every spoonful.
Insights and Conclusions
As the final spoonful of this creamy adventure melts on your tongue, it’s clear that a yogurt maker isn’t just a kitchen gadget-it’s a gateway to endless homemade delight. By unlocking the secrets of fermentation and customization, this little machine empowers you to craft perfect batches of velvety yogurt tailored to your taste and lifestyle. Whether you’re a health enthusiast, a culinary experimenter, or simply someone who cherishes the fresh, tangy goodness of homemade yogurt, embracing a yogurt maker transforms a simple dairy staple into a personalized masterpiece. So go ahead-ignite your creativity, nurture your gut, and savor the creamy magic that only a yogurt maker can unlock.