- Natural fermentation deepens flavor and improves keeping quality for sourdough muffins.
- Hydration and handling control the crumb openness and the signature nooks.
- Griddle cooking forms the classic crust while preserving a tender interior.
Prep and Cook Time for sourdough muffins
Starter readiness requires regular feeds until the starter becomes active and bubbly; plan 4–6 hours after a refresh at warm room temperature. A predictable peak shortens overall bake-day variability.
Dough mixing, bulk fermentation, shaping, and final proof typically take 3–6 hours of elapsed time depending on room temperature and starter vigor. Griddling and finishing take another 15–25 minutes.
Yield for sourdough muffins
This formula yields roughly eight medium-sized sourdough muffins suitable for splitting with a fork. Cutter size and dough weight determine final yield; weigh rounds for bakery-level consistency.
Consistent portions ensure even cooking and similar crumb across a batch. For absolute repeatability, use a digital scale and mark dough weights for future bakes.
Difficulty Level for sourdough muffins
Skill level: intermediate. Bakers should understand starter maintenance, dough hydration, and gentle handling to protect gas bubbles and form nooks.
Key competencies include judging starter peak and timing the final proof. Tools that help: kitchen scale, bench scraper, and an accurate surface thermometer.
Ingredients & Measurements for sourdough muffins
Use fresh ingredients and accurate weights. Below are clear metric quantities for home bakers converting from volume to weight.
Adjust minor variables rather than ingredient ratios when temperature or flour absorbency changes to keep the method consistent.
- 120 g active sourdough starter (fed and at peak)
- 240 g all-purpose flour
- 120 ml whole milk, warmed to about 29°C (85°F)
- 25 g unsalted butter, melted and cooled
- 12 g granulated sugar
- 5 g fine sea salt
- Cornmeal for dusting
- Additional flour for light dusting when shaping
Instructions for sourdough muffins
Follow these measured steps to emphasize fermentation and texture. Observe the dough rather than following strict minutes when variables differ.
Work in stages and keep hands and tools lightly floured to avoid over-handling the dough and collapsing interior gas pockets.
- Feed starter: Refresh starter 4–6 hours before mixing, or use it at peak activity when it doubles and is bubbly. A reliable peak yields consistent rise.
- Mix: Dissolve starter, warmed milk, and sugar; add sifted flour and salt. Stir to a shaggy mass and rest 10–20 minutes to allow full hydration.
- Knead and develop gluten: Knead by hand 8–10 minutes or use a low-speed mixer until dough is smooth and elastic. Strong gluten traps gas and builds the open crumb.
- Incorporate butter: Add cooled melted butter and knead briefly until evenly distributed; fat tenderizes the crumb and extends shelf life.
- Bulk fermentation: Place dough in a lightly oiled bowl and ferment at room temperature until it increases by ~50%. Perform a gentle stretch-and-fold halfway through.
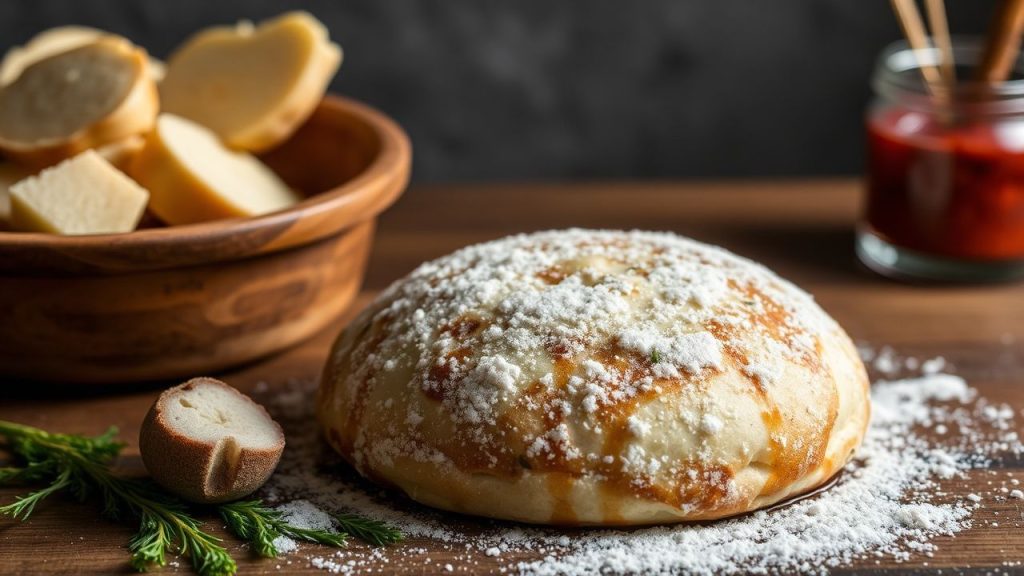
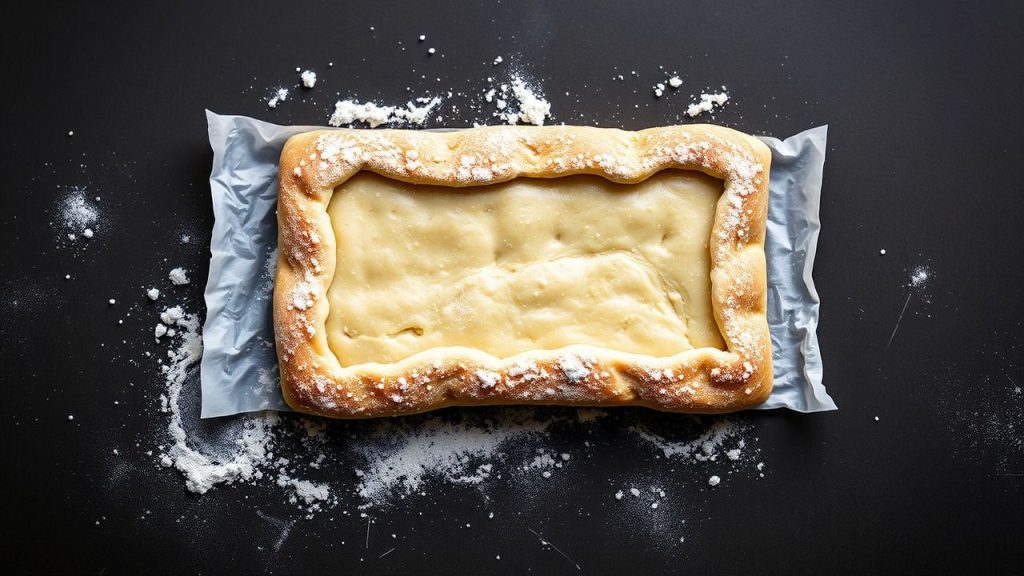
- Pre-shape and rest: Turn dough out, pat into a 1-inch slab, and rest 15 minutes to relax the gluten for cleaner cuts.
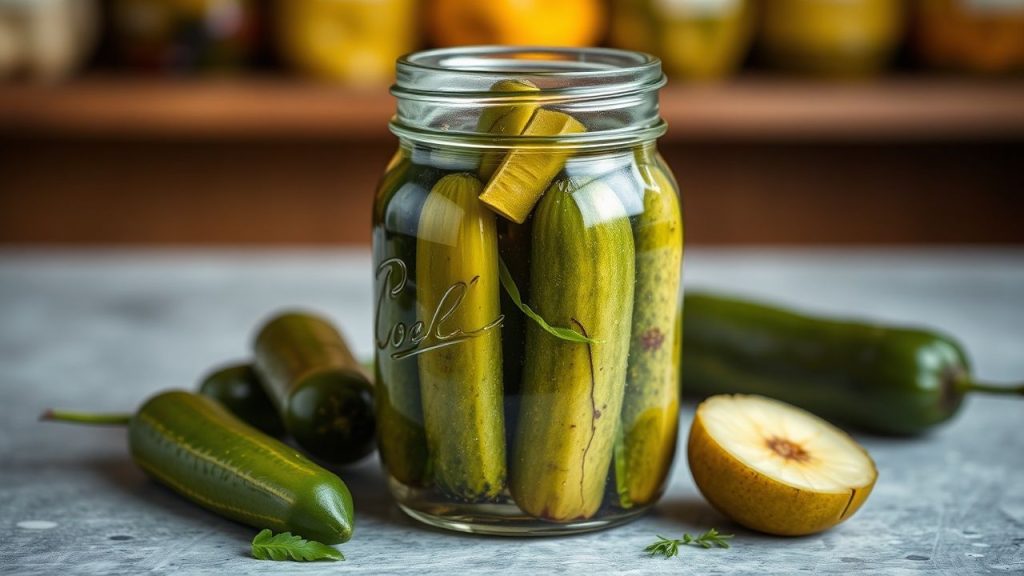
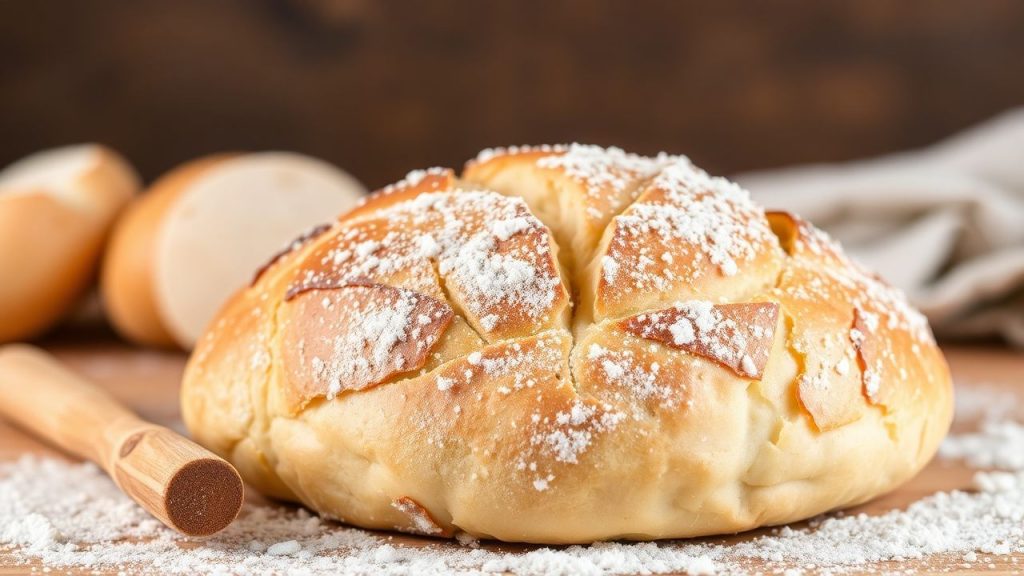
- Shape and dust: Use a 3-inch cutter to stamp rounds; reroll scraps once. Dust both sides with cornmeal to create texture and prevent sticking on the griddle.
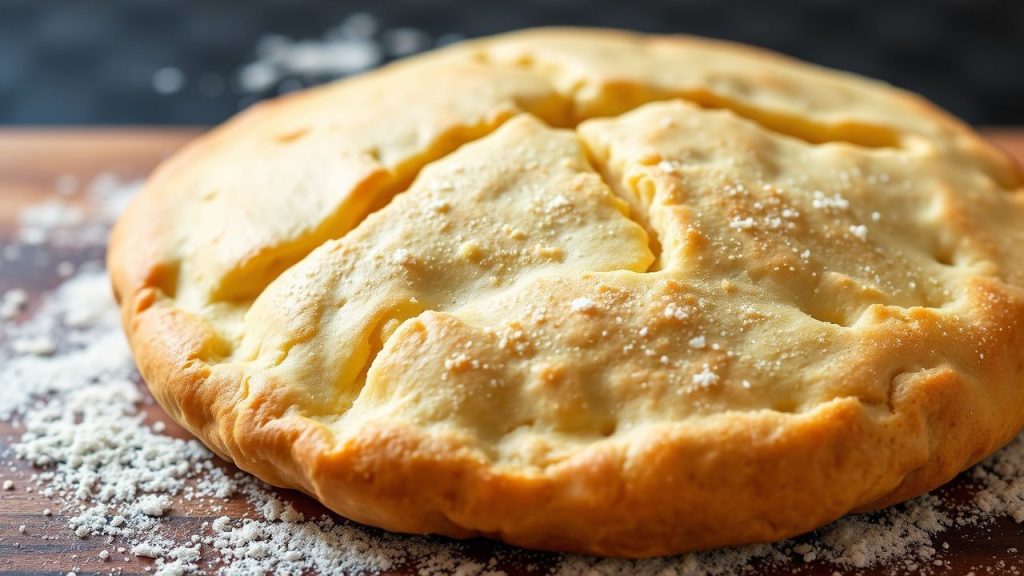
- Final proof: Place rounds on parchment, cover loosely, and proof 45–60 minutes until puffy but not collapsed. Avoid overproofing, which flattens nooks.
- Cook on the griddle: Heat a heavy skillet over medium-low. Cook 6–8 minutes per side with a lid to trap steam; flip once bottoms turn golden. Slow cooking gives the classic crust without drying the interior.
- Cool and split: Cool on a rack to set the crumb, then split with a fork to reveal the nooks and crannies preferred for butter and toppings.
Tips for Success with sourdough muffins
Hydration control is central: target 65–70% hydration for a manageable but extensible dough. Too wet makes shaping messy; too dry tightens the crumb.
Room temperature affects timing: cooler rooms deepen flavor while warmer rooms accelerate fermentation. Adjust proof times rather than ingredient ratios to compensate.
 Expert Insight
For more on wild-yeast fermentation, consult key background reading such as sourdough and how fermentation shapes flavor at fermentation. These sources explain microbial activity that creates taste and gas.
 Pro-Caution
Serving Suggestions for sourdough muffins
Toast halves lightly and smear with room-temperature butter for a classic experience that highlights the open crumb. The nooks hold fat and spreads, giving pleasing contrast in each bite.
For savory builds, top with smashed avocado and a poached egg or smoked salmon and cream cheese. Bold flavors pair well with the mild tang of sourdough muffins.
Nutrition & Storage for sourdough muffins
Store cooled muffins in an airtight container at room temperature up to three days. For longer storage, slice and freeze; reheat directly from frozen in a toaster for best texture.
Each muffin contains roughly 150 kcal with moderate protein and carbohydrate. Freeze portions to preserve texture and streamline meal prep.
| Nutrient | Per Muffin |
|---|---|
| Calories | 150 kcal |
| Protein | 5 g |
| Carbohydrates | 28 g |
| Fat | 3.5 g |
Q&A about sourdough muffins
This short Q&A clarifies technique points and expectations for the recipe. Each answer focuses on practical troubleshooting and observable cues.
References below point to core fermentation and flour science information for deeper reading.
What makes sourdough English muffins different?
They rely on a wild-yeast culture instead of only commercial yeast, producing a tangy flavor and chewier texture. Wild fermentation alters acid profile and shelf life.
For technical context, review how wild cultures work in sourdough research and descriptions.
Why do nooks and crannies form?
Open pockets result from retained gas during fermentation combined with gentle shaping. Proper gluten development and careful griddling preserve these air pockets.
Gluten structure plays a mechanical role; read more about protein networks at gluten.
Can I use different flours?
Yes. All-purpose flour works well, while higher-protein flours deliver more structure and larger pockets. You can add whole-grain flours up to 20–30% without sacrificing texture if you adjust hydration.
Understanding flour types helps predict absorption and crumb behavior; basic flour science is summarized on Wikipedia under relevant articles.
Is griddling required?
Griddling forms the thin, crisp crust associated with English muffins and handles the flat shape efficiently. You can finish in a moderate oven for slightly different crust characteristics.
For stylistic background on the product, consult the historical and descriptive entry for English muffin.
Practical Notes and Internal Resources
Track your variables: starter activity, ambient temperature, and dough texture. Adjust proof times based on those observations to reproduce the result consistently.
For related recipes and variations, see internal resources: sourdough muffins tag and a companion guide at sourdough English muffin recipe. Use batch notes to refine timings between bakes.
FAQ
The following concise FAQ answers common production and troubleshooting questions. Use it as a quick reference while you bake.
Each answer provides clear steps or checks you can perform in real time.
How do I know my starter is ready?
A ready starter doubles and shows a network of bubbles within 4–6 hours of feeding at warm room temperature. It smells pleasantly acidic, not sharply sour.
Can I speed up the process?
Yes. Slightly warming the environment shortens proof times or adding a pinch of instant yeast (about 0.5 g) increases reliability. Note that speed reduces fermentation-derived complexity.
Why did my muffins turn out dense?
Common causes are underdeveloped gluten, low hydration, or underproofing. Check elasticity and allow a fuller final proof next time to let gas expand the crumb.
How do I get uniform browning?
Preheat the griddle thoroughly and use medium-low heat to promote even color. Rotate the pan if your heat source has hot spots and monitor surface temperature.
Can I add seeds or herbs?
Yes. Fold seeds or finely chopped herbs into the dough before shaping. Keep additions light to preserve dough structure and the classic crumb.
Final note: consistent weighing, observing starter activity, and controlled proof times yield repeatable, bakery-quality results. Track each variable and refine small adjustments across bakes to shorten the feedback loop between observation and consistent outcomes.

See also: sourdough muffins
See also: sourdough muffins
]]>Bake Fresh Delight opens the door to an ancient, practical loaf: homemade pita bread that puffs into a soft pocket and carries bold fillings. I write as a professional baker with years of artisan bread training to guide you through reliable techniques that yield consistent, soft pitas with crisp, golden blistering.
- Simple ingredients, precise technique: water, flour, yeast, salt, and olive oil.
- High heat and rested dough: create the steam that forms the pocket.
- Versatile serving: use pitas for wraps, dips, mini pizzas, and more.
Origins and Bread Science
Pita has deep roots across the Eastern Mediterranean and Near East, where flatbreads evolved to suit hearth and clay-oven baking. For background on the bread style and history, see pita and flatbread on Wikipedia.
At the oven level, pita puffs when internal moisture turns to steam faster than the crust sets, trapping air and creating a pocket. That rapid steam formation relates directly to oven temperature and dough hydration; modern home ovens mimic traditional ovens when you preheat a baking stone or steel.
Prep and Cook Time
Preparation: 20 minutes active work, mostly mixing and kneading. Keep tasks short and focused for consistent dough texture.
Rising and baking: 1–1.5 hours for the first rise and about 10–12 minutes total bake time for multiple batches at high heat. Preheating the baking surface takes at least 30 minutes to reach even thermal mass.
Yield
This recipe yields eight medium pitas, approximately 4–6 inches each depending on how thin you roll them. Alter size to suit your use: larger rounds serve as wraps, smaller rounds make snack-size pizzas.
If you double the batch, divide dough into equal portions and manage proofing space; crowding reduces oven hot spots and lowers puff reliability. Refrigerating dough after the first rise gives you scheduling flexibility and deepens flavor.
Difficulty Level
Label this recipe “Easy to Medium” for home bakers. The methods require simple techniques: activation, kneading, proofing, and high-heat baking—skills you can master in a few tries.
Expect a learning curve with oven placement and rolling thickness. Track results each bake and adjust time or oven rack position to suit your equipment for reliable pockets.
Ingredients
Use fresh, single-ingredient staples for predictable fermentation and gluten development. I list my go-to proportions for an 8-piece batch below.
Quality matters: choose unbleached all-purpose or a mix with bread flour for higher protein and better chew. For how yeast works in dough, consult Baker’s yeast.
- 2 ¼ teaspoons (1 packet) active dry yeast
- 1 ¼ cups warm water (110°F/43°C)
- 3 cups all-purpose flour, sifted
- 1 tablespoon olive oil
- 1 teaspoon granulated sugar
- 1 teaspoon salt
Instructions
Follow these steps in order for consistent dough structure and reliable pocket formation. I present each step with practical cues and alternative suggestions for small ovens.
- Activate the yeast: Combine warm water, sugar, and yeast in a bowl. Let sit 5–7 minutes until frothy; a healthy foam signals active yeast.
- Mix the dough: Whisk flour and salt, then add the yeast mixture and olive oil. Mix until a shaggy mass forms; avoid over-flouring to keep hydration balanced.
- Knead thoroughly: Turn dough onto a floured surface and knead for 8–10 minutes until smooth and elastic. Use a bench scraper to manage tacky dough rather than adding too much flour.
- First rise: Oil a bowl, place the dough inside, cover, and let it double in a warm place for 1–1.5 hours. Bulk fermentation develops flavor and strength in the gluten network.
- Divide and shape: Punch down, divide into 8 equal pieces, form tight balls, and let them rest briefly. Tight ball shaping yields even crumb and consistent pocket formation.
- Roll and rest: Roll each ball into a disk about 1/4-inch thick; cover stacked disks and rest 10 minutes. This short bench rest relaxes gluten and improves oven spring.
- Preheat baking surface: Place a baking stone or inverted baking sheet on the middle rack and preheat to 475°F (245°C) for at least 30 minutes. Heat retention in the stone produces the rapid steam needed for puffing; read more about baking thermal mass on baking.
- Bake quickly: Slide 2–3 rounds onto the hot surface and bake 3–4 minutes until they puff and show light brown spots. Remove and cover with a towel to keep them soft while you finish the batch.
Tips for Success: Mastering the Dough and Perfecting Puff
Small technique tweaks yield large results. I emphasize temperature control, dough feel, and timing as the three pillars of reliable pita.
Use an oven thermometer to confirm high heat. A stone or steel with good thermal mass gives immediate surface heat; this heat turns internal moisture to steam and lifts the dough into a pocket.
- Temperature matters: Warm water activates yeast; a hot oven creates steam. Keep yeast activation between 100–115°F for best results.
- Rest and relaxation: Rest disks covered to avoid a dry skin that prevents puffing. Ten minutes is usually enough to relax gluten without overproofing.
- Ball shaping: Smooth, tight balls roll into even disks and produce consistent pockets.
- Flour variations: Blend bread flour and all-purpose for more chew; add whole wheat for flavor but expect denser pitas.
- Make-ahead: Refrigerate dough overnight after the first rise. Bring to room temperature before shaping for predictable handling.
Expert Insight
Practice small batches to calibrate your oven. Each home oven behaves differently, so log times, rack position, and batch size to repeat successes.
Pro-Caution
Creative Serving Suggestions to Elevate Your Homemade Pitas
Homemade pita becomes a platform for many cuisines and textures. Use it as a vehicle for vegetables, proteins, and bold sauces.
Try filling pitas with falafel, grilled vegetables, or scrambled eggs for breakfast. Pairing ideas and a complementary dip recipe are available via internal resources like Pair with Classic Hummus and our bread baking basics guide.
- Falafel and tahini: Crisp falafel, cucumbers, tomatoes, and tahini create a balanced, textural sandwich.
- Grilled veggies: Roast zucchini, peppers, and eggplant with olive oil and herbs for a hearty vegetarian option.
- Breakfast pita: Fill with scrambled eggs, spinach, and crumbled cheese for an on-the-go morning meal.
- Mini pizzas: Use pitas as quick pizza bases; broil with sauce and cheese for 2–3 minutes.
Nutrition and Portion Notes
A medium pita (about 60 g) typically contains roughly 165 kcal with 5 g protein, 33 g carbs, and 1.5 g fat. These values vary by flour type and added fats.
To boost protein and fiber, substitute part of the white flour with higher-protein or whole grain flours. Monitor hydration carefully when using whole grains; they absorb more water and may need extra rest.
Q&A
I answer common technical and practical questions I encounter from home bakers. Keep reading for troubleshooting and advanced notes.
These responses focus on reproducible technique rather than one-off hacks, so you build reliable instincts that transfer to other breads, too.
What makes homemade pita bread better than store-bought?
Homemade pita delivers fresh aroma, control over ingredients, and immediate texture—warm and soft with an authentic pocket. You avoid preservatives and can tailor crumb, hydration, and salt levels to taste.
Homemade also offers creative flexibility: flavoring the dough, seeding the tops, or altering size are simple at home and give superior results to mass-produced loaves.
How does the pocket form inside pita?
The pocket forms when internal moisture vaporizes into steam faster than the outer dough sets, inflating the layers like a balloon. Quick surface setting traps steam and creates a hollow center.
High oven temperature and correct disk thickness promote this reaction. Too-thick dough may not heat through; too-thin may not retain enough moisture to inflate.
Can I add flavors or toppings to the dough?
Yes. Herbs, garlic, or spice blends like za’atar mix well into the dough or brush on top before baking. Sesame and nigella seeds add crunch and aroma when sprinkled on the surface.
Adjust salt and hydration when adding dry ingredients to keep dough consistency stable. Record ratios to reproduce successful variations.
What common mistakes prevent pita from puffing?
Common issues include insufficient oven heat, disks that dried out before baking, and uneven rolling thickness. Each of these interferes with steam formation or trapping.
Fix these by preheating a stone or steel, covering rolled disks until baking, and rolling consistently. Use bench rests to relax gluten for better oven spring.
How does mastering pita improve other baking skills?
Baking pita hones your sense of dough feel, fermentation timing, and temperature management—skills applicable to loaves, flatbreads, and enriched doughs. The process trains you to read dough, not a recipe alone.
Regular practice improves kneading efficiency and proofing judgment, which accelerates progress on more advanced artisan breads.
Key Takeaways
Bake Fresh Delight is about dependable technique: control hydration, use high heat, and protect rolled disks before baking. Those three actions yield the reliable pockets that make pita so useful.
Practice with small batches, record what your oven does, and refine rolling thickness to suit your tastes. With careful technique, you’ll turn this simple dough into a versatile staple for everyday meals.
FAQ
How should I store leftover pita?
Cool to room temperature, then store in an airtight container or zip bag for up to 2 days at room temperature. For longer storage, freeze flat with parchment between rounds and reheat from frozen.
Can I use instant yeast instead of active dry yeast?
Yes. Reduce proofing time slightly and mix instant yeast directly with dry ingredients. Watch dough temperature and fermentation speed to avoid overproofing.
Will a cast-iron pan work instead of a baking stone?
A preheated cast-iron griddle or skillet works well for individual rounds and conducts heat rapidly. Heat the pan thoroughly and work quickly to maintain its surface temperature.
Is it possible to make pita without a pocket?
Yes. If you prefer flat, non-puffed rounds, roll thinner and bake slightly longer at a lower temperature; the dough will bake through without trapping a large pocket.
Are there gluten-free pita options?
Gluten-free pitas require specialist blends and binding agents like xanthan gum; they will differ in texture and may not form traditional pockets. Use recipes developed specifically for gluten-free flours.
See also: Pita Bread
]]>
- Slow, controlled time deepens flavor without extra ingredients.
- Temperature precision steers enzymatic breakdown and yeast kinetics.
- Minimal yeast and high protein flour improve texture and structure.
- Regular folds strengthen gluten while preserving gas pockets.
Prep and Cook Time
Preparation: 20 minutes for mixing and initial handling. Work quickly to keep ingredients cold so fermentation begins under controlled conditions.
Cold fermentation: 18–72 hours depending on recipe goals. Shorter times favor mild flavor; longer times intensify sweetness and subtle acidity.
Final proof and baking: 1–2 hours after returning dough to room temperature for shaping and rise. Use a preheated oven and a hot surface or Dutch oven to maximize oven spring.
Yield
This formula yields two medium artisanal loaves, about eight slices each when cut evenly. Expect variable weight loss during baking based on hydration and bake time.
For scaling, adjust ingredient quantities proportionally and monitor fermentation time: larger mass ferments differently than smaller pieces due to thermal inertia.
Difficulty Level
Medium: Ideal for confident home bakers who can read dough behavior and control fridge temperature. You do not need professional equipment, but consistent technique matters.
Practice develops intuition. Over several bakes you learn how your flour, hydration, and refrigerator interact to create consistent results.
Recipe
This recipe highlights technique over gimmicks. Follow timing and temperature closely to get repeatable results.
For best structure, use bread flour with 12–14% protein and measure water with a thermometer. Cold water slows yeast activation and keeps enzyme activity gradual.
Ingredients
- 3 ½ cups bread flour, sifted and chilled
- 1 ½ cups cold water (about 40°F / 4°C)
- 1 tsp fine sea salt
- ½ tsp instant dry yeast
Choose flour for protein content to trap CO₂ and produce a chewy crumb. If you use whole grain flours, boost hydration slightly and expect denser crumb.
Use a reliable scale when possible; weight-based measurements give predictable hydration and dough consistency.
Instructions
- Combine dry ingredients: Whisk flour, salt, and yeast to distribute evenly. Cold yeast and dry salt separation prevent premature activity.
- Add cold water gradually: Stir until the dough just forms a shaggy mass. Stop when the mixture becomes homogenous but still tacky; avoid overmixing.
- Autolyse rest: Cover and rest 30 minutes to hydrate flour and jump-start gluten bonding. This step aids enzyme action and improves extensibility.
- Gentle knead: Knead 3–5 minutes until smoother, adding minimal flour. Aim for a cohesive, slightly elastic dough rather than a stiff ball.
- Bulk cold fermentation: Oil a container, place dough inside, and refrigerate at 38–42°F (3–6°C). The low temperature slows yeast so enzymes convert starches into flavor precursors.
- Periodic folds: Every 12 hours, perform gentle stretch-and-folds to align gluten without releasing gas. These folds strengthen structure while preserving fermentation gases.
- Warm and shape: After 48–72 hours, let dough sit 1 hour at room temperature, then shape into loaves. Avoid degassing; maintain internal bubbles for open crumb.
- Proof: Place shaped loaves in a floured banneton and proof 1–1.5 hours at room temperature until nearly doubled. Use a bench scrape to tighten the surface for better oven spring.
- Bake: Preheat oven to 475°F (246°C) with a stone or Dutch oven. Score to control expansion and bake 20–25 minutes until the crust caramelizes and sounds hollow when tapped.
- Cool: Cool completely on a rack before slicing to finish crumb set and preserve moisture balance.
Tips for Success
Temperature control: Use a fridge thermometer and measure water temperature. Small changes alter fermentation rates and flavor outcomes.
Hydration and flour: Higher hydration yields more open crumb but requires confident handling. For predictable results, start at 65–70% hydration for bread flour.
- Minimal yeast: Use a small yeast quantity to let enzymes and native microbes drive flavor rather than fast gas production.
- Regular folds: Strengthen gluten gently; do not over-knead after cold rest.
- Monitor dough, not time: Watch signs—blooming gas pockets and a softer feel—rather than strict hours; dough behavior varies by flour and fridge.
For deeper technical context on the organisms and chemistry, read about yeast and fermentation. These pages explain how microbes convert sugars and produce flavor compounds.
Expert Insight
For gluten mechanics and dough strength, review the principles of gluten formation. Understanding protein behavior helps you adjust hydration and folding cadence.
Pro-Caution
Serving Suggestions
Slice thick and toast lightly to emphasize the crust and open crumb. Pair simple spreads like cultured butter or a drizzle of oil to let the bread’s flavor lead.
Use the loaf with soups, cheese boards, or as a base for sandwiches where texture supports bold fillings. The balanced acid and sweetness from slow fermentation complement savory profiles.
- Butter and local honey for contrast.
- Olive oil with rosemary and sea salt as an appetizer.
- Thick slices with braised meats or creamy stews for hearty meals.
Nutrition
The table below shows per-slice estimates for a medium loaf. Values vary by flour, hydration, and portion size.
| Nutrient (per slice) | Amount |
|---|---|
| Calories | 120 kcal |
| Protein | 4 g |
| Carbohydrates | 24 g |
| Fat | 0.5 g |
Practical Adjustments and Variations
Experiment with hydration, flour blends, and fermentation times to find your desired balance. For example, adding 10–20% whole-grain flour increases flavor but reduces extensibility.
Try incorporating a portion of preferment or a small sourdough starter for layered acidity and aroma. For directions on wild fermentation, consult our internal guides such as Bread Making Basics and Sourdough Guide.
FAQ
What is the ideal fridge temperature for cold fermentation?
Keep the fridge at roughly 38–42°F (3–6°C). This range slows fermentation enough to develop flavor while keeping yeast active. Measure with a dedicated fridge thermometer to avoid guesswork.
How does cold fermentation change dough flavor?
Slow fermentation lets yeast and enzymes break down starches and proteins into flavorful molecules such as organic acids and maltose. As a result, the bread develops subtle sweet and tangy notes and a richer aroma.
Can I cold ferment pizza dough the same way as bread?
Yes. Pizza dough benefits from cold aging for 24–72 hours to improve extensibility and flavor. Shape gently after warming briefly and bake on a hot surface for optimal crust and blistering.
What signs indicate over-fermentation?
Look for a dough that collapses, smells overly alcoholic, or lacks strength when shaped. If the dough loses structure and becomes slack, shorten the next ferment or reduce temperature slightly.
Is cold fermentation healthier than quick fermentation?
Slow fermentation can increase digestibility by breaking down some complex carbohydrates and gluten proteins, and it can create acids that aid nutrient absorption. However, claims vary by ingredient and method, so evaluate results case by case.
Cold fermentation rewards disciplined technique with consistent results. Control your variables, keep clear notes, and refine one factor at a time to build repeatable, delicious outcomes.
See also: cold fermentation
]]>
- Check gluten development by stretching a small dough piece into a translucent membrane.
- Troubleshoot hydration when dough tears easily or feels stiff during the test.
- Use tactile cues together with proofing time to time your next shaping step.
- Practice builds intuition—repeat the test across recipes to learn flour behavior.
Prep and Cook Time
Planning time helps you schedule kneading, rests, and bulk fermentation. Typical hands-on prep takes about ten minutes, while bulk fermentation often takes one to two hours depending on temperature and yeast activity.
Allow extra time when you test and re-test dough with the windowpane method. Testing does not add much clock time, but it improves outcome reliability and prevents under- or overworked dough.
Yield
This guidance uses a roughly 700 g dough batch, suitable for one artisan loaf. You can scale the ratios proportionally for multiple loaves or different pan sizes.
Adjust hydration and mixing time when you change batch size; larger batches retain heat and may need slightly longer kneading or cooler proofing. Keep notes so you repeat successful results.
Difficulty Level
Medium. The technique itself is simple, but interpreting tactile feedback requires practice. Expect to refine feel, timing, and hydration across several bakes.
Beginners should practice on standard bread formulas first, then try enriched or whole-grain doughs once they understand gluten behavior. Use the windowpane test as a repeatable checkpoint.
Ingredients for Mastering the Windowpane Test
Use a straightforward dough formula to focus on technique: bread flour, water, salt, and a modest amount of yeast. A well-balanced recipe highlights gluten development without masking faults from ingredient overload.
Standard example: 500 g bread flour, 320 g water, 10 g salt, 7 g yeast. Adjust hydration by 2-4% based on your flour and local humidity; document changes in a baking log.
Step-by-Step Instructions to Perform the Windowpane Test with Precision
Follow these steps in sequence to assess gluten strength. Use relaxed, rhythmic handling to avoid tearing the network you want to evaluate.
- Mix the dough: Combine flour and yeast, then add water gradually until all flour hydrates. Mix just until a shaggy mass forms to avoid premature overworking.
- Initial kneading: Turn dough onto a floured surface and knead 8–10 minutes using a push-fold-turn motion. Look for elasticity and a smoother surface as signs of initial gluten alignment.
- Pause and rest: Cover and rest 10 minutes to let strands relax and hydrate. This autolyse-like pause improves extensibility before you add salt or continue kneading.
- Add salt and finish kneading: Sprinkle salt and knead another 5 minutes to strengthen the gluten network. Salt tightens gluten bonds and enhances flavor, so incorporate it evenly.
- First windowpane check: Pinch off a golf-ball sized piece, then gently stretch it between thumbs and forefingers into a thin membrane. Hold it to the light: a translucent pane without immediate tearing indicates developing gluten.
- Bulk fermentation: Place dough in an oiled bowl, cover, and allow to rise until roughly doubled. Fermentation relaxes gluten and develops flavor; timing varies with temperature and yeast.
- Final gluten test: Repeat the windowpane after bulk fermentation to judge maturity before shaping. If the pane is uniformly thin and translucent, move to shaping; if not, extend folds, rest, or light kneading.
Practical tips during each step
When stretching, rotate the dough piece between fingers to test multiple directions. Uniform stretch without immediate tearing shows balanced gluten alignment.
If the dough resists and snaps back, give it short rests to relax. Conversely, if the dough slacks and won’t hold tension, incorporate stronger folds or reduce hydration slightly next time.
Interpreting Results and Adjusting Dough for Perfect Texture
Elasticity, translucency, and failure pattern tell you what to change. Quick tears suggest underdeveloped gluten or low hydration; slack panes suggest over-relaxed gluten or overproofing.
Adjust kneading time in small increments and use brief rests to let gluten realign. Also, modulate hydration by a few percent: add water if dough feels dry; reduce water if it is overly slack for your flour type.
Pro-Caution
If the membrane forms but shows holes at the edges, practice gentler stretching and longer rests. This pattern often signals adequate development but insufficient extensibility.
Expert Tips to Master Gluten Strength for Artisan Baking Success
High-protein flours generally form stronger gluten networks, but handling and hydration remain decisive factors. Use consistent measurement and keep a baking log to identify patterns.
Temperature influences gluten and yeast activity; warm doughs develop gluten faster and ferment quicker, while cooler doughs slow both processes. Adjust kneading and proof times accordingly.
Expert Insight
Practice the test across formulas: lean hearth breads, enriched doughs, and whole-grain mixes behave differently. The windowpane is most reliable with wheat-based doughs where gluten forms a continuous network.
Use visual and tactile records: note how the dough looks, feels, and passes the test at each stage. Over time you’ll anticipate proofs and shaping windows more reliably.
Subtle adjustments
Increase strength with additional fold cycles rather than extended intense kneading. Gentle folds align gluten without overheating the dough.
For high-hydration doughs, accept a looser feel but test more frequently. These doughs can produce large open crumb when handled correctly, even if the pane appears slack early on.
Serving Suggestions
Once your dough passes the final windowpane and bakes into a crusty loaf, slice and serve simply to highlight crumb structure. Fresh butter, olive oil, or a soft cheese complement an open, chewy interior.
Toast slices to evaluate crumb openness and oven spring in subsequent loaves. Sharing notes and photos with other bakers speeds learning and refines your technique.
Resources and Further Reading
For foundational background, consult key references on gluten, dough behavior, and fermentation. These scientific overviews clarify what you feel in the bowl and why it matters during baking.
Read more on gluten, the physical properties of dough, classic bread structure, and how fermentation modifies gluten and crumb. Combine these concepts with hands-on practice to gain consistent results.
Explore internal guides such as Artisan Bread Kneading Techniques and Bread Hydration Guide for recipe-specific adjustments and advanced folding methods.
FAQ
What exactly is the gluten windowpane test?
The windowpane test involves stretching a small dough piece until it becomes thin enough to let light pass through. A translucent, unbroken membrane indicates that gluten strands have formed a continuous, elastic network.
When should I perform the test during my bake?
Test after initial kneading and again after bulk fermentation. Early checks indicate whether to continue kneading; later checks confirm readiness for shaping and final proof.
Why does my dough tear during the test?
Tearing usually means underdeveloped gluten or insufficient hydration. Add short rests or knead gently longer. Small hydration adjustments can make a large difference, especially with whole-grain flours.
Can I use this test for all dough types?
The test works best for wheat-based doughs that form gluten. Low-gluten or gluten-free doughs, and high-rye blends, will not produce a clear windowpane and require alternative readiness checks.
How many times should I test a single batch?
Perform a minimum of two checks: once after initial kneading and again after bulk fermentation. If you make adjustments, test again to confirm their effect before shaping.
Wrapping Up
The windowpane test turns an intuitive skill into a repeatable checkpoint. It helps bakers control crumb, oven spring, and final texture through measured assessment of gluten strength.
Practice this test over multiple recipes and keep simple notes on hydration, kneading time, and test outcomes. With steady practice you will build reliable instincts and bake consistently better loaves.
See also: windowpane test
]]>
- Gluten forms when water hydrates glutenin and gliadin, then mechanical action aligns them.
- Hydration and time often matter more than forceful kneading; temperature speeds enzyme and yeast activity.
- Flour choice sets the baseline: higher protein flours yield stronger gluten.
- Tests and techniques—windowpane, stretch-and-fold, and fermentation control—ensure consistent results.
What Is Gluten and How It Works
Gluten describes the protein network formed mainly from glutenin and gliadin when wheat flour meets water. These proteins bond and create an elastic, extensible matrix that traps carbon dioxide produced by yeast.
Understanding gluten chemistry helps you choose the right methods. For core background on the proteins and structure, see gluten on Wikipedia and use that foundation when you test dough performance.
Key Factors That Develop Gluten
Three variables control gluten strength: hydration, mechanical action, and time. You must balance these elements according to the flour, recipe, and desired crumb.
Adjust any variable to tune dough. For example, increase hydration to develop gluten with gentle handling, or increase kneading time for lower-hydration doughs to reach similar strength.
Hydration: Percentage and Feel
Hydration equals water weight divided by flour weight. Typical ranges: 55–65% for sandwich loaves, 65–75% for artisan loaves.
Higher hydration creates a more extensible gluten network but makes handling trickier. Use wet-hand techniques and stretch-and-fold to manage higher-hydration doughs.
Kneading vs. Time: Methods Compared
Traditional kneading aligns proteins quickly through mechanical action. However, long, slow fermentation can achieve similar gluten structure with minimal kneading.
Use the no-knead approach for hands-off dough, or employ short, periodic stretch-and-folds to build strength while preserving gas and flavor.
Practical Techniques: Tests, Tools, and Timing
Use objective checks rather than guesswork. The windowpane test and a tactile assessment of dough elasticity tell you when gluten has developed enough for shaping.
Temperature control also counts. Aim for a final dough temperature around 24–27°C (75–80°F) to balance yeast activity and enzyme action for most yeasted breads.
Windowpane Test and Benchmarks
Pinch a golf-ball-size piece and stretch it thin. If it forms a translucent, stretchable membrane without tearing, gluten is ready for bulk fermentation.
If it tears, rest the dough for 10–20 minutes and test again. Often, a short autolyse (rest after mixing flour and water) dramatically improves windowpane results.
Tools and Additives
Use a bench scraper, dough hook, or your hands depending on batch size. Bakers sometimes add vital wheat gluten to strengthen weak flours.
Rely first on technique: hydration, autolyse, and fold cycles deliver the best flavor and structure. Reserve additives when you cannot change flour sources.
| Bread Type | Hydration |
|---|---|
| Sandwich loaves | 55–65% |
| Artisan boules | 65–75% |
| Ciabatta | 75–85%+ |
Flour Choice and Its Impact
Protein content dictates potential gluten strength. Bread flour typically contains 12–14% protein, while all-purpose ranges 10–12%. Whole grain flours include bran that can cut gluten strands, yielding denser crumbs.
Blend flours to balance nutrition and texture. For weak flours, a small addition of high-protein flour or vital wheat gluten brings structure without overworking the dough.
Refer to the flour overview at flour on Wikipedia for technical details about milling and protein levels.
Troubleshooting Common Problems
Density, lack of oven spring, and tearing all point to gluten issues or fermentation errors. Diagnose by re-checking hydration, knead time, and proofing temperature.
For instance, dense crumb often means underdeveloped gluten or short fermentation. Conversely, open crumb with large uneven holes can indicate overproofing or very high hydration without sufficient surface tension.
Pro-Caution
After resting the dough, re-evaluate elasticity. Often a controlled, cool bulk ferment fixes structural issues and improves flavor through slower enzyme activity.
Specific Techniques: Stretch-and-Fold, Autolyse, and No-Knead
Stretch-and-fold builds alignment without aggressive kneading. Lift a portion of dough, stretch it over itself, and rotate. Repeat every 20–30 minutes during early bulk fermentation.
Autolyse—mixing water with flour and resting 20–60 minutes before adding salt and yeast—improves hydration and reduces kneading time. The method enhances extensibility and flavor.
Expert Insight
The no-knead method relies on long fermentation to develop gluten passively. It suits high-hydration doughs and yields excellent flavor due to extended enzyme and yeast interaction.
For hands-on guidance, find practical walkthroughs on internal pages like baking techniques and recipe-specific adjustments at bread recipes on this site.
Temperature, Fermentation, and Yeast Control
Yeast performance depends on dough temperature. Warmer dough accelerates fermentation but shortens flavor development. Cooler dough slows activity and improves complexity.
Target dough fermentation temperatures (final dough temp) will vary with your schedule. For baseline reading on yeast species and handling, see baker’s yeast on Wikipedia.
Practical Temperature Ranges
Room-temperature bulk fermentation typically runs 1–4 hours depending on dough strength and yeast amount. Retarding in the fridge overnight yields deeper flavor and easier shaping.
Use a thermometer to calculate water temperature for your mixing target. Control variables and reproduce results reliably across bakes.
Final Shaping and Oven Spring
Proper shaping builds surface tension, which supports oven spring. Tight shaping reduces degassing and helps the loaf rise vertically in the oven.
Score loaves to control expansion. For crust and crumb balance, add steam in the first 10 minutes of baking to delay crust set and maximize oven spring.
FAQ
How do I know when gluten is strong enough?
Perform the windowpane test. If the dough stretches thin and translucent without tearing, it has sufficient gluten. Also check that it holds gas and feels springy when poked.
Can I improve gluten in whole wheat dough?
Yes. Use higher hydration, autolyse, and slightly longer fermentation. Sifted dough or added vital wheat gluten can also improve structure while preserving whole-grain flavor.
Is vigorous kneading always better?
No. Vigorous kneading builds strength fast but can overheat the dough and damage structure. Often, gentle folding and time produce better flavor and an open crumb.
When should I add salt and why does timing matter?
Add salt after autolyse and with yeast if using direct methods. Salt tightens gluten and slows enzyme activity, so adding it too early can reduce extensibility during initial development.
What if my dough never forms a windowpane?
Check flour quality, add short rests (autolyse), and increase hydration slightly. If needed, use small additions of high-protein flour or vital wheat gluten and extend fermentation time.
For additional technical context about fermentation and enzymatic action, consult fermentation (food) on Wikipedia.
Armed with these techniques—controlled hydration, deliberate resting, and measured mechanical action—you can unlock gluten consistently so your loaves rise, slice, and taste like professional-baked bread. Practice the tests, monitor temperature, and adjust flour blends to match your goals. Happy baking and precise measuring yield reliable results.
See also: gluten
]]>