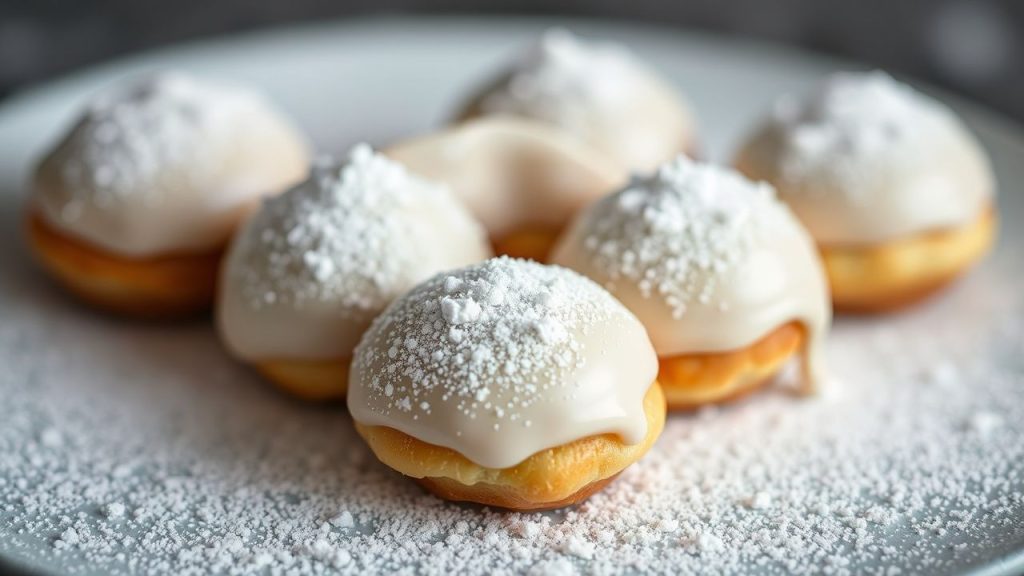
- At a glance: invert sugar increases sweetness and slows crystallization in confections.
- It forms when sucrose hydrolyzes into glucose and fructose.
- Professionals use it to extend shelf life and improve mouthfeel in baked goods.
- Home cooks can make it with simple tools and careful temperature control.
What is invert sugar?
Invert sugar is a syrup produced when the disaccharide sucrose is hydrolyzed into its monosaccharide components. This chemical change yields a liquid that tastes sweeter and resists crystallization relative to table sugar.
The inversion process converts sucrose into a mixture of glucose and fructose, altering optical rotation and functional properties. The result behaves differently in doughs, icings, and confections, which is why professionals rely on it.
Prep and Cook Time
Preparation time is short, but the process needs patience and attention to temperature. Total active time typically runs about 40 to 45 minutes, including cooking and cooling stages.
Plan for: 10 minutes prep, 30 minutes for syrup inversion and monitoring, and about 20 minutes of cooling before use or storage. Accurate timing helps prevent unwanted caramelization.
- Preparation: 10 minutes
- Cooking (syrup inversion): 30 minutes
- Cooling time: 20 minutes
Yield
This recipe produces roughly 2 cups of invert sugar syrup, depending on evaporation and final concentration. You can scale the ingredients linearly for larger batches, but maintain temperature control and stirring technique.
Store the finished syrup in a sealed container at room temperature to preserve its texture. For long-term storage, refrigeration will slow microbial growth but can increase viscosity.
Difficulty Level
Medium. The technique requires steady heat, a candy thermometer, and an understanding of the soft-ball stage to avoid under- or overcooking. Precision matters more than speed.
If you have basic candy-making experience, you will find the method straightforward. New bakers should practice temperature control on a small batch before scaling up.
Ingredients
Use simple, pantry-stable ingredients to make invert sugar at home. The acid catalyst can be an organic acid like lemon juice or a food-grade acid salt such as cream of tartar.
- 2 cups granulated sugar
- 1 cup water, divided
- ¼ teaspoon cream of tartar (potassium bitartrate) or ¼ teaspoon lemon juice
- ½ teaspoon baking soda, dissolved in 1 teaspoon water (added at the end to neutralize acid)
Instructions
Combine 1 cup water, granulated sugar, and the cream of tartar or lemon juice in a heavy-bottomed saucepan. Stir gently to blend without splashing; this minimizes sugar loss and ensures even heating.
Heat the mixture over medium heat, stirring until the sugar fully dissolves. Once dissolved, bring the syrup to a gentle simmer and monitor with a candy thermometer until the mixture reaches 236°F (soft-ball stage).
- Once the desired temperature is reached, remove from heat and carefully pour in the baking soda solution. The syrup will foam briefly; stir gently to neutralize the acid and halt inversion.
- Allow the syrup to cool at room temperature until it thickens to a pourable consistency. Avoid rapid cooling to prevent crystallization spots forming.
- Transfer to a sterile glass jar and seal. Label with the date and store at room temperature for up to several months, assuming good sanitation and dry storage.
[p]
 Pro-Caution
[/p]
Chef’s Notes & Tips for Success
Skim any foam during cooking for a clearer final syrup. Foam removal improves appearance and reduces trapped air that can promote crystallization during storage.
Invert sugar is highly hygroscopic, so store it in a sealed container to maintain texture. When substituting into recipes, reduce other liquids slightly to account for the syrup’s dissolved water.
 Expert Insight
For subtle flavor variation, swap cream of tartar for fresh lemon juice; the slight citrus note complements many fruit-based desserts. However, acids vary in strength, so maintain consistent measures.
Visit our science of sugar and baking tips pages for trial recipes and troubleshooting if you want to experiment further. Those internal guides provide batch-tested ratios and application ideas.
Serving Suggestions
Invert sugar shines in icings, glazes, caramel, and soft-centered candies where smooth mouthfeel matters. It also helps keep cookies tender and ice cream scoopable at lower temperatures.
Drizzle a small amount over fresh fruit to deepen perceived sweetness without overpowering natural flavors. You can also fold a tablespoon or two into jam to reduce crystallinity and improve spreadability.
| Nutrient | Per 1 Tbsp (20g) | Value |
|---|---|---|
| Calories | 60 | kcal |
| Carbohydrates | 16 | g |
| Protein | 0 | g |
| Fat | 0 | g |

Q&A
Below are concise answers to the most common technical and practical questions about invert sugar. These responses reflect food science principles used by professionals in pastry and ingredient formulation.
They cover the chemistry of inversion, application tips, and safety considerations for home production. Use these as a quick reference while you test your first batches.
Q1: What is invert sugar, really?
A1: Invert sugar is the syrup produced when sucrose hydrolyzes into glucose and fructose; the change alters sweetness and crystallization.
Q2: Why is it called “invert” sugar?
A2: The term describes the shift in optical rotation when sucrose splits into its component sugars; the direction of rotation in polarized light is effectively inverted.
Q3: How does invert sugar differ from regular sugar?
A3: Unlike crystalline granulated sugar, invert sugar remains liquid, tastes slightly sweeter per unit, attracts moisture, and slows crystal formation in finished goods.
In Summary
Invert sugar is a practical, science-backed ingredient that adjusts sweetness, texture, and shelf stability in many recipes. It requires simple chemistry, consistent temperature control, and correct neutralization to produce reliably at home.
Use it strategically—small substitutions can yield measurable improvements in tenderness and longevity without changing a recipe’s core structure. Keep records of ratios and outcomes so you can replicate success.
FAQ
Can I substitute invert sugar for honey or corn syrup?
Yes. Invert sugar behaves similar to light corn syrup and diluted honey in recipes because of its liquid form and composition of glucose and fructose. Adjust sweetness and liquid ratios when substituting to maintain balance.
How long does homemade invert sugar last?
Stored in a clean, sealed jar at room temperature, invert sugar usually lasts several months. Refrigeration extends shelf life further but may increase thickness.
Does invert sugar change baking times?
It can. Because invert sugar retains moisture and modifies sugar concentrations, items may brown faster and remain moister. Watch bake color and test doneness with a toothpick rather than relying on time alone.
Is invert sugar healthier than table sugar?
Nutritionally, it provides similar calories to other sugars. Its higher sweetness per gram can allow reduced usage, but caloric impact remains comparable per teaspoon.
Can I buy invert sugar instead of making it?
Yes. Commercial invert syrups and specialty confectioners’ syrups are available and formulated for consistency. Making it at home gives control over concentration and flavor but requires careful technique.
See also: Invert sugar
]]>
- Key takeaway: Precise lamination builds the physical layers that create flake.
- Key takeaway: Butter quality and temperature govern steam production and layer separation.
- Key takeaway: Controlled fermentation develops flavor and dough extensibility.
- Key takeaway: High initial oven heat creates lift; a short finish preserves color and crumb.
The Science Behind Crafting the Perfect Croissant Crust: Unlocking Layers and Fermentation
Crafting a reliable croissant crust needs measurable technique. Each action — mixing, resting, folding, proofing, and baking — affects the final texture and color.
Start by thinking in terms of physics and chemistry: trapped steam separates layers, enzymes and yeast build flavor, and browning reactions create color. Use that framework to troubleshoot.
Prep and Cook Time
Active prep: about 1 hour for mixing and shaping. Hands-on time concentrates early; most time is passive chilling and proofing.
Total time: plan 16 hours including overnight rests and proofing to let fermentation develop balanced flavor and elasticity.
- Preparation: 3 hours (active time: 1 hour)
- Fermentation (chilling between folds): 12–14 hours (overnight ideal)
- Baking: 18–22 minutes
- Total Time: Approximately 16 hours (including fermentation)
Yield
This formula yields 12 classic-sized croissants when you cut the dough into standard triangles and roll consistently. Scaling up requires proportional adjustments to butter and yeast.
For commercial batches, give extra attention to chilling and proofing consistency to maintain uniform lift across trays.
Difficulty Level
Advanced: this technique demands patience and attention to detail during lamination and proofing. Expect learning-curve variability in rise and flake when you first practice.
However, following precise temperatures and rest intervals reduces failures and improves repeatability for home bakers.
Ingredients
Use ingredients that support structure and flavor. For example, choose a moderate-protein bread flour for good gluten formation without toughness.
Here are the standard amounts for 12 croissants. Measure by weight for accuracy; scales beat volume for consistency.
- 500g bread flour, sifted
- 300ml whole milk, cold
- 50g granulated sugar
- 10g fine sea salt
- 15g instant dry yeast
- 250g unsalted butter, cold and firm (for lamination)
- 1 large egg (for egg wash)
- Optional: 25g melted butter for brushing after baking
Instructions
Follow these steps with attention to temperature control. Use a thermometer to keep dough and butter at target ranges.
Keep folds even and rest the dough between folds in the refrigerator to prevent butter migration.
- Prepare the dough: Combine flour, sugar, salt and yeast. Add cold milk gradually and mix until a rough mass forms.
- Knead and chill: Knead 4–6 minutes until smooth. Cover and refrigerate 1 hour to relax gluten and firm the dough for lamination.
- Prepare butter block: Pound cold unsalted butter between parchment into a 1 cm square block; chill until firm but pliable.
- Lock-in stage: Roll dough to a rectangle, place butter block in center and fold edges over to seal completely.
- First fold: Roll to a long rectangle and perform a letter (single) fold. Wrap and chill 1 hour.
- Repeat folds: Perform two more letter folds, chilling 1 hour between each. This creates the alternating fat-and-dough layers.
- Final shaping: Roll to ~6mm thickness, cut triangles and shape croissants. Place on parchment-lined trays and proof in a warm, humid spot until nearly doubled.
- Egg wash and bake: Brush with beaten egg and bake at 200°C (400°F) for 18–22 minutes until deep golden, rotating trays for even color.
- Finish: Optionally brush with melted butter for sheen. Cool slightly on racks before serving.
Chef’s Notes
Butter temperature: Target butter that yields a clean fold without cracking or oozing. Aim for firm but malleable.
Resting times: Longer chilling stabilizes layers and limits butter smear into dough. Err on the side of cooler, not warmer.
Expert Insight
- Proofing environment: Keep proofing near 24°C with humidity to allow steady yeast activity without surface drying.
- Variations: Add high-quality chocolate or almond paste if desired, but avoid overloading the roll to preserve lift.
- Make-ahead: Shape and freeze trays, then bake from frozen with a few extra minutes in the oven.
Serving Suggestions
Serve croissants warm for best texture contrast between crust and crumb. They pair well with coffee or fruit preserves.
For savory service, fill halves with ham and Gruyère or use them to build composed sandwiches that highlight the pastry layers.
Understanding the Role of Butter Layers for Flakiness
Butter acts as the steam source and mechanical separator between dough layers. As the oven heats, water in butter vaporizes and forces layers apart.
Choose butter with a lower water ratio to reduce premature steam loss. For more context on butter composition, see butter on Wikipedia.
Mastering Dough Lamination Techniques for Optimal Texture
Lamination creates hundreds of alternating sheets; each fold multiplies layer count. Even pressure during rolling keeps layers uniform and prevents weak spots.
Compare lamination to techniques used for related pastries. For broader theory on laminated dough, consult the puff pastry page.
The Chemistry of Fermentation Impact on Crust Formation
Yeast fermentation generates carbon dioxide and minor alcohols that inflate layers and add flavor. Proper timing balances flavor with dough strength.
Fermentation also affects crust coloration through sugar availability that drives browning reactions. See the yeast article for fermentation mechanics and interactions.
Baking Temperature Secrets to Create that Golden Crisp Finish
Start at a high oven temperature to maximize steam production for lift, then lower slightly toward the end to avoid over-browning. This two-phase heat approach yields both height and color.
Watch for the Maillard reaction; it browns the crust and adds savory notes. For background on non-enzymatic browning, read the Maillard reaction entry.
Maintain consistent oven humidity and avoid opening the door early. Sudden heat loss can collapse the rising layers and flatten the crust.
Pro-Caution
Practical Troubleshooting
If croissants lack lift, check yeast freshness and proofing conditions first. Slow or cold proofing yields under-expanded layers.
If layers fuse, reduce flour on the board and shorten rolling pressure. Excessive flour and heat both encourage layer adhesion.
Q&A
Below are concise answers to common technical questions about croissant crusts.
Use these points as quick checks during your next baking session.
Q1: What makes the croissant crust so flaky and crisp?
The layered structure separates under steam pressure during baking, producing the signature flake. Consistent folds and proper butter temperature keep these layers discrete.
Good lamination and a high initial oven temperature provide the mechanical lift necessary for crisp exterior and airy interior.
Q2: How important is butter quality for the crust?
Very important. Higher fat butter reduces water content and stabilizes the lamination. It also enhances flavor and mouthfeel.
European-style butter generally performs better for laminated dough because of its fat-to-water ratio.
Q3: Why does temperature control matter so much?
Temperature affects gluten elasticity, butter firmness and yeast activity. Each influences layer formation and oven spring.
Use refrigeration between folds and a cool laminating surface to avoid butter migration and layer collapse.
Q4: Does flour type change the crust texture?
Yes. Use a flour with moderate protein to develop enough gluten for structure while keeping tenderness. Too strong a flour yields a chewier crumb.
Adjust hydration slightly when swapping flour brands to maintain the dough’s handling characteristics.
Final Notes
Perfecting croissant crust takes repeatable technique and controlled variables. Track temperatures, resting times and fold counts to build a reliable process.
Apply the principles above in small practice batches. With measured adjustments, you will consistently produce flaky, golden croissants.
FAQ
How many folds are ideal for croissants?
Most classic recipes use three single (letter) folds or two book folds to create hundreds of layers. The ideal count balances layer number with dough strength.
Too many folds can overwork the dough; aim for a reproducible routine.
Can I use regular butter instead of European-style butter?
You can, but adjust expectations: standard butter often has higher water content and can reduce lamination stability. Compensate with stricter chilling.
When possible, test both and note differences in rise and flavor.
Is overnight refrigeration necessary?
Yes. Slow cold fermentation develops flavor and improves dough extensibility, which helps with lift and texture during baking.
Shorter rests produce acceptable results, but not the same depth of flavor or consistency.
How do I store baked croissants for the next day?
Store at room temperature in a paper bag for up to 24 hours to preserve crispness. Reheat briefly in a low oven to refresh texture.
Avoid airtight containers that trap steam and soften the crust.
Where can I read more about laminated dough theory?
Start with general pastry references and encyclopedia entries on laminated pastries and pastry chemistry. The croissant article on Wikipedia gives historical and technical context.
Combine reading with hands-on practice to connect theory to results.

| Nutrient | Per Croissant (Estimate) |
|---|---|
| Calories | 280 kcal |
| Protein | 6 g |
| Carbohydrates | 28 g |
| Fat | 15 g |
Apply these core principles consistently: control temperature, choose stable butter, and allow fermentation the time it needs. That approach turns repeatable technique into reliably flaky croissant crusts.

See also: croissant crust
]]>Chewy or crispy? The difference lies in measurable ingredient behavior and heat transfer during baking. Understanding those factors gives you repeatable control over texture.
- At a glance: Sugar type and moisture steer chewiness versus crispiness.
- Fat state and baking time control spread and edge crisp.
- Flour protein and mixing determine structure and chew.
- Small technique tweaks yield predictable texture changes.
How Ingredients Shape Texture
Every ingredient plays a mechanical or chemical role. Sugar, fat, flour, and eggs interact to set structure, hold water, and brown surfaces.
For example, sugar type alters moisture retention and caramelization, while all-purpose flour supplies protein for gluten formation. Those reactions directly affect chew and snap.
Key Chemical Players
Baking soda (sodium bicarbonate) encourages spread by producing CO2 and raising pH, which speeds browning. Use it when you want a broader, slightly chewier cookie profile.
Sodium bicarbonate reacts with acidic ingredients, shifting texture and color; control the amount to tune spread versus lift. Too much or too little changes the crumb abruptly.
Prep and Cook Time
Timing guides final moisture. Shorter bakes trap water for a tender, chewy center while longer bakes dry the dough and create crisp edges.
Typical ranges: prep 15 minutes, optional chill 30–60 minutes, bake 8–13 minutes; total time varies by oven and cookie size. Test-bake a small batch to dial in your oven’s idiosyncrasies.
- Preparation: 15 minutes
- Chilling dough (optional): 30–60 minutes
- Baking: 8–13 minutes
- Total time: Approx. 40–90 minutes
Yield and Difficulty
Typical yield for this formula is about 24 medium cookies. Skill level: intermediate—recommended for bakers ready to adjust ratios and time for specific texture goals.
Scaling is linear for small batch increases, but watch bake time and sheet crowding when you change batch size. Crowding alters heat flow and spread.
Ingredients
Use quality basics and measure precisely. Small shifts in sugar or fat percent produce predictable textural changes.
Core ingredients below include common pantry items; substitute deliberately and test. For deeper guidance, see our internal guide on the role of flour for protein choices.
- 2 1/4 cups all-purpose flour, sifted
- 1 teaspoon baking soda
- 1/2 teaspoon fine sea salt
- 3/4 cup unsalted butter, softened
- 1 cup packed light brown sugar
- 1/2 cup granulated sugar
- 1 large egg + 1 egg yolk (extra chewiness)
- 2 teaspoons pure vanilla extract
- 1 1/2 cups semisweet chocolate chips
- Optional: 1/2 cup chopped walnuts or pecans
Instructions
Follow these steps in sequence to control hydration and gluten development. Order matters: creaming, egg addition, and gentle mixing each affect final texture.
- Preheat the oven to 350°F (175°C). Line baking sheets with parchment for even browning and controlled bottoms.
- Combine dry ingredients: whisk flour, baking soda, and salt in a medium bowl to ensure even leavening.
- Cream butter and sugars: beat until fluffy, 3–4 minutes, to trap air for a lighter crumb when desired.
- Add eggs and vanilla: add whole egg and then yolk, mixing until homogenous; extra yolk increases tenderness and moisture retention.
- Fold in dry mix and mix-ins: fold by hand or low speed; stop when just combined to avoid overdeveloping gluten and toughness.
- Chill for chew: refrigerate dough 30–60 minutes to solidify fat and slow spread if aiming for a denser, chewier center.
- Scoop and bake: drop rounded tablespoons 2 inches apart. For chewy: 9–11 minutes; for crispy: 11–13 minutes, watching for golden edges.
- Cool briefly on the sheet: rest 5 minutes, then transfer to a rack to finish cooling and set texture.
Oven variance is real—document your times at a given rack position and temperature for reproducible results. Keep a small notebook or photo log to track changes.
Pro-Caution
Tips for Success
Small, consistent choices yield predictable results. Use a scale for precision when you change ratios or test variables.
Expert Insight
Control butter temperature: softened but cool butter traps air without melting. Melted butter increases spread and can produce thinner, crisper cookies.
More brown sugar favors chew due to molasses content; more granulated sugar promotes crisp due to faster drying and caramelization. For texture experiments, change one variable at a time and record results.
Serving Suggestions
Serve warm for maximum texture contrast: slightly crisp edge, soft center. Add a small finishing sprinkle like flaky salt to emphasize flavor boundaries.
For presentations, pair with ice cream or milk to enhance perceived tenderness and contrast. For events, keep cookies on flat trays at room temperature to retain intended texture.
Nutrition and Visual Guide
Per-cookie nutrition varies by size and mix-ins. Use the table below as an approximate guide for a medium 24-cookie batch.
| Nutrient | Per Cookie (approx.) |
|---|---|
| Calories | 150 kcal |
| Protein | 2 g |
| Carbohydrates | 20 g |
| Fat | 7 g |
Adjust serving sizes to match your dietary goals. Swap some butter for applesauce or reduce chocolate to lower calories, but test texture after each change.
Further Reading and Internal Resources
For deeper technical detail on protein and hydration, read our internal guide on the role of flour. For practical troubleshooting and oven tips, see baking troubleshooting.
The linked pages include targeted experiments that pair well with the techniques in this recipe. Use them to build a testing plan and improve outcomes quickly.
FAQ
What makes a cookie chewy instead of crispy?
Chewiness results from retained moisture and a denser crumb structure. Use higher brown sugar, extra yolk, and shorter bake time to hold water in the crumb.
How do I get crisp edges and a soft center?
Bake until edges brown slightly while centers remain glossy and slightly underbaked; carryover heat will finish the center. A thinner dough or slightly longer bake commonly produces crisp edges.
Does flour type matter?
Yes. Higher-protein flours increase gluten and chew; lower-protein flours or blends reduce elasticity for a more tender bite. For precise swaps, measure by weight and test small batches.
Can I convert a chewy recipe to a crispy one?
Yes. Increase granulated sugar, reduce moisture or egg yolk, and extend bake time slightly. Also bake on darker pans or at a marginally lower temperature longer to dry the cookie evenly.
Why should I chill dough?
Chilling firms fats and allows the flour to hydrate, reducing spread and enriching flavor. Use chilling when you want a taller, chewier cookie or a more developed flavor profile.
Apply these principles methodically: change one variable, test, and log results. Over time you will refine a formula that produces the exact chew or crisp you prefer.

See also: cookie texture
]]>
- Steam is the leavening agent: water content and oven heat control rise.
- Starch gelatinization builds structure: the panade step matters.
- Eggs tune texture: protein and moisture determine pipeability and hold.
- Consistent technique yields repeatable results.
Understanding the Chemistry of Choux Dough for Flawless Texture
The classic pâte à choux creates its lift with steam rather than chemical leaveners. A cooked dough called a panade traps moisture; when heated in the oven, that moisture flashes to steam and expands the matrix, forming a hollow interior.
Starch gelatinization during the stovetop cook step sets the structure so the dough expands without collapsing. Read more about starch gelatinization on Wikipedia: Starch gelatinization.
Gluten plays a controlled role. We do not develop a strong gluten web as with bread; instead, limited protein alignment gives elasticity for puffing while remaining tender. For background see Wikipedia: Gluten.
Eggs supply liquid, fat, and protein that both strengthen and plasticize the dough. The balance between liquid and egg proteins dictates whether the dough is pipeable and whether it holds shape in the oven. See Wikipedia: Egg (food).
Ingredients, Yield and Equipment
Use precise measures. A kitchen scale beats volume cups for repeatability. Standard proportions are about equal parts water and flour by weight once accounting for butter and eggs.
Yield: approximately 24 medium choux buns. Equipment: saucepan, wooden spoon, piping bag with large tip, baking sheets, and a wire rack. For pastry technique context, review Wikipedia: Pâte à choux.
Prep and Cook Time
Preparation: 20 minutes. Use room-temperature eggs for easier incorporation.
Cooking (stovetop + baking): 40 minutes. Bake on middle rack for consistent heat exposure.
Yield
Approximately 24 medium-sized choux buns. Adjust piping size to vary counts.
Difficulty Level
Intermediate. Basic pastry experience helps, but methodical technique yields excellent results for precise bakers.
Ingredients
- 1 cup water, preferably filtered
- 8 tbsp (113g) unsalted butter, cut into cubes
- 1/2 tsp fine sea salt
- 1 tbsp granulated sugar (optional for sweeter dough)
- 1 cup all-purpose flour, sifted
- 4 large eggs, at room temperature
Step-by-Step Technique (Precise Method)
1. Preheat the oven to 400°F (200°C). Prepare two baking sheets with parchment or silicone mats.
2. Combine water, butter, salt, and sugar in a medium saucepan over medium-high heat. Heat to a rolling boil while stirring so the butter fully melts and the mixture is homogeneous.
3. Remove the pan from heat and add all the sifted flour in one motion. Stir vigorously with a wooden spoon until a smooth ball forms and the dough pulls away from the pan sides, about 1–2 minutes.
4. Return pan to low heat for 1–2 minutes while stirring constantly to evaporate surface moisture. This drying step controls the final water available to generate steam.
5. Transfer the panade to a mixer bowl or large mixing bowl. Let cool 3–5 minutes. Cooling prevents premature cooking of eggs when they are added.
6. Add eggs one at a time, beating after each addition. The dough becomes glossy and ribbon-like when properly hydrated. Stop when the batter falls from a spoon in a thick ribbon.
7. Fit a piping bag with a large round or star tip. Pipe 1.5-inch mounds spaced 2 inches apart. Smooth peaks if necessary with a wet fingertip to reduce cracking.
8. Mist the tops lightly with water or brush gently to remove dry flour. This small surface moisture reduces top splits and yields a smoother shell.
9. Bake at 400°F for 15 minutes, then lower to 350°F (175°C) and bake 20–25 minutes until shells are deeply golden and crisp. Do not open the oven early.
10. Cool on a wire rack. Cooling preserves the hollow interior and keeps shells crisp.
Common Problems and Troubleshooting
Flat or collapsed choux usually result from low initial oven temperature or undercooked panade. Ensure the panade reached a smooth ball and that you used the correct oven sequence.
Cracked tops occur when the dough surface dries before rising. Brushing or misting the tops and avoiding excess flour on the surface minimizes cracking.
Dense, heavy shells typically mean too little egg or overcooked panade. Remember: eggs add steam potential and elasticity; add them gradually until the ribbon stage.
Pro-Caution
Practice builds feel. Use a kitchen scale and keep notes on oven idiosyncrasies to refine timing and temperatures for your equipment.
Expert Insight
Spacing matters. Give shells room to expand so hot air circulates evenly and the steam can inflate the dough without crowding.
Tips for Success: Unlocking the Secrets to a Perfect Rise and Crispness
Temperature control: A high initial oven temperature creates rapid steam formation. The follow-up lower temperature dries the shell and sets structure.
Moisture balance: The stovetop drying step controls the water available for steam. Over-drying yields a stiff dough; under-drying produces greasy or heavy results.
Egg integration: Beat eggs in slowly and observe texture. The proper consistency falls in a thick ribbon; it should not be runny or rock-solid.
Piping precision: Consistent pressure and removing air from the bag produce uniform puffs and reduce misshapen shells.
Serving Suggestions and Internal Resources
Choux shells work for both sweet and savory fillings. Classic options include vanilla pastry cream or flavored pastry creams and savory mousses with herbs or smoked fish.
For guidance on flour choices and how protein content affects texture, review our internal resource: Baking Flour Guide: Which Fits Your Pastry Best?. For ideas on fillings and plating, visit Choux Filling Ideas for curated recipes and pairing notes.
Garnish with powdered sugar, tempered ganache, or microgreens for savory versions. Pair with tea or a light sparkling beverage to contrast textures and flavors.
Nutritional Snapshot
One medium choux shell: approximately 95 kcal, 3 g protein, 12 g carbohydrates, and 3.5 g fat. Use this as a guideline; actual values vary with filling choice and portion size.
| Nutritional Value (per choux) | Calories | Protein | Carbs | Fat |
|---|---|---|---|---|
| One medium choux shell | 95 kcal | 3g | 12g | 3.5g |
FAQ
What makes choux pastry unique compared to other pastries?
Choux relies on steam for lift rather than chemical leaveners or laminated fat layers. The cooked dough traps moisture that vaporizes in the oven, inflating shells to produce a hollow center ideal for fillings.
Why is the stovetop cooking step essential?
Cooking flour with water and fat gelatinizes starches and removes excess surface moisture. This creates a cohesive panade that can trap air and steam during baking. Skipping this step prevents proper structure formation.
How do I know when eggs are fully incorporated?
The dough should look glossy and fall in a thick ribbon from the spoon or mixer paddle. If the batter sits in a mound that slowly levels, you have the correct consistency.
Why do my shells collapse after baking?
Collapsing indicates too little structure or a sudden steam loss. Common causes: insufficient panade cook, underbaked interior, or opening the oven during the critical set phase. Maintain oven temperatures and avoid early door opening.
Can I freeze choux shells?
Yes. Freeze fully cooled, unfilled shells in an airtight container. Re-crisp in a 300°F oven for 5–8 minutes before filling to restore texture.
Final Notes
Mastery comes from precise technique and observation. Track weights, oven behavior, and small timing changes to convert one-off successes into routine results.
Choux pastry rewards methodical practice. Follow the sequence here, respect moisture and temperature, and you will produce reliably hollow, crisp shells for both classic and creative fillings.
See also: Choux pastry
]]>
- Key control points: cold butter, measured folds, and precise resting.
- Timing matters: short active work periods with frequent chilling produce the best lift.
- Steam-driven lift: trapped moisture creates separation and puff.
Essentials of Puff Pastry Structure
Puff pastry depends on distinct sheets of dough separated by solid butter. When the butter melts and produces steam during baking, it forces the layers apart and creates volume.
For a technical overview of laminated pastries, consult the puff pastry entry on Wikipedia for puff pastry. That resource summarizes layer geometry and historical technique succinctly.
Lamination and Layer Geometry
Lamination multiplies layers by geometric folding. Each letter fold or book fold increases the number of alternating dough-and-fat layers exponentially, which directly affects flake count and rise.
Maintain clean edges and even thickness when rolling; uneven sheets produce trapped pockets of butter and irregular puff. For visual comparison, see the croissant-vs-puff guide in our internal resources: Croissant vs Puff Pastry Guide.
Ingredient Science: Flour, Fat, and Water
Choose low-to-moderate protein flour to limit gluten extensibility while retaining enough structure to hold steam pockets. Overdeveloped gluten makes the pastry tough rather than flaky.
Understand the fat: butter contains water and milk solids; those components generate steam and flavor. Read more about butter at Wikipedia for butter to appreciate its melting profile and water content.
Role of Gluten and Dough Strength
Gluten provides tensile strength so layers can separate without tearing. However, excessive mixing or hot handling increases gluten formation and reduces tenderness.
Resting the dough relaxes gluten and prevents elastic recoil during final baking. The concept of gluten structure is summarized at Wikipedia for gluten.
Temperature Control and Handling Protocols
Temperature control drives success. Cold, firm fat keeps layers distinct; warm butter disperses and ruins lamination. Work quickly and chill often to maintain contrast between dough and fat.
A chilled environment also prevents butter smearing into surrounding dough. Use short working phases, and refrigerate between folds to re-solidify the butter and relax the gluten network.
Practical Temperature Targets
Aim for work-surface temperatures below 18°C (65°F) if possible; keep butter at fridge-cold firmness. If a butter block softens, re-chill it before proceeding to the next fold.
Preheat the oven fully and consider a preheated baking steel or tray to deliver immediate heat to the pastry base. For general principles, consult the baking overview at Wikipedia for baking.
Step-by-Step Method That Produces Reliable Layers
Follow a measured sequence: mix dough gently, encase butter, perform a series of folds, and maintain consistent chilling. This creates predictable layer counts and even rise.
Work in three or four turns of folding: a classic routine uses a single turn followed by two or three letter folds, with 20–30 minute chills between each. Longer final chilling (60–90 minutes) improves lift.
- Mixing: Combine flour and salt, then add water sparingly. Keep the dough shaggy and cool; do not knead.
- Butter Enclosure: Flatten a cold butter slab to a uniform thickness and encase it in the dough rectangle.
- Turns and Chills: Roll to length, fold (letter or book fold), wrap, and chill. Repeat the sequence for the targeted number of layers.
- Final Rest: Chill at least 1 hour after the last fold before rolling for shaping and baking.
For additional technique tutorials, see our internal reference on lamination: Lamination Techniques.
Expert Insight
Troubleshooting Common Failures
When pastry collapses or lacks lift, the usual culprits are warm butter, overworking, or insufficient oven heat. Diagnose by checking butter distribution and oven temperature stability.
If butter has smeared, you will see streaks rather than laminar separation. Re-chill and rework only if the structure still holds a central fat envelope. Avoid re-rolling repeatedly; that thins and blends layers.
Pro-Caution
Advanced Adjustments and Pro Techniques
Experienced bakers manipulate hydration and fat content to tune texture. Slightly lower hydration tightens layers; slightly higher hydration can create a more open crumb if handled correctly.
Use European-style butter for higher fat content and stronger flavor. Alternatively, blending a small percentage of high-melting-point fat can stabilize laminates in warm kitchens, but expect subtle flavor changes.
Make-Ahead and Freezing
You can freeze laminated dough after the final chill. Wrap airtight and freeze flat; thaw overnight in the refrigerator before shaping to preserve layering integrity.
For commercial timelines, batch-prep dough and bake from chilled or slightly chilled state to retain consistent oven spring across shifts.
Serving, Fillings, and Applications
Puff pastry adapts to sweet and savory uses: tarts, turnovers, palmiers, and layered appetizers. Keep fillings light so steam can separate layers rather than weigh them down.
Brush finished pieces with glazes for shine, or dust with sugar after baking for contrast. For layered laminated bread like croissants see our internal comparison: Croissant vs Puff Pastry Guide.
Nutrition Snapshot
Per serving, puff pastry is energy-dense due to butter and flour. Balance portions with fresh fruit or protein-based fillings for a more nutrient-dense plate.
| Nutrient | Per Serving |
|---|---|
| Calories | ≈220 kcal |
| Protein | ≈3 g |
| Carbohydrates | ≈15 g |
| Fat | ≈16 g |
FAQ
How many folds produce optimal layers?
Two to three letter folds (creating roughly 27–81 layers depending on technique) balance work time and reliable puff. More folds increase layers but require precise chilling to avoid smearing.
Can I use margarine instead of butter?
Substitutes affect melting profiles and water content. Margarine can work but will alter flavor and steam production. For classic lift and taste, butter remains the best option.
Why does my pastry become greasy?
Greasy pastry indicates fat meltdown into the dough pre-bake. Reduce handling heat, chill frequently, and ensure the butter stays as a discrete block until oven time.
Is laminating by hand better than machine lamination?
Hand lamination gives fine control for artisanal batches; sheeting machines offer consistency at scale. Both can produce excellent results when temperature and timing are controlled.
How hot should the oven be?
Preheat to 200–220°C (400–425°F) for rapid steam generation. A hot initial environment encourages fast lift before significant fat loss.
See also: puff pastry
]]>
- Precise whipping produces a stable foam that traps air without collapsing.
- Gradual sugar addition stabilizes proteins while preserving volume.
- Temperature and pan preparation determine rise and crumb structure.
- Acid and folding technique fine-tune foam strength and uniformity.
Prep and Cook Time
Plan your work to avoid rushed steps: egg whites respond to timing and temperature. Having ingredients measured and equipment ready reduces the chance of mistakes that deflate the foam.
Set aside at least 1 hour 60 minutes for baking and cooling to ensure structure sets fully. Clean, dry tools and a cold oven thermometer help preserve consistent results.
- Preparation: 25 minutes
- Baking: 35 minutes
- Cooling: 1 hour
Yield and Difficulty
This recipe yields 10–12 slices and requires steady hands more than advanced skills. The technique focuses on control: whipping, sugar timing, and delicate folding.
Label this as medium difficulty because the margin between under-whipping and over-whipping is narrow. Rehearse the whipping stages and practice folding to build confidence.
Ingredients
Use reliable, purpose-driven ingredients. Each component plays a specific physical role: egg whites create the foam, sugar stabilizes it, and cake flour provides a light starch matrix.
- 12 large egg whites at room temperature
- 1 ½ cups superfine sugar, divided
- 1 cup cake flour, sifted
- 1 ½ teaspoons cream of tartar
- ¼ teaspoon salt
- 1 teaspoon pure vanilla extract
- Optional: zest of 1 lemon or ½ teaspoon almond extract
Instructions
Work methodically: preheat the oven, prepare equipment, and sift dry ingredients ahead of whipping. A clean, dry bowl and whisk are non-negotiable—even a trace of fat prevents proper foam formation.
Follow the sequence below exactly, and transfer batter to the pan immediately after folding to retain maximum air. Bake and invert the pan right away to lock the structure while hot.
- Preheat the oven to 350°F (175°C). Use a 10-inch tube pan that is clean and completely ungreased.
- Sift the cake flour and ½ cup of the superfine sugar together twice to aerate and remove lumps; set aside.
- Beat the egg whites in a large, spotless bowl with cream of tartar and salt until foamy on medium speed.
- Increase speed to high and add remaining sugar one tablespoon at a time until glossy, stiff peaks form.
- Fold in vanilla and optional zest gently.
- Carefully fold the sifted flour mixture into the whites using sweeping motions with a rubber spatula until just combined.
- Transfer the batter to the tube pan and smooth the surface lightly. Bake about 35 minutes until the top springs back.
- Invert the pan immediately onto a cooling rack and let cool completely—about 1 hour—before releasing the cake from the pan.
The Chemistry of Whipping
Understanding how proteins and air interact gives you predictable control. Egg white proteins unfold under shear, creating a network that traps air as minute bubbles and forms a foam.
That protein network eventually coagulates under heat and locks the structure in place. For background on egg-white composition and behavior, consult the Egg white overview.
Protein networks and foam mechanics
Mechanical agitation causes proteins such as ovalbumin to unfold and realign at the air–water interface, where they form a cohesive film. This film resists coalescence of bubbles and sustains volume during early baking.
As temperature rises, those proteins denature and set, stabilizing the foam into a spongy solid. For technical context on proteins and their folding behavior, see Protein.
Role of sugar and acid
Sugar delays rapid protein bonding by drawing water and moderating interactions, yielding a finer, more stable foam. Add sugar gradually during whipping to slow coagulation and preserve peak volume.
Acids such as cream of tartar lower pH and promote more even protein unfolding, strengthening the foam network. Read more about cream of tartar chemistry at Cream of tartar.
Baking and Cooling
Bake at the specified temperature so proteins set steadily without over-browning or drying. An oven that runs hot will over-coagulate the surface and reduce final volume.
Invert the pan immediately after baking to let gravity support the foam while it cools and sets. This step prevents the structure from collapsing under its own weight.
Pro-Caution
Tips for Success
Small technique adjustments yield consistent, repeatable results. Control variables—room temperature egg whites, spotless equipment, and measured sugar additions—to achieve predictable outcomes.
Practice recognizing stages of whipped egg whites: glossy soft peaks, glossy firm peaks, and stiff dry peaks. Stop at glossy stiff peaks to maintain moisture and structure.
- Egg whites at room temperature whip to greater volume and faster than chilled whites.
- Use superfine sugar so it dissolves fully and yields a smooth meringue.
- Fold gently to preserve trapped air; turn the bowl and use wide strokes.
- Cool inverted to avoid shrinkage and maintain height.
Expert Insight
Serving Suggestions
Angel food cake pairs with high-acid or creamy accompaniments that balance its subtle sweetness. Fresh berries, citrus curds, or a light whipped cream add contrast without weighing the cake down.
Dust with powdered sugar or serve thin slices with macerated fruit for an elegant presentation. For recipe cross-reference, explore related techniques at molecular-gastronomy-basics and practical methods at baking-basics on this site.
Nutrition
Nutrition values vary with ingredient choices and portion size, but a typical slice is low in fat and moderate in carbohydrates. The cake derives most calories from sugar and starch.
| Nutrient | Per Slice (1/12) |
|---|---|
| Calories | 140 |
| Protein | 4g |
| Carbohydrates | 30g |
| Fat | 0.1g |
FAQ
What makes angel food cake so light?
Egg whites whipped into a stable foam trap countless tiny air bubbles, which expand during baking and create lift. The coagulation of proteins during heating locks that airy structure into place.
Why are egg whites the star ingredient?
Egg whites contain proteins that form films around air bubbles when whipped, producing a strong but lightweight network. Their lack of fat allows proteins to bond tightly, which is essential for foam stability.
How does sugar influence whipping and texture?
Gradual sugar addition stabilizes the foam by slowing protein bonding and helping retain moisture. Too much sugar added too early will weigh the foam down and reduce volume.
Why invert the pan immediately after baking?
Inversion supports the delicate foam while it cools and the protein matrix continues to set. Cooling upside-down prevents collapse and preserves maximum height.
Can I substitute egg whites with an alternative?
Some substitutes like aquafaba mimic foaming but produce different textures and flavors. For classic rise and crumb, real egg whites remain the most reliable option.
Apply these science-based techniques and you will bake taller, more consistent angel food cakes. For a practical primer on flour and its role in baked structure, consult the Flour reference.
Key Takeaways
Every successful angel food cake depends on controlled whipping, measured sugar timing, and immediate cooling. Treat each step as a mechanical and chemical process to produce predictable results.
Master these variables and you transform simple ingredients into an elegant, cloudlike dessert with consistent height and tender crumb.
See also: angel food
]]>Beneath the delicate surface of a macaron lies precise chemistry that creates its crisp shell and tender interior. Understanding protein networks, moisture control, and emulsification lets bakers reliably shift a sweet template into a savory realm.
- Controlled egg-white foams produce the air structure that creates feet and chew.
- Macaronage balances aeration and viscosity for uniform shells.
- Filling moisture and pH influence shelf life and mouthfeel.
- Temperature and drying determine color, feet and top integrity.
Prep and Cook Time
Preparation: 45 minutes | Resting: 30 minutes | Baking: 15 minutes | Total: 1 hour 30 minutes.
These timings assume aged egg whites and a preheated, evenly calibrated oven. Small ovens or uneven heating require trial trays to dial in exact bake time.
Yield and Difficulty
Yield: Approximately 24 savory macarons (12 filled sandwiches). The yield depends on piping consistency and tray layout.
Difficulty: Advanced. This recipe demands measured technique and attention to each step to control protein foam and batter viscosity.
Ingredients
Ingredient quality and particle size affect shell texture. Use finely ground almond flour and fully sifted powdered sugar to avoid coarse bits that break shells.
Below is a focused ingredient list for a herb-cream cheese savory macaron:
- 100g almond flour, finely ground and sifted
- 100g powdered sugar, sifted
- 75g egg whites, aged at room temperature (about 3 days)
- 25g granulated sugar
- 10g black sesame seeds, toasted and finely ground (optional)
- 1/4 tsp cream of tartar
- ½ tsp coarse sea salt
- Filling: 100g cream cheese, softened
- 1 tbsp finely chopped chives
- 1 tbsp finely minced roasted garlic
- 1 tbsp unsalted butter, softened
- Salt and freshly ground black pepper to taste
- Optional garnish: Microgreens or edible flowers
Almond flour provides oil and protein that interact with the meringue matrix to influence shell chew. For more on the almond’s properties, see Almond.
Instructions
Follow each step precisely to maintain foam stability and batter viscosity. Small adjustments in mixing or temperature change the final texture dramatically.
Use standard pastry tools: a stand mixer, a fine sieve, a piping bag with a round tip, and parchment or silicone mats for even baking.
1. Prepare the dry mixture
Sift the almond flour and powdered sugar together. Fold in toasted ground sesame and sea salt to distribute solids evenly.
Remove any coarse pieces caught in the sieve; a fine, homogeneous powder ensures smooth shells and prevents cracking during bake.
2. Whip the egg whites
Start at medium speed until egg whites become frothy. Add cream of tartar to raise foam stability, then add granulated sugar gradually while increasing speed to high.
Whip to glossy, stiff peaks. The protein network must trap air without running; stable peaks indicate the structure needed for feet and rise. See Meringue for protein foam basics.
3. Macaronage and piping
Fold the dry mix into the meringue in three increments. Use a spatula to press and fold until the batter flows like lava: smooth and slightly runny but not liquid.
Transfer batter to a piping bag and pipe 3.5 cm rounds. Tap the tray firmly to release large air bubbles, then allow shells to rest until a skin forms on the surface; this step enables proper feet development.
4. Baking and cooling
Preheat the oven to 150°C (302°F) and bake one tray at a time for 14–16 minutes. Shells are done when they have risen feet and the tops are set without browning.
Cool shells completely on the baking sheet before peeling. Hot removal risks collapsing moisture gradients and losing the desired chewy interior.
Filling and Assembly
For savory fillings, control moisture to prevent sogginess. Cream cheese stabilized with a small amount of butter binds flavors while staying spreadable.
Combine cream cheese, butter, chives, and roasted garlic. Season to taste and whip until smooth. Pair shells by size and pipe filling to assemble sandwiches. Chill 24 hours to let flavors meld and texture settle.
Tips for Success
Egg-white age and room temperature influence foam quality. Aged whites whip faster and often yield more stable peaks; avoid using freshly separated whites straight from the fridge.
Temperature control matters: an oven thermometer will verify the setpoint and avoid browning or underdeveloped feet. Consistency in environment yields consistent results.
- Macaronage feel: Batter should flow slowly off the spatula in a continuous ribbon.
- Rest time: Let shells dry until a slight skin forms to ensure a smooth top and good feet.
- Freeze shells: Unfilled shells freeze well for up to a month; thaw completely before filling.
Emulsification ties the fat-rich almond flour to the aqueous meringue and affects texture. For a primer on emulsification science, consult Emulsification.
Expert Insight
Control of pH and salt is subtle but impactful. Salt enhances perceived flavor but excessive ion concentration can weaken protein foams, so use salt sparingly in the shell batter.
Pro-Caution
Serving Suggestions
Serve savory macarons as an appetizer along with light, palate-cleansing accompaniments. Garnish with microgreens or a small herb leaf for visual contrast.
Pair with a crisp white or a light herbal iced tea to highlight subtle herb notes without overpowering the delicate shell. Present on a minimalist platter to emphasize shape and color.
Explore additional herb and spice pairings on our internal variation page: Savory macaron herb variations. For technical background on macaron structure, see Macaron science explained.
Nutrition
Approximate per-shell nutrition is provided for planning service and portion control. Values will vary with ingredient brands and exact portion sizes.
| Nutrition (per macaron) | Calories | Protein | Carbs | Fat |
|---|---|---|---|---|
| Calories | 85 kcal | 2 g | 7 g | 5 g |
FAQ
What key chemical changes produce macaron feet?
Feet form when trapped air expands and protein networks set at the base while the top forms a skin. The skin controls where expansion occurs, producing the characteristic frilly foot.
Temperature and batter viscosity determine how much air expansion happens before proteins solidify, so both must be consistent.
How do egg-white proteins create structure?
Whipping denatures proteins and forms a network that traps air and water, creating a foam. Stabilizers like cream of tartar help the network resist collapse during folding and baking.
Protein denaturation and recombination set during baking, which locks the foam into a crisp exterior and tender interior.
Can I make savory macarons gluten-free or vegan?
Macarons are naturally gluten-free when made with almond flour. Vegan adaptations use aquafaba (chickpea liquid) instead of egg whites, but aquafaba requires longer whipping and often additional stabilizers to match texture.
Expect slight adjustments to hydration and baking times for vegan versions; trial batches help find balance.
How long can I store assembled savory macarons?
Assembled savory macarons keep well refrigerated for up to three days if fillings are low in free moisture. For longer storage, freeze shells unfilled and fill after thawing.
Bring refrigerated macarons to room temperature before serving to restore ideal texture and release flavors.
Why do my macarons crack on top?
Cracks result from insufficient skin formation, overmixed batter, or oven temperature spikes. Allow proper resting time and avoid excessive tapping after piping.
Calibrate your oven and practice macaronage to achieve the right balance between aeration and stability.
For additional reading on the macaron itself, consult Macaron. For egg-white chemistry, see Egg white (protein).
See also: savory macaron
]]>
- No-knead relies on time: long fermentation develops gluten slowly.
- Texture shifts: you often get a more open, irregular crumb.
- Flavor deepens: extended fermentation produces more complex acids and aromas.
- Handling changes: higher hydration and gentle shaping become critical.
What is kneading and why it matters
Kneading mechanically develops gluten, the protein matrix that traps gas and gives bread structure. Bakers apply folding and pressure to align gluten strands rapidly.
This mechanical action contrasts with biochemical development over time. For more on the protein itself, see gluten on Wikipedia.
Mechanics of gluten formation
Kneading stretches and orients gluten-forming proteins (gliadin and glutenin). That creates elasticity and strength so the dough holds rise and shape.
When you skip this work, enzymes and hydration gradually do the aligning for you during fermentation. For background on fermentation processes, consult fermentation.
How skipping kneading changes dough structure
Skipping kneading shifts the method from physical manipulation to time-based chemistry. You give enzymes, water, and yeast hours to develop the network that kneading would otherwise force in minutes.
That slower pathway creates characteristic differences in crumb, crust, and flavor. Understanding those differences lets you control outcomes deliberately.
Texture and crumb
No-knead doughs often yield a more open, irregular crumb with larger alveoli. The result looks rustic and can hold toppings or dips well.
If you under-ferment, however, the loaf will be dense and gummy. Correct timing prevents that problem and rewards patience.
Flavor and aroma
Extended fermentation increases organic acid and ester production, which gives the loaf deeper, tangy notes. This is why many bakers prefer long, slow rises for flavor.
Long fermentation also improves keeping quality; the loaf stays flavorful longer compared with a quick, mechanically developed loaf.
Practical steps for reliable no-knead loaves
Successful no-knead bread requires deliberate adjustment of hydration, time, and shaping. Treat it as a method, not a shortcut.
Start with a high-hydration dough (typically 70–80% hydration) and allow 12–18 hours of fermentation at room temperature for most yeasted recipes.
- Hydration: higher water content encourages natural gluten development.
- Fermentation time: longer bulk ferment improves strength and flavor.
- Handling: minimal degassing and gentle shaping preserve open crumb.
For recipe ideas and tested methods, see our internal bread recipes collection. For technical background, review our baking science resources.
Expert Insight
Allow the shaped dough a final proof in a well-floured banneton or a lined bowl to build surface tension gently. That tension supports oven spring and a pleasing crust.
Common pitfalls and how to avoid them
People often assume no-knead means no attention. The truth: no-knead trades effort now for patience and timed care later.
Common mistakes include under-hydration, insufficient fermentation, and harsh shaping. Each leads to predictable faults like tight crumb, weak oven spring, or collapsed loaves.
Pro-Caution
Temperature control matters. Cooler rooms slow enzyme activity and require longer fermentation. Warmer rooms speed fermentation but risk overproofing.
When troubleshooting, log times, temperatures, and hydration. That data makes adjustments rapid and reliable.
Quick troubleshooting table
| Symptom | Likely cause | Fix |
|---|---|---|
| Dense crumb | Under-fermented or low hydration | Extend bulk ferment 2–4 hours; increase hydration 2–4% |
| Large collapse mid-loaf | Overproofed or weak shaping | Shorten proof or tighten shaping; cold retard overnight |
| Sticky handling | High hydration and low gluten development | Use gentle dusting, stretch-and-folds, or chill briefly |
How yeast and microbes shape the no-knead profile
Yeast metabolizes sugars into CO2 and alcohol, driving the rise. Bacterial activity introduces acids and flavor compounds over long fermentation.
Different leavens (commercial yeast vs. sourdough starter) produce distinct profiles. For more on yeast and starters, consult yeast and sourdough entries.
Choosing between quick no-knead and sourdough
Quick no-knead uses commercial yeast and yields reliable results with less time. Sourdough emphasizes complex flavor and longer retards.
Both methods benefit from long hydration and gentle handling. Choose by desired flavor profile and the time you can commit.
Final considerations for home bakers
Skipping kneading is a conscious technique choice. It favors fermentation-driven structure and flavor over mechanical speed.
Adopt the method with intention: monitor times, use appropriate hydration, and adjust for room temperature. You will control the result, not leave it to chance.
FAQ
Can I skip kneading completely and still get good bread?
Yes. You can get excellent bread with no-knead methods if you allow adequate fermentation and use higher hydration. Skillful shaping and proofing finish the loaf.
How long should I ferment no-knead dough?
Typical room-temperature fermentation runs 12–18 hours for a standard recipe. Adjust based on room temperature and desired flavor intensity.
Will no-knead bread have the same chew as kneaded bread?
No-knead loaves often have a different chew—less uniform but pleasantly open. Proper hydration and time produce good chew even without mechanical kneading.
Do I need special equipment for no-knead baking?
You do not need special mixers. A Dutch oven helps create steam and strong oven spring, but you can also use a baking stone and steam pan.
Can I adapt my favorite kneaded recipe to a no-knead method?
Yes, but adapt hydration and increase fermentation time. Log changes and test small batches until you get reliable results.
See also: no-knead
]]>