- Basting preserves moisture and delays surface drying for tender results.
- Warm, fat-based bastes improve browning and carry aromatic ingredients.
- Timing matters: baste after initial crust formation and at steady intervals.
- Tools and motion determine coverage and speed without losing oven heat.
The Science Behind Basting: Why Moisture is a breakthrough
Basting affects heat flow and surface chemistry. By reintroducing liquid and fat to the outer layers, you slow surface dehydration while promoting reactions that generate flavor and color.
Specifically, controlled moisture supports the Maillard reaction and limits hard surface formation that blocks even cooking. Both outcomes yield a tender interior and well-browned exterior.
Choosing the Perfect Basting Liquid
Choose a base of fat plus a flavorful carrier. Melted unsalted butter or neutral oil provides lubricity and heat transfer, while stocks or citrus add taste and acidity to balance richness.
When you add sugar or syrups, monitor color closely because sugars accelerate caramelization. Use less sweet ingredients for long profiles and add small amounts near the end for glaze-like gloss.
Tips for Flavorful and Juicy Results
Balance is the goal. Combine fat, acid, and aromatics so each baste layers flavor without overpowering the protein.
- Warm your baste: Keep it at serving temperature to avoid dropping oven heat.
- Add aromatics late: Fresh herbs and citrus zest in the final baste preserve volatile flavors.
- Control sweetness: Use honey or maple sparingly to prevent excessive browning.
Timing and Technique: How to Baste Like a Pro Without Losing Heat
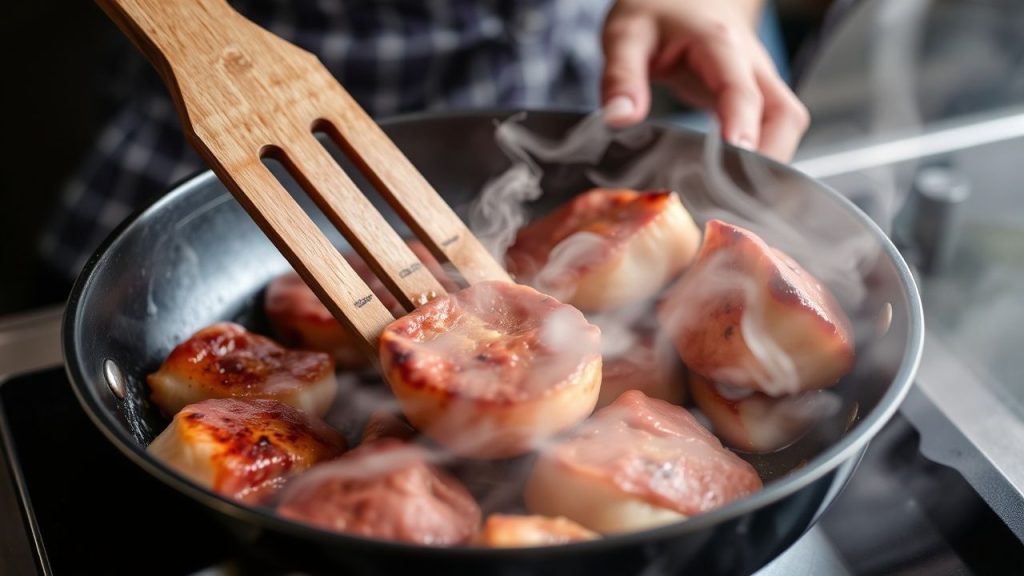
Start basting after the surface has set and a light crust forms. For many roasts that takes 10–20 minutes at moderate oven temperature; for quick sears reduce frequency.
Baste at consistent intervals to maintain surface moisture but avoid continuous wetting that prevents browning. Frequent, brief basting keeps temperatures steady and encourages even color development.
Tools and Motion
Use a long-handled spoon, ladle, or bulb baster to reach into deep pans without tilting the oven or grill excessively. A steady, rhythmic pour covers the surface evenly.
Tilt the pan to gather juices and spoon over the highest points. This motion increases contact between liquid and meat, improving heat transfer and glazing the surface.
 Expert Insight
Common Mistakes to Avoid When Basting for Maximum Moisture Retention
Avoid common errors that undo the benefit of basting. The most frequent mistakes are temperature shock, over-basting, and using baste mixtures that interfere with browning.
Cold liquids lower the pan temperature and stall reactions. Opening the oven repeatedly creates heat loss. Excessively watery bastes dilute surface flavors and slow Maillard chemistry.
 Pro-Caution
Practical fixes for each mistake
If you see soggy surfaces, reduce basting frequency and raise pan temperature slightly to encourage drying between applications.
For flare-ups on the grill, apply baste quickly and keep a spray bottle of water nearby. Use oil-based bastes sparingly when grilling over direct flame.
Prep and Cook Time
Estimate times based on cut, size, and method. Basting adds minimal time if you plan intervals and keep liquids warm.
Typical guideline: Prep: 10–20 minutes. Cook: 30–90 minutes depending on protein and desired doneness.
- Prep time: 15 minutes
- Cook time: 45 minutes (dependent on dish and size)
Yield
Serves 4–6 as written. Adjust the basting volume proportionally for larger pieces.
For small roasts or poultry, plan 1–1.5 tablespoons of baste per baste cycle; larger cuts may need more to maintain surface coverage.
Difficulty Level
Medium. The technique requires attention to timing, temperature control, and choice of baste. Those skills are transferable to many cooking methods.
Use a probe thermometer to avoid overcooking and to decide when to rest—this preserves moisture and ensures consistent doneness.
Ingredients
The following amounts make a versatile basting liquid for a mid-sized roast or poultry. Scale as needed and keep the mix warm during cooking.
- 4 tbsp unsalted butter, melted
- 1/4 cup chicken broth
- 2 tbsp fresh lemon juice
- 2 cloves garlic, minced
- 2 tbsp fresh rosemary, chopped
- Salt and freshly ground black pepper, to taste
- Optional: 1 tbsp honey or maple syrup for sweetness
Instructions
Follow these steps for consistent results. Each step focuses on preserving moisture while building flavor through controlled heat and repeated glazing.
- Prepare the basting liquid: Gently warm butter, broth, lemon, garlic, rosemary, salt, and pepper in a small saucepan. Hold warm, do not boil.
- Preheat: Set oven or grill to 375°F (190°C) for even caramelization without too-rapid drying.
- Initiate cooking: Place protein or vegetables on a roasting pan and cook uncovered for 10–20 minutes to develop a crust.
- Baste carefully: Use a long-handled spoon or baster to apply warm liquid every 5–15 minutes depending on the item and method.
- Rotate and monitor: Turn the dish midway for even color. Limit door openings to reduce temperature fluctuations.
- Rest before serving: Let the cooked food rest 5–10 minutes to redistribute juices for maximum tenderness.
Chef’s Notes & Tips for Success
Small technique changes produce large improvements. Use these notes to refine your routine and adapt for specific proteins or vegetables.
- Swap chicken broth for a rich vegetable stock for vegetarian options.
- Infuse oil with chili or garlic for a different flavor profile on the grill.
- For delicate fish, baste once or twice near the end to avoid breaking the flesh.
- Prepare the basting liquid a day ahead and rewarm gently to save time on service day.
Serving Suggestions
Finish basted meats with a final spoonful of warm baste and a sprinkle of fresh herbs to brighten the plate. Presentation matters: glossy surfaces signal succulence.
Pair basted proteins with roasted root vegetables or a crisp salad dressed with lemon vinaigrette for contrast. For texture, add toasted nuts or fresh citrus zest as a final touch.
| Nutrient | Per Serving |
|---|---|
| Calories | 220 |
| Protein | 25g |
| Carbohydrates | 3g |
| Fat | 12g |
For additional technique practice, review our internal guides on how to master basting techniques and check the step-by-step notes in our roasting tips collection.
References and Further Reading
For foundational chemistry and cooking science, consult the following resources that explain the reactions and methods discussed above.
- Maillard reaction — the chemical pathway that creates browning and complex flavor.
- Caramelization — sugar-driven browning relevant when using honey or syrups.
- Grilling — method notes for basting over open flame and managing flare-ups.
- Roasting — high-heat, dry-heat technique where basting most often applies.
- Butter — why this fat carries flavor and browns surfaces effectively.
FAQ
How often should I baste different proteins?
Frequency depends on size and method. For large roasts, baste every 10–15 minutes after the crust forms. For quick-roasted poultry, basting every 5–10 minutes during the middle phase works well. Fish benefits from only one or two applications near the end.
Can I use pan drippings as a baste?
Yes. Pan drippings concentrate flavor and natural juices. Strain fat and adjust seasoning. Warm the collected juices before applying to avoid temperature loss.
Will basting make meats too salty?
Basting itself does not increase saltiness unless your baste contains high-sodium stock. Taste your baste and the meat, then adjust salt sparingly to maintain balance.
Is basting necessary for every roast?
No. Slow-roasted, tightly wrapped, or braised dishes retain moisture through other means and may not benefit from frequent basting. Use the technique when you want a glossy finish, layered aromas, and improved browning.
What tools work best for even coverage?
Long-handled spoons, basters, and small ladles provide speed and control. Use a baster for focused application and a spoon for broader coverage. Keep a small heatproof pot near your station to hold warm baste.
Basting is a high-return technique: a modest investment in attention yields visibly better texture and flavor. Apply warm, balanced bastes and consistent motion to preserve juices, enhance browning, and deliver more reliable results across proteins and vegetables.
See also: Basting
]]>
- Key takeaways:
- High, stable surface heat creates the Maillard crust that builds flavor.
- Dry surface, correct oil, and minimal flipping deliver even browning.
- Resting and temperature control preserve juiciness and texture.
Prep and Cook Time
Preparation: 10 minutes. Bring cuts to room temperature, pat dry, and pre-measure aromatics for efficient basting. A short prep prevents surprise moisture that ruins the crust.
Cooking: 15 minutes. A properly preheated pan shortens sear time and improves crust development. The actual sear window is brief; plan your timing and tools before you heat the skillet.
Yield
Serves 4 when using roughly 2 lbs of ribeye or equivalent protein. Portion sizes and thickness change cook times, so adjust the resting guidance accordingly.
Scale ingredients and sear times for smaller pieces or multiple batches. Searing in controlled batches keeps pan temperature consistent and ensures an even crust on each piece.
Difficulty Level
Medium. Searing requires attention to heat and timing, but it relies on repeatable technique rather than advanced culinary maneuvers. Anyone who follows the sequence and monitors temperature will succeed.
Key skills include seasoning, surface-drying, managing pan heat, and using an instant-read thermometer. These tasks are straightforward and teachable for regular home cooks.
Ingredients
Use clean, focused ingredients to let the sear shine. For a classic seared steak, use a 1-inch ribeye or similar steak brought to room temperature and fully patted dry.
Essential items: a high-smoke-point oil, coarse salt, fresh cracked black pepper, butter, and aromatics for basting. Adjust herbs and aromatics to match the protein.
- 2 lbs beef ribeye steak, about 1-inch thick, room temperature
- 2 tbsp high smoke point oil (refined avocado oil or refined grapeseed oil)
- 1 tsp kosher salt
- 1/2 tsp freshly ground black pepper
- 2 tbsp unsalted butter
- 3 cloves garlic, crushed
- 2 sprigs fresh thyme
Instructions
Select a heavy-bottomed stainless steel or cast iron skillet for the best heat retention and even browning. Cast-iron provides the sustained hot surface that helps form a consistent crust; consult an internal guide for pan care and seasoning if needed: Pan Selection Guide.
Follow these steps in order to sear with control and repeatability. Keep tools — tongs, spoon for basting, and an instant-read thermometer — within reach before you heat the pan.
- Preheat the pan: Place the skillet over medium-high heat for 4–6 minutes until it is visibly smoking at the edge. A hot, dry surface is non-negotiable for a good sear.
- Pat the steak dry: Press a few paper towels across the surface to remove moisture. A dry surface contacts the pan directly and browns efficiently.
- Season: Generously season both sides with kosher salt and cracked black pepper. Press the seasoning lightly so it adheres without drawing moisture.
- Add oil: Add 2 tablespoons of your high-smoke-point oil and swirl to coat the bottom of the pan. The oil should shimmer, not smoke aggressively.
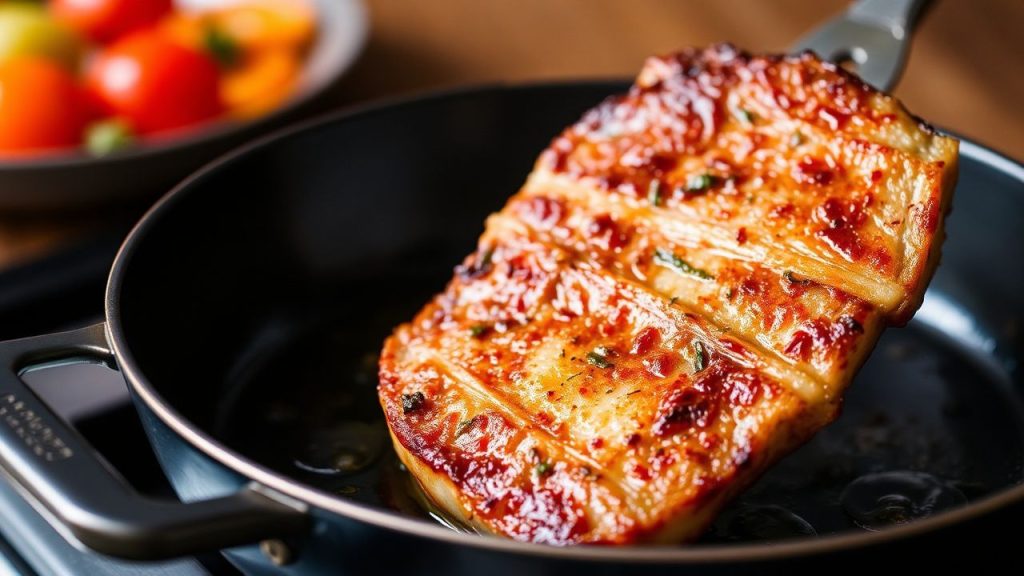
- Sear without disturbance: Place the steak in the pan and leave it undisturbed for 3–4 minutes, or until a dark golden-brown crust forms. Flip once using tongs to preserve the crust.
- Baste with butter and aromatics: Add butter, garlic, and thyme immediately after flipping. Tilt the pan and spoon the melted butter over the top for 2–3 minutes to finish, aiming for 125–130°F for medium-rare final temp after resting.
- Rest: Remove the steak to a warm plate, tent loosely with foil, and rest 5–10 minutes. Resting allows internal temperature to equalize and juices to redistribute.
Tips to Sear It Right: Mastering Temperature Control
Surface temperature governs the Maillard reaction — the chemical browning that produces complex savory flavors. A steady surface temp between roughly 400°F and 450°F promotes ideal crust formation without burning the fat.
Use an infrared or contact thermometer to gauge pan temperature. If the pan temperature dips after adding protein, pause between batches so the surface regains heat to avoid steaming instead of searing.
For background on the chemical process that creates browned flavor, read more about the Maillard reaction: Maillard reaction. Understanding the reaction helps you time the sear for maximum flavor.
Choosing the Right Pan and Oil for Maximum Flavor
Cast iron and heavy stainless steel excel because they hold heat when food hits the surface. A pan that cools significantly on contact will steam the food and prevent proper browning.
For technical reading on pan types and material properties, consult the cast iron reference: Cast-iron skillet. Good pan selection reduces hot spots and improves control.
Select oils with smoke points above 450°F for high-heat searing. These oils allow sustained surface temperatures without producing off flavors from burnt oil.
Chef’s Notes – Tips for Success
Patience matters: Resist constant flipping. Allow the crust to develop undisturbed for a clean sear. Frequent movement breaks the surface contact needed for the Maillard reaction.
Avoid overcrowding: Sear in batches to keep surface temperature stable. Crowding traps steam and yields pale, uneven browning.
- Swap herbs: Replace thyme with rosemary if you prefer a piney aroma during basting.
- Internal temp guide: Aim for 125–130°F for medium-rare after resting; adjust to taste.
Expert Insight
Do not skip the resting step; it is short but critical for texture. Cutting too soon lets flavorful juices run out and diminishes the eating experience.
Pro-Caution
Serving Suggestions
Slice the steak against the grain for tender bites and plate over creamy mashed potatoes or grilled seasonal vegetables. Simple sides let the seared flavors remain the focal point.
Finish with a sprinkle of flaky sea salt and a spoonful of pan jus or herb butter to add shine and immediate flavor contrast. For related preparation techniques, see our internal Ultimate Guide to Cooking Steaks.
| Nutrient | Per Serving |
|---|---|
| Calories | 580 kcal |
| Protein | 54 g |
| Carbohydrates | 1 g |
| Fat | 42 g |
Practical Notes and Techniques
Vegetables sear differently than meats; they release water and often require a hotter pan and drier surface. Give vegetables space and use direct contact to concentrate sugars into caramelization.
When using grill grates, you still rely on the same principles: high, direct heat and dry contact. For a primer on outdoor searing techniques, see the grilling resource: Grilling.
FAQ
What does it mean to sear food, and why is it important?
Searing applies high, dry heat to a food surface to create a brown, flavorful crust. This browning occurs via the Maillard reaction and amplifies savory flavors while adding texture contrast to the dish.
Does searing seal in juices?
Searing does not physically ‘seal’ juices, but a good crust slows moisture loss during further cooking. The crust improves perceived juiciness by preserving interior moisture and adding concentrated surface flavor.
Can I sear vegetables the same way as steak?
Yes—apply the same principles: dry surface, very hot pan, and minimal overcrowding. Vegetables benefit from high heat to caramelize sugars, producing complex, sweet-savory notes.
Is cast iron better than stainless steel for searing?
Both work well. Cast iron holds heat longer and provides steady contact; heavy stainless heats faster and offers fine control. Choose the pan that matches your workflow and heat source.
How do I know when to flip?
Flip when the protein releases easily and shows a deep golden-brown crust. If it resists, give it more time; forcing a flip too early will tear the developing crust.
For a basic overview of cooking science and techniques that inform searing decisions, consult this foundational resource: Cooking. Understanding the why helps you apply the how consistently.
Embrace the heat, control the contact, and let a reliable sequence of temperature, timing, and rest produce repeatable results. Searing rewards precision and a small set of reliable habits.
See also: Searing
]]>