- Brining drives salt and spice molecules into the meat for flavor and moisture retention.
- Collagen-to-gelatin conversion gives corned beef its silky mouthfeel when cooked low and slow.
- Maillard browning adds roasted, nutty notes when you finish with a sear or broil.
- Timing and resting preserve juices and improve sliceability.
What corned beef is and why curing matters
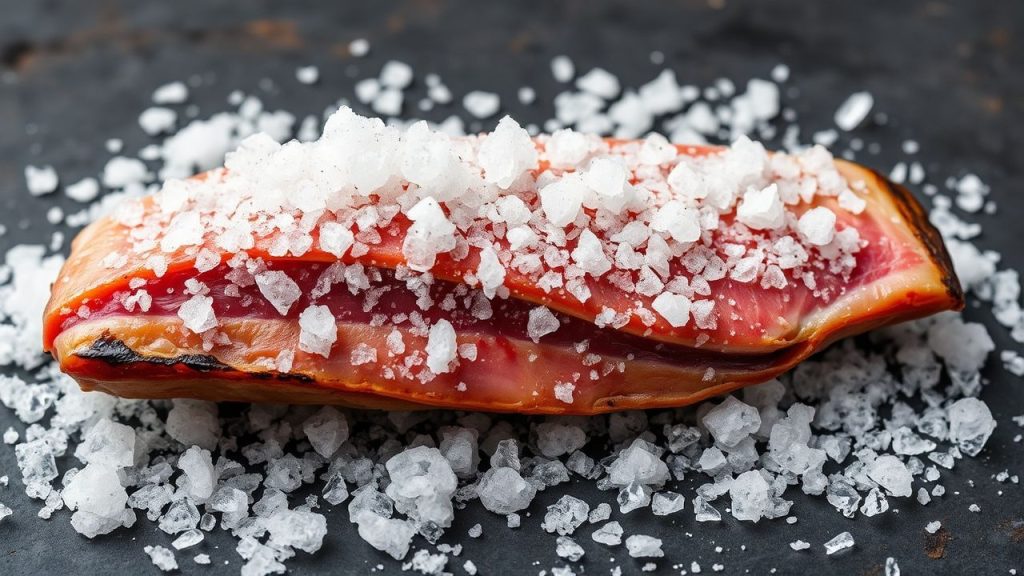
Corned beef is brisket cured in a salt-based brine with spices, then cooked to tenderness. The salt mixture denatures surface proteins and helps spices penetrate deeper for consistent flavor.
During curing, salt and nitrite chemistry alter muscle pigments and microbial risk, which stabilizes color and safety. For basic reference on brine chemistry see brine.
Brine composition: salt, sugar, and curing agents
Use a brine with balanced salt and sugar to control osmotic flow into the meat. Salt draws water and solutes into muscle cells via osmosis, while sugar moderates flavor and browning potential.
Nitrite or pink curing salt prevents growth of harmful bacteria and fixes the distinctive pink hue by reacting with myoglobin. For the pigment chemistry, consult myoglobin.
How protein and water interact during brining
Salt changes protein structure; it partially unfolds myosin and other proteins so they bind more water and retain it during cooking. This altered protein matrix produces a juicier texture compared with an untreated cut.
Turn the brisket periodically while brining to ensure even penetration. Also, soak briefly in fresh water after curing to correct excess salt levels before cooking.
Collagen, gelatin, and texture transformation
Brisket is rich in collagen that toughens raw meat but becomes gelatin when heated gently. Gelatin dissolves into the cooking liquid and coats the tongue, giving that characteristic silky mouthfeel.
Apply a low, steady heat for several hours to convert collagen into gelatin without overcooking muscle fibers. For a deeper explanation of structural proteins, review collagen.
Temperature windows for ideal conversion
Collagen breaks down effectively between about 70–90°C (160–195°F); maintain steady heat in that range to maximize tenderness. If temperature rises too quickly, fibers expel moisture and the texture can become dry or stringy.
Use a probe thermometer and gentle simmering or controlled pressure cooking to hold the meat within the target window. Consistent temperature yields reproducible results.
Maillard reaction: finishing for flavor depth
The Maillard reaction produces dozens of volatile compounds that create roasted, savory, and nutty flavors. This reaction occurs between amino acids and reducing sugars at higher temperatures and gives browned surfaces their complex aroma.
Although corned beef often cooks in moist heat, finish with a brief high-heat sear or under a broiler to activate Maillard chemistry on the surface. Read more about the reaction on the Maillard reaction page: Maillard reaction.
Practical cooking methods and timing
Choose the method that matches your schedule and texture goals. Slow simmering and pressure cooking both break down collagen, but they behave differently in timing and result.
Consult our cooking techniques guide for detailed methods that suit your equipment and time. Also see our recipes index at /recipes/corned-beef for tested timing charts and variations.
Slow simmer versus pressure cooking
Slow simmering at low heat allows gradual collagen dissolution and gentle spice infusion into the meat. This method rewards patience with even texture and controlled moisture retention.
Pressure cooking shortens the time needed for collagen conversion but raises the risk of over-softening if held too long. Use manufacturer timing recommendations and test doneness; err on the side of slightly underdone and allow carryover to finish during natural release.
Spices, aroma compounds, and their roles
Spices contribute volatile oils and small molecules that dissolve into the brine and migrate into the meat. Mustard seed, coriander, and peppercorns each add distinct volatile compounds that build a layered aromatic profile.
Because volatiles are temperature-sensitive, many of their oils release during long, gentle heating rather than a rapid boil. Toast whole spices briefly before adding to the brine to amplify their aromatic compounds.
Chef’s Notes: precise steps for repeatable results
Brine time: 5–7 days for a 4–6 lb brisket gives deep flavor without excessive salt. Turn the meat every 48 hours for uniform cure penetration.
Rinse and soak: After curing, rinse thoroughly and soak 1–2 hours in cold water to remove surface salt. This step prevents an overly salty final dish while preserving the brine’s benefits.
 Expert Insight
After cooking, rest the corned beef 10–15 minutes before slicing against the grain to preserve juices and improve mouthfeel. Resting allows protein fibers to relax and redistributes gelatin within the cut.
 Pro-Caution
Finish slices with a quick sear in a hot skillet or under a hot broiler for 2–4 minutes to add a caramelized surface. The contrast between tender interior and browned exterior increases perceived richness.
Serving suggestions and pairings
Serve corned beef with simple, bright sides that cut fat and highlight aroma: steamed cabbage, boiled potatoes, or a mustard-forward sauce work well. Acidic or spicy condiments lift the savory profile and add balance.
For visual appeal, slice uniformly and arrange on a warm board with herbs. Offer a small bowl of spiced mustard or horseradish on the side for guests to customize heat and tang.

Evidence-based troubleshooting
If your corned beef is dry, check the brine concentration and cooking temperature control. Overly high heat or insufficient brine time both reduce moisture retention.
If texture is gummy, you may have heated too quickly into a high-temperature zone where muscle fibers contract and squeeze out moisture. Slow down the heat ramp and use a thermometer for repeatability.
FAQ
What is the role of nitrite in corned beef?
Nitrite inhibits growth of Clostridium botulinum and stabilizes the pink color by reacting with myoglobin. Use only approved curing salts at label doses to gain safety benefits without exceeding safe intake limits.
How long should I brine a brisket for corned beef?
For a 4–6 lb brisket, 5–7 days achieves deep flavor infusion. Reduce time for smaller cuts and increase for large pieces; monitor salt uptake by sampling during the process.
Can I get Maillard flavor without dry-searing?
Yes. Use a hot oven broil or torch to brown the surface after moist cooking, or sear slices in a very hot pan for a short time. These approaches trigger Maillard reactions without drying the whole cut.
Why is resting the meat important?
Resting permits redistributed juices and allows internal temperature to equilibrate, which yields juicier slices and better texture. Slice after rest and always cut against the grain for tenderness.
Are there safety concerns with home curing?
Yes. Follow tested recipes for nitrite amounts, maintain refrigeration during curing, and discard brines after use. Proper sanitation and measured ingredients minimize risk.
For layered technique advice, see our internal guide to cooking techniques and the recipes index at /recipes/corned-beef. These pages provide timing charts and step-by-step photos to support reliable execution.
Understanding the simple chemistry behind corned beef — salt-driven curing, collagen conversion, and Maillard browning — makes the dish easier to master. Apply these science-backed steps to get tender, flavorful results consistently.
See also: Corned beef
]]>
- Key takeaway: Control surface heat to trigger browning while protecting interior moisture.
- Key takeaway: Simple marinades with salt, acid, and sugar manage tenderness and crust formation.
- Key takeaway: Use a meat thermometer and a two-zone fire for consistent doneness.
- Key takeaway: Resting yields juicier slices and prevents immediate juice loss when serving.
Why the science matters for grilled chicken
Successful grilled chicken depends on reproducible physical and chemical changes. The Maillard reaction creates the deep, savory crust you expect; manage temperature to favor Maillard browning rather than surface burning. Maillard reaction
Control of heat transfer and moisture differentiates dry, tough results from succulent meat. A controlled sear followed by a lower-heat finish manages conduction and convection so the center reaches safe temperature without overcooking the exterior. Grilling
Ingredient choices and marinade chemistry for grilled chicken
Marinades and brines change surface chemistry and water-holding capacity for grilled chicken. Use oil to carry flavor, salt to improve water retention, and modest acid to adjust texture; excessive acid will denature proteins and make meat mushy. Marinade
Brining provides uniform seasoning and better yield for lean cuts used in grilled chicken dishes. Salt interacts with muscle proteins to retain moisture during cooking; plan brine strength and time by cut size and thickness. Brining
Marinade components, dosages, and timing
For thighs, start with 1/4 cup neutral oil, 2–3 tablespoons of salt-based seasoning, 1–2 tablespoons acid, and 1 tablespoon sugar or honey only when you want added crust. Marinate 2–6 hours for thighs; thin breasts need 30–60 minutes to avoid over-tenderizing.
Keep the marinade chilled and never reuse raw marinade as a sauce unless you boil it. Pat chicken dry before placing on the grill to maximize direct surface contact and encourage Maillard browning.
Salt, enzymes, and dry-brine technique for grilled chicken
Dry-brining uses coarse salt rubbed into skin and flesh, followed by refrigeration for several hours to a day to season through. This method dries the skin slightly and improves crisping when you sear for grilled chicken.
Enzymatic tenderizers (papain, bromelain) act quickly; apply sparingly and for limited time to avoid a mushy texture. Use enzymes only when you intentionally target extreme tenderness for dense pieces.
Grill setup and heat management for grilled chicken
Always configure a two-zone fire: a direct high-heat side for searing and an indirect cooler side for finishing. This setup lets you build crust on skin and then move pieces away from direct flame to reach internal temperature without burning the exterior. Grilling
Clean, well-oiled grates reduce sticking and produce reliable sear marks that accelerate crust formation. Preheat the grill until the surface reaches a stable range specific to your cut—375–450°F for many setups—before you put chicken down.
Two-zone fire and flare-up control
Create a hot direct zone for initial sear and a medium indirect zone for finishing; move pieces between zones as they progress. When fat causes flare-ups, transfer meat to the indirect side until flames drop and then return briefly to the sear zone for color touch-up.
Keep a metal lid, grill brush, or spray bottle handy to control flames safely without cooling the grill excessively. Use mild fruitwoods sparingly if you want a delicate smoke note on your grilled chicken.
Step-by-step cooking method for grilled chicken
Remove chicken from refrigeration 20–30 minutes before grilling to reduce cold spots and promote even searing. Season just before cooking so the dry surface remains primed for browning and does not sit wet on the grate.
Place skin side down over direct heat and hold for 5–8 minutes without moving to develop color and crispiness. Flip once and move to indirect heat to finish until a safe internal target is reached.
Searing, finishing, and internal temperature for grilled chicken
Sear to build a crust, then finish at moderate heat until the thickest portion registers 165°F (74°C). Insert a probe thermometer into the deepest portion, avoiding bone contact for accuracy; this eliminates guesswork and prevents overcooking.
After pulling the chicken, tent loosely with foil and rest 5–10 minutes; this step equalizes temperature and redistributes juices. Resting improves perceived juiciness and yields cleaner slices for plating.
Tips for success with grilled chicken
Pick cuts that match your service goals: thighs tolerate more heat and forgiving carry, while breasts need careful timing to stay moist. Group similar sizes on the grate so pieces finish at the same moment and reduce rescue attempts.
Monitor the grill with an infrared surface thermometer or built-in gauge to maintain consistent results across batches. Use internal links to your recipe bank and setup guides for repeated success: grilled chicken recipes and grill setup guide.
Expert Insight
Trim large fat pockets that cause flare-ups but leave enough fat where you want self-basting. Apply finishing glazes during the last minute to avoid burning sugars; timing keeps both flavor and appearance clean.
Pro-Caution
Serving, pairing, and presentation for grilled chicken
Use resting time to prepare sides, toss a herb salad, or grill vegetables so plating happens while the meat relaxes. Slice against the grain for consistent tenderness and arrange to display crisp skin and moist interior.
Pair grilled chicken with acidic elements or lightly tannic beverages to cut fat and highlight layers of seasoning. A citrus dressing or herb-forward relish refreshes the palate and balances each bite.
Nutrition and portioning for grilled chicken
Trim excess fat or remove skin to reduce calories when needed; skin-on servings add flavor but increase energy density. A standard portion of 4–6 ounces delivers roughly 25–30 grams of protein depending on the cut.
When you use marinades with oil or sugar, account for those calories in menu planning; light application of glaze adds minimal energy if timed at the end. Archive nutrition facts for repeat recipes to help guests track intake accurately.
FAQ
How do I get both crispy skin and a fully cooked interior on grilled chicken?
Sear skin over direct heat to render fat and create crispness, then move the piece to indirect heat to finish to 165°F (74°C). Use a probe thermometer for repeatable accuracy and avoid guessing by color alone.
Can I use the same marinade for different cuts of grilled chicken?
Yes, but adjust marination time by thickness: thin breasts need 30–60 minutes, thighs 2–6 hours, and bone-in pieces may go longer with careful acid control. Tweak time rather than ingredients for clean outcomes.
What is the best wood for smoky flavor without overpowering grilled chicken?
Choose mild fruitwoods like apple or cherry for a subtle sweet-smoke that complements poultry. Heavy woods (hickory, mesquite) risk dominating delicate seasonings, so use them sparingly if at all.
How do I prevent flare-ups from dripping fat on the grill?
Trim large fat deposits and use a two-zone setup so you can move meat off direct heat when flare-ups start. Keep a metal lid or spray bottle at hand to control flames quickly without losing grill temperature.
Is brining better than a wet marinade for grilled chicken?
Brining improves moisture retention and even seasoning; wet marinades add surface flavor, acid, or sugar for caramelization. Choose brine for consistent juiciness and short marinades for surface flavor or crust development.
Final note: Treat grilling as a sequence of controlled steps: prepare, sear, finish, and rest. Apply these techniques to your grill, monitor core temperature, and you will reproduce high-quality grilled chicken reliably.
See also: grilled chicken

See also: grilled chicken
]]>
- At a glance: Salt lowers available water and limits microbes.
- Method matters: dry cure, brine, and injection change rate and texture.
- Safety essentials: correct salt percent, temperature, and validated nitrite formulas.
- Outcome: preserved shelf life plus distinct texture and flavor.
Salt curing mechanism: dehydration and osmotic stress
Salt curing works primarily by reducing free water in muscle and on surfaces, a concept measured as water activity. When salt contacts tissue it creates an osmotic gradient that draws water from cells and from contaminating microbes.
This movement of water across membranes is osmosis; review the physical principle on osmosis for the underlying physics. Reduced water activity slows metabolism and reproduction of many spoilage organisms.
How salt curing changes microbial viability and food safety
Lower water activity forces microbes into osmotic stress. Many common spoilage bacteria and some pathogens cannot grow below defined water-activity thresholds, so salt curing is an effective hurdle when applied correctly.
Industrial curing typically combines salt curing with cold storage and other barriers. For historical and technical context on combined methods, see food preservation.
Types of salt and how they influence salt curing
Different salts dissolve and migrate through tissue at different rates. Fine table salt penetrates quickly; coarse salts dissolve more slowly, giving a gradual cure and different flavor release.
Trace minerals in some sea salts can provide subtle sensory differences, but the preservative action comes from sodium chloride. For the chemistry of common salt, refer to salt (sodium chloride).
Dry cure versus brine in salt curing
Dry cure applies salt directly to the meat surface; the process concentrates on-contact brine as moisture migrates out. This firming alters texture and concentrates flavor over days to weeks.
Brine cure dissolves salt in water and uses soaking or injection to distribute salt evenly. Brining reduces processing time but demands strict control of concentration and temperature for safety and consistency.
Protein chemistry in salt curing: texture and color effects
Salt interacts with myofibrillar proteins, solubilizing them and enabling protein networks to bind water differently. That change alters bite, sliceability, and the finished product’s juiciness.
Color changes in cured products often involve nitrite chemistry reacting with myoglobin. For background on the muscle pigment, see myoglobin. When nitrite is used, it stabilizes cured color and affects flavor.
Practical steps for safe, repeatable salt curing
Measure by weight. Use a gram scale to calculate percent salt relative to meat weight; common dry-cure rates for preservation range from 2% to 3.5% depending on product and desired outcome.
Control storage conditions. Most home cures require chilling at 0–4 °C (32–40 °F) during processing to limit growth of unwanted microbes and to keep enzymatic activity predictable.
[p]
Expert Insight
Curing additives and modern adjustments in salt curing
Sodium nitrite remains a controlled additive in many cured products because it inhibits anaerobes like Clostridium botulinum and stabilizes color. Use only validated dose tables and follow regulatory limits; the compound is documented on sodium nitrite.
Processors often combine reduced-sodium salt blends with hurdle technologies such as refrigeration, acidification, or modified atmospheres to lower sodium while maintaining safety. Validation and testing remain essential when formulas change.
Method selection: matching salt curing technique to product goals
Choose dry cure for dense, aged products where texture and concentrated flavor matter. Dry cures favor slow moisture loss and encourage firmer slices over time.
Choose brine or injection for quicker, uniform salt distribution in larger or thicker cuts. Injection offers speed and consistent salt profile, but requires precise brine recipes and equipment to avoid pockets or over-salting.
Monitoring and control: critical parameters for salt curing
Track three variables: salt percent by weight, time, and temperature. Document each batch so you reproduce successful outcomes and spot deviations quickly.
Use calibrated thermometers and scales. Small errors scale up across batches; a 0.2% difference in salt can move a product from safe to borderline for shelf life and sensory quality.
Flavor development and sensory effects of salt curing
Salt concentrates flavors by reducing free water and by changing how proteins and fats release aroma. It enhances perceived saltiness and umami while modifying mouthfeel through protein binding.
Extended cures and controlled fermentations let enzymes and selected microflora build complexity. Many classic products—prosciutto, pancetta, and gravlax—use time and specific microflora to develop depth.
Balancing taste and health in salt curing
Cured meats can be high in sodium. Mitigate intake by reducing portion size, choosing lower-sodium formulations, or pairing cured items with vegetables and whole grains to balance a meal.
Manufacturers increasingly test partial-sodium substitutes and adjust process controls to maintain microbial safety while lowering sodium. Always review product labels for sodium and additive content.
Pro-Caution
Handy checklist before you start salt curing
Measure everything by weight. A gram-scale and percentage calculations give repeatable results.
Plan chilling and storage. Maintain cold-chain control throughout the cure and aging period to limit unwanted growth and errant fermentation.
Follow validated recipes for nitrite use, if any. Safety is formula-driven—consult institutional cure tables and published protocols when in doubt.
Document time, temperature, salt percent, and sensory checks. Good records make troubleshooting and scale-up practical.
Start small, observe texture and moisture changes daily, and adjust based on measured outcomes. Visual cues—firmness, reduced surface moisture, and uniform color—indicate salt migration and progress.
Common questions about salt curing
How quickly does salt curing preserve meat?
Salt begins reducing surface water immediately, but full penetration depends on grain size, meat thickness, and method. Dry cures typically take days to weeks; brining acts faster but still requires controlled time and temperature for safety.
Expect at least one day per kilogram for many traditional dry cures under typical household conditions; thicker cuts and colder temperatures extend that timeline.
Does sea salt preserve meat differently than table salt in salt curing?
All sodium chloride preserves via the same chemical mechanism. Differences in grain size and trace minerals affect cure rate and flavor nuance, not the fundamental preservative action.
Choose grain size to match the method: fine for quick penetration, coarse for gradual curing and tactile seasoning during handling.
Can salt curing replace refrigeration?
Historically, salt extended storage before refrigeration. Today, salt curing complements refrigeration but rarely replaces it for long-term safety except in strictly validated, low-moisture products.
Combine salt curing with cold storage for predictable safety and the best sensory results, especially when nitrite is not used.
Are cured meats safe to eat every day?
Moderation is sensible. Regular intake of high-sodium or nitrite-containing products can carry health considerations. Balance consumption with dietary choices and pay attention to portions.
When preparing cured meat at home, favor tested recipes and limit frequent consumption of high-sodium items in the diet.
Where can I learn validated salt curing recipes?
Use sources that publish tested, weight-based recipes: culinary-school manuals, accredited food-science textbooks, and government food-safety publications. These resources provide cure tables and validated formulas for nitrite and salt percentages.
Document each attempt, compare outcomes to the documented tables, and scale up only after consistent results across batches.
See also: salt, osmosis, food preservation, sodium nitrite
Salt curing remains a precise, measurable method for preserving meat when practitioners apply correct salt percentages, maintain temperature control, and follow validated additive rules. Use measurement, maintain records, and consult authoritative cure tables for safe, repeatable results.
Expert Insight
See also: salt curing
]]>
- Key takeaway: Brining increases moisture retention and seasons muscle fibers from the inside out.
- Key takeaway: Salt concentration, time, and temperature drive reliable outcomes; aromatics refine the profile.
- Key takeaway: Use wet or dry brines according to desired texture and finish; follow safety and timing guidelines.
How brining works
Brining relies on physical processes—primarily osmosis and diffusion—to move salt and water into tissue. The mechanics are straightforward and predictable when you control concentration and time.
Salt first draws some surface fluids out, which mix with the brine solution and then re-enter the muscle. This exchange alters protein structure and increases the meat’s ability to hold water.
Osmosis and protein interaction
Osmosis explains the initial movement of water; salt gradients cause liquid to shift across membranes until equilibrium forms. Read a concise primer on osmosis for the fundamental physical principle.
At the molecular level, salt partially denatures surface proteins so they bind water more effectively. That slight unfolding creates a network that traps moisture and helps the muscle stay tender during cooking.
Wet brine vs dry brine: choose by finish
Wet brines immerse food in a saltwater solution and are ideal when you want added water and uniform seasoning. They benefit large cuts and whole birds by increasing overall mass and juiciness.
Dry brines use salt rubbed on the surface and rely on the meat’s own juices to dissolve and redistribute salt. Dry brining concentrates flavor and favors crisp skin or crust because it avoids adding extra surface moisture.
For structured guidance on methods and step sequences, consult internal resources like brining techniques which outline equipment and timing for home cooks.
Practical brine recipes and timing
Measure salt by weight for repeatability, not by eye. A reliable starting point: 5-7% salt by weight for wet brines and a thin, even coating for dry brines on whole poultry.
Time scales vary by size. Small cuts need minutes to a few hours, mid-size roasts need several hours, and whole poultry often benefits from 8–24 hours depending on density.
| Item | Salt ratio (wet brine) | Typical time |
|---|---|---|
| Chicken pieces | 5% (50 g salt per liter) | 1–4 hours |
| Whole chicken | 6% (60 g/L) | 8–12 hours |
| Pork chops | 5–6% (50–60 g/L) | 2–6 hours |
| Large roast | 5–6% (50–60 g/L) | 12–24 hours |
Aromatics and flavor add-ins
Simple aromatics—garlic, peppercorns, citrus peel, bay leaf—add volatile compounds that infuse during the soak. Sugar balances salt and supports better browning via the Maillard reaction when roasting; learn more about that process on Maillard reaction.
Use small quantities of strong aromatics to avoid overpowering the primary ingredient. Test combinations on small portions before scaling up for a full roast.
Expert Insight
Start with a baseline recipe and iterate. For example, a basic brine of 50 g kosher salt and 25 g sugar per liter of water covers most poultry and pork cases reliably.
Safety and common mistakes
Keep brining food refrigerated at or below 4 °C (40 °F) to prevent bacterial growth. Always use a non-reactive container, such as food-grade plastic, stainless steel, or glass, to avoid metallic off-flavors.
Rinse only if needed. After wet brining, pat meat dry thoroughly to promote browning. Over-rinsing wastes seasoning; instead, blot and rest before cooking for a correct surface texture.
Pro-Caution
Avoid too-long brine times on delicate proteins like fish; they require far less exposure than tougher cuts. For vegetarian proteins like tofu, use shorter brine times and adjust salt down significantly to prevent collapse.
Mastering texture and finish
To optimize texture, combine brining with appropriate cooking techniques: high heat searing, controlled roasting, or quick frying depending on cut. Brining sets the stage, but technique delivers the finish.
Salt type matters. Table salt, kosher salt, and sea salt differ by density; convert by weight for accuracy. For a quick reference on the mineral, see salt properties and culinary uses.
When crisp skin is the goal, dry-brine and refrigerate uncovered for several hours to dry the surface. When juicy interior trumps crust, wet brine then dry thoroughly before high-heat cooking.
For recipe testing and step-by-step examples, refer to internal guides like brined chicken recipe and staging notes on brine-to-cook transitions.
FAQ
What is brining and why use it?
Brining is soaking food in a salt solution to improve moisture retention and seasoning depth. It modifies protein structure so cooked meat releases less liquid and tastes seasoned through, not just on the surface.
How does the science translate to cooking results?
Salt and water move in predictable ways; proteins hold more water after partial denaturation, and surface seasoning penetrates inward. These measurable changes yield juicier texture and balanced flavor when you control variables.
Which is better: wet brine or dry brine?
Neither is universally better; choose based on desired outcome. Use wet brines to add moisture and even seasoning for large cuts. Use dry brines to concentrate flavor and achieve crisper skin.
How long should I brine different foods?
Times vary: vegetables and small cuts often need minutes to a few hours, poultry and roasts need several to many hours. Use the table above as a starting point and adjust for thickness and salt type.
Are there foods that should not be brined?
Delicate fish and some shellfish can become too soft with prolonged brining; brine cautiously and briefly. Highly processed or pre-salted products (like smoked ham) do not need additional brining unless a recipe explicitly calls for it.
Understanding the physical principles and practicing precise measurements gives you reproducible, restaurant-level results at home. Apply these seven core secrets—control salt by weight, match time to mass, pick the right brine type, add aromatics sparingly, keep food cold while brining, dry surfaces for crispness, and always test on small pieces before scaling up—and you will consistently unlock superior flavor and texture.
See also: Brining
]]>