- Slow cooking converts collagen into gelatin, creating moist, silky meat.
- Control of temperature and time matters more than exact seasonings.
- Sear first to build flavor, then finish low and slow for tenderness.
- Rest and slice against the grain for the best mouthfeel.
Understanding Connective Tissue and Its Transformation
Tough cuts are tough because they contain dense connective tissue and more collagen. These proteins give muscles structure for movement, which is why shoulder, shank and brisket are economical but firm.
When you apply steady, low heat, collagen denatures and becomes gelatin. That gelatin dissolves into the cooking liquid, improving mouthfeel and moisture retention.
The Role of Collagen Breakdown in Tenderizing Tough Cuts
Collagen is the structural protein that keeps fibers bound. Over hours at low temperatures, collagen hydrolyzes into gelatin, which feels silky and coats meat fibers.
As gelatin forms, it also thickens the braising liquid and traps juices close to the meat. That dual effect both tenderizes and boosts savory depth.
Optimal Temperature and Timing for Maximum Flavor Extraction
Temperature control is decisive. Aim for steady heat that allows collagen to dissolve without drying muscle fibers; typically that means oven or slow-cooker ranges where liquid simmers gently.
For many large cuts, plan on 6–12 hours depending on size and connective tissue. Use an instant-read thermometer and focus on feel: when the meat yields easily to a fork, collagen has softened sufficiently.
Choosing the Right Cuts and Enhancing Flavor
Select cuts with visible connective tissue and a tone of marbling: beef brisket, chuck roast, pork shoulder, lamb shanks and oxtail perform predictably. Those cuts respond to low heat and long time because they have the collagen to convert.
Marinades with moderate acid—vinegar or citrus—help tenderize the surface before cooking. Also, apply a dry rub and sear to develop the Maillard reaction for deeper flavor; learn more about the Maillard reaction to use heat to your advantage.
Practical Recipe & Timing Details
This section converts the science above into a practical plan for a classic slow-cooked brisket. Follow the sequence: season, sear, braise slowly, rest, then slice against the grain.
For more technique notes, visit our internal guide on slow-cooking basics and check a related brisket build at brisket recipes. These pages expand on tools and vessel choice.
Prep and Cook Time
Preparation: 20 minutes for trimming and assembling a rub. Reserve time if you plan to marinate overnight.
Marinating (optional): 4–12 hours. Cooking: 6–8 hours on low heat; larger pieces need up to 12 hours.
Yield & Difficulty
Serves 6–8 depending on side dishes. Expect some shrinkage during cooking as moisture concentrates.
Difficulty: Medium. The work is front-loaded. After searing and setup, most of the time is hands-off.
Ingredients
The ingredient list below supports a classic savory brisket. Quantities are scalable.
- 3 lb beef brisket, trimmed
- 1 cup beef broth
- 1/2 cup apple cider vinegar
- 2 tbsp olive oil
- 1 tbsp smoked paprika
- 2 tsp garlic powder
- 1 tsp ground cumin
- 1 tsp black pepper
- 1 tsp kosher salt
- 1 large onion, sliced
- 4 cloves garlic, smashed
- 2 bay leaves
Instructions
Follow a three-stage sequence: build flavor, denature collagen, and finish to serve. Each step affects final texture and sauce quality.
- Mix the rub: Combine vinegar, olive oil, smoked paprika, garlic powder, cumin, pepper, and salt. The rub both seasons and primes the surface for searing.
- Apply and rest: Rub the brisket thoroughly. For deeper penetration, refrigerate 4–12 hours. Bring meat to near room temperature before searing.
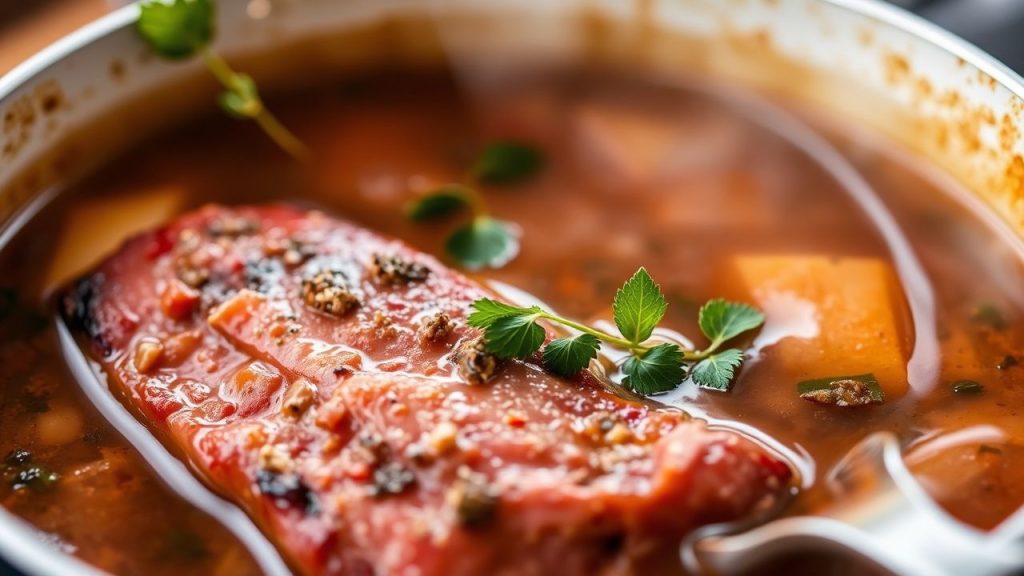
- Sear: Brown brisket on all sides in a hot skillet until a rich crust forms. This step creates flavor compounds that enrich the braise.
- Set up to braise: Place sliced onion and smashed garlic in the bottom of a Dutch oven or slow cooker. Nestle the seared brisket on top, add bay leaves, and pour beef broth around—not over—the meat to preserve the crust.
- Slow cook: Maintain a gentle simmer or use the low setting on a slow cooker. Cook 6–8 hours, or until the meat pulls apart with minimal resistance.
- Rest and slice: Rest 10–20 minutes before slicing against the grain. Resting redistributes juices and improves texture.

 Expert Insight
Finishing touches matter. A light sprinkle of fresh herbs or a squeeze of acid at service can brighten the rich sauce and cut perceived fattiness.
 Pro-Caution
Storage is straightforward: refrigerate leftovers in an airtight container up to 3 days or freeze portions for longer storage. Reheat gently to preserve texture.
Chef’s Notes & Troubleshooting
If meat remains firm after the recommended time, extend the cook rather than increase the heat. Low, additional hours allow collagen to finish breaking down.
Use a fork to test for correct pull: when the fork slides in with little resistance and the meat flakes loosely, it is ready. Overcooking can make thin portions stringy, so consider slicing larger pieces thicker for service.
Variations
Swap proteins to change flavor: pork shoulder and lamb shank behave similarly due to collagen content. Adjust cook time to account for bone-in pieces and shape.
Try adding aromatic vegetables, mushrooms, or a splash of fortified wine to the braising liquid for flavor variation while maintaining the same low-and-slow approach.
Serving Suggestions
Pair slow-cooked brisket with creamy mashed potatoes, polenta, or buttered noodles to match the sauce’s richness. Add a crisp vegetable or a bright slaw for contrast.
Garnish with parsley and a light dusting of smoked paprika to make plates pop visually and to add a final aromatic lift.
| Nutrient | Amount (per serving) |
|---|---|
| Calories | 410 kcal |
| Protein | 38 g |
| Carbohydrates | 6 g |
| Fat | 24 g |
FAQ
Why does slow cooking transform tough cuts into tender meat?
Slow cooking exposes collagen to steady, moderate heat so it can hydrolyze into gelatin. That gelatin lubricates and softens fibers, producing a tender mouthfeel and richer sauce.
What temperatures and internal doneness should I aim for?
Maintain a gentle simmer or use a slow-cooker low setting. Rather than a single internal temperature, judge doneness by tenderness: when a fork meets little resistance and meat pulls apart, it is done.
Are there cuts that should not be slow-cooked?
Lean, tender cuts such as tenderloin or sirloin lack connective tissue and can dry out with prolonged cooking. Reserve slow methods for collagen-rich cuts and use quick, high-heat techniques for lean steaks.
Does searing matter if I plan to cook the meat for many hours?
Yes. Searing builds flavor via surface browning and creates compounds that enrich the braising liquid. The extra 5–10 minutes of searing translates to a deeper finished flavor.
How should I store and reheat leftovers to retain texture?
Cool brisket quickly, then refrigerate in an airtight container up to 3 days. Reheat gently in a low oven with a splash of braising liquid or in a covered skillet to avoid drying the meat.
Embrace the process: time and controlled heat will transform inexpensive cuts into meals with complex aroma and luxurious texture. Use technique, test by feel, and trust patient cooking.
See also: Slow cooking
]]>Fish cooking moves from raw to ready in a fraction of the time required for beef or pork because the tissue architecture, protein chemistry, and water content demand less energy to change state. Chefs and food scientists measure these differences objectively: lower collagen, shorter muscle fibers, and lower denaturation temperatures all speed the process.
- Fish cooking is faster because muscle sheets and less collagen reduce the heat needed to reach tenderness.
- High water content in fish accelerates internal heat transfer and evens temperatures quickly.
- Denaturation thresholds for key proteins are lower, so texture and opacity change at modest internal temps.
Anatomy and composition: the core reasons for fish cooking
Fish muscle consists of short, layered fibers (myomeres) separated by thin connective tissue (myosepta), a layout that fragments into flakes when the proteins denature. This sheet-like architecture shortens the distance heat must travel, so the center of a fillet reaches target temperature quickly.
Fish evolved for buoyancy, not weight-bearing, so their tissues contain much less structural collagen than mammals. Less collagen means less time spent converting tough connective tissue to gelatin, which removes the need for long, slow cooking typical of cuts from land animals.
Muscle structure and collagen
Short fibers and thin myosepta give fish a flaky texture; heat separates those sheets rather than tearing through dense bundles. That mechanical difference is why a fillet flakes at lower temperatures than a steak.
Collagen content in fish is low compared with beef. Consult the authoritative overview on collagen for comparative values and the biochemical role of connective tissue in meat texture.
Protein denaturation temperature
Key muscle proteins in fish begin to denature around 50–60°C (120–140°F), so a fillet turns opaque and firms at modest internal temperatures. This lower thermal threshold explains why brief high-heat searing or short roasting suffices to cook fish through.
Denaturation changes how fibers scatter light and hold water; for technical background see protein denaturation. That explanation links molecular change to the visible cues cooks use every day.
Thermal dynamics and water content for rapid fish cooking
Fish flesh typically contains about 70–80% water, which acts as an efficient heat conductor compared with fat and dense protein. Water conducts heat rapidly by conduction and also buffers the rate of temperature rise through latent heat effects.
As water heats inside the tissue it redistributes energy, helping the interior climb to target temperature with less surface-to-center gradient. For more on the thermal properties of water, see water (molecule).
Fat content and species variation in fish cooking
Not all species cook at identical speeds. Lean white fish such as cod and haddock heat through faster than thick, oil-rich species like salmon or tuna because the former have lower fat volume per unit of tissue.
Fat slows the speed at which internal temperature rises, but it also protects against moisture loss. As a result, fatty fish tolerate slightly longer cooks before becoming dry, even though overall times remain short compared with red meat.
Practical cooking techniques that respect the science of fish cooking
Match method to thickness and fat content. Use high initial heat to form a crust on thin fillets, then reduce or use carryover heat to finish at the target internal temperature without overshooting.
Direct-contact methods such as pan-searing or grilling suit thin pieces and emphasize rapid surface browning. Thicker steaks and whole fish respond well to short roasting, steaming, or a combination of sear-and-oven to ensure even doneness.
Timing and temperature: a practical table for fish cooking
Use a probe thermometer for consistent results; most chefs target 55–60°C (130–140°F) as the sweet spot for texture and juiciness. Adjust times for thickness, starting temperature, and method.
Below is a concise guideline. These are starting points — test with a thermometer and your preferred texture.
| Cut | Method | Time (per side) | Target |
|---|---|---|---|
| Thin fillet (0.5 cm) | Pan-sear | 30–60 sec | 55–60°C |
| Medium fillet (1–2 cm) | Grill / Broil | 2–4 min | 55–60°C |
| Thick steak (2–3 cm) | Roast / Pan & Oven | 4–8 min | 55–60°C |
Texture, flavor, and sensory outcomes in fish cooking
Quick cooking preserves delicate volatile compounds and prevents oil oxidation, which keeps flavor clean and bright. Rapid heating also maintains a tender interior and reduces the risk of the chalky texture that follows overcooking.
Overcooking drives moisture out and collapses protein matrices, producing a dry, firm result. Precision and monitoring are therefore essential when you apply rapid, high-heat methods.
Expert Insight
Resting fish briefly evens the internal temperature and improves juiciness. For thin fillets a short rest of 30–60 seconds is adequate; thicker pieces can rest 2–3 minutes.
How knowing the science improves home fish cooking
Understanding the mechanics behind heat transfer and protein behavior lets you plan cook times and methods that preserve texture and flavor. Choose the technique that matches thickness and fat level to avoid guesswork.
Small, practical steps—patting fillets dry, preheating pans, and using temperature probes—deliver consistent results. These are low-effort changes that yield reliably better fish.
At a molecular glance: why fish cooking completes quickly
At the molecular level, lower denaturation temperatures for sarcoplasmic proteins and less collagen account for a faster structural transition. Heat unfolds proteins more rapidly in fish tissue, changing opacity and firmness earlier in the cook.
These molecular facts explain common observations: thin fillets turning opaque quickly, easy flaking along myomeres, and a delicate mouthfeel when properly timed.
Resources and references
For an anatomy overview that clarifies the sheet-like muscle arrangement in fish, consult fish anatomy. That page helps link structural features to culinary outcomes.
For further reading on the physical chemistry behind cooking and water’s role in heat transfer, the references on water (molecule) and protein behavior provide accessible, authoritative context.
Pro-Caution
FAQ
Does thickness always determine cooking time?
Yes. Thickness is the primary determinant because heat must travel to the center. Thinner pieces cook quickly; thicker cuts need more time or gentler methods to reach even doneness.
Always use a thermometer on thick pieces and adjust methods—sear-and-oven or steam—so the exterior does not overcook before the center reaches target temperature.
Is there a universal internal temperature for fish cooking?
Most chefs and food scientists recommend 55–60°C (130–140°F) as an optimal range for texture and moisture retention. This range works for most fillets and steaks, but some species and safety guidelines differ.
When safety is a concern (for certain species or susceptible populations), follow authoritative food-safety recommendations for higher target temperatures or validated treatments.
Why does fish become opaque when cooked?
Opacity results from protein denaturation and the rearrangement of muscle fibers that changes how light scatters. This visual cue reliably indicates structural change when combined with temperature verification.
Use both visual and temperature checks so you avoid undercooking or overcooking based solely on appearance.
Can I use slow cooking methods for fish cooking?
Yes—gentle poaching and low-temperature sous-vide produce silky textures for delicate species. However, fish does not benefit from long braises meant for high-collagen cuts; those methods are unnecessary and may degrade delicate flavors.
Choose slow methods only when the goal is a particular texture produced at low temperatures, and monitor internal temperature closely.
How do I prevent fish from sticking to the pan?
Pat the surface dry, preheat the pan until it is hot, and use a small amount of oil. Let a crust form before flipping; that crust detaches the flesh and reduces tearing.
Also choose the right tool: a thin, wide spatula helps lift delicate fillets without breaking them.
See also: fish cooking
]]>