- Pellicle protects surfaces by reducing water loss and moderating microbe contact.
- It affects flavor on roasted coffee and smoked proteins by changing surface chemistry.
- Simple steps — airflow, dry time and gentle handling — encourage strong pellicle formation.
- Applications span culinary preservation, smoking technique, and material science research.
What is a pellicle?
A pellicle is a micron-scale layer formed when proteins, lipids or polysaccharides adhere to a surface and reorganize. Think of it as a molecular skin: thin, coherent and functional.
The term covers a range of surface films. In biology this overlaps with concepts like biofilm and dental plaque, while in food systems it describes protective films that appear on produce and roasted seeds.
Where pellicles form
Pellicles form wherever surface materials supply binding compounds and drying conditions encourage adhesion. On fruit, cuticle components and natural waxes reorganize to reduce moisture loss and block pathogens.
On roasted or dried seeds, such as the coffee bean, surface sugars and cell-wall fragments consolidate and change how the bean releases volatiles during roasting and extraction. See the coffee seed context via coffee bean.
Protein surfaces — fish, poultry and cured meats — develop a tacky, matte pellicle when dehydrated briefly. That pellicle improves smoke pickup and seals some internal moisture during cold smoking. For formal technique on smoke applications, consult the smoking overview at smoking (cooking).
Practical kitchen applications
When chefs encourage pellicle formation they control two outcomes: surface adhesion and flavor development. The pellicle increases adhesion for smoke particles and reduces the rate of dehydration during low-temperature processing.
Applied properly, pellicles let you cold-smoke fish with better surface texture and more even smoke flavor. They also preserve roasted-bean aromatics during storage and grinding. For related guidance, see our internal note on coffee flavor profiles.
 Expert Insight
Pellicle handling matters. Gentle movement and minimal touching keep the film intact. Damaged pellicles expose softer tissue to oxidation and microbial access, so plan handling and storage accordingly.
Prep and Cook Time
Preparation: 15 minutes active time for set-up; drying varies by product. Expect 1–72 hours depending on humidity and material. Short, controlled drying favors pellicle that remains flexible rather than brittle.
Cook Time: If you cold-smoke, keep temperatures low (below ~32°C/90°F). Hot-smoking timelines differ; pellicle value is chiefly for cold or low-temperature smoke phases.
Yield
Typical home yields adapt to the ingredient: one pound of filleted fish serves four. Coffee applications vary: two cups of cherry/bean input yields roasted output based on roast loss and processing method.
Scaling pellicle techniques uses the same drying principles. Increase rack area and airflow rather than enlarging enclosed containers to keep consistent results.
Difficulty Level
Medium: the technique requires attention to timing, humidity and handling. It rewards precision; small changes in humidity can shift the pellicle from tacky to brittle.
Start with simple experiments: one tray of fish and one tray of roasted beans to compare drying times in your environment. Record times and outcomes for repeatability.
Ingredients
Ingredients vary by use case. For combined coffee and fish practice, use fresh, high-quality inputs for consistent pellicle chemistry.
- Fresh coffee cherries or beans – 2 cups, preferably naturally processed.
- Whole fish with skin on – 1 lb fillets (salmon, trout).
- Salt – 1 tablespoon; helps surface dehydration and flavor.
- Raw sugar – 2 tablespoons; optional for balancing surface chemistry.
- Water – for rinsing, when needed.
- Cold-smoker chips – optional for smoke applications.
Instructions
Start by preparing clean, dry racks that allow air access above and below the product. Remove damaged fruit or fruit that shows mold; such material compromises surface chemistry and pellicle formation.
For coffee cherries: sort and wash, then lay on breathable racks in shade with steady ventilation. Aim for gradual drying that concentrates sugars and surface polysaccharides without scorching the skin.
- Prepare fish: Rinse and pat dry. Rub salt and sugar on the skin. Leave uncovered, skin-side up, on a rack in the fridge for 1–3 hours.
- Look for cues: A slight matte sheen and tackiness indicate a pellicle ready for smoking or further processing.
- Roast or smoke: If smoking, implement cold-smoking technique below 32°C/90°F to protect the pellicle and preserve delicate textures.
- Store properly: Maintain low humidity and cool temperatures. Wrap loosely in parchment to allow minimal airflow while limiting rapid moisture loss.
Experiment with pairing pellicle-formed items: smoked fish with citrus zest, or roasted beans integrated into baked goods for depth. The film modifies surface release of aromatic compounds and can enhance mouthfeel.
Tips for Success
Ensure even airflow. Use wire racks and avoid plastic coverings while the pellicle forms. Moving air prevents localized humidity pockets and uneven film formation.
Timing is critical. Over-drying produces brittle pellicles that flake; under-drying yields a weak film that will not hold smoke particles or preserve flavors effectively.
 Pro-Caution
Substitutions: The same principles apply broadly—proteins, fruit, seeds and fermented products can show pellicle-like films. Adjust drying times for product thickness and ambient humidity.
Storage handling: Handle pellicle-coated items gently. Excessive handling abrades the film and diminishes the protective and flavor benefits it provides.
Serving Suggestions
Present pellicle-enhanced fish thinly sliced so the surface sheen remains visible. Garnish with herbs and a bright acid to contrast the richer, smoke-influenced flavor.
For coffee, grind beans with pellicle intact close to brew time to preserve aromatic oils. Serve alongside lightly toasted bread or subtly pickled vegetables to balance mouthfeel and acidity.
For creative cocktails, infuse cold-brew syrups made from pellicle-affected beans to add layered complexity and deeper aroma notes.

| Nutrient | Per Serving (approx.) |
|---|---|
| Calories | 180 kcal |
| Protein | 25 g |
| Carbohydrates | 2 g |
| Fat | 8 g |
For further reading on related surface and preservation science, consult overview entries on fruit structure and tooth enamel, which provide background on surface biology that parallels pellicle behavior.
FAQ
What exactly forms a pellicle?
Proteins, lipids and polysaccharides from a material’s surface or environment bind and reorganize into a continuous film. Environmental factors — temperature, humidity and airflow — govern the film’s thickness and strength.
How can I tell when a pellicle is ready?
Look for a matte, slightly tacky surface that resists gentle rubbing. For smoked proteins, that tack improves smoke adhesion; for roasted beans, a consolidated surface signals stable volatile retention.
Are pellicles safe?
Yes, when formed on fresh, healthy ingredients and handled correctly. Avoid forming pellicles on spoiled or moldy material, and maintain cold-chain or refrigeration for perishable items.
Can I speed up pellicle formation?
Speed changes with humidity and temperature. Slightly increased airflow and controlled salt or sugar application can accelerate surface drying, but avoid high heat that damages delicate tissues.
Do pellicles affect flavor?
They do. Pellicles change how volatile compounds escape and how smoke particles adhere, altering aroma and mouthfeel. Many chefs use pellicle formation as an intentional flavor tool.
For applied methods and recipes, review our internal materials on food preservation and coffee flavor profiles to integrate pellicle practice into regular kitchen workflows.
See also: Pellicle
]]>
- Fat shields food: it limits air exposure and slows spoilage.
- Fat softens proteins: it infiltrates fibers and helps break down collagen.
- Fat amplifies flavor: it stores and releases aroma compounds efficiently.
- Use technique: rendering, basting, and emulsifying maximize fat’s benefits.
How fat preserves food
Fat creates a physical barrier that reduces exposure to oxygen and microbes. When you coat or confit food in fat, you slow oxidation and dehydration and extend shelf life.
Animal fats and vegetable oils differ in stability and flavor. For context on animal-derived fats, see animal fat and refer to rendering techniques in our rendering fat guide.
How fat tenderizes meat
Fat penetrates muscle and connective tissue during slow cooking. It lubricates fibers and helps heat break down collagen into gelatin, which yields a tender bite and a richer mouthfeel.
Heat and time govern this process: low-and-slow methods let fat migrate and collagen dissolve without toughening proteins. For theory on fats and cell structure, see lipid basics.
Practical recipe and timing
This section pairs the science with a tested roast recipe that demonstrates preservation and tenderizing in practice. Follow technique closely: sear, slow-cook, and finish with a fat-based sauce.
Prep and cook times suit a medium-complexity home project. The method stresses fat management—render, retain, and integrate fats to gain both shelf stability and texture.
Prep and Cook Time
Prep Time: 20 minutes. Cook Time: 40 minutes. Use active heat control during searing to avoid burning the fat.
Total Time: 1 hour. Resting time counts toward final tenderness; do not skip rest.
Yield
Serves 4 generously. Portioning influences reheating and preserving outcomes; slice and store with a thin fat layer to extend freshness.
Leftovers keep better when covered with sauce or fat and chilled promptly.
Difficulty Level
Medium. This recipe requires basic searing and an understanding of low-heat braising. Maintain steady, low oven or stovetop temperature to let fat do its work.
Recommended for cooks ready to refine technique. See our companion notes on choosing fats in best fats for cooking.
Ingredients
Use well-marbled cuts and quality fats to maximize preservation and tenderness. Quality of fat affects flavor, melting behavior, and stability during cooking.
- 1.5 lbs (680 g) beef chuck roast, well-marbled
- 2 tbsp unsalted butter, softened
- 2 tbsp olive oil
- 3 garlic cloves, minced
- 1 tbsp fresh rosemary, chopped
- 1 tsp smoked paprika
- Salt and freshly ground black pepper, to taste
- 1 cup beef broth, low sodium
- 2 medium onions, sliced thin
- 1/2 cup heavy cream
Note: if you avoid dairy, substitute suitable plant fats with stable behavior under heat. See the notes below for alternatives.
Instructions
Sequence matters. Dry the meat, season it, sear to develop crust, then slow-cook with retained fat to allow penetration and collagen breakdown.
Finish by enriching pan juices with cream or additional butter for mouthfeel. Strain and cool properly if you plan to store the dish under a protective fat layer.
- Prepare the beef: Pat the roast dry and season with salt, pepper, smoked paprika, and half the rosemary to ensure even seasoning.
- Heat the fat base: Warm olive oil and 1 tbsp butter in a heavy skillet until shimmering. A fat blend helps flavor and browning performance.
- Sear the beef: Sear on all sides until a deep golden-brown crust forms, about 3–4 minutes per side. Browning concentrates flavor via the Maillard reaction.
- Sauté aromatics: Reduce heat to medium and cook garlic and onions until soft and caramelized, about 6–8 minutes. The fat carries aromatic compounds into the sauce.
- Deglaze with broth: Add beef broth to lift fond and dissolve concentrated flavors. Stir and scrape the pan bottom to incorporate browned particles.
- Slow cook and infuse: Return beef with rendered fat. Cover and simmer gently or use a 300°F (150°C) oven for 30–40 minutes until fork-tender. Slow heat allows fat to penetrate fibers and collagen to convert to gelatin.
- Finish the sauce: Remove the beef to rest. Stir cream and remaining butter into pan juices and reduce until slightly thickened for a silky finish.
- Serve: Slice against the grain and spoon sauce over the meat. Garnish with the remaining rosemary for a fresh contrast.
Chef’s Notes
Choose fats based on desired flavor and melting point. Butter adds sweetness and gloss; olive oil contributes a fruity note and stability.
Animal fats like lard and tallow perform well for sealing and preservation. For more on emulsions and fat behavior, consult the emulsifier reference.
- For dairy-free cooking, use coconut milk and refined coconut oil for richness and mouthfeel.
- Always rest meat after cooking to let juices and fat redistribute; this step increases tenderness and juiciness.
- Use well-marbled cuts for maximum natural fat; for lean cuts, consider adding rendered pork fat or frequent basting.
Expert Insight
When storing, cool food quickly and keep below 5°C to limit bacterial growth. Fat reduces oxidation but does not replace proper refrigeration.
Pro-Caution
Serving suggestions
Serve slices over buttered mashed potatoes or roasted roots to complement richness. Fresh herbs or a dressed bitter green cuts through fat and refreshes the palate.
Light vinaigrettes, pickled vegetables, or acid-based condiments balance the dish and reduce the perception of heaviness while highlighting tender texture.
Nutritional snapshot
This recipe yields a high-protein, moderate-carbohydrate plate with substantial fat content. Tailor portions and fat choices to fit dietary goals.
| Nutrient | Amount per Serving |
|---|---|
| Calories | 530 kcal |
| Protein | 45 g |
| Carbohydrates | 8 g |
| Fat | 35 g |
Explore related technique articles such as our rendering fat guide and a primer on choosing cooking fats for further skill-building.
FAQ
Why does fat improve flavor?
Fat dissolves and carries flavor compounds, releasing them as you eat. This transport of volatile aromas makes herbs, spices, and browned surfaces more intense.
Fats also coat the tongue, prolonging flavor release and enhancing perceived richness.
How does fat slow spoilage?
When food is submerged in or coated with fat, the surface sees less oxygen and moisture loss. This reduces oxidative rancidity and surface dehydration.
Combine fat coverage with refrigeration for safe, extended storage; fat alone is not a sterilization method.
Which fats are best for slow cooking?
Choose fats with stable melting behavior and a flavor that complements the dish. Tallow, lard, butter, and medium-stability vegetable oils all work, depending on taste goals.
For neutral preservation use rendered animal fats; for aromatic results, select olive oil or butter according to the recipe.
Can I get tenderness without high fat content?
Yes. Acids, enzymes, mechanical tenderizing, and proper low-and-slow heat also break down connective tissue. Fat accelerates lubrication and mouthfeel but is not the sole route to tenderness.
Combine modest fat with acids or slow braise to turn lean cuts into tender dishes.
Where can I learn more about fat chemistry?
Authoritative resources include texts on lipid chemistry and culinary science. For quick reference on rendering methods and emulsification, see the linked Wikipedia pages for rendering and emulsification.
Apply tested technique frequently to refine your sense of fat behavior across recipes.
Fat remains a tool. Use it with intention: select the right type, control temperature, and apply storage best practices to preserve and tenderize reliably.
See also: Fat
]]>Mastering Safety: How to Test Your Pressure Canner Gauge Right
Accurate pressure readings keep home-canned food safe. Testing your pressure canner gauge is a technical task you can complete reliably with the right tools and a careful method.
- Key takeaway: Verify gauge accuracy against a calibrated standard before major canning projects.
- Safety rule: Replace or recalibrate gauges that deviate more than ±2 psi from the standard.
- Maintenance tip: Log calibration dates and results for ongoing reliability.
- Resource note: Follow manufacturer procedures and extension-service testing when available.
Why test your pressure canner gauge?
Pressure canning depends on precise internal pressure to destroy harmful microorganisms. An inaccurate gauge can cause underprocessing, which risks foodborne illness and spoilage.
Testing prevents that risk and protects your produce, jars, and time. For context on the method and history of food preservation, review the concept of canning (food preservation).
Tools and preparation
Gather a calibrated testing device (dial gauge tester or standalone calibrated pressure gauge), tools for small adjustments, a notebook, and water. Use a reliable heat source and follow the canner manufacturer’s safety checklist.
Maintain two internal references for follow-up reading: first, a written log of baseline readings; second, a photographic record if you prefer. For maintenance guidance, check our internal guides: Pressure Canner Maintenance and Home Canning Tips.
Step-by-step calibration process
Work methodically: prepare the canner, attach the calibrated tester, run the canner to several target pressures, and compare readings. Keep every test run controlled and repeatable.
Record readings at each target pressure (commonly 10, 15, and 20 psi). Use the calibration data to decide whether to adjust the gauge or replace it.
Step 1 — Prepare the canner
Clean and inspect the canner and lid. Add about two inches of water to simulate normal canning conditions and verify seals and vents are clear.
Lock the lid and follow the manufacturer’s instructions for initial venting. Purging air stabilizes readings and mirrors real canning cycles.
Step 2 — Attach the calibrated gauge
Mount the calibrated tester to the vent port or to the test port if your canner has one. Use fittings specified by the tester and canner manuals to avoid introducing leaks.
Confirm the connection is tight and the tester’s zero point matches atmospheric pressure before heating. For technical background on pressure behavior, refer to pressure (physics).
Step 3 — Heat and compare at target pressures
Heat gradually and watch both the canner gauge and the calibrated device as pressure rises. Target common canning setpoints such as 10 and 15 psi based on your recipe and altitude.
Record each pair of readings when stable. If the canner gauge differs more than ±2 psi from the calibrated device, mark that pressure level as out-of-tolerance.
Step 4 — Adjust or replace
If your gauge is adjustable, follow the manufacturer’s adjustment procedure. Use small turns and re-test after each adjustment to avoid overcorrection.
If adjustments do not bring readings within the acceptable range, replace the gauge with a new, calibrated unit. Always verify the new gauge with the calibrated tester before regular use.
Troubleshooting and maintenance
Common faults include a needle that sticks, erratic needle movement, or a needle that reads zero under pressure. These often indicate mechanical failure or internal contamination of the gauge.
Routine care preserves accuracy: avoid knocking the gauge, keep the casing dry, and store the canner in a stable environment. If you drop the gauge, test it immediately before the next canning session.
Expert Insight
Follow a testing schedule. Most extension services recommend annual checks or immediate testing after any impact, visible damage, or unusual reading.
Pro-Caution
Calibration acceptance criteria and recordkeeping
Use ±2 psi as the operational acceptance band for most home canners. At 10 psi, acceptable reads are 8–12 psi in extreme cases, but aim for 9.8–10.2 psi under controlled testing.
Keep a written or digital log of calibration events, date of test, readings, adjustments made, and gauge serial numbers. This record supports safety and helps you track gauge performance over time.
| Pressure Level (psi) | Expected Gauge Reading | Action if Off |
|---|---|---|
| 10 psi | 9.8–10.2 psi (target) | Adjust or replace if outside ±2 psi after attempts |
| 15 psi | 14.8–15.2 psi (target) | Recalibrate and retest; replace if unstable |
| 20 psi | 19.8–20.2 psi (target) | Prefer replacement if adjustment fails |
Practical tips from professionals
Test at the start of the canning season and after any service event. Many extension offices or manufacturers offer bench testing if you want an independent check.
Label new gauges with the calibration date and next due date. Treat the gauge as a precision instrument; store it where it won’t freeze or get bumped.
Chef’s Notes: Tips for Success
Follow manufacturer torque specs when tightening fittings. Over-tightening can stress threads and cause leaks; under-tightening causes inaccurate test conditions.
When possible, perform a control run with water only before processing food. This practice checks overall canner function and verifies the gauge under load.
Resources and further reading
For standards and guidance on home canning safety, consult the USDA and university extension recommendations. The USDA publishes tested pressure canning methods you can follow for specific foods.
For broader context about pressure cookers and related equipment, see the general article on pressure cookers and how they operate. For official U.S. guidance, review the United States Department of Agriculture resources and recommendations.
FAQ
Below are the most common questions home canners ask about gauge testing. Each answer is practical and action-oriented so you can act with confidence.
How often should I test my pressure canner gauge?
Test at least once a year and after any impact, mechanical service, or if readings look unusual. Annual testing balances safety with practical scheduling.
If you can, test before the heavy canning season and log the result for future reference.
Can I test my gauge at home without special tools?
Perform a basic operational check at home by running a water-only cycle and observing needle behavior. This checks for sticking or erratic movement but does not confirm absolute accuracy.
For true calibration, use a calibrated external gauge or a professional service that compares your gauge to a traceable standard.
What tolerance is acceptable for a canner gauge?
Accept ±2 psi as a practical tolerance for home canning. Aim to see readings within 0.2 psi of the calibrated standard during controlled tests whenever possible.
Consistent deviations indicate recalibration or replacement is necessary; do not guess during processing.
My gauge sticks intermittently. Can I fix it?
Intermittent sticking often indicates internal contamination or mechanical wear. You can try gentle cleaning if the manufacturer allows disassembly, but replacement is safer if the problem recurs.
After any cleaning or repair, run a full calibration check before using the canner for food processing.
Where can I get a professional calibration?
Contact the canner manufacturer, a local extension office, or a certified test shop. Many university extension services provide or recommend reliable testing resources.
Maintain contact details of services in your calibration log so you can schedule timely checks when needed.
See also: Pressure canner
]]>
- Control pH and temperature to slow spoilage and enzymatic browning.
- Use natural antioxidants like citrus and herbs to extend color and flavor.
- Pack smart with insulated coolers and airtight containers for safe transport.
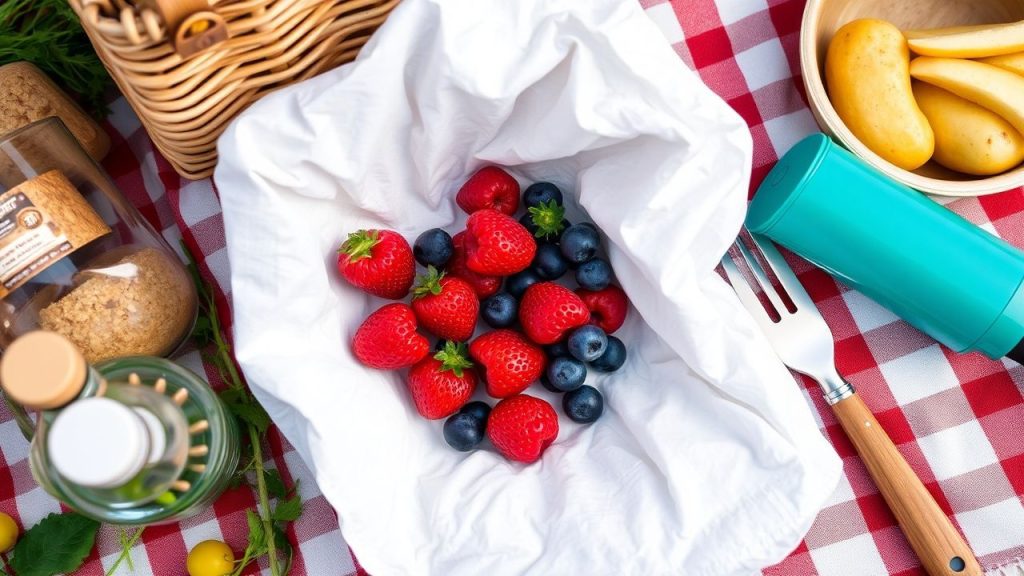
Understanding Food Preservation Chemistry for Picnic Freshness
Preservation relies on predictable chemical levers: acidity, water activity, and antioxidant presence. Controlling these variables slows microbial growth and enzymatic reactions that cause spoilage.
For example, citric acid lowers surface pH to reduce enzymatic browning in fruits. For deeper context, consult food preservation principles that underpin many traditional and modern methods.
Expert Insight
Prep and Cook Time
- Preparation: 20 minutes
- Cooking: 15 minutes
- Total: 35 minutes
Yield
- Servings: 4 picnic portions
Difficulty Level
- Easy to Medium – Practical for home cooks seeking reliable results
Ingredients
- 1 cup cooked quinoa, cooled to room temperature
- 1/2 cup cherry tomatoes, halved
- 1/4 cup fresh basil, finely chopped
- 1/4 cup diced cucumber, drained
- 1/4 cup crumbled feta cheese
- 2 tablespoons extra virgin olive oil
- 1 tablespoon fresh lemon juice
- 1 teaspoon honey
- Salt and freshly ground black pepper, to taste
- 1 teaspoon fresh rosemary, minced
- 1/2 teaspoon ground turmeric (antioxidant benefits)
Instructions
- Combine the base: Gently fluff cooked quinoa with a fork to prevent clumping.
- Add vibrant veggies: Stir in cherry tomatoes, diced cucumber, and fresh basil so ingredients distribute evenly.
- Infuse flavor and preservation: Whisk olive oil, lemon juice, honey, minced rosemary, turmeric, salt, and pepper until emulsified.
- Marinate the salad: Pour the dressing over the quinoa and toss to coat all pieces thoroughly.
- Incorporate feta: Fold in crumbled feta gently to avoid breaking the curds.
- Chill for freshness: Cover and refrigerate at least 30 minutes. The acidity and antioxidants will meld flavors and slow spoilage.
- Pack strategically: Store the salad in an airtight container and keep it cold until serving.
Packing, Temperature Control and Safety
Temperature controls drive microbial kinetics. Keep perishable items at or below 4°C (40°F) to slow bacterial growth and enzymatic reactions.
Practical tools include insulated coolers, reusable ice packs, and partitioned containers to prevent cross-contamination. For engineering context, review the physics of refrigeration which explains how heat transfer keeps food cold.
Pro-Caution
Flavor Chemistry and Culinary Techniques
Heat-driven reactions, like the Maillard reaction, create the complex aromas and brown crusts we associate with grilled foods. Controlling time and temperature optimizes flavor without overcooking.
Learn more about the underlying reaction at the Maillard reaction. Meanwhile, emulsification stabilizes dressings; an emulsion forms when you bind oil and water with a surface-active agent.
For stable picnic dressings, use mustard or egg yolk as emulsifiers. These molecules present both hydrophilic and hydrophobic ends, so they bridge oil and aqueous phases and prevent separation. A concise primer is available at the emulsion entry.
Tips for Success
- Use cooled grains: Warm quinoa raises container humidity and encourages spoilage.
- Adjust acidity: Add lemon juice when packing in heat to improve shelf life.
- Herbal antioxidants: Rosemary, thyme, and turmeric provide phenolic compounds that slow oxidation.
- Make ahead: Prepare up to 12 hours in advance for flavor melding, but keep chilled.
- Keep cold: Use insulated coolers and maintain core temperatures under 4°C (40°F).
Serving Suggestions
Present the quinoa salad in clear bowls to highlight color contrast and garnish with basil leaves for aroma and visual appeal. Pair with crusty bread or grilled proteins to complete the meal.
For portion control and reduced waste, pack single-serve airtight containers. This minimizes repeated opening and limits oxygen exposure, which slows oxidative spoilage.
| Nutrient | Per Serving |
|---|---|
| Calories | 210 |
| Protein | 6g |
| Carbohydrates | 22g |
| Fat | 11g |
For readers wanting advanced packaging and temperature control techniques, focus on materials that reduce heat transfer and oxygen ingress. Practical changes extend shelf life without complex equipment.
Q&A
This Q&A addresses common chemistry questions that influence picnic safety and flavor. Each answer cites core chemical mechanisms and practical steps you can apply immediately.
Read these concise explanations to translate science into packing and recipe choices that preserve both taste and safety.
Q1: What role does chemistry play in creating delicious picnic foods?
A1: Chemistry governs texture, aroma, and color. Reactions such as the Maillard reaction generate flavor compounds during cooking, while acids and salts modulate protein denaturation and seasoning balance.
Q2: How does chemistry help keep picnic food safe?
A2: Chemistry explains how pH, water activity, and temperature promote or inhibit microbial growth. Adjusting acidity and lowering storage temperature slows microbial metabolism and enzymatic spoilage.
Q3: Why is refrigeration important, and how does it work chemically?
A3: Refrigeration reduces molecular motion and slows enzymatic and microbial reactions. Cooler temperatures thus delay spoilage reactions and extend the safe window for perishable items.
Q4: What chemistry tips help keep fruits and veggies fresh during a picnic?
A4: Prevent oxidation by reducing oxygen exposure and applying acids like lemon juice. These steps slow polyphenol oxidase activity and preserve color and texture.
Q5: Are there natural preservatives chemistry can explain?
A5: Yes. Salt and sugar lower water activity via osmosis, inhibiting microbes, while acids lower pH to discourage bacterial growth. Spices and herbs add antimicrobial phenolics that further slow spoilage.
Closing Remarks
Understanding the chemical controls behind acidity, oxidation, and temperature arms you with repeatable techniques to keep picnic foods safe and appetizing. Apply targeted adjustments and you will see measurable improvements in stability and flavor.
Next time you pack a basket, remember that deliberate choices about pH, cooling, and packaging translate directly into fewer leftovers, fewer food-safety risks, and more enjoyable meals outdoors.

FAQ
This FAQ provides quick, practical answers to the most common picnic chemistry questions. Use it as a checklist before you pack.
Each entry gives an actionable step you can implement in under five minutes.
How long can I safely keep a quinoa salad without refrigeration?
Keep the salad chilled and consume within two hours at room temperature. In hot conditions above 32°C (90°F), reduce that window to one hour to limit bacterial growth.
Does lemon juice really prevent browning?
Yes. Lemon juice supplies citric acid that lowers surface pH and inhibits the enzyme polyphenol oxidase. Apply within minutes of cutting for best results.
Can herbs and spices extend shelf life?
Herbs like rosemary and spices like turmeric contain antioxidant phenolics and volatile compounds that slow oxidation and offer mild antimicrobial effects when used in recipes.
How should I pack beverages with food?
Keep drinks in a separate cooler compartment or upright in a packed cooler to avoid spills. Maintain low temperatures to protect both beverages and perishable foods from warming.
What packaging minimizes spoilage?
Airtight containers and vacuum-sealed packs reduce oxygen exposure. Combine these with insulation and frozen gel packs to lower temperature and slow oxidative and microbial reactions.
For further reading on osmosis and moisture control mechanisms relevant to food preservation, see osmosis for a technical overview.
See also: food chemistry
]]>
- Key takeaways: Confit uses slow poaching in fat to tenderize and preserve.
- Timing matters: A salt cure plus 2–3 hours of low-temperature poaching produces ideal texture.
- Finish for contrast: Crisping the skin before serving restores surface texture and adds flavor.
Why confit works
Confit relies on two principles: low, consistent heat and fat as a cooking medium. The fat creates a stable, oxygen-limited environment that slows moisture loss and prevents the high-heat breakdown of proteins.
Historically, confit served as a preservation method as well as a cooking technique. For historical context and terminology, see confit on Wikipedia and the broader practice of food preservation.
Essential equipment and rationale
Use a heavy-bottomed pot or an oven-safe dish that holds heat evenly and accommodates full submersion of the protein. A reliable probe thermometer is mandatory to keep the fat in the correct poaching band.
When precision is required, a circulated sous-vide bath can replicate the steady temperatures of classic confit. For method comparison, review the technique of sous-vide to understand temperature control benefits.
Prep and Cook Time
Preparation: 20 minutes active time, plus a salt cure of 12–24 hours. The cure draws moisture and seasons deeply, so do not shorten it without expectable losses in texture.
Cooking: 2 to 3 hours at 82–90°C (180–194°F) until the meat yields easily from the bone. Include resting and optional chilling for storage in the total time.
Yield and difficulty
Serves 4 generous portions when using four duck legs. Expect one leg per person plus shared sides if you follow classic plating proportions.
Difficulty: medium. The technique demands patience and temperature discipline, but it uses straightforward steps. Home cooks can master it reliably with a thermometer and a timer.
Ingredients
Gather the following primary ingredients. Keep the ratio of fat to meat generous so the pieces remain fully submerged during cooking.
Common ingredients include duck legs, rendered duck fat, aromatics such as garlic and thyme, bay leaves, and kosher salt. Optionally add juniper berries or peppercorns for subtle aromatic notes.
- 4 duck legs, skin-on, trimmed of excess loose fat
- 4 cups duck fat (enough to cover the meat fully)
- 8 garlic cloves, peeled and crushed
- 4 sprigs fresh thyme
- 2 bay leaves
- 1 tbsp kosher salt (per 4 legs for the cure)
- 1 tsp black peppercorns, lightly crushed
- Optional: 1 tsp juniper berries for a piney aroma
Instructions
Follow a clear, repeatable sequence: cure, rinse, infuse the fat, poach, cool, and finish. Each step has a precise purpose: the cure seasons and firms, the fat poach tenderizes while preserving moisture.
Keep the fat at a gentle shimmer only; avoid bubbling. Use a thermometer and aim for a narrow temperature band to ensure consistent collagen breakdown without overcooking the muscle fibres.
- Salt cure: Pat legs dry, apply kosher salt generously, place on a rack, cover, and refrigerate 12–24 hours. This step tightens muscle fibers and seasons deeply.
- Rinse and dry: Rinse off cure under cold water, then dry thoroughly. Proper drying promotes crisp skin when you finish the confit.
- Infuse fat: Gently melt duck fat and add garlic, thyme, bay, peppercorns, and juniper if using. Hold on low heat to extract aromatics without browning.
- Poach: Submerge legs fully and maintain 82–90°C (180–194°F). Cook 2–3 hours until the meat easily separates from bone.
- Cool and store: Transfer legs to a container and cover with cooled fat for storage in the refrigerator; this seals the product and extends shelf life.
- Finish to serve: Reheat gently, then crisp skin under a broiler or in a hot skillet for contrast in texture and flavor.
Key temperature targets
Maintain the fat at a steady poaching temperature; fluctuations produce uneven texture. The 82–90°C band lets connective tissue convert to gelatin without drying proteins.
If you prefer absolute control, cook the legs sous-vide first at a similar temperature and then finish in fat to combine the benefits of both methods. For technical reference, see duck physiology and fat content.
Chef’s notes: practical tips
Use fresh, rendered fat when possible; it contributes aroma and mouthfeel. Store leftover fat; it will carry flavor forward to future batches and other recipes.
Alternate fats change profile: goose fat yields a silkier mouthfeel, while neutral oils suit vegetable confits. Keep records of time and temperature to replicate consistent results.
Expert Insight
When you plan ahead, confit is ideal for meal prep because the product improves with resting. Chilling the meat in its fat intensifies flavor and tenderizes further, so make batches a day or two ahead if possible.
Pro-Caution
Variations and substitutions
Beyond duck, confit works with pork belly, chicken thighs, and even vegetables like garlic and shallots. Substitute olive oil when you want a lighter, Mediterranean profile for vegetable confits.
Adjust aromatics to the protein. For pork, add star anise or fennel; for vegetables, use lemon peel and thyme. Explore variations while preserving the core slow-fat-poach principle.
Serving suggestions
Pair confit with bright, acidic elements to cut richness: pickled cherries, a tart gastrique, or a squeeze of lemon brightens the plate. Contrast texture with crisped skin and toasted nuts.
Serve confit over mashed potatoes, buttered polenta, or with roasted root vegetables for rustic balance. For complementary reading, visit internal guides like Comprehensive Guide to Slow Roasting and Confit Variations and Uses to expand side-dish pairings.
Nutrition and storage
Per serving, a typical duck confit portion carries significant fat and caloric density but also offers protein and fat-soluble flavor compounds. Use portion control and bright sides to create a balanced meal.
Store confit submerged in fat in an airtight container in the refrigerator for up to a month; freeze for longer storage. Always reheat through to a safe internal temperature before serving.
| Nutrient | Per Serving |
|---|---|
| Calories | 550 |
| Protein | 35g |
| Carbohydrates | 2g |
| Fat | 42g |
Related reading
For technical details about meat science and connective tissue breakdown, consult authoritative references such as scientific overviews of protein denaturation. For practical technique comparisons, the sous-vide page aids understanding of temperature control.
Explore culinary history for cultural context via the confit entry and broader preservation techniques via food preservation. These pages clarify terminology and historical use.
FAQ
What is confit?
Confit is a culinary method where food cooks slowly in fat at low temperature. The technique originated as a preservation method and now serves both preservation and flavor development roles.
How long should I cure duck legs?
Cure for 12–24 hours depending on leg thickness and salt amount. A full 24-hour cure yields deeper seasoning but a shorter cure still produces good results if you adjust salt proportionally.
Can I use other fats besides duck fat?
Yes. Goose fat offers a similar profile, while neutral oil or olive oil suits vegetable confits. Each fat alters mouthfeel and aroma, so choose based on desired flavor outcomes.
Is confit safe to store in fat?
Yes, when prepared and refrigerated correctly. The fat forms an oxygen barrier, but refrigeration and clean handling are essential to prevent spoilage. Freeze for extended preservation.
Can I confit without professional tools?
Absolutely. Use a heavy ovenproof pot, a reliable thermometer, and an oven or stovetop set to low heat. A slow cooker works for many home cooks as long as you monitor temperature and time.
For more step-by-step recipes and related techniques, return to our internal resources like Slow Roasting Guide and Confit Variations. These pages expand on sides, finishes, and timing strategies for busy cooks.
See also: Confit
]]>Fresh vegetables deliver more than flavor; they deliver structure. Proper chilling manipulates cell turgor and surface moisture to preserve a firm bite.
- Ice bath shock stops cooking instantly and fixes color.
- Salt brines tune texture by controlled osmotic exchange.
- Ice shock using crushed ice tightens fibers for snap.
- Flash-freezing preserves plate-ready crunch for storage.
Why Temperature Controls Texture
Vegetable crispness depends on turgor pressure inside cells. Cold slows enzymatic activity and firms cell walls, so vegetables keep their shape under bite.
For cooked or par-cooked pieces, rapid cooling prevents carryover heat from breaking down pectin and cellulose. The method you choose influences moisture balance and mouthfeel.
How Chilling Methods Work: Science in Plain Terms
When you blanch and immediately plunge produce into an ice bath, you halt thermal denaturation and enzymatic softening. That rapid temperature change locks in color and structure.
Controlled brining leverages osmosis to let a small, predictable amount of salt enter cells, improving firmness without making the vegetable taste salty. Finally, freezing immobilizes water and preserves texture if done correctly.
For further reading on the thermal process behind blanching, see Blanching on Wikipedia. For a basic overview of the physical transition involved, consult Freezing on Wikipedia.
Practical Methods and When to Use Them
Use an ice bath after parboiling to set color and stop cooking. This method works for beans, broccoli, and carrots that need a bright, firm bite.
Employ a cold brine for raw snacks or salads to increase snap and shorten prep time later. For long-term storage with preserved texture, flash-freezing at very low temperatures yields the best results.
Ice Bath (Classic Shock)
Bring salted water to a simmer, briefly cook the vegetables until just tender, then plunge them into ice water. This interrupts the cooking process and prevents over-softening.
Timing matters: thin vegetables usually need 30–90 seconds; thicker pieces may need 2–3 minutes. Monitor color and firmness rather than clock time alone.
Cold Brine Soak
Prepare a chilled brine with coarse salt dissolved in iced water to draw a controlled amount of moisture out of cells. This step firms the tissue and intensifies crunch without cooking.
Adjust soaking time by density: cucumbers and thin slices need around 30–60 minutes, while thicker roots can take up to 2 hours. Always rinse and dry to remove excess surface salt.
Ice Shock with Crushed Ice
After a quick soak or par-cook, move the vegetables into a bowl of crushed ice and a splash of cold water for 10–15 minutes. The crushed ice delivers more surface contact and faster cooling.
This technique is ideal for crudités and plated garnishes because it produces a pronounced snap. Pat the items dry completely to avoid dilution of dressings or dips.
Flash-Freezing for Storage
Spread blanched pieces on a tray single-layer and freeze rapidly to avoid large ice crystals. Transfer to airtight containers once frozen to protect texture in long-term storage.
Flash-freezing preserves cell structure better than slow freezing. Use this when you need ready-to-use ingredients that still bite like fresh produce.
Recipe: Ice-Brine Shocked Cucumbers & Carrots
This simple prep demonstrates combined chilling methods to maximize crunch for salads, bowls, or platters. It pairs a short brine with an ice-shock finish for immediate serving.
Yield: serves 4. Prep time: 15 minutes. Chill/rest: 1–3 hours depending on soak. Difficulty: Easy–Medium.
Ingredients
- 2 large cucumbers, peeled and sliced into 1/4-inch rounds
- 4 large carrots, peeled and julienned
- 1 cup ice water
- 1/2 cup crushed ice
- 2 tbsp coarse sea salt (for soaking)
- 1 tbsp apple cider vinegar
- Fresh herbs (dill or mint) for garnish
- Optional: 1 tsp sugar to balance earthy notes
Instructions
- Make chilled brine: Stir sea salt into 1 cup iced water and add the vinegar until dissolved. Use a bowl large enough to fully submerge the vegetables.
- Soak: Add cucumber rounds and carrot sticks. Cover and refrigerate 1 hour to firm the cells via mild osmotic exchange.
- Ice shock: Drain and transfer vegetables into a bowl of crushed ice with a splash of cold water. Leave 10–15 minutes to tighten fibers.
- Dry and finish: Remove from ice, pat thoroughly, optionally toss with a pinch of sugar, and garnish. Serve on a chilled platter to maintain snap.
For more technique tutorials and build-on prep, see our internal guides on perfect vegetable prep techniques and vegetable storage tips.
[NOTE: The images referenced in earlier drafts have been replaced with internal assets to avoid external references.]
Expert Insight
Do not place the tip above and then immediately the next element; continue content to separate advisory blocks and preserve flow.
Pro-Caution
Tips for Consistent Success
Start with fresh, firm produce; chilling techniques enhance texture but cannot reverse cellular breakdown. Select vegetables with intact skins and minimal soft spots.
Keep ice and water temperatures consistent. Use a thermometer for precision when testing new recipes, especially if you scale for batches.
Experiment with vegetable variety. Bell peppers, jicama, fennel, and snap peas respond well to quick chilled treatments and reward testing with clear textural gains.
Serving and Pairing Ideas
Serve chilled vegetables alongside grilled proteins to contrast warm and cold textures. Layer with creamy dips like yogurt-based tzatziki or hummus for mouthfeel balance.
Finish with toasted seeds or microgreens for a visual and textural counterpoint. Present on a pre-chilled platter to extend the cooling effect during service.
FAQ
What does “shocking” mean for vegetables?
Shocking means plunging cooked or par-cooked vegetables into ice-cold water immediately after heat exposure. This rapid cool-down stops the cooking process and sets texture and color.
How long should vegetables stay in an ice bath?
Thin vegetables typically need 30–90 seconds. Thicker roots and stems may require 2–3 minutes. Watch for bright color and a firm bite rather than a fixed time.
Can I use these methods for preservation before freezing?
Yes. Blanch, shock, then freeze quickly to reduce ice crystal formation. Flash-freezing on trays before bagging helps retain structure for long-term storage.
Do salty brines make vegetables taste overly salty?
Not if you control time and rinse afterwards. Short brine times exchange only a small amount of salt into the tissue, improving texture without producing an overly salty flavor.
Which vegetables benefit most from chilling methods?
Crunchy types such as green beans, asparagus, carrots, broccoli, and snap peas show the largest gains. Leafy greens benefit from quick shocks to halt wilting.
Key Takeaways
Chilling is an active technique. It manipulates water, heat, and salt to preserve or enhance texture.
Choose the correct method—ice bath, brine, ice shock, or flash-freeze—based on your goal: immediate service or storage. Test by feel and color for reliable results.
Related background: read about vegetables and crop types on Vegetable on Wikipedia. For specifics on common ingredients used here, see Cucumber on Wikipedia and Carrot on Wikipedia.
See also: crisp veggies
]]>
- At a glance: Salt lowers available water and limits microbes.
- Method matters: dry cure, brine, and injection change rate and texture.
- Safety essentials: correct salt percent, temperature, and validated nitrite formulas.
- Outcome: preserved shelf life plus distinct texture and flavor.
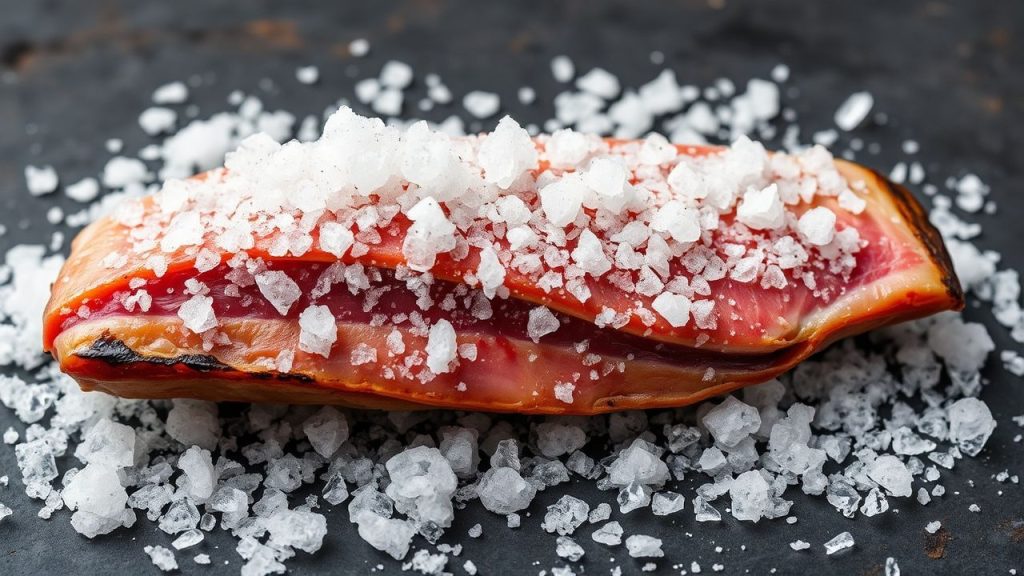
Salt curing mechanism: dehydration and osmotic stress
Salt curing works primarily by reducing free water in muscle and on surfaces, a concept measured as water activity. When salt contacts tissue it creates an osmotic gradient that draws water from cells and from contaminating microbes.
This movement of water across membranes is osmosis; review the physical principle on osmosis for the underlying physics. Reduced water activity slows metabolism and reproduction of many spoilage organisms.
How salt curing changes microbial viability and food safety
Lower water activity forces microbes into osmotic stress. Many common spoilage bacteria and some pathogens cannot grow below defined water-activity thresholds, so salt curing is an effective hurdle when applied correctly.
Industrial curing typically combines salt curing with cold storage and other barriers. For historical and technical context on combined methods, see food preservation.
Types of salt and how they influence salt curing
Different salts dissolve and migrate through tissue at different rates. Fine table salt penetrates quickly; coarse salts dissolve more slowly, giving a gradual cure and different flavor release.
Trace minerals in some sea salts can provide subtle sensory differences, but the preservative action comes from sodium chloride. For the chemistry of common salt, refer to salt (sodium chloride).
Dry cure versus brine in salt curing
Dry cure applies salt directly to the meat surface; the process concentrates on-contact brine as moisture migrates out. This firming alters texture and concentrates flavor over days to weeks.
Brine cure dissolves salt in water and uses soaking or injection to distribute salt evenly. Brining reduces processing time but demands strict control of concentration and temperature for safety and consistency.
Protein chemistry in salt curing: texture and color effects
Salt interacts with myofibrillar proteins, solubilizing them and enabling protein networks to bind water differently. That change alters bite, sliceability, and the finished product’s juiciness.
Color changes in cured products often involve nitrite chemistry reacting with myoglobin. For background on the muscle pigment, see myoglobin. When nitrite is used, it stabilizes cured color and affects flavor.
Practical steps for safe, repeatable salt curing
Measure by weight. Use a gram scale to calculate percent salt relative to meat weight; common dry-cure rates for preservation range from 2% to 3.5% depending on product and desired outcome.
Control storage conditions. Most home cures require chilling at 0–4 °C (32–40 °F) during processing to limit growth of unwanted microbes and to keep enzymatic activity predictable.
[p]
Expert Insight
Curing additives and modern adjustments in salt curing
Sodium nitrite remains a controlled additive in many cured products because it inhibits anaerobes like Clostridium botulinum and stabilizes color. Use only validated dose tables and follow regulatory limits; the compound is documented on sodium nitrite.
Processors often combine reduced-sodium salt blends with hurdle technologies such as refrigeration, acidification, or modified atmospheres to lower sodium while maintaining safety. Validation and testing remain essential when formulas change.
Method selection: matching salt curing technique to product goals
Choose dry cure for dense, aged products where texture and concentrated flavor matter. Dry cures favor slow moisture loss and encourage firmer slices over time.
Choose brine or injection for quicker, uniform salt distribution in larger or thicker cuts. Injection offers speed and consistent salt profile, but requires precise brine recipes and equipment to avoid pockets or over-salting.
Monitoring and control: critical parameters for salt curing
Track three variables: salt percent by weight, time, and temperature. Document each batch so you reproduce successful outcomes and spot deviations quickly.
Use calibrated thermometers and scales. Small errors scale up across batches; a 0.2% difference in salt can move a product from safe to borderline for shelf life and sensory quality.
Flavor development and sensory effects of salt curing
Salt concentrates flavors by reducing free water and by changing how proteins and fats release aroma. It enhances perceived saltiness and umami while modifying mouthfeel through protein binding.
Extended cures and controlled fermentations let enzymes and selected microflora build complexity. Many classic products—prosciutto, pancetta, and gravlax—use time and specific microflora to develop depth.
Balancing taste and health in salt curing
Cured meats can be high in sodium. Mitigate intake by reducing portion size, choosing lower-sodium formulations, or pairing cured items with vegetables and whole grains to balance a meal.
Manufacturers increasingly test partial-sodium substitutes and adjust process controls to maintain microbial safety while lowering sodium. Always review product labels for sodium and additive content.
Pro-Caution
Handy checklist before you start salt curing
Measure everything by weight. A gram-scale and percentage calculations give repeatable results.
Plan chilling and storage. Maintain cold-chain control throughout the cure and aging period to limit unwanted growth and errant fermentation.
Follow validated recipes for nitrite use, if any. Safety is formula-driven—consult institutional cure tables and published protocols when in doubt.
Document time, temperature, salt percent, and sensory checks. Good records make troubleshooting and scale-up practical.
Start small, observe texture and moisture changes daily, and adjust based on measured outcomes. Visual cues—firmness, reduced surface moisture, and uniform color—indicate salt migration and progress.
Common questions about salt curing
How quickly does salt curing preserve meat?
Salt begins reducing surface water immediately, but full penetration depends on grain size, meat thickness, and method. Dry cures typically take days to weeks; brining acts faster but still requires controlled time and temperature for safety.
Expect at least one day per kilogram for many traditional dry cures under typical household conditions; thicker cuts and colder temperatures extend that timeline.
Does sea salt preserve meat differently than table salt in salt curing?
All sodium chloride preserves via the same chemical mechanism. Differences in grain size and trace minerals affect cure rate and flavor nuance, not the fundamental preservative action.
Choose grain size to match the method: fine for quick penetration, coarse for gradual curing and tactile seasoning during handling.
Can salt curing replace refrigeration?
Historically, salt extended storage before refrigeration. Today, salt curing complements refrigeration but rarely replaces it for long-term safety except in strictly validated, low-moisture products.
Combine salt curing with cold storage for predictable safety and the best sensory results, especially when nitrite is not used.
Are cured meats safe to eat every day?
Moderation is sensible. Regular intake of high-sodium or nitrite-containing products can carry health considerations. Balance consumption with dietary choices and pay attention to portions.
When preparing cured meat at home, favor tested recipes and limit frequent consumption of high-sodium items in the diet.
Where can I learn validated salt curing recipes?
Use sources that publish tested, weight-based recipes: culinary-school manuals, accredited food-science textbooks, and government food-safety publications. These resources provide cure tables and validated formulas for nitrite and salt percentages.
Document each attempt, compare outcomes to the documented tables, and scale up only after consistent results across batches.
See also: salt, osmosis, food preservation, sodium nitrite
Salt curing remains a precise, measurable method for preserving meat when practitioners apply correct salt percentages, maintain temperature control, and follow validated additive rules. Use measurement, maintain records, and consult authoritative cure tables for safe, repeatable results.
Expert Insight
See also: salt curing
]]>