- Two-zone cooking for fast crust and gentle finish to protect internal juices.
- Marinades and resting help fibers retain and redistribute moisture.
- Choose the right cut—marbling and fat prevent the perception of dryness.
- Use thermometers to stop cooking before excessive moisture loss.
Mastering Temperature Control to Preserve Grilling Moisture
Heat management determines how rapidly proteins denature and expel liquid. When you plan for searing and finishing zones, you control where moisture moves and how much evaporates from the surface.
Set up at least two zones on the grill: a hot, direct side for crust formation and a cooler, indirect side for finishing. This two-zone approach reduces total time at extreme temperatures and protects grilling moisture in thicker cuts.
Why Heat Forces Moisture Out
Muscle tissue stores water inside cells and between protein strands; as temperature rises, the protein matrix contracts and squeezes liquid outward. That mechanical change explains why rapid, prolonged exposure to high heat increases drip loss and surface evaporation.
Thermal denaturation changes protein shape and binding capacity, which frees water previously held in the matrix. For the underlying biochemistry consult protein denaturation, which clarifies how heat releases bound water.
Heat, Evaporation, and Drippings
Evaporation accelerates with hotter air and longer exposure, so a hot sear can force moisture toward the exterior and increase drip loss. That steam and liquid loss is a physical process you must manage when you concentrate heat at the surface.
Conversely, slower cooking at moderate temperatures gives proteins time to set more gently and reduces aggressive expulsion of water. For basic physics about phase change and heat transfer, see evaporation.
Practical Grilling Workflow
Organize your workflow before you light the grill to reduce time on extreme heat and lower overall moisture loss. Sequence matters: prep, sear, finish indirectly, then rest—the order protects grilling moisture at each stage.
Prepare tools and staging: a calibrated instant-read thermometer, clean tongs, and a two-zone setup reduce guesswork and prevent accidental overexposure to direct flame. Consistent technique produces repeatable, juicy results.
Prep and Cook Time
Allow time for active prep and any marinade so the surface chemistry supports browning without excessive steaming. Typical windows are 15 minutes active prep and 2–4 hours of marinade when applicable to tenderize and add protective oil.
Cooking time varies by thickness and cut; a 1–2 inch steak often needs 20–30 minutes total with sear plus indirect finish, while larger roasts require longer indirect cooking but at lower temperatures to preserve grilling moisture.
Yield and Difficulty
Yield depends on portion size and cut. A 2 lb portion generally serves four; adjust target internal temperatures rather than strict times to preserve juiciness across different weights and shapes.
Difficulty is medium: you need a two-zone setup and an accurate thermometer. Focused attention and a consistent workflow yield better results than complicated spice blends or extended marinades.
Ingredients & Prep
A well-marbled ribeye or chuck roast holds and conveys moisture better during cooking because rendered intramuscular fat improves mouthfeel. For reference on muscle and fat composition consult meat composition.
Marinades that combine oil and modest acid—such as buttermilk or lemon—tenderize connective tissue and create a thin lipid barrier that limits surface evaporation. Pat the surface dry before searing to encourage rapid crust formation without steaming.
Step-by-Step Instructions
- Marinate: Combine buttermilk, lemon juice, minced garlic, rosemary and a pinch of salt. Submerge for 2–4 hours so the acid loosens connective tissue while dairy buffers surface proteins.
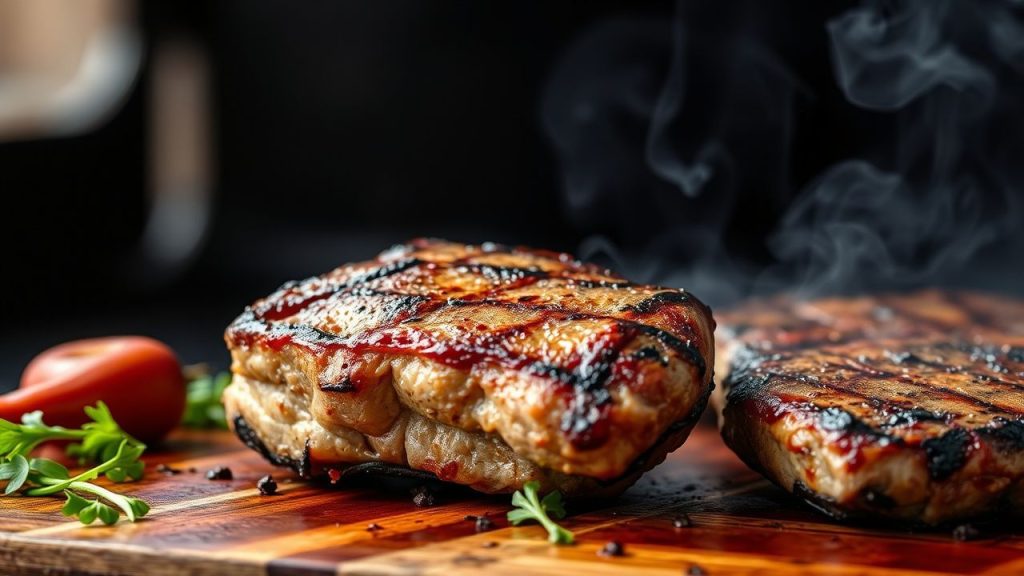
- Preheat grill: Create two heat zones: one side hot (450–500°F) for searing, the other medium-low (300–350°F) for finishing. This limits the time meat spends at moisture-extracting temperatures.
- Pat dry: Remove from marinade and blot the surface. A dry surface browns quickly and avoids steam that can pull water toward the exterior and increase drip loss.
- Sear: Sear 2–3 minutes per side over direct heat until a deep crust forms. Flip once to promote even browning and reduce total surface exposure to flames.
- Finish indirectly: Move to the cooler zone, close the lid, and monitor internal temperature with an instant-read thermometer. Pull at 5°F below target to account for carryover and protect final grilling moisture.
- Rest: Tent loosely with foil for 10 minutes so juices redistribute. Cutting too soon forces fluid out and reduces perceived juiciness.
 Pro-Caution
Measure temperature rather than guessing by touch. Calibration and correct probe placement reduce variance between cooks and avoid wasted product.
Tips for Success
Choose cuts with balanced marbling because intramuscular fat melts and lubricates the mouthfeel, which improves perceived juiciness even if some water is lost. Lean cuts require gentler heat and faster cooking to maintain moisture.
Manage flare-ups by moving meat to indirect heat when fat ignites; open flames char the surface quickly and can drive moisture from deeper tissues. Control fat rendering with moderate searing and timely movement to the cool zone.
[TI P]Expert Insight: Rest your meat under a loose foil tent for at least half the thickness time. This short cooldown re-equilibrates internal juices and often improves perceived juiciness more than adding more fat or extra marinade.[/TIP]
Use a thermometer that reads quickly and accurately to reduce time with the lid open and the grill cool zone compromised. Accuracy improves repeatability and reduces moisture loss from overshooting target temperatures.
Serving Suggestions
Slice across the grain to shorten muscle fibers and make each bite feel more tender; cutting technique directly affects perceived moisture and chew. Serve slices alongside quick-grilled vegetables for contrast in texture and temperature.
Finish with a light drizzle of herb oil or a small pat of compound butter to add surface fat and enhance mouthfeel without changing internal moisture. These surface additions mask small losses in internal water and improve palatability.
Nutritional Snapshot
This section provides a practical estimate for standard servings and highlights the role of fat in perceived juiciness. The numbers vary by cut, trimming, and cooking losses, so treat values as guides rather than absolutes.
For a typical 2 lb portion divided into four servings you can expect roughly the following macronutrient profile; adjust for leaner cuts or added butter.
| Nutrient | Amount per Serving |
|---|---|
| Calories | 380 kcal |
| Protein | 45 g |
| Carbohydrates | 3 g |
| Fat | 22 g |
FAQ
The FAQ answers focus on why meat loses water on the grill and how to protect what matters. These concise answers give direct, evidence-based steps to reduce grilling moisture loss and improve outcomes.
Below are the most common questions home cooks ask, with clear, actionable answers you can apply on the next cook.
Why does meat lose moisture when grilled?
Heat causes muscle proteins to contract, which squeezes water out of cells and between fibers. Simultaneously, surface evaporation removes water, so both internal pressure and air exposure determine total moisture loss.
Is all moisture lost during grilling?
No. Some water remains bound within tissue, especially in well-marbled cuts where rendered fat improves juiciness perception. Nevertheless, higher temperatures and longer times generally increase both evaporation and drip loss.
Can marinating reduce moisture loss?
Yes. Oil in marinades provides a partial barrier to evaporation, while acids and enzymes help break down connective tissue and improve water-holding capacity. Proper marinade timing yields tender, moister results.
What role does resting play?
Resting lets contracted proteins relax and allows juices to redistribute internally, so less fluid escapes when you slice. A proper rest improves the final plate’s juiciness more reliably than extra fat or extended searing.
Which cuts retain moisture best?
Fattier cuts such as ribeye and short rib retain more perceived moisture because melting intramuscular fat enhances mouthfeel. For lean cuts, shorten cook times and pull at lower target temperatures to preserve grilling moisture.
Final Thoughts
Heat is a tool; use it deliberately to coax flavor without surrendering moisture. Two-zone cooking, controlled searing, correct marinades, and accurate thermometry keep grilling moisture within the muscle for consistently juicy results.
Practice the workflow, check internal temperatures, and make small adjustments to timing and heat for each cut. With attention to these principles you will routinely produce steaks and roasts that balance a flavorful crust with a tender interior.
See also: grilling techniques and grilled steak guide
See also: grilling moisture
]]>
- Key takeaway: Control surface heat to trigger browning while protecting interior moisture.
- Key takeaway: Simple marinades with salt, acid, and sugar manage tenderness and crust formation.
- Key takeaway: Use a meat thermometer and a two-zone fire for consistent doneness.
- Key takeaway: Resting yields juicier slices and prevents immediate juice loss when serving.
Why the science matters for grilled chicken
Successful grilled chicken depends on reproducible physical and chemical changes. The Maillard reaction creates the deep, savory crust you expect; manage temperature to favor Maillard browning rather than surface burning. Maillard reaction
Control of heat transfer and moisture differentiates dry, tough results from succulent meat. A controlled sear followed by a lower-heat finish manages conduction and convection so the center reaches safe temperature without overcooking the exterior. Grilling
Ingredient choices and marinade chemistry for grilled chicken
Marinades and brines change surface chemistry and water-holding capacity for grilled chicken. Use oil to carry flavor, salt to improve water retention, and modest acid to adjust texture; excessive acid will denature proteins and make meat mushy. Marinade
Brining provides uniform seasoning and better yield for lean cuts used in grilled chicken dishes. Salt interacts with muscle proteins to retain moisture during cooking; plan brine strength and time by cut size and thickness. Brining
Marinade components, dosages, and timing
For thighs, start with 1/4 cup neutral oil, 2–3 tablespoons of salt-based seasoning, 1–2 tablespoons acid, and 1 tablespoon sugar or honey only when you want added crust. Marinate 2–6 hours for thighs; thin breasts need 30–60 minutes to avoid over-tenderizing.
Keep the marinade chilled and never reuse raw marinade as a sauce unless you boil it. Pat chicken dry before placing on the grill to maximize direct surface contact and encourage Maillard browning.
Salt, enzymes, and dry-brine technique for grilled chicken
Dry-brining uses coarse salt rubbed into skin and flesh, followed by refrigeration for several hours to a day to season through. This method dries the skin slightly and improves crisping when you sear for grilled chicken.
Enzymatic tenderizers (papain, bromelain) act quickly; apply sparingly and for limited time to avoid a mushy texture. Use enzymes only when you intentionally target extreme tenderness for dense pieces.
Grill setup and heat management for grilled chicken
Always configure a two-zone fire: a direct high-heat side for searing and an indirect cooler side for finishing. This setup lets you build crust on skin and then move pieces away from direct flame to reach internal temperature without burning the exterior. Grilling
Clean, well-oiled grates reduce sticking and produce reliable sear marks that accelerate crust formation. Preheat the grill until the surface reaches a stable range specific to your cut—375–450°F for many setups—before you put chicken down.
Two-zone fire and flare-up control
Create a hot direct zone for initial sear and a medium indirect zone for finishing; move pieces between zones as they progress. When fat causes flare-ups, transfer meat to the indirect side until flames drop and then return briefly to the sear zone for color touch-up.
Keep a metal lid, grill brush, or spray bottle handy to control flames safely without cooling the grill excessively. Use mild fruitwoods sparingly if you want a delicate smoke note on your grilled chicken.
Step-by-step cooking method for grilled chicken
Remove chicken from refrigeration 20–30 minutes before grilling to reduce cold spots and promote even searing. Season just before cooking so the dry surface remains primed for browning and does not sit wet on the grate.
Place skin side down over direct heat and hold for 5–8 minutes without moving to develop color and crispiness. Flip once and move to indirect heat to finish until a safe internal target is reached.
Searing, finishing, and internal temperature for grilled chicken
Sear to build a crust, then finish at moderate heat until the thickest portion registers 165°F (74°C). Insert a probe thermometer into the deepest portion, avoiding bone contact for accuracy; this eliminates guesswork and prevents overcooking.
After pulling the chicken, tent loosely with foil and rest 5–10 minutes; this step equalizes temperature and redistributes juices. Resting improves perceived juiciness and yields cleaner slices for plating.
Tips for success with grilled chicken
Pick cuts that match your service goals: thighs tolerate more heat and forgiving carry, while breasts need careful timing to stay moist. Group similar sizes on the grate so pieces finish at the same moment and reduce rescue attempts.
Monitor the grill with an infrared surface thermometer or built-in gauge to maintain consistent results across batches. Use internal links to your recipe bank and setup guides for repeated success: grilled chicken recipes and grill setup guide.
 Expert Insight
Trim large fat pockets that cause flare-ups but leave enough fat where you want self-basting. Apply finishing glazes during the last minute to avoid burning sugars; timing keeps both flavor and appearance clean.
Pro-Caution
Serving, pairing, and presentation for grilled chicken
Use resting time to prepare sides, toss a herb salad, or grill vegetables so plating happens while the meat relaxes. Slice against the grain for consistent tenderness and arrange to display crisp skin and moist interior.
Pair grilled chicken with acidic elements or lightly tannic beverages to cut fat and highlight layers of seasoning. A citrus dressing or herb-forward relish refreshes the palate and balances each bite.
Nutrition and portioning for grilled chicken
Trim excess fat or remove skin to reduce calories when needed; skin-on servings add flavor but increase energy density. A standard portion of 4–6 ounces delivers roughly 25–30 grams of protein depending on the cut.
When you use marinades with oil or sugar, account for those calories in menu planning; light application of glaze adds minimal energy if timed at the end. Archive nutrition facts for repeat recipes to help guests track intake accurately.
FAQ
How do I get both crispy skin and a fully cooked interior on grilled chicken?
Sear skin over direct heat to render fat and create crispness, then move the piece to indirect heat to finish to 165°F (74°C). Use a probe thermometer for repeatable accuracy and avoid guessing by color alone.
Can I use the same marinade for different cuts of grilled chicken?
Yes, but adjust marination time by thickness: thin breasts need 30–60 minutes, thighs 2–6 hours, and bone-in pieces may go longer with careful acid control. Tweak time rather than ingredients for clean outcomes.
What is the best wood for smoky flavor without overpowering grilled chicken?
Choose mild fruitwoods like apple or cherry for a subtle sweet-smoke that complements poultry. Heavy woods (hickory, mesquite) risk dominating delicate seasonings, so use them sparingly if at all.
How do I prevent flare-ups from dripping fat on the grill?
Trim large fat deposits and use a two-zone setup so you can move meat off direct heat when flare-ups start. Keep a metal lid or spray bottle at hand to control flames quickly without losing grill temperature.
Is brining better than a wet marinade for grilled chicken?
Brining improves moisture retention and even seasoning; wet marinades add surface flavor, acid, or sugar for caramelization. Choose brine for consistent juiciness and short marinades for surface flavor or crust development.
Final note: Treat grilling as a sequence of controlled steps: prepare, sear, finish, and rest. Apply these techniques to your grill, monitor core temperature, and you will reproduce high-quality grilled chicken reliably.
See also: grilled chicken

See also: grilled chicken
]]>
- Control heat: steady temperature preserves interior meat moisture and prevents runaway evaporation.
- Sear smart: a dry surface forms a crust quickly while limiting deep interior moisture loss.
- Rest meat: hold before slicing so meat moisture redistributes and stays in the muscle.
- Pick marbling: intramuscular fat slows moisture loss and boosts perceived juiciness.
Mastering Temperature Control to Preserve Meat Moisture
Temperature is the single most effective tool for managing meat moisture during grilling. Proteins denature and fibers contract as internal temperature rises, and controlling that rise reduces how much water the muscle expels.
Use a quality thermometer and zone heat to manage the ramp. Establish a hot sear zone and a moderate indirect zone so you can sear then finish without blasting the interior; this two-zone method limits evaporation and protects meat moisture.
The Science: How Heat Forces Meat Moisture Out of Muscle
At a molecular level, heat changes protein structure and forces meat moisture outward. Protein networks shrink as they denature, squeezing intracellular water toward the surface where it either pools or evaporates.
Simultaneously, internal water becomes vapor as temperature climbs and creates pressure gradients. Those gradients push meat moisture outward until equilibrium or evaporation at the surface reduces the vapor pressure.
Maillard Reaction and Meat Moisture Management
The Maillard reaction produces the brown, savory crust we prize, but it needs a relatively dry surface to proceed. Surface moisture must evaporate before browning, so a short, dry sear intentionally trades surface water for flavor without sacrificing interior meat moisture when timed correctly.
Patting the surface dry and avoiding crowding lets moisture evaporate quickly during the sear window. That fast surface drying helps form a crust faster and reduces the length of time the interior experiences elevated steam pressure that drives meat moisture loss.
Why a Dry Surface Matters
Surface water creates steam that blocks browning and prolongs high internal temperatures. By contrast, a dry surface supports rapid Maillard reactions that lock in texture and minimize prolonged internal vapor pressure.
Work in short, controlled sear intervals. This preserves more meat moisture while still delivering the flavorful crust diners expect.
Practical Prep, Timing and Ingredients to Protect Meat Moisture
Good results begin before the meat hits the grates. Bring steaks to near room temperature and pat them dry to remove surface water that would otherwise steam away during searing.
Salt draws moisture briefly to the surface, but when you time it correctly salt helps proteins hold water and improves flavor without increasing final moisture loss. Use coarse kosher salt at least 30 minutes prior or just before cooking, based on cut thickness.
Prep and Cook Time Guidelines
Preparation Time: 15 minutes. Bring meat close to ambient and dry the surface thoroughly to reduce initial steam.
Marinating Time: Optional, 1–4 hours. Balanced marinades with oil and mild acid can aid tenderness without causing excessive moisture migration in thin cuts.
Equipment and Thermometry
A reliable instant-read thermometer removes guesswork and helps maintain meat moisture. Aim for internal targets rather than fixed cook times: 130–135°F for medium-rare suits most steaks.
Keep the sear surface around 450°F for rapid crusting, then move to indirect heat to finish. That prevents the interior from climbing too fast and expelling excessive meat moisture.
Ingredients, Yield and Cut Selection for Juiciness
Yield: Serves 4. Choose steaks about 1-inch thick for predictable cook times and consistent meat moisture retention.
Recommended cuts: Ribeye, striploin, and tenderloin use marbling to slow moisture loss and increase perceived juiciness.
Shopping List
- 4 beef ribeye steaks (1-inch thick, well-marbled)
- 2 tbsp olive oil
- 1 tbsp kosher salt
- 1 tsp black pepper
- 2 cloves garlic, minced
- Fresh rosemary
- Optional: 1 tbsp butter for finishing
Step-by-Step Instructions to Minimize Meat Moisture Loss
Follow consistent steps to control moisture migration and maximize flavor. Each action either shortens unnecessary evaporation or enhances final texture.
Use a two-zone approach: sear over high heat, then move to indirect heat to reach the target internal temperature without overshooting and forcing meat moisture out.
- Bring steaks to room temperature. Pat dry to remove surface moisture; a dry exterior sears faster and reduces steam formation.
- Rub olive oil evenly. Season with kosher salt and black pepper to taste.
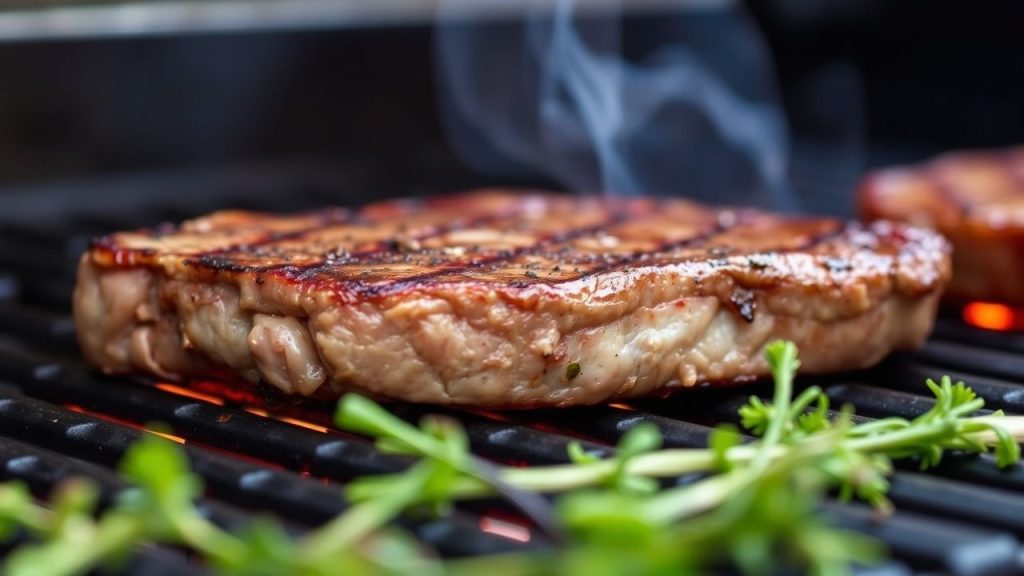
- Preheat the grill to medium-high (≈450°F/230°C). Verify with a surface thermometer and set an indirect zone.
- Sear for 3–4 minutes per side without moving to develop a caramelized crust quickly.
- Finish over indirect heat until internal temperature reaches your desired doneness.
- Optional basting: In the final minute, baste with butter, garlic, and rosemary for aroma and added surface fat that slows moisture escape.
- Rest 5–7 minutes. Let juices redistribute; slicing too soon causes immediate drip loss and reduces retained meat moisture.
Expert Insight
Record sear duration, surface temp, and carryover rise each cook. This practice reduces variability and protects meat moisture batch to batch.
Pro-Caution
Thin cuts require a different approach: short sear and immediate rest, or a lower surface temperature to avoid explosive moisture migration.
Chef’s Notes: Techniques that Preserve Meat Moisture
Choose marbled cuts. Intramuscular fat both adds flavor and reduces rapid heat penetration, which helps the interior retain meat moisture longer during cooking.
Avoid piercing the meat. Use tongs to flip and a probe thermometer to check temperature. Each puncture creates a direct path for meat moisture to escape.
Marinades and Salt Use
Balanced marinades with oil create a thin surface barrier while salt helps proteins bind water when timed properly. Use oil-based or balanced blends rather than aggressive acidic baths on thin cuts.
Sous-vide pre-cook followed by a quick sear can yield predictable internal doneness and conserve meat moisture through gentle temperature control.
Serving, Pairings and Presentation to Highlight Juiciness
Slice against the grain to shorten muscle fibers and make each bite seem juicier. Garnish with flaky sea salt and herbs to accentuate perceived moisture and flavor.
Pair with bright chimichurri or charred vegetables to cut fat and highlight texture contrasts. A robust red wine or acid-forward sauce balances richness and emphasizes retained meat moisture.
Advanced Concepts: Pressure, Steam and Fiber Mechanics
As internal water vaporizes, pressure gradients form between the interior and surface. Those gradients drive meat moisture outward until the surface allows evaporation into the air.
You can limit this migration by slowing the interior temperature rise. Low-and-slow finishes or precise thermal baths reduce internal steam pressure and preserve more liquid in the muscle matrix.
Thermal Properties and Heat Capacity
Water has a high heat capacity and a large latent heat of vaporization. Once internal water turns to vapor, it removes significant heat and accelerates drying unless the temperature ramp is controlled.
Understanding these thermal properties helps you design cook curves that retain meat moisture while achieving safe, flavorful doneness.
Internal Resources and Further Reading
Want to refine your heat mapping? See our internal guide for zone charts and target temps for common cuts. Track both surface and internal readings to protect meat moisture across different grills.
For detailed guidance on resting and carryover cooking, consult our resting guide with carryover temperature tables and timing rules that help preserve meat moisture in larger roasts and steaks.
FAQ
Why does grilled meat sometimes come out dry?
High heat and long cook times push more internal water out of muscle fibers. If internal temperature rises too fast, proteins contract excessively and expel juices that then evaporate, reducing meat moisture.
Control the temperature ramp, use a two-zone grill, and monitor internal temps to limit aggressive evaporation and keep meat moisture where it belongs.
What happens to moisture inside meat during grilling?
Heat denatures proteins and creates vapor pressure inside cells. That pressure pushes water outward where it either collects on the surface or evaporates into the air, decreasing retained meat moisture.
Maintaining a moderate interior rise lowers vapor pressure and helps retain more meat moisture in the muscle matrix.
How does the Maillard reaction affect moisture loss?
The Maillard reaction requires a hot, relatively dry surface to produce flavor. Surface moisture must evaporate before browning begins, so the intended short sear window sacrifices a little surface water to gain crust while protecting interior meat moisture.
Time the sear for fast, hot contact on a dry surface to minimize interior moisture loss and maximize crust formation.
Can marinating help retain meat moisture?
Balanced marinades with oil, salt, and mild acid can slow moisture loss and improve tenderness. Oil creates a small protective barrier while salt helps proteins bind water when used correctly.
Avoid over-marinating thin cuts in acidic solutions longer than four hours; excessive breakdown can make texture mushy and alter moisture behavior.
Which grilling techniques best preserve juiciness?
Use a sear-then-finish method: sear quickly over high heat, then move to indirect heat to reach target internal temperature slowly. Rest the meat before slicing to allow juices to redistribute and maintain meat moisture.
Combine thermometry with zone cooking and choose cuts with good marbling for consistent, juicy results.
See also: protein denaturation, Maillard reaction, water, sous-vide, meat
See also: meat moisture
]]>
- At a glance: Choose direct heat for quick sears and indirect heat for gentle, even cooking.
- Use a calibrated probe thermometer to reach 165°F / 74°C without overcooking.
- Rest cooked chicken to let juices redistribute for better texture.
- Combine zones: sear on direct heat, finish on indirect for best results.
Overview and Practical Uses of Direct Heat and Indirect Heat
Direct heat delivers high, focused energy to the chicken surface and produces crisp skin and char. This approach suits wings, thighs, and small cuts that benefit from intense surface browning.
Indirect heat cooks by surrounding the chicken with warm air or radiant heat and prevents the exterior from burning while the interior comes up in temperature. Use it for whole birds, bone-in breasts, and large pieces that need time to reach a safe internal temperature.
Grilling and roasting share technical fundamentals but differ in airflow, fuel, and scale. Refer to authoritative context on grilling and roasting for technique differences and equipment choices.
Prep and Cook Time for Direct Heat and Indirect Heat
Preparation: 15 minutes is typical when you include patting dry and seasoning. Properly dried skin with a light oil coat allows direct heat to crisp quickly and predictably.
Cooking: Total cook time varies by cut and method. Direct sear times per side are short; indirect finishes take 20–40 minutes depending on size and whether you use a two-zone grill or an oven.
- Preparation: 15 minutes
- Cooking: 30-45 minutes (varies by heat method and cut)
- Total Time: 45-60 minutes
Yield
This guidance serves about four people when using four bone-in thighs or a similar weight of boneless cuts. Adjust quantities if you scale to larger gatherings or smaller appetites.
Yield depends on side dishes and portion sizes. Apply the same timing principles when cooking multiple racks on a grill or in batches in the oven.
- Serves 4 generously
Difficulty Level
Difficulty rates as medium because you must manage heat zones and use a thermometer to confirm doneness. Learning to control direct heat and indirect zones rewards careful attention more than advanced chef skills.
Home cooks can learn two-zone grilling and oven finishing quickly. Practice sequencing sear and finish stages and you will improve consistency across all poultry cuts.
Ingredients
Use four bone-in, skin-on thighs or four breasts depending on texture preference. Season simply with oil, smoked paprika, garlic powder, onion powder, dried thyme, salt, and black pepper.
Fresh herbs and lemon added after resting brighten the dish and enhance perceived juiciness. Keep seasonings balanced so the heat method expresses the chicken’s natural flavor.
- 4 bone-in, skin-on chicken thighs (or 4 chicken breasts)
- 2 tbsp olive oil
- 1 tbsp smoked paprika
- 1 tsp garlic powder
- 1 tsp onion powder
- 1 tsp dried thyme
- Salt and freshly ground black pepper, to taste
- Fresh herbs and 1 lemon for garnish and finishing
Instructions
Start by preheating and create clear hot and cool zones: for direct heat use high heat (~450°F / 230°C); for indirect heat leave one side cooler or use a 375°F (190°C) oven. Building zones gives you control over sear and finish stages.
Pat chicken dry, rub with oil, and season evenly. Let the rub adhere briefly but avoid brining or over-salting without testing first on a small piece.
Direct Heat Grilling
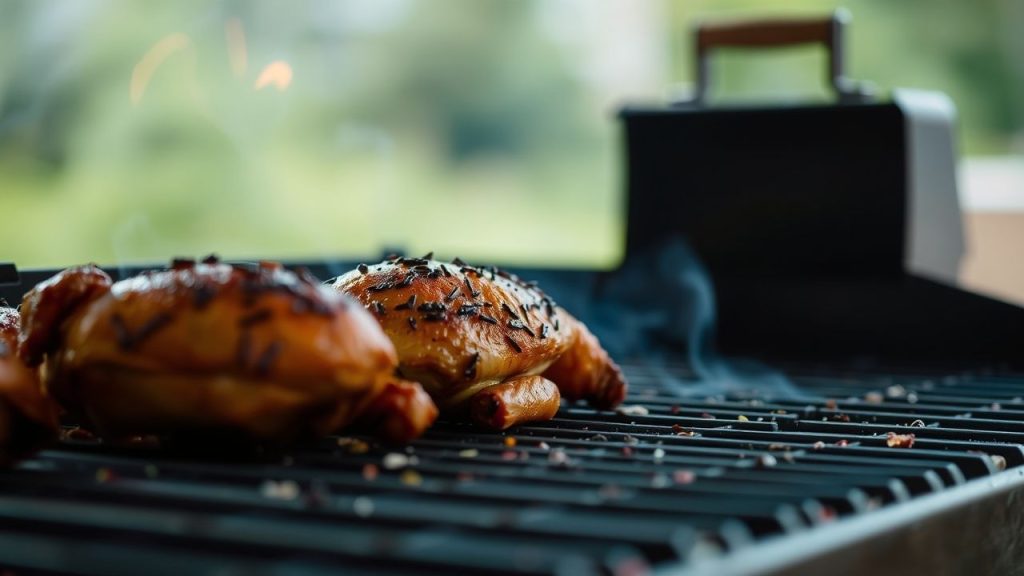
Place pieces skin side down over high heat and sear until the skin crisps and char marks form, about 5–7 minutes. Flip once and finish for another 4–6 minutes while watching for flare-ups from dripping fat.
Use tongs and move pieces off the hottest area if flames spike. A quick sear on direct heat locks surface flavor while you reserve interior cooking for the finish stage.
Indirect Heat Grilling or Oven Finish
Move seared pieces to the cooler zone or close the oven to let them cook gently for 25–35 minutes. Insert a probe thermometer into the thickest part to confirm 165°F (74°C) for safety.
Maintain a covered environment to encourage even heat circulation and consistent carryover cooking. Let carryover raise the final temperature slightly while resting under tented foil.
Pro-Caution
After removing from heat, tent the chicken loosely and rest for 5–10 minutes to allow juices to redistribute. Cutting immediately forces juices out and dries the meat.
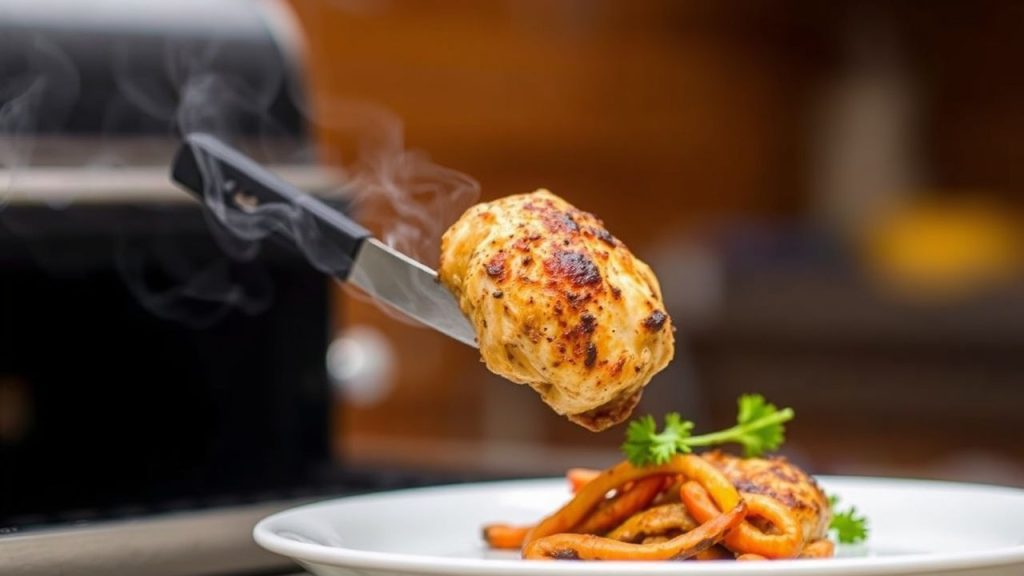
Finish with lemon and herbs for brightness. Serving at the right temperature and texture improves perceived flavor without adding extra fat.
Tips for Success with Direct Heat and Indirect Heat
Choose heat by cut: Use direct heat for thin or skin-on cuts and indirect for thick or whole birds. This approach balances exterior texture and interior moisture.
Manage flare-ups by trimming excess fat and keeping a spray bottle of water or a cooler zone to move pieces into when flames spike. Predictable heat reduces burnt spots and bitterness.
- Direct heat: Quick sear, crisp skin, best for thighs and wings.
- Indirect heat: Slow cook, even internal temp, best for whole birds and large breasts.
- Hybrid method: Sear on direct heat then finish indirectly for the best balance of texture and juiciness.
Experiment with wood chips during indirect grilling to introduce mild smoke without burning the skin. Keep spice blends simple so the method remains the primary flavor driver.
Expert Insight
Serving Suggestions
Pair grilled chicken with seasonal vegetables that can share the grill or be roasted at similar temperatures. Vegetables like asparagus and bell peppers complement smoky, direct heat flavors and add textural contrast.
Light sauces such as garlic aioli or chimichurri brighten both direct and indirect preparations without overwhelming the meat. A lemon wedge and fresh parsley add a final acidic lift to the plate.
For authoritative guidance on handling and temperatures, consult food-safety references such as food safety. Follow recommended temperatures and hygiene for best results.
Nutritional Information (per serving)
| Nutritional Information (per serving) | Calories | Protein | Carbs | Fat |
|---|---|---|---|---|
| Bone-in, skin-on thigh (150g) | 280 | 26g | 0g | 18g |
| Olive Oil (1/2 tbsp) | 60 | 0g | 0g | 7g |
| Spices & herbs | 5 | 0g | 1g | 0g |
Technical Notes and Equipment
A reliable instant-read or probe thermometer is essential for precision; it removes the guesswork from timing. For details on thermometer types and calibration, review the thermometer overview.
Set up a two-zone grill when using charcoal or gas to create a hot sear zone and a cooler finish zone. This setup mimics an oven’s ambient heat while preserving the option to sear on direct heat.
Use heavy pans or a cast-iron skillet when finishing in the oven to preserve heat and encourage even cooking. Consistent contact and radiant heat reduce hot spots and speed finishing without drying the meat.
Final Notes
Mastering direct heat and indirect heat is a practical skill set that improves reliability and flavor for all poultry cooks. Consistent use of temperature checks, resting, and appropriate heat selection elevates everyday chicken to restaurant-quality results.
Adopt the routines described here and practice across cuts until the timing and behavior of your equipment feel intuitive. With repeated application you will deliver juicy, safe, and well-textured chicken every time.
See also: chicken heat | grill basics
FAQ
What is the core difference between direct and indirect heat?
Direct heat places the chicken directly above the heat source for immediate browning and crisping. Indirect heat surrounds the chicken with warm air and radiates heat gently to avoid burning the exterior.
When should I use direct heat over indirect?
Use direct heat for small, skin-on, or thin cuts that need quick browning and a crispy crust. Switch to indirect when pieces are thick, bone-in, or require time to reach safe internal temperatures without charring.
Can I combine both methods in one cook?
Yes. A common method is to sear over direct heat, then move the chicken to indirect heat to finish cooking. That combination produces both crisp skin and a moist interior.
How do I prevent flare-ups on the grill?
Trim excessive fat, keep a cooler zone to move pieces into, and use tongs to reposition items during flare-ups. A short spray from a water bottle helps control flames without dousing coals.
What internal temperature is safe for chicken?
The safe internal temperature target for chicken is 165°F (74°C) measured at the thickest point. Use a calibrated probe to confirm, then allow brief resting time for carryover stabilization.
Recommended Reading:
]]>
- Key heat range: medium-high (375–425°F) for surface browning without burning.
- Core tip: keep the core intact to hold each wedge while grilling.
- Finishing move: a splash of acid brightens the caramelized sweetness.
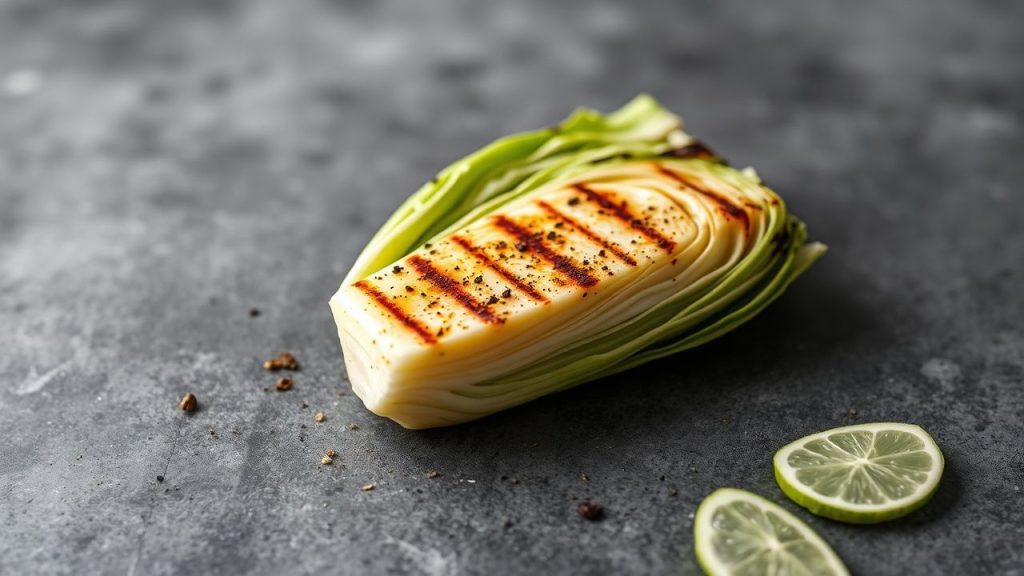
Why grill cabbage
Grilling concentrates cabbage flavors by driving surface browning and removing some water, which intensifies sweetness and adds smoky notes. This approach turns ordinary cabbage into a textural element that holds up on a plate and pairs well with proteins and grains.
Grilled wedges also offer a range of mouthfeels from crisp charred edges to a tender core, making them more versatile than boiled or steamed preparations. The contrast between crunchy exterior and soft interior makes them visually appealing and satisfying to eat.
Prep and cook time
Preparation: 10 minutes. Prepare wedges by trimming loose outer leaves and cutting the head into 4 sturdy wedges with the core left in place to bind leaves.
Cooking: 20–25 minutes. Grill at medium-high heat, searing each side to develop deep brown spots while keeping the interior tender but not mushy.
Yield and difficulty
Serves 4 as a side. This is an approachable technique suitable for chefs and home cooks who want dependable results.
Difficulty: Easy to Medium. It requires temperature control and patience to achieve even caramelization without overcooking the center.
Ingredients
Core ingredients: 1 large green cabbage (cut into 4 wedges, core intact), 3 tablespoons olive oil, 1 teaspoon smoked paprika, 1 teaspoon garlic powder, ½ teaspoon ground cumin, 1 teaspoon kosher salt, freshly ground black pepper to taste.
Finishes: 1 tablespoon apple cider vinegar or lemon juice; optional garnish: chopped parsley, toasted pine nuts, or grated hard cheese. Keep ingredients simple to let caramelization and smoke shine.
Instructions
Preheat a gas or charcoal grill to medium-high heat, targeting a surface temperature around 375–400°F. If you grill indoors, heat a heavy cast-iron skillet or grill pan until very hot to mimic direct grill heat.
- Trim and slice: Remove loose outer leaves and quarter the cabbage through the core so each wedge keeps its shape.
- Season: Whisk oil, smoked paprika, garlic powder, cumin, salt, and pepper; brush both faces of each wedge. Oil promotes browning and spices add complementary savory and smoky notes.
- Sear cut-side down: Place wedges cut-side down on the hot grate and cook 6–8 minutes without moving to develop deep caramelization. Look for rich golden-brown patches that indicate Maillard and sugar browning reactions.
- Flip and finish: Turn with a wide spatula and grill the other side 6–8 minutes, then move to indirect heat or reduce flame to finish cooking through without burning edges.
- Finish with acid: Off the heat, drizzle apple cider vinegar or lemon juice over warm wedges to lift flavors and balance sweetness.
For additional technique options and recipe variations, see our internal resources on Ultimate Grilled Vegetables Guide and quick-start Grill Tips. These pages list heat charts and conversion tips for different grills and pans.
Science of caramelization and Maillard reactions
Two browning processes deliver flavor: carbohydrate caramelization and the Maillard reaction. Caramelization breaks down sugars at high heat to create sweet, toasty compounds while Maillard reactions form savory, umami-rich molecules from amino acids and sugars.
Both processes depend on surface temperature, moisture, and time on the heat source. Managing those variables lets you steer toward sweet caramel notes, savory depth, or a balance of both—so monitor heat rather than relying on arbitrary timings.
Practical technique notes
Keep the core intact; it acts as a backbone that prevents each wedge from falling apart during flipping. Brush oil generously; it both transfers heat and helps the surface proteins and sugars brown evenly.
Control flare-ups by trimming excess fat from adjacent meats and keeping a two-zone fire on charcoal grills. For consistent results, measure grate temperature with an infrared thermometer and adjust vents or burner settings as needed.
Tips for success
Control heat: Medium-high sear then finish over medium heat produces the best balance of crust and tender center. Avoid extremes: too hot chars before the center cooks; too cool yields gray, limp wedges.
Patience matters: Let the surface form a crust before flipping; this prevents tearing and enables easy release. Use a wide spatula and a moderate flipping cadence to maintain wedge integrity.
Expert Insight
Marinating overnight adds depth but can reduce surface dryness needed for strong caramelization; if you marinate, pat wedges dry before searing. For indoor cooks, preheat a heavy skillet until it smokes slightly, then reduce heat a touch to maintain control.
Pro-Caution
Serving suggestions
Serve grilled cabbage wedges as a rustic side beside roasted meats or grain bowls, or use them as a centerpiece for a vegetarian plate topped with yogurt-herb sauce or spicy aioli. The wedges’ char and tender core make them an excellent textural contrast on composed plates.
Garnish with bright elements like lemon zest or parsley, and add crunchy elements such as toasted pine nuts for texture contrast. For a full plate, combine with grilled root vegetables and a hearty grain for an earthy, seasonal entrée.
Nutrition at a glance
Grilled cabbage remains a low-calorie, fiber-rich vegetable providing vitamin C and K with minimal added fat when dressed lightly. Grilling retains more vitamins than boiling because nutrients do not leach into cooking water.
Use light oil and modest finishing cheese to keep servings nutrient-dense and calorie-conscious. For more on cabbage nutrition and micronutrients, see the Wikipedia entry on Vitamin C and general Nutrition.
| Nutrient | Amount per serving |
|---|---|
| Calories | 110 kcal |
| Protein | 3 g |
| Carbohydrates | 9 g |
| Fat | 7 g |
FAQ
Why grill cabbage wedges instead of steaming or boiling?
Grilling concentrates flavor through controlled browning and introduces smoky notes that steaming or boiling cannot deliver. It also preserves texture contrast between charred edges and a tender core, which enhances mouthfeel and plate presentation.
What temperature gives the best char without burning?
Target a grate temperature of 375–425°F (190–220°C) for direct searing and move wedges to medium heat to finish. Use an infrared thermometer to verify grate temperature and avoid guesswork for repeatable results.
How do I know when a wedge is done?
Look for deep golden-brown patches on the cut surface and a fork that slides in with slight resistance. The wedge should hold shape while offering a tender bite—avoid overcooking until completely soft.
Can I add marinades or sauces?
Yes; brush on sauces that won’t burn quickly, or add them after the grill stage to prevent excessive charring. Finishing with acidic or creamy sauces balances the smoky sweetness and adds complexity.
Are there indoor alternatives to a grill?
Use a preheated cast-iron skillet or a heavy grill pan over high heat to mimic direct sear. A broiler can also work for quick surface browning, but watch closely to prevent burning.
See also: grilled cabbage
]]>
- At a glance: Control heat to caramelize without collapsing the wedge.
- Acid and oil in a short marinade tenderize and boost flavor without sogginess.
- Direct sear plus moderate cooking yields crisp edges and tender cores.
Prep and Cook Time
Plan for efficient workflow: active prep is short, but a brief rest in the refrigerator improves results. Total clock time depends on whether you marinate and on grill temperature control.
Typical timings work well for home grills and provide a reliable baseline for adjustments. Use these numbers to estimate and to scale for larger batches.
- Preparation: 15 minutes
- Marination: 30 minutes to 1 hour (optional)
- Grilling: 12-15 minutes
- Total: Approximately 1 hour to 1 hour 30 minutes
Yield
This method yields about four servings when using a medium head of cabbage cut into six wedges. Each wedge holds enough flavor to act as a hearty side or light vegetarian main.
Adjust wedge size to serve more people or to create smaller, shared tasting portions. Keep the core intact so wedges hold shape during the sear.
Difficulty Level
Skill required: Easy to Medium. The technique relies on timing and heat management rather than advanced knife work. Even beginners can produce consistent results with a thermometer and a visual checklist.
Intermediate cooks will benefit from refining charcoal or gas temperature control and experimenting with spice blends. The payoff is reliably crisp edges and a tender interior.
Ingredients
Use fresh, firm cabbage for the best texture and flavor. A tighter head gives sweeter results and resists falling apart on the grill.
Keep seasonings simple to highlight the vegetable; acid and oil matter most for heat transfer and cell softening.
- 1 medium green cabbage, cut into 6 wedges with core intact
- 3 tablespoons olive oil
- 1 tablespoon apple cider vinegar or fresh lemon juice
- 2 teaspoons smoked paprika
- 1 teaspoon garlic powder
- 1 teaspoon sea salt
- ½ teaspoon freshly ground black pepper
- ½ teaspoon crushed red pepper flakes (optional)
- Fresh herbs (thyme or parsley) for garnish
- Grated Parmesan or vegan cheese (optional)
Instructions
Follow a clear sequence: rinse, cut, season, rest briefly, then sear and finish. The core keeps leaves aligned and allows even heat conduction from outer to inner layers.
Heat and contact time determine caramelization and tenderness. The science behind surface browning is the same Maillard chemistry used across roasting and searing techniques.
- Prepare the wedges: Rinse the cabbage and pat dry. Slice into 6 equal wedges, leaving the core attached to hold the layers together.
- Make the marinade: Whisk together olive oil, apple cider vinegar, smoked paprika, garlic powder, sea salt, black pepper, and red pepper flakes. The acid and oil help soften cellulose and speed flavor uptake.
- Marinate briefly: Brush or toss each wedge in the dressing. Chill for 30 minutes if time allows; short marinades soften outer leaves without soaking the wedge.
- Preheat the grill: Heat to medium-high, roughly 400°F/200°C. Good heat control matters for searing and for avoiding a burned exterior with an undercooked interior. See Grilling for equipment and fuel notes.
- Sear cut side down: Place wedges on the grill cut side down. Sear 5–7 minutes until golden with blistering; then flip and grill 5–8 minutes until tender when pierced.
- Check doneness: Test with a skewer or knife; it should slide through with modest resistance. The interior should be soft but still hold structure.
- Finish and serve: Transfer to a platter, garnish with herbs and cheese if desired, and add a final drizzle of olive oil for shine.
Tips for Success
Understand the balance of moisture and heat: too much low heat produces limp leaves; too much high heat chars before the inside softens. Aim for quick surface browning and steady internal heating.
Thicker outer leaves need more time; smaller heads require less. Adjust times and watch for visual cues rather than relying on fixed minutes alone.
Expert Insight
Keep at least one neutral paragraph between Expert Insight and any caution notes. That helps readers process practical tips before safety advice.
Serving Suggestions
Serve wedges with contrasting textures and acids to balance smoky richness. A spoonful of herbed yogurt or chimichurri brightens each bite and adds moisture without sogginess.
For heartier plates, place wedges on creamy polenta or a bed of quinoa salad. Toasted nuts, seeds, or pomegranate seeds add crunch and visual appeal.
Pro-Caution
Use the wedge as a plated centerpiece or slice it into sections for shared platters. The contrast between charred edge and buttery center is the goal.
Why the Science Works
Two chemical processes create the flavor and color you see: the Maillard reaction and caramelization. Both transform sugars and amino acids into flavorful, aromatic compounds.
Learn these basics and you can manipulate texture and taste. See Maillard reaction and caramelization for the mechanisms behind browning.
On a cellular level, controlled acid and heat change cellulose and pectin behavior, loosening leaf structure without turning wedges to mush. For reference on plant cell walls, consult Cellulose.
Nutritional Snapshot
Grilled cabbage keeps most vitamins intact while concentrating flavor. Minimal oil keeps calories modest and the dish nutrient-dense.
Seasoning choices alter sodium and fat counts, so adjust to dietary needs without sacrificing technique. The table below gives a typical per-serving breakdown.
| Nutritional Component | Per Serving |
|---|---|
| Calories | 120 kcal |
| Protein | 4 g |
| Carbohydrates | 10 g |
| Fat | 8 g |
Q&A
The questions below address common technique and flavor concerns. Answers focus on actionable steps you can test at the grill.
Use these responses as a checklist while you practice. Small changes in timing or temperature yield consistent improvements.
Q1: What makes grilling cabbage wedges different from boiling?
Grilling applies dry, high heat that produces surface browning and smoke flavors. Boiling simply softens the vegetable without creating Maillard-derived complexity.
Q2: Why keep the core intact?
The core acts as a spine that holds leaves together during searing and flipping. Removing it causes layers to separate and scatter on the grates.
Q3: How do I avoid a burnt exterior and raw center?
Control distance from heat and use two-zone cooking if necessary. Sear on high briefly, then move to a cooler zone to finish gently.
Q4: Does marinating change texture?
A short acidic marinade loosens outer fibers and speeds caramelization. Overlong marination can saturate the wedge and reduce the desired bite.
Concluding Remarks
Mastering grilled cabbage wedges comes down to control: of heat, timing, and seasoning. Each variable contributes predictably to texture and flavor when you apply consistent tests.
Practice with one wedge as a test-run and adjust temperature or resting time before cooking the full batch. That approach saves time and yields repeatable, high-quality results.
FAQ
How do I choose the best cabbage for grilling?
Select a medium, firm head with densely packed leaves and no soft spots. Tighter heads tend to be sweeter and hold up better to searing.
Can I prepare wedges ahead of time?
You can trim and marinate wedges up to 4 hours ahead; refrigerate them covered. Grill just before serving to preserve crisp edges.
What if I only have a stovetop pan?
Use a cast-iron skillet to mimic grill contact and sear the cut side. Finish in the oven at 375°F to allow the interior to tenderize evenly.
Are there vegan finishing options?
Yes. Swap Parmesan for a nutritional yeast or a sprinkle of toasted sesame for umami. Drizzle tahini or a lemon vinaigrette for richness.
How should I store leftovers?
Cool wedges to room temperature, then refrigerate in an airtight container for 2–3 days. Reheat briefly under a broiler or in a hot skillet to restore edge crispness.
See also: grilled cabbage
]]>