- Focus on one variable: change temperature, not temperature and time together.
- Measure precisely: use a thermometer and digital scale for repeatable results.
- Document outcomes: keep a short log to track meaningful pattern changes.
Optimizing Temperature and Timing for Consistent Culinary Results
Heat and time dictate texture and flavor. Proper searing, controlled simmering, and timed rests transform proteins and vegetables into predictable outcomes.
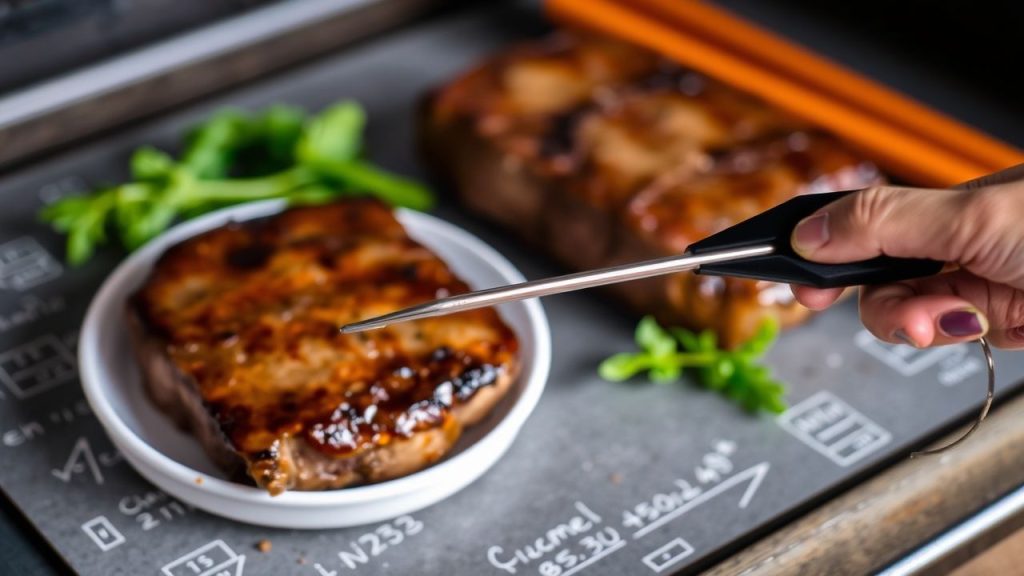
When searing meat, target the correct surface temperature to trigger browning without overcooking. The Maillard reaction is the chemical process that creates the browned flavor and aroma; learn its basics on Maillard reaction.
Surface Heat vs. Internal Temperature
Surface temperature controls browning; internal temperature controls doneness. Use a probe or instant-read thermometer to monitor internal values during and after cooking.
A calibrated thermometer reduces guesswork. For instrument basics, see the entry for thermometer and choose one rated for culinary use.
Practical Recipe: Controlled Chicken Skillet
This recipe demonstrates how small variable changes yield consistent results across cooks. Follow the sequence and measure key points.
Keep one variable steady per test: heat level, pan type, or batch size. Record the results and adjust in future runs.
Recipe Snapshot
Prep Time: 20 minutes. Cook Time: 30 minutes. The timing here reflects a single-skillet workflow that scales if you keep pan crowding in check.
Yield: Serves 4. Difficulty: Medium. If you change protein size or pan type, expect at least a 10% time variance.
Ingredients
- 2 tbsp olive oil, extra virgin
- 1 medium onion, finely diced
- 3 garlic cloves, minced
- 1 lb chicken breasts, cut into 1-inch cubes
- 1 tsp smoked paprika
- ½ tsp sea salt
- ¼ tsp freshly ground black pepper
- 1 cup cherry tomatoes, halved
- ½ cup chicken broth, low sodium
- 1 tbsp fresh thyme, chopped
- 1 tbsp lemon juice, freshly squeezed
Instructions
- Heat the oil in a heavy skillet over medium heat until it shimmers. Add diced onion and sauté until translucent, about 4 minutes.
- Add garlic and cook 30 seconds until aromatic; avoid browning so flavor remains bright.
- Raise heat to medium-high and add seasoned chicken. Sear until golden and cooked through, roughly 8 minutes, turning pieces for even color.
- Cook tomatoes until they soften, about 3 minutes, releasing juices that form the pan sauce base.
- Deglaze with chicken broth and simmer uncovered for 5 minutes to concentrate flavor and thicken the sauce slightly.
- Finish off heat with thyme and lemon juice to balance richness with acidity.
Tips for Success
Control one variable at a time to build reliable technique. Small, repeatable changes teach you how each factor affects the final plate.
Use tools that quantify variables: a probe thermometer, a digital scale, and timers. For a technical view of ingredient interactions, review food chemistry.
- Temperature control: Aim for pan surface ranges that support browning without burning.
- Timing: Avoid crowding the pan; work in batches for stable sear and consistent internal temps.
- Measuring: Use scales for spices and weight-sensitive elements to cut variance.
- Cookware: Match pan size to volume; large surface area increases evaporation and browning speed.
 Expert Insight
Adjust recipes for equipment differences. Induction heats faster; gas gives quick response. Adapt heat down 1–2 notches on fast-reacting surfaces.
Serving and Storage
Serve this chicken over neutral grains like couscous or mashed potatoes to showcase texture and sauce. Garnish with fresh thyme and a light oil drizzle to boost aroma.
Cool leftovers quickly and store in airtight containers in the refrigerator. Reheat gently over low heat to preserve moisture and avoid protein tightening.
 Pro-Caution
Nutrition and Further Reading
Per serving estimates: approximately 320 kcal, 35 g protein, 6 g carbohydrates, and 15 g fat. Use these as planning targets if you adjust portion sizes or ingredients.
For broader technique references, consult the general topic of cooking and the discipline of culinary arts to place method decisions in context.
| Nutrient | Amount per Serving |
|---|---|
| Calories | 320 kcal |
| Protein | 35 g |
| Carbohydrates | 6 g |
| Fat | 15 g |
Want more precision techniques? Visit our internal resources for step-by-step calibration and advanced control strategies: Precision in Kitchen Techniques and Temperature and Timing Guide. These guides offer checklists you can print and use during tests.
Q&A
Q1: What are “variables” in the kitchen?
A: Variables are measurable factors that change a dish’s outcome: temperature, time, ingredient mass, equipment, and moisture. Treat them as parameters to control, test, and log.
Q2: Which variable gives the biggest payoff for home cooks?
A: Temperature control gives the most immediate improvement. Learning to manage surface heat and internal probe readings reduces many common errors.
Q3: Can tools remove all variability?
A: Tools reduce guesswork but cannot eliminate ingredient variance. Freshness, seasonality, and produce size still affect outcome; calibrate for those differences rather than chasing perfection.
Q4: How should a beginner start experimenting?
A: Change one variable per attempt and keep a two-line log: what you changed and the result. After a few repeats, patterns emerge and you gain predictable control.
Final Thoughts
Variables are the operational knobs of cooking. Learn to adjust heat, time, and quantities deliberately, and you convert recipes into reproducible results.
Approach the kitchen as a small lab: measure, test, record, and iterate. That approach yields consistent meals and builds real culinary skill.
FAQ
How do I calibrate my pan and stove?
Heat an empty pan for defined intervals and time how long water droplets sizzle. Use those observations to map stove settings to pan surface behavior under load.
Document the pan material and thickness. A thin pan heats faster and requires lower settings than a heavy, thick-bottomed skillet.
What probe temperature should I use for chicken breasts?
Target 160–165°F (71–74°C) for fully cooked, juicy chicken breast. Pull meat slightly under final target and rest; residual heat raises internal temperature a few degrees.
Always measure in the thickest part for a reliable reading.
How do I scale a skillet recipe without losing browning?
Scale by batch, not by pan size beyond its effective surface area. Cook in multiple batches to maintain high surface temperatures and consistent browning.
If you must increase volume, use a larger, heavier pan and increase heat in measured increments while monitoring with a thermometer.
How important is ingredient weight versus volume?
Weight gives repeatability. Spices and chopped produce vary by packing and size. Use a digital scale for repeatable seasoning and portion control.
For liquids, measuring cups suffice, but for dry ingredients, prefer grams for consistency.
Where can I learn more about the science behind these techniques?
Start with the food chemistry overview and practical technique guides in culinary curricula. Practice with short experiments and keep results brief and focused.
Visit our internal pages for printable checklists and experiment logs: Precision in Kitchen Techniques.
See also: Kitchen Control
]]>
- Salt early: dry-brine for flavor and improved muscle relaxation.
- Sear hot: create a Maillard crust to lock flavor and texture.
- Control temp: use an instant-read thermometer and rest before slicing.
- Aging or enzymes: break down collagen for sustained tenderness.
Prep and Cook Time
Preparation: 10 minutes. Bring steaks to room temperature for even cooking and predictable carryover.
Cook Time: 12–15 minutes depending on thickness. Use direct high heat for a short sear, then lower the heat to finish to target temperature.
Yield and Difficulty
Yield: Serves 2 hearty portions. Adjust times when cooking thicker cuts or multiple pieces in one pan.
Difficulty: Medium. The techniques require timing, temperature tracking, and attention to surface moisture for a reliable result.
Ingredients
Gather quality ingredients and simple tools: two 10–12 oz ribeye steaks, kosher salt, freshly ground black pepper, a high smoke-point oil, unsalted butter, fresh thyme, and garlic.
Use a heavy skillet (cast iron preferred) and an instant-read thermometer. Choosing the right cut matters; ribeye offers marbling that improves tenderness and mouthfeel.
- 2 (10-12 oz) ribeye steaks, at room temperature
- 1 tablespoon kosher salt
- 1 teaspoon freshly ground black pepper
- 2 tablespoons high smoke-point oil (canola or avocado)
- 2 tablespoons unsalted butter
- 3 sprigs fresh thyme
- 3 cloves garlic, lightly crushed
Instructions
Step 1 — Dry the surface: Pat steaks thoroughly with paper towels. A dry surface ensures a rapid Maillard reaction and prevents steaming.
Step 2 — Season and rest: Salt both sides generously. Let seasoned steaks sit for 30–120 minutes uncovered in the fridge for a basic dry-brine effect or rest 30 minutes at room temperature if cooking immediately.
- Preheat skillet: Heat a heavy pan over high heat until smoking hot. Add oil and swirl to coat the surface.
- Sear both sides: Place steak away from you to avoid splatter. Sear undisturbed 3–4 minutes per side to build a dark crust, then reduce heat.
- Finish and baste: Lower heat to medium-low, add butter, thyme, and garlic, and spoon melted butter over the steaks to enrich flavor.
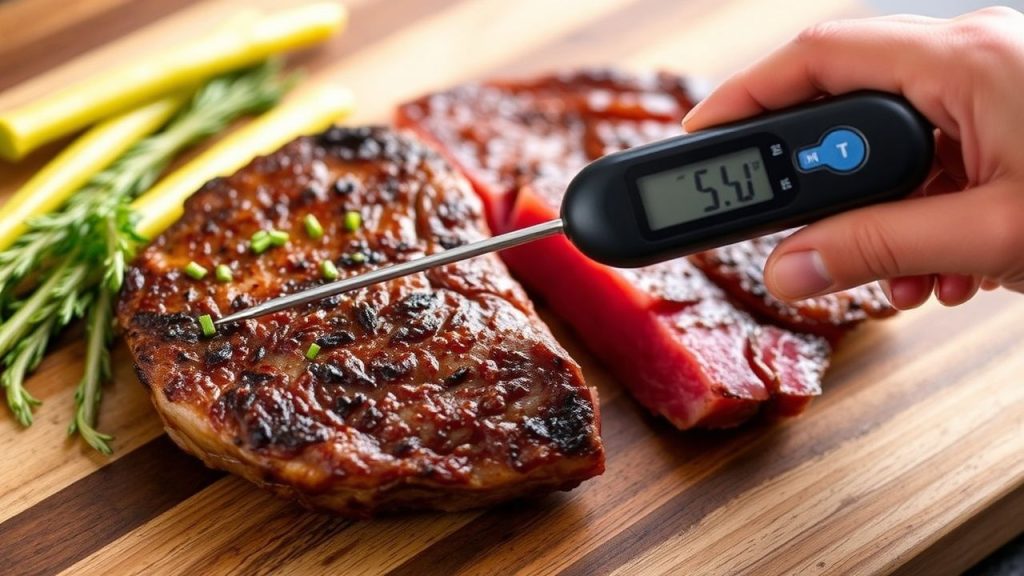
- Check doneness: Use an instant-read thermometer: 130°F for medium-rare, 140°F for medium; remember carryover heat raises temperature after removal.
- Rest and slice: Tent loosely with foil and rest 5–10 minutes. Slice against the grain to shorten fibers and maximize tenderness.
Pro-Caution
Science of Tenderness
Meat tenderness depends on three physical elements: muscle fiber structure, connective tissue, and intramuscular fat. Each element responds differently to salt, heat, and time.
Connective tissue like collagen toughens with heat but converts to gelatin under long, low temperatures. Learn more about connective tissue on connective tissue.
Maillard Reaction and Flavor
The Maillard reaction produces the brown crust and dozens of flavor compounds. It requires a dry surface and high heat to proceed efficiently.
Control moisture and maximize surface temperature to favor Maillard products while avoiding burning. For a technical reference, see Maillard reaction.
Enzymes, Aging, and Tenderizing
Aging concentrates flavor and allows endogenous proteolytic enzymes to cleave proteins. Both wet and dry aging promote measurable tenderization.
For background on controlled breakdown processes used in the trade, consult aging of meat.
Chef’s Notes
Cut selection: Choose cuts with appropriate marbling for your cooking method. Ribeye offers intramuscular fat that melts during cooking and improves tenderness.
Temperature control: Use an instant-read thermometer for accuracy. Remove steaks slightly below target temp to account for carryover cooking.
Expert Insight
Variations and Advanced Techniques
For tougher cuts, employ low-and-slow braises to hydrolyze collagen into gelatin. Alternatively, consider sous-vide cooking to hold temperature precisely while enzymes work.
Enzymatic marinades (pineapple, papaya) contain proteases that act on surface proteins. Use them briefly to avoid a mushy surface and to preserve internal texture; read about proteases protease.
Serving Suggestions
Serve sliced steaks with a simple pan jus or herb butter to complement but not mask beef flavor. Sides such as roasted potatoes or a bright arugula salad balance richness.
Finish with flaky sea salt and fresh herbs. A small garnish adds visual contrast and a final aromatic note without overwhelming texture.

Nutrition
Estimate per serving: approximately 680 kcal, 55 g protein, 52 g fat, 0 g carbohydrates. Values vary by cut and trimming.
Trim visible fat to control saturated fat content, or choose leaner cuts when desired. Balance portions with vegetable sides for a complete plate.
FAQ
Why does a properly rested steak taste juicier?
Resting allows muscle fibers to relax and reabsorb some exuded juices. Cutting immediately forces those juices onto the plate, reducing perceived juiciness.
Rest time depends on thickness; 5–10 minutes is common for typical steaks to equalize temperature and retain moisture.
Does salt actually tenderize meat?
Salt initially draws moisture out, then reabsorbs it with dissolved salt molecules that season and slightly alter protein structure. This process, known as dry brining, improves water-holding capacity and texture.
Timing matters: brief salting seasons the surface, while longer salting (30–120 minutes) yields more pronounced tenderizing effects.
How should I use a thermometer for best results?
Insert an instant-read thermometer into the steak’s center, avoiding bone or fat pockets. Aim for 5°F below your target and allow carryover heat to finish cooking during rest.
Verify multiple pieces when cooking several steaks to ensure uniform doneness across the batch.
Are marinades necessary for tenderness?
Marinades add flavor and can alter surface texture. Acidic or enzymatic marinades tenderize mainly at the surface and are less effective on thick cuts without extended time.
For deep tenderization, use aging, mechanical tenderizing, or long, low-temperature cooking methods instead of relying solely on marinades.
What cut should I pick for consistent tenderness?
Select cuts from low-activity muscles for natural tenderness. Filet mignon and ribeye top the list because they have less connective tissue and good marbling.
For leaner preferences, sirloin or strip steak can perform well with careful temperature control and proper slicing against the grain.
Master these steps and you will consistently produce steaks that are tender, flavorful, and texturally satisfying. Science gives you the rules; precise technique delivers the result.
See also: tender steak
]]>
- Faster roast time because the bird lies flat and heats evenly.
- More surface for seasoning so rubs and marinades contact more meat and skin.
- Consistent crisping since larger skin surfaces contact hot air and radiant heat.
- Simple technique that scales from chicken to larger poultry with modest adjustments.
Why spatchcock chicken works
Flattening a bird changes how heat moves through tissue. By reducing the maximum thickness you shorten conductive paths, which speeds the approach to safe internal temperatures while lowering the chance of overcooked breast meat.
This principle rests on classic heat-transfer behavior; for a primer on the physics behind conduction consult the heat conduction entry. Practical kitchen outcomes also rely on the Maillard reaction for browned flavor; see the Maillard reaction for the chemistry that yields savory crusts.
Prep and Cook Time for spatchcock chicken
Plan active prep time at about 15 minutes for the cut and rub, plus 2 to 4 hours if you choose to marinate. Roast time typically falls between 35 and 45 minutes at 425°F (220°C) for a 3.5–4 lb bird; adjust for size and oven behavior.
Use an instant-read thermometer to confirm doneness at the thigh (165°F / 75°C). Thermometry outperforms timers because oven calibration and bird mass vary; always verify core temperature before plating.
Ingredients & Yield for spatchcock chicken
This recipe yields 4 to 6 servings from a 3.5–4 lb whole bird. The exposed surface and reduced cooking time concentrate flavor so portions taste richer than weight alone suggests.
For the best balance between skin crisp and interior juiciness, choose a bird of uniform size. If you prefer, ask your butcher for a pre-spatchcocked poultry to save prep time and reduce handling.
Ingredients
1 whole chicken (3.5 to 4 lbs), spatchcocked
3 tbsp olive oil; 1 tbsp smoked paprika; 1 tsp garlic powder; 1 tsp onion powder; 1 tsp kosher salt; ½ tsp black pepper; ½ tsp cayenne (optional); zest and juice of 1 lemon; 2 tbsp chopped rosemary; 2 tbsp thyme; 1 cup low-sodium broth (pan)
Yield
Estimate 4 to 6 servings depending on appetite and side dishes. Larger breasts typically yield two generous portions while thighs contribute additional platefuls.
Leftovers keep well and make sandwiches, salads, or a quick fried rice. Reserve bones for stock to extract remaining flavor and limit waste.
Technique: Spatchcock Chicken — Spatchcock and Cook
Place the bird breast-side down and use sharp kitchen shears to cut along both sides of the backbone from tail to neck. Remove the backbone, then flip and press the breastbone until the breast flattens audibly.
Tuck wing tips and position the bird skin-side up on a rack set in a rimmed sheet pan. Add a small amount of pan liquid to protect drippings; do not flood the pan or you will steam the skin instead of crisping it.
- Spatchcock the chicken: Remove the backbone and press flat. Practice improves speed and yields a clean, uniform profile.
- Make the rub: Whisk the oil with smoked paprika, garlic and onion powders, salt, pepper, cayenne, lemon zest, rosemary, thyme, and lemon juice. Oil carries fat-soluble flavor and helps the skin brown.
- Apply and rest: Rub both sides, then refrigerate uncovered for 1 hour for drier skin or covered for deeper herb penetration. Dry skin sears and browns faster.
- Cook: Roast at 425°F (220°C) for 35–45 minutes, or sear on direct heat then move to indirect grill zones. Target 165°F (75°C) in the thigh with an instant-read thermometer.
- Rest and carve: Tent loosely and rest 10–15 minutes. Carve along joints and reserve bones for stock.
Tips for Success with spatchcock chicken
Pat the skin very dry and salt early when time allows. Salt draws moisture to the surface, which then dries and promotes a deeply browned, crisp crust when heated.
Control heat with a rack to encourage airflow and use pan liquid sparingly to prevent steaming. On the grill, alternate direct and indirect zones to avoid burnt skin while finishing interior temperature.
- Master the cut: Practice on a single bird or buy pre-spatchcocked poultry to save time.
- Marinate smart: Short marinades punch through quickly on a flattened bird; overnight yields bolder herb notes.
- Thermometer first: Probe the thickest thigh without touching bone for the real reading.
- Rubs and finishes: Try smoked paprika, chipotle, or a lemon-herb glaze to vary the flavor profile.
[LASTLINE_SEP]
Expert Insight
After resting, carve with a sharp knife along joints. Reserve pan juices to spoon over slices for finishing flavor and moisture.
Safety and Handling for spatchcock chicken
Always cook poultry to 165°F (75°C) measured in the thigh for safety. Use separate boards and utensils for raw poultry and wash hands thoroughly to prevent cross-contamination.
Chill leftovers promptly and use within 3–4 days refrigerated, or freeze for longer storage. Proper handling reduces food-safety risk and preserves quality.
Pro-Caution
Serving Suggestions for spatchcock chicken
Pair the bird with roasted root vegetables or a bright chimichurri to cut through richness. Acidic components like lemon or vinegar-based sauces brighten the palate and balance fat.
Garnish with lemon wedges and chopped parsley, and present on a carving board. Reserved pan juices or a light gravy provide an extra layer of savory moisture.
Nutritional Information for spatchcock chicken
Estimate nutrition per serving at about 320 kcal with approximately 40 g protein, 1 g carbs, and 15 g fat when prepared with light oil and skin retained. Values vary with portion size and added fats.
Use a nutrition calculator for precise values based on your specific ingredients and portioning. Adjust for skin removal or added sides when planning dietary needs.
| Nutritional Information (per serving) | Calories | Protein | Carbs | Fat |
|---|---|---|---|---|
| Spatchcocked Chicken | 320 kcal | 40 g | 1 g | 15 g |
Q&A about spatchcock chicken
Spatchcocking applies broadly to whole birds and some large cuts to shorten cook time while improving evenness. The technique scales from domestic chicken to turkey with heat and time adjustments.
For an overview of poultry species and common practices consult the chicken article. To understand the related cutting technique, see the butterflying entry.
FAQ
What exactly is spatchcock chicken and how is it different from butterflying?
Spatchcock chicken refers to removing the backbone and flattening the bird so it cooks evenly. Butterflying is a similar concept applied to other cuts; both reduce thickness but spatchcock often implies removing more structure for a fully flat profile.
How long should I marinate a spatchcock chicken?
Marinate for 2 hours for noticeable flavor enhancement or overnight for deeper penetration. Avoid highly acidic long marinades that can soften protein excessively; refrigerate while marinating for safety.
Can I use the spatchcock method on turkey or other poultry?
Yes. Larger birds benefit from flattening, though you should increase cooking time and reduce peak heat to avoid burnt skin before the interior reaches safe temperature. Allow longer resting time for large birds.
What tools make spatchcock chicken easier?
Sharp kitchen shears, a heavy-duty cutting board, and an instant-read thermometer are essential. A towel under the board prevents slipping; a rimmed pan with a rack encourages airflow around the bird.
Should I remove the skin before cooking a spatchcock chicken?
Keep the skin for best moisture retention and browning. Removing skin reduces crispness and dries the meat faster; if you must remove it, plan to baste or brine to preserve juiciness.
For further technique notes and troubleshooting, consult authoritative roasting resources and experiment with small adjustments for your oven or grill. Practical repetition yields consistent results.
Relevant technical references: roasting, Maillard reaction, and butterflying.

See also: spatchcock chicken
]]>
- Key takeaway: Sear to develop a Maillard crust, then finish in the oven for juiciness.
- Key takeaway: Use a high-quality marinara sauce and properly handled mozzarella for the best melt.
- Key takeaway: Rest the chicken after baking to redistribute juices and improve texture.
- Key takeaway: Measure internal temperature with an instant-read thermometer for safety and precision.
Prep and Cook Time
Preparation: 15 minutes. Pound the breasts to an even thickness and season them evenly to ensure predictable cooking.
Cooking: 30 minutes. This covers searing, a short oven finish, and an optional broil to brown the cheese.
- Total Time: 45 minutes
Yield and Difficulty
This recipe yields four main-course servings, each balancing protein, sauce, and cheese for a satisfying plate. Adjust portion sizes to fit appetite or dietary limits.
Difficulty rates easy-to-medium. The technique centers on controlled searing and accurate internal temperature monitoring for reliable results.
Ingredients
Gather ingredients that deliver clear flavor and dependable texture. Consistent chicken thickness keeps cooking times uniform and predictable.
Select whole-milk or part-skim mozzarella and a vivid tomato base to avoid a flat finish. Below is a concise ingredient list to assemble before you begin.
- 4 boneless, skinless chicken breasts (about 6 ounces each, pounded to even thickness)
- 2 tablespoons olive oil
- 3 cups marinara sauce
- 2 cups shredded fresh mozzarella cheese
- 1 teaspoon garlic powder
- 1 teaspoon onion powder
- 1 teaspoon dried oregano
- 1 teaspoon dried basil
- 1/2 teaspoon crushed red pepper flakes (optional)
- Salt and freshly ground black pepper to taste
- Fresh basil leaves for garnish
- Grated Parmesan cheese for finishing (optional)
For quick background reading on primary components, review standard references on marinara sauce, mozzarella, and basil.
Instructions
Follow methodical steps so searing builds flavor and the oven finish preserves juiciness. Work with a heavy, oven-safe skillet such as cast iron or stainless steel for even heat and predictable browning.
Monitor the internal temperature to 165°F (74°C) in the thickest part for safety and ideal texture. Use an instant-read thermometer for accurate, repeatable results.
- Preheat the oven to 400°F (200°C). A hot oven shortens oven time and reduces moisture loss.
- Season the chicken breasts with salt, pepper, garlic powder, onion powder, oregano, and dried basil. Pat the spice blend into both sides for even seasoning.
- Heat the olive oil in a large oven-safe skillet over medium-high heat. Add the chicken and sear until golden, about 4 minutes per side; do not crowd the pan.
- Pour the marinara over the seared chicken so each breast receives an even coating. Spoon sauce into hollows to ensure even heating.
- Top with mozzarella so the cheese covers meat and sauce in a single layer for consistent melting.
- Bake uncovered for 12–15 minutes, or until the chicken reaches 165°F (74°C) in the thickest part. Broil 2–3 minutes if you need a golden finish; watch closely to avoid burning.
- Let rest for 5 minutes after removing from the oven. Resting relaxes collagen and redistributes juices for a tender bite.
- Garnish and serve with fresh basil and optional grated Parmesan for aromatic contrast.
Keep an instant-read thermometer in hand. It prevents overcooking and helps maintain a moist interior while achieving safe doneness.
Pro-Caution
When broiling, move the rack so the pan sits about 6–8 inches from the element. That distance gives the cheese time to brown without scorching the sauce.
If you prefer less char, use a torch briefly on the cheese rather than a full broil cycle. A torch lets you target browning while protecting delicate components.
Tips for Success: Essential Herbs and Spices to Elevate Your Chicken Marinara
Balance dried herbs with sauce acidity. Dried oregano and basil concentrate flavor, so measure precisely and taste before final assembly.
Garlic and onion powders add savory depth without adding moisture. For a fresher lift, stir chopped fresh basil or parsley into the sauce just before topping the chicken.
Herbs, Cheese, and Heat Management
To maximize melt quality, let shredded mozzarella sit at refrigerator temperature for 15–20 minutes before using. Slightly warmer cheese spreads and melts more evenly during oven time.
For a silkier texture, use thin slices of fresh mozzarella and pat excess moisture dry first. That reduces runoff into the sauce and preserves a glossy cheese finish.
Expert Insight
Use a neutral olive oil with a modest smoke point for even searing; a single tablespoon per side is often enough. Reserve extra oil for the pan if you plan to cook a vegetable side in the same skillet.
Pairing Suggestions and Serving Tips for an Irresistible Meal
Serve the dish with a crisp green salad dressed in lemon vinaigrette to cut richness. The acidity refreshes the palate and elevates the tomato notes in the chicken marinara.
For starch, offer al dente spaghetti or creamy polenta; both absorb sauce and complement textural contrast. Use starchy sides to carry the sauce and round the plate.
Consider classic pairings that suit the dish. A simple sautéed broccoli or charred green beans add color and fiber while keeping the meal balanced.
Reference common table roles of olive oil and pasta when planning sides: review olive oil and spaghetti for background on how they interact with tomato-based sauces.
Nutrition and Serving Data
This dish supplies lean protein with calcium from the cheese and antioxidants from tomatoes. Adjust portion size and cheese selection to meet specific dietary goals.
Below is a standard estimate per serving. For precise tracking, weigh ingredients and use nutrition software tied to your chosen brands.
| Nutrient | Per Serving |
|---|---|
| Calories | 420 kcal |
| Protein | 50 g |
| Carbohydrates | 12 g |
| Fat | 18 g |

Q&A
This section answers common technique and variation questions you can apply while cooking. Each answer gives concise, practical direction to refine timing, texture, and ingredient choices.
Use these tips to calibrate your method and adapt the recipe for flavor preferences or equipment differences.
What makes this chicken marinara a standout dish?
The contrast of a seared crust, bright tomato sauce, and silky melted cheese creates layered flavor and texture. Careful execution lets each component complement rather than compete.
How should the chicken texture feel when done?
Cook to an internal temperature of 165°F (74°C). The exterior should feel springy with a slight give while the inside remains moist, never dry.
Is shredded mozzarella acceptable or is fresh mozzarella better?
Both work. Shredded mozzarella melts quickly and offers even coverage while fresh mozzarella yields a creamier mouthfeel but can release moisture if not patted dry.
Can I prepare elements ahead of time?
Yes. Sear the chicken and cool chicken and sauce separately. Reassemble with cheese and bake when ready for service to retain texture and flavor.
What variations elevate the recipe?
Additions like sautéed mushrooms, olives, or a splash of white wine in the sauce deepen the profile. Swap mozzarella for provolone or a blend if you prefer a sharper finish.
FAQ
How do I prevent watery cheese on the chicken marinara?
Pat fresh mozzarella dry and slice thinly to reduce moisture. Use low-moisture shredded cheese when you need even coverage and minimal liquid release.
Can I use chicken thighs instead of breasts?
Yes. Bone-in thighs will require more oven time; remove early to check internal temperature. Thighs tolerate higher heat and remain forgiving when seared.
What oven-safe pans work best for searing and finishing?
Cast iron and stainless steel are ideal for even heat and a reliable sear. Nonstick pans that are oven-safe can work, but they typically do not produce as robust a crust.
How do I scale the recipe without losing quality?
Keep the searing stage non-crowded to maintain high pan temperature. Sear in batches if necessary and combine for the oven finish to preserve crust and moisture.
What side sauces or garnishes improve the dish?
Finish with fresh basil and a grind of black pepper. A light dusting of grated Parmesan adds umami and a finishing contrast to the soft mozzarella.
See also: marinara sauce, mozzarella, basil
See also: chicken marinara
]]>Poaching yields reliably tender results when you control heat and time precisely. Gentle, steady heat lets proteins set slowly so juices stay in the meat rather than on the cutting board.
- Poaching preserves moisture by cooking below boiling point.
- Target temperatures guide doneness more reliably than clock time.
- Flavor comes from the poaching liquid and a brief rest after cooking.
Why poach chicken? Benefits of poached chicken
Poached chicken delivers a uniform texture that slices cleanly for salads, sandwiches, and composed plates. You keep added fat low while preserving lean protein and mouthfeel.
Chefs use poached chicken when they need predictable results across portions. The method reduces moisture loss compared with high-heat cooking and gives a neutral base that accepts sauces and dressings well.
Key safety and science for poached chicken
Food safety requires poultry reach a safe internal temperature to destroy bacteria but avoid overcooking. The widely accepted safe internal target for chicken is 165°F (74°C), which you should confirm with a thermometer to ensure safety while preserving texture.
Control both liquid and internal temperature to balance safety with tenderness. For background on handling and pathogen control, consult food safety guidance.
Ideal poaching temperatures for poached chicken
Keep the poaching liquid below a rolling boil. A consistent liquid temperature between 160°F and 180°F (71–82°C) holds the meat in a zone where proteins coagulate slowly and juices remain locked in.
Lower settings inside that band give silkier breast meat, while the higher end shortens cook time for thicker or bone-in pieces. Use a probe to stabilize the liquid temperature rather than guessing by eye.
Temperature by cut
Different cuts require slight changes because thickness and bone alter heat transfer. Boneless breasts cook faster; bone-in thighs need higher liquid temperatures and longer time to reach the same internal target.
Confirm doneness with an instant-read or probe thermometer at the thickest point. Focus on internal temperature rather than total time to avoid dry meat or undercooking.
Boneless, skinless breasts
Maintain the liquid at about 165–170°F (74–77°C). Expect roughly 15–22 minutes depending on thickness; stop when the thickest spot reads 165°F.
For consistent slices, chill briefly after resting to firm the protein for cleaner cuts when serving salads or platters with poached chicken.
Bone-in thighs and whole pieces
Hold the liquid nearer 170–180°F (77–82°C) so heat penetrates bone and connective tissue. Typical times run 25–35 minutes, but always verify with internal temperature rather than a clock.
Allow extra time for large pieces and expect carryover heat to raise internal temperature a few degrees during the rest period.
Step-by-step poaching guide for poached chicken
Work with room-temperature chicken for the most even cook. Trim fat, pat pieces dry, and season lightly before they go into the liquid.
Use a wide pot so pieces lay in a single layer and stay submerged. Add aromatics and enough liquid to cover the meat completely and keep the lid mostly on to stabilize temperature.
- Build the poaching liquid: Use low-sodium broth or water with lemon, garlic, onion, and thyme to flavor the liquid.
- Heat to target: Bring liquid just below boil, then reduce heat to hold between 160–180°F (71–82°C).
- Submerge gently: Add chicken and maintain small bubbles or faint steam; avoid rolling boil.
- Monitor internal temp: Use a digital probe to confirm 165°F (74°C) at the thickest point.
- Rest and hold: Remove and rest under foil 5 minutes for carryover heat and juice redistribution.
For recipe ideas and plating tips that pair well with poached chicken, see internal resources such as our poached chicken recipes and the technique primer on poaching basics. These internal pages provide tested recipes and timing charts that match the guidance here.
Tools and precision
A reliable digital probe or instant-read thermometer is essential for consistent poached chicken. Use an immersion circulator for sous-vide level precision if you need tight temperature control across many portions.
Compare poaching and sous-vide: both use low, steady heat, but sous-vide seals meat in a bag and requires specialized equipment. For a concise technical overview, consult sous-vide.
Tips for success
Do not overcrowd the pot; pieces should not touch too closely so each portion receives even heat. Work in batches when cooking multiple servings for consistent results.
Season the liquid rather than only the meat so the poached chicken picks up balanced flavor. Keep the lid mostly on to reduce evaporation and temperature drift.
[TI P]Expert Insight: For consistent slices, chill poached chicken briefly after resting, then slice cold. This firms the proteins slightly and yields cleaner cuts for salads and platters.[/TIP]
Adjust salt after poaching when the juices settle back into the meat. Taste the liquid after cooking to learn how much flavor the chicken released.
Pro-Caution
Carryover heat can raise internal temperature by a few degrees, so remove the chicken as it reaches 162–163°F if you intend a 165°F final after resting.
Serving suggestions
Sliced poached chicken suits composed salads, cold platters, sandwiches, and light pasta dishes. The neutral profile accepts bright dressings and herb sauces without overpowering the protein.
For a bright finish, serve poached chicken with a lemon vinaigrette or herb salsa and a crunchy element like toasted nuts. Pair with steamed greens or a simple grain for a balanced plate.
Make-ahead and storage
Poached chicken stores well when cooled quickly. Refrigerate within two hours and use within three days for best quality and safety.
For longer storage, shred and freeze in portioned bags for soups or casseroles. Label containers with date and use within three months for optimal texture.
Nutrition snapshot
Poached chicken retains lean protein while keeping added fat low when you trim visible fat. It fits nutrition-focused plans by providing high-quality protein with minimal added calories.
The approximate macronutrient profile for a 6 oz boneless, skinless breast poached without added fat is roughly 220 calories, 36 g protein, 2 g carbohydrates, and 5 g fat. Adjust portions and sauces to match meal targets.
References and further reading
For background on poaching as a cooking method, consult the general overview at poaching (cooking). For poultry-specific context, review poultry.
Practice precise temperature control and rest time to dial in the exact liquid temperature and timing that match your desired result for each cut of poached chicken.
FAQ
What makes poaching different from roasting or grilling?
Poaching cooks meat gently in liquid rather than exposing it to dry air or direct flame. That approach keeps muscle fibers from seizing and helps the poached chicken retain moisture.
Why control the liquid temperature rather than boiling?
Boiling forces proteins to seize and expel juices, producing dry, tough meat. A controlled simmer between 160–180°F preserves moisture and yields tender poached chicken.
How do I know when poached chicken is done?
Always verify with an instant-read or probe thermometer. The safe internal target is 165°F (74°C). The meat should feel slightly springy and be opaque throughout.
Can I poach frozen chicken?
You can, but expect extra time and less predictable heat distribution. For even results, thaw first so the heat penetrates consistently across the piece for proper poached chicken texture.
What liquids work best for flavor?
Low-sodium broth, water with aromatics, or a blend of stock and a splash of wine all work well. The poaching liquid transfers subtle flavor; avoid overpowering aromatics that mask the meat.
See also: poached chicken
]]>
- Check accuracy regularly with ice and boiling tests.
- Keep ±1°F accuracy as a practical target for food safety and quality.
- Calibrate, replace batteries, and inspect probes to avoid skewed readings.
- Store and clean properly to extend service life and performance.
Choosing the Right Meat Thermometer for Reliable Readings
Selecting the correct thermometer sets the baseline for accurate cooking. Choose a device that matches the cooking technique you use most often: instant-read for quick checks, probe-style for unattended roasts, or oven probes for long cooks.
Look for a stated accuracy of ±1°F when possible and prefer probes made from food-grade stainless steel. Also consider response time, waterproof rating, and whether the unit supports field recalibration.
Types and features that matter
Instant-read digital thermometers give fast readings and are ideal for finishing steaks and chops. Probe thermometers with wired or wireless transmitters monitor internal temps during long roasts and smoking sessions.
Analog dial thermometers work, but they generally lack the precision and quick response of quality digital probes. For most cooks, a calibrated digital probe with a stainless-steel shaft provides the best balance of speed and durability.
Step-by-Step Methods to Calibrate Your Meat Thermometer at Home
Two simple lab-style checks give you verifiable reference points: an ice-water bath for the freezing point and a pot of boiling water for the boil point. Both are quick, repeatable, and require only common kitchen items.
Perform these checks on a stable surface and avoid contact with metal sides or pot bottoms. Record readings and use your device’s calibration option or note the offset if recalibration is not available.
Ice bath method (freezing point)
Fill a tall glass with crushed ice, add cold water, and stir to create an ice-water slurry. Insert the probe so it sits fully in the chilled water but does not touch the glass walls or bottom.
The accurate reference is the freezing point of water, 32°F (0°C). A properly calibrated probe should read within about ±1°F of that mark after 30 seconds.
Boiling water method (boil point)
Bring a pot of fresh water to a rolling boil and suspend the probe in the steam above the bubbles, avoiding contact with the pot sides or bottom. Wait for the reading to stabilize.
At sea level, the reference is the boiling point of water, 212°F (100°C). Adjust expectations if you cook at altitude; higher elevation lowers the boiling temperature.
Common Accuracy Issues and How to Troubleshoot Them
Temperature errors usually come from a few repeatable causes: dirty or bent probes, low batteries, or calibration drift. Diagnose quickly by running the ice and boiling tests and noting consistent offsets.
If readings shift between tests, replace batteries first, then inspect the probe for physical damage or debris. Clean the shaft with warm, soapy water and a soft cloth before retesting.
Pro-Caution
Digital units may offer a user-accessible calibration screw or menu reset. For units without calibration, track the offset and mentally correct readings, or replace the unit if the error exceeds about 2°F.
Slow response and inconsistent values
Slow response often comes from residue coating the probe. Even a thin grease film insulates the sensor and delays equilibrium. Clean and dry the probe thoroughly and repeat the check.
If results still vary, swap in fresh batteries, or try the thermometer in several different cups of ice water to confirm whether the issue is repeatable. Intermittent faults usually mean internal electronics are degrading.
Pro Tips for Maintaining and Storing Your Meat Thermometer for Longevity
Routine care keeps readings reliable. Clean the probe after every use, store the unit in its protective case, and remove batteries during long-term storage to avoid leakage and corrosion.
Handle probes gently; do not bend the shaft or drop the unit on hard surfaces. Even a small kink in a probe can change how the sensor reads temperatures.
Expert Insight
For cooks who travel or smoke outdoors, choose IP-rated or explicitly waterproof models. High humidity and temperature swings accelerate wear in non-sealed units.
Practical Uses: When Accuracy Matters Most
Poultry, large roasts, and ground meats demand precise internal temperatures to ensure safety. Conservative targets and trusted readings prevent undercooking without sacrificing juiciness.
For sous-vide and candy work, probe accuracy and calibration are essential because small temperature differences produce big changes in texture. Verify instruments before critical cooks.
For reference on safe final internal temperatures and food handling, consult reputable public guidance such as the food safety resources maintained by public health authorities.
At-Home Test Plan: A Quick Checklist
Run this checklist before any important cook: check batteries, clean probe, ice-test, boil-test, and note any consistent offsets. If offsets exceed about 2°F, recalibrate or replace.
Keep a small notebook or digital note with recorded offsets for each thermometer you own. That habit saves time and prevents guesswork during service.
For step-by-step usage of instant-read devices, see our internal guides: how to use an instant-read meat thermometer and best meat thermometers for purchasing advice.
FAQ
How often should I check my meat thermometer?
Test before any major cook and at least monthly with regular use. Physical shocks, heat exposure, and battery changes can shift accuracy, so quick checks are inexpensive insurance.
Can I trust a cheap thermometer if it passes the ice and boil tests?
Yes, a basic unit that reads accurately at both reference points can be trusted for many cooks. However, cheaper units may drift sooner and often lack rugged construction for heavy use.
Does altitude affect thermometer tests?
Yes. The boiling point of water drops as elevation increases. See the altitude relationship and adjust expectations when using the boiling test at higher elevations.
What accuracy tolerance should I accept?
A practical target is ±1°F for most cooking purposes. When safety margins are tight, such as poultry or cured meats, keep devices within that tolerance or replace them when they exceed it.
Can I use the same tests on smoker and oven probe thermometers?
Yes. The ice and boiling checks apply to oven probes, smoker controllers, and candy thermometers within their intended ranges. Confirm that the probe’s rated range includes your test points first.
Final Thoughts
Testing a meat thermometer is a low-effort, high-impact habit. Accurate readings protect health and improve flavor by preventing over- or undercooking.
Use the simple ice and boil checks regularly, maintain the probe and battery compartment, and replace compromised units. Small steps produce consistent, professional-level results in any kitchen.
See also: meat thermometer
]]>Searing a steak straight from the freezer tests conventional cooking rhythm and rewards precise technique. This guide explains what changes when you skip thawing, how to manage heat and moisture, and which steps reduce risk while improving flavor.
- Quick summary: a hot sear plus gentle finish can produce a crusty exterior and a juicy center.
- Key risk: uneven cooking and surface steaming if heat management fails.
- Tools matter: heavy pans and an instant-read thermometer cut uncertainty.
- Safety tip: verify internal temperature before serving.
Why sear frozen steak?
Searing from frozen saves time and limits spoilage from repeated thawing. It also changes how the Maillard reaction develops because the outer layer meets extreme heat while the core stays cold.
When you create that deep brown crust, the Maillard reaction drives rich flavor and color. Read more about the chemistry behind browning at Maillard reaction.
Prep, Cook Time, and Yield
Preparation: 5 minutes. Cooking: 20–25 minutes depending on thickness. Total: about 30 minutes for a standard 1–1.5-inch cut.
This timing assumes a quick, high-heat sear followed by finishing in a moderate oven. Use an instant-read thermometer to target internal temperatures precisely.
Cooking time by thickness
Thickness alters how long the oven step takes. A 1-inch steak needs less oven time than a 1.5-inch steak to reach medium-rare.
Plan for an extra 5–10 minutes in the oven for steaks at the thicker end of the range. Always measure internal temperature rather than relying on visual cues alone.
Ingredients and Equipment
Ingredients are straightforward: frozen ribeye or similar cut, high smoke point oil, butter, garlic, and herbs. Keep seasonings simple when the meat is frozen.
Choose heavy cookware. A massy pan stores heat and helps vaporize surface ice, which supports crust formation. See the benefits of heavy pans at cast-iron skillet.
- 1 frozen ribeye (10 oz, 1–1.5 in thick)
- 1 tbsp high smoke point oil (grapeseed, avocado, refined canola)
- 1 tsp kosher salt
- ½ tsp black pepper
- 2 tbsp unsalted butter, 2 cloves garlic, 2 sprigs thyme or rosemary
Technique: Step-by-step
This is a two-stage approach: sear hard, finish gently. Preheating the oven and a heavy skillet balances rapid crusting with controlled internal cook-through.
Keep each action deliberate. Overcrowding, low heat, or impatience converts the process to steaming and ruins the crust.
- Preheat oven to 375°F (190°C). A moderate oven finishes the center without overcooking the crust.
- Heat a heavy skillet over medium-high until hot. Add oil and let it shimmer; you want surface vaporization when the frozen steak lands.
- Place the frozen steak on the pan. Sear undisturbed for 3–4 minutes to build a deep brown crust.
- Flip carefully and add butter, garlic, and herbs. Baste with the melted butter to support even browning.
- Sear second side for 3–4 minutes, then transfer the skillet to the oven to finish—10–15 minutes typical for medium-rare.
- Rest the steak under loose foil for 5–7 minutes before slicing against the grain.
Heat management
Use medium-high for the initial sear but avoid raging flames that brown too quickly without penetrating. If the oil smokes excessively, reduce heat slightly.
After searing, the oven provides even conduction. That transition avoids a burnt exterior with a raw center when the surface cooks faster than the interior.
Safety and Internal Temperature
Food safety depends on internal temperature, not external appearance. Use an instant-read thermometer to confirm doneness across the center of the steak.
Aim for 125°F (52°C) for medium-rare, 135°F (57°C) for medium. For safety guidance and context on handling, see Food safety.
Pro-Caution
After resting, verify temperature near the thickest part. If the core falls short of your target, return to the oven briefly rather than slicing early.
Tips for Success
Pat the steak dry with paper towels to reduce surface ice. Fewer surface crystals mean less steam when the meat hits the pan.
Seasoning after searing can work, but a light dust of salt before searing helps draw flavors into the crust. Adjust technique by cut and thickness.
Expert Insight
Common mistakes
Flipping too soon is the fastest way to lose crust. Let the meat form a stable crust before moving it; that shell resists tearing and maintains juices.
Using low-mass pans or overcrowding the skillet reduces pan temperature and increases steaming. Work in single layers and preheat between batches.
Why chefs sometimes prefer alternative finishes
Chefs often combine searing with slow or controlled methods to guarantee doneness. For example, some sear quickly then finish by sous-vide or in a low oven to hold exact temperatures.
Finishing techniques trade time for consistency. When repeatable results and texture control matter, controlled-temperature methods reduce variance compared with oven-only approaches.
Serving Suggestions
Serve the sliced steak with simple, high-acid or herb-driven sides to cut richness. Lemon-dressed greens or roasted vegetables provide balance.
A pat of herb butter or a light pan jus elevates perceived juiciness. Keep garnishes minimal so the sear and meat quality remain the star.
Nutrition and Yield
Typical nutrition for a 10 oz cooked ribeye seared from frozen will vary with fat content and cooking loss. The table below presents a reasonable estimate per serving.
| Nutrient | Amount per Serving |
|---|---|
| Calories | 450 kcal |
| Protein | 42 g |
| Carbohydrates | 1 g |
| Fat | 32 g |
Adjust portions and sides for your diet goals. Searing does not materially change macronutrient totals compared with conventional thawed cooking.
FAQ
Can you sear steak straight from the freezer?
Yes. You can sear a steak from frozen if you manage heat properly and finish the interior slowly. The method relies on a strong initial sear and a gentle cook-through step to avoid raw spots.
What are the main risks of searing frozen steak?
The primary risks are uneven cooking and surface steaming. Excess moisture can turn a potential crust into a soggy surface, and the center can remain undercooked without careful finishing.
How do I check doneness when cooking from frozen?
Use an instant-read thermometer inserted into the thickest part of the steak. Target your preferred internal temperature and allow for carryover during resting.
Which pans and fats work best?
Heavy, high-mass pans like cast iron provide thermal stability and help vaporize surface moisture quickly. Use oils with a high smoke point and add butter late for flavor.
Should I try this at home or stick to thawing?
If you enjoy kitchen experimentation and have the right tools, searing from frozen is a solid option. For absolute consistency, thaw-first methods remain the simplest route for predictable results.
Further reading: Explore related techniques in our internal guide on perfect sear steak techniques for more controlled approaches and troubleshooting.
See also: frozen steak
]]>
- Accurate doneness: Remove guesswork for consistent results.
- Food safety: Reach temperatures that kill harmful bacteria.
- Texture control: Prevent dry meat and undercooked centers.
- Versatility: Use on grilling, roasting, baking, and candy work.
What a food thermometer is and how it works
A food thermometer is an instrument that measures the internal temperature of food. Most modern devices use a metal probe with a sensor that converts heat to an electrical signal and displays a temperature value.
Thermometers calibrated for cooking read quickly and give a reliable value within a few seconds for instant-read types, or monitor continuously for probe-style units. Learn more about the underlying device technology on thermometer.
Why you should use one every time
Using a thermometer removes guesswork and reduces waste. You stop overcooking proteins and preserve juiciness by targeting precise internal temperatures for each food type.
Food safety improves because you can confirm lethal temperatures for pathogens rather than relying on color or time alone. For background on illness prevention and temperature control, see food safety.
Key temperature targets to memorize
Memorize a short list of internal temperatures to speed decisions in the kitchen. Common safe targets include: poultry 165°F (74°C), pork 145°F (63°C), fish 140°F (60°C), and beef ranges where medium-rare is 130–135°F (54–57°C).
Rest time matters: carryover cooking raises internal temperature after removal. For large roasts allow 10–20 minutes rest depending on size; smaller cuts need less time. That final rise yields juicier results and predictable doneness.
Types of food thermometers
Thermometers fall into clinical groups by use case: instant-read, leave-in probe, and smart wireless devices. Choose based on cooking method, response time, and whether you need continuous monitoring.
Each type has trade-offs: instant-read gives speed, probe units give long-term monitoring, and wireless options free you to multitask while the probe watches the roast.
Instant-read thermometers
Instant-read models deliver temperatures in seconds and suit quick checks while searing or finishing a steak. Use them for thin cuts and when you need fast, actionable feedback.
They are not designed to stay in the oven for long. For slow roasts or smoking, pair instant-read checks with a leave-in probe to monitor progress between checks.
Probe and leave-in thermometers
Probe thermometers are ideal for roasts, whole birds, and smokers where continuous monitoring matters. Insert the probe into the thickest part and route the cable through the oven door or use a wireless base for remote reads.
These units help you track temperature curves and predict when to remove food and begin resting. They improve precision for large cuts and low-and-slow techniques.
How to use a food thermometer correctly
Always insert the probe into the thickest part of the food, avoiding bone, gristle, or excess fat. For steaks and fillets insert sideways to reach the center; for whole poultry target the breast and thigh junction.
Allow the display to stabilize before recording the reading. For instant reads wait the manufacturer-specified time, usually 2–10 seconds. For leave-in probes confirm the steady reading over several minutes to detect temperature stalls.
Follow recommended targets for each protein and consider carryover rise when timing removal from heat. Use a consistent probe insertion point for repeated checks so your notes remain comparable.
Pro-Caution
Calibration, maintenance, and best practice
Calibrate thermometers periodically. The ice-point method (probe in crushed ice water at 32°F/0°C) and the boiling-point method (probe in rolling water, adjusted for altitude) require simple checks to ensure accuracy.
Clean and sanitize the probe between uses with hot, soapy water or alcohol wipes. Store in a protective sheath to avoid bending or damaging the sensor, which spoils accuracy.
Chef’s notes and practical tips
Choose the right tool for the task: a fast-response instant-read for thin cuts and a wired probe for roasts. Battery life, response speed, and probe length matter in daily use.
Keep a small kitchen log. Note temperatures, oven setup, and resting time for recurring recipes so you replicate success and learn from variation. Cross-referencing results shortens the learning curve.
Expert Insight
Serving suggestions and finishing touches
Rested proteins yield juicier slices and better mouthfeel. Slice against the grain for tender cuts and present on warmed plates so food keeps heat at the table.
Use finishing elements—compound butter, pan jus, or a light sauce—to add gloss and depth. These touches highlight the precise doneness your thermometer helped secure.
| Nutrient | Per Serving (Avg.) |
|---|---|
| Calories | 250 kcal |
| Protein | 28 g |
| Carbohydrates | 5 g |
| Fat | 12 g |
For trusted safety guidance and temperature charts consult authoritative resources. Pair your reading practice with technique guides to build confidence and reduce waste.
Explore related content like Mastering Grilling Temperatures and Kitchen Tools Guide for deeper practical steps and product recommendations.
FAQ
What is the best temperature for chicken?
Cook chicken to an internal temperature of 165°F (74°C) in the thickest part. This target ensures harmful bacteria are reduced to safe levels while keeping meat moist when combined with proper resting time.
Can I leave a thermometer in the oven?
Only use leave-in thermometers designed for continuous high-heat exposure. Instant-read devices usually cannot withstand long oven exposure. Check the manufacturer’s specifications before leaving any probe inside.
How often should I calibrate my thermometer?
Check accuracy every few months or after a drop. Use the ice-point or boiling-point methods to confirm. Frequent professional use or rough handling calls for more frequent checks.
Do thermometers work for baking and candy?
Yes. Use probe thermometers for bread and custards to verify doneness and candy thermometers for sugar stages where precise temperature defines texture. Each task requires the correct thermometer type.
Where can I learn more about cooking science?
Read focused references on technique and science. The cooking and meat pages explain fundamentals that link temperature to texture. Combine that knowledge with hands-on practice and a log of results.
Final thoughts
A food thermometer is a compact investment that upgrades results across grilling, roasting, and baking. It saves time, reduces waste, and protects health by giving you concrete temperature data instead of guesswork.
Adopt consistent probe technique, maintain your device, and keep a short set of target temperatures by memory. Your food will reward that small habit with better texture, flavor, and reliability every time.
See also: food thermometer
]]>
- Pull slightly low: aim 5–10°F (3–5°C) below final target for most cuts.
- Rest smart: allow 10–30 minutes depending on size to let juices redistribute.
- Probe placement matters: center thickest section without touching bone or fat.
- Use the right tool: instant-read for checks, leave-in probes for continuous monitoring.
What is carryover cooking?
Carryover cooking occurs when internal temperature rises after removal from a heat source. Residual heat stored in outer layers migrates inward and raises the center temperature by several degrees.
This concept applies across roast, steak, poultry, and even thick fish. Understanding carryover links directly to how heat transfers through muscle and fat, so knowing the physics helps you time the pull point precisely. For background on how heat affects food structure, consult this meat overview.
Why a thermometer matters
A thermometer removes guesswork. Visual cues like color or juices lie; temperature gives objective data so you can pull meat at the exact moment to account for carryover.
Temperature control improves juiciness, texture, and food safety. For core safety thresholds—especially for poultry—use validated temperature targets when planning your pull temperature; see food safety guidance.
Thermometer types and when to use them
Pick a thermometer that fits the task. Two common categories dominate pro and home kitchens: instant-read units and leave-in probe thermometers.
Instant-read thermometers
Instant-read devices give a quick temperature snapshot. Use them to check the thickest part of a cut right before you expect to pull; they are fast and less invasive.
Instant reads are ideal for steaks and thin roasts where you need frequent checks. However, avoid leaving them in during rest or oven cook time; they are for spot checks only. For basic technical context, read about the standard thermometer principles.
Leave-in probe thermometers
Leave-in probes monitor temperature continuously and record trends during the last phase of cooking. They allow you to pull based on the rising curve rather than a single reading.
Probes shine with large roasts and whole birds where carryover will be significant. Choose a probe with a thin stem and an accurate display; wireless probes add convenience when resting on the counter.
Practical pull temperatures and resting guidelines
Plan your pull point by subtracting the expected carryover amount from your target final temperature. Typical rise ranges from 5°F to 15°F (3–8°C) depending on mass, initial temperature, and cooking method.
Below is a quick reference table with common target final temperatures and recommended pull points plus resting times. Use these as starting points and refine by experience.
| Protein | Final Temp (F) | Pull Temp (F) | Rest Time |
|---|---|---|---|
| Beef steak (medium-rare) | 130–135°F | 125–130°F | 5–10 min |
| Beef roast | 135–145°F | 125–140°F | 10–30 min (size-dependent) |
| Pork (safe and juicy) | 145°F | 135–140°F | 10–20 min |
| Poultry (safe) | 165°F | 155–160°F | 10–20 min |
| Thick fish / salmon | 120–130°F | 115–125°F | 5–10 min |
Adjust the pull temperature if the piece has high thermal mass (dense bone, large diameter) or if you prefer carryover to finish the cooking. Always allow for a safety margin on poultry and ground meats per food-safety standards.
Expert Insight
After a few tests you will learn how many degrees your typical roast climbs while resting. Keep a simple log of weight, oven temp, pull temp, and final result to speed mastery.
Probe placement and technique
Insert the probe into the thickest part of the cut, perpendicular to the muscle fibers. For bone-in pieces, avoid touching bone because bone reads hotter and will give a false high result.
Place probes so the tip sits at the geometric center of the thickest section. For long roasts, target the broadest cross-section rather than the narrow end.
Thickness, thermal mass, and crust management
Thick pieces store more residual heat and therefore have greater carryover. Thin fillets often show negligible rise; treat them as near-instant items.
Crisp crusts can soften during resting if wrapped tightly. Tent with foil loosely to retain heat while allowing steam to escape and preserve textural contrast.
Pro-Caution
After resting, slice against the grain for even texture and to display the correct doneness. Slicing too soon releases juices; wait until the internal pressure relaxes after rest.
Troubleshooting common issues
If a roast finishes too dry, identify whether the oven temperature was too high, the probe was misplaced, or the pull point was set too high. Record the failure mode and change only one variable at a time.
If the exterior lacks color, you probably pulled too early or the Maillard reaction did not develop. Higher initial sear heat or longer exposure at medium-high heat helps; learn more about browning chemistry at Maillard reaction.
FAQ
How many degrees does carryover cooking usually add?
Expect about 5–15°F (3–8°C). Small steaks will be at the low end; large roasts will be at the high end. Use the probe trend to refine this estimate for your specific roasts.
Should I tent with foil or leave uncovered when resting?
Tent loosely to hold heat without trapping steam if you want to preserve crust crispness. Tight wrapping creates condensation and softens crusts.
Can carryover cooking make undercooked meat safe?
Carryover adds limited heat and cannot reliably replace reaching safe internal temperatures while cooking. Always aim for the correct minimum safe temperature during the cook, especially for poultry and ground products.
What probe accuracy should I expect?
Aim for a probe accuracy of ±1–2°F. Calibrate periodically by testing in an ice water slurry (should read ~32°F/0°C) and near-boiling water, adjusted for altitude.
Does resting time differ for bone-in versus boneless cuts?
Yes. Bone-in cuts usually need longer rest because bone affects heat distribution and thermal mass. Increase rest time for large bone-in roasts by 5–10 minutes compared to a similar-sized boneless cut.
Mastery of carryover cooking comes from combining methodical temperature control with consistent technique. Use the guidance above, keep notes, and tune pull points to your kitchen and equipment. Over time, the thermometer will become your most reliable tool for consistent, juicy results.
See also: carryover cooking
]]>