- High initial heat crisps skin while finishing at lower heat preserves juiciness.
- Brining increases moisture retention and seasoning depth in the meat.
- Maillard browning produces complex savory compounds that define roast flavor.
- Resting and carryover ensure juices redistribute for tender slices.
Introduction: Why science matters for roast chicken
Roasting a whole chicken is a controlled transformation of proteins, water, and fats. Each decision—temperature, fat choice, seasoning—changes the final texture and taste in predictable ways.
Understanding the chemical and physical processes lets you repeat excellent results reliably. That approach turns luck into technique, and technique into repeatable flavor.
Core timing and yield
Prep time: 30 minutes active. Optional brine: 4–12 hours. Roast time: 1 hour 15 minutes to 1 hour 30 minutes depending on bird size and oven.
Yield: Serves 4 to 6. Difficulty: Medium. These estimates assume a 4–5 pound chicken and a calibrated oven for accurate heat control.
Ingredients
The ingredient list below focuses on components that interact with heat and contribute to texture and aroma. Use a consistent chicken size (4–5 lb) for timing accuracy.
Keep major functional items on hand: salt for brining, a fat source for conduction and browning, fresh aromatics for volatile oils, and a thermometer for verification.
- 1 whole chicken, about 4 to 5 pounds, patted dry
- 4 cups water (for brine)
- ¼ cup kosher salt (for brine)
- 2 tablespoons granulated sugar (optional, for brine)
- 4 sprigs fresh thyme
- 4 cloves garlic, smashed
- 1 lemon, halved
- 3 tablespoons unsalted butter, softened
- 2 tablespoons olive oil
- Freshly ground black pepper, to taste
- 1 teaspoon smoked paprika
- 1 teaspoon dried oregano
For herb background and aroma chemistry, thyme contributes thymol and other volatiles that enhance savory notes. Read more on thyme chemistry and uses.
How the science works (Key reactions)
The signature transformation in roast chicken skin and browned areas is the Maillard reaction, where amino acids and reducing sugars react at elevated temperatures to form hundreds of flavor compounds.
These compounds provide roasted, savory, and nutty notes. For a technical overview, see Maillard reaction and its role in culinary browning.
Water loss, heat transfer, and texture
High heat at the start encourages rapid surface moisture evaporation, producing a dry skin surface that browns efficiently. Meanwhile, gradual conduction moves heat into muscle fibers without over-drying the interior.
Understanding conduction and evaporation gives you control: manipulate heat and surface moisture to tune crispness versus juiciness.
Technique: Practical, science-backed steps
Apply a sequence of steps that manage moisture, salt distribution, fat contact, and heat profile. Each step has a measurable effect on texture and flavor.
Below, the numbered instructions match the recipe timing and explain the rationale so you can adjust with confidence.
Brining and seasoning
Create a basic brine by dissolving ¼ cup kosher salt and optional sugar in 4 cups cold water. Submerge the bird for 4–12 hours to allow osmotic and protein changes that improve moisture retention and seasoning depth.
For technical background on brining concepts, consult brining studies and summaries that explain salt’s effect on muscle proteins.
Preheat and initial roast (high heat)
Preheat the oven to 425°F (220°C) to jump-start skin drying and browning. Place the bird breast-side up on a rack to expose skin to hot air and promote even airflow.
After 25–30 minutes, reduce heat to 375°F (190°C) to slow internal cooking and let the center approach safe temperatures without excessive external drying.
Roasting to temperature
Use an instant-read or probe thermometer and target 165°F (74°C) in the thickest thigh flesh. Temperature is the reliable endpoint; visual cues alone can mislead.
For general roasting principles and oven effects on roast quality, see roasting (cooking).
Resting and carryover
Remove the chicken and tent loosely with foil. Rest for 15 minutes to allow carryover cooking and redistribution of juices. This step raises final internal temperature slightly and stabilizes juices for carving.
Proper resting converts surface moisture into retained juices and reduces drip loss when carving.
Recipe instructions (step-by-step)
Follow the practical sequence below. Each step builds on the previous to control moisture, flavor, and texture.
Read all steps before starting, and use a thermometer to verify doneness at the end.
- Brine: Dissolve salt (and sugar if using) in 4 cups cold water. Submerge the chicken fully and refrigerate 4–12 hours. This improves moisture retention and even seasoning.
- Dry thoroughly: Remove, rinse briefly, then pat very dry with towels. Dry skin is essential for efficient browning via the Maillard reaction.
- Preheat oven: Heat to 425°F (220°C) to start. High initial heat produces rapid surface evaporation and accelerates browning.
- Season and fat: Rub softened butter under and over the skin, add olive oil, then season with smoked paprika, black pepper, oregano, and a light sprinkle of salt. Stuff cavity with thyme, garlic, and lemon halves.
- Rest before roasting: Let the bird sit 20 minutes at room temperature to reduce temperature gradient between surface and core for more even cooking.
- Roast: Place breast-side up on a rack in a shallow pan. Roast 60–90 minutes total, reducing the oven to 375°F after roughly 30 minutes. Insert thermometer into the thigh, avoiding bone, and remove at 165°F (74°C).
- Rest and carve: Tent and rest 15 minutes, then carve. Spoon pan juices over carved slices for added richness.
[WARNING]Pro-Caution: Use a calibrated thermometer and follow recommended internal temperature guidelines to prevent foodborne illness. For official safety standards and handling, see food safety.
Tips for success
Small adjustments yield large differences. Test variations methodically so you can isolate what changes flavor or texture.
Keep notes: record bird size, oven model and calibrated temps, brine duration, and rest time to reproduce the best result.
- Try herb butter under the skin to transport aromas into the meat while limiting surface burning.
- Brush with a light oil instead of butter if you want the crispiest skin without extra browning from dairy fats.
- Ensure the surface is completely dry before seasoning to prevent rubbery or steamed skin.
- If short on time, use a dry salt rub; it seasons but will not match brine-induced moisture retention.
- Pre-brine overnight for convenience and deeper seasoning penetration.
[TIP]Expert Insight: If you want predictable skin crispness, pat the bird dry, leave it uncovered in the refrigerator overnight, then roast. The extended surface drying reduces surface water and improves Maillard browning.
Serving suggestions and presentation
Carve on a warm platter and spoon pan juices over the slices to enhance mouthfeel and flavor. Fresh herb sprigs and thin lemon slices add visual contrast and a bright aromatic lift.
Serve with roasted root vegetables or a crisp green salad. For pairing, moderate-bodied white wines or light-bodied reds complement the roast without overpowering delicate chicken flavors.
Nutrition (approximate per serving)
Calories and macronutrients vary by portion and added fat. Use the table below only as a guideline for planning.
| Nutrient | Per Serving (approx.) |
|---|---|
| Calories | 350 kcal |
| Protein | 45 g |
| Carbohydrates | 1 g |
| Fat | 16 g |

FAQ
How does brining actually help the chicken stay moist?
Brining allows salt to penetrate muscle tissue and partially denature proteins. That process enables the meat to retain more water during cooking, reducing dry texture after roasting.
The practical result: a juicier bite and more evenly seasoned meat throughout the bird.
Why start at a high oven temperature then lower it?
High initial heat dries and browns the surface quickly, promoting crisp skin and flavor from Maillard reactions. Lowering the temperature afterward reduces the rate of moisture loss while the interior reaches a safe endpoint.
This two-stage profile balances exterior crispness with interior tenderness.
What is the most reliable way to check doneness?
An instant-read thermometer in the thickest thigh muscle, avoiding the bone, is the most reliable method. Target 165°F (74°C) as the safe internal temperature for poultry.
Visually, golden skin and clear juices help, but temperature measurement prevents guesswork.
Can I substitute herbs and aromatics safely?
Yes. Aromatics such as rosemary, sage, and thyme contain volatile oils that infuse the meat with distinct notes during roasting. Choose combinations that complement your side dishes and personal preference.
Varying herbs changes the aromatic profile without altering core cooking principles like heat and moisture control.
Does butter make the skin better than oil?
Butter adds flavor and helps carry herb aromas, but its milk solids brown more quickly. Oil promotes crispness and tolerates higher surface temperatures without burning.
Combine both strategically: a thin brush of oil for crisping, plus herb butter under the skin for flavor delivery.
Mastering a roast chicken is a matter of repeatable steps informed by heat, moisture management, and seasoning science. Apply the methods above and adjust small variables to make the dish reliably excellent.
See also: Roast Chicken
]]>
- Control steam: Pierce or vent casings to prevent sudden bursts.
- Use medium power: Moderate energy yields even internal cooking.
- Finish hot: Brief searing mimics Maillard browning for aroma and texture.
How Microwaves Cook Sausage
Microwave ovens agitate water molecules inside food, producing internal heat rather than surface-only heating. This mechanism explains why microwaved items steam from within and why surfaces do not brown the way they do on a skillet.
Understanding that mechanism helps you manage moisture and avoid casing failure. For a technical reference on the appliance and its heating principle, see microwave oven.
Prep and Cook Time
Preparation Time: 5 minutes. Cook Time: 3–5 minutes depending on microwave wattage. Short bursts and checks prevent overcooking.
Total Time: 8–10 minutes. Timing varies with sausage diameter and starting temperature; colder sausages require slightly longer cook cycles.
Yield
Serves: 2–3 people with four average pork sausages. Adjust portion counts for appetite and side dishes.
Portion control helps you plan rest time and finishing sear to keep texture consistent across servings.
Difficulty Level
Skill: Easy. The microwave simplifies thermal control but requires brief technique tweaks for optimal texture.
Follow measured power settings, vent casings, and add an optional skillet finish to match pan-fried results.
Ingredients
Use quality sausages for best results; natural casings respond predictably to heat. Typical ingredients include:
- 4 pork sausages (natural casing preferred)
- 1 tbsp olive oil or melted butter
- 1 tbsp water to generate gentle steam
- 1 tsp smoked paprika (optional)
- Fresh cracked black pepper to taste
- Fresh herbs such as thyme or rosemary for garnish
For background on the food type and its composition, consult sausage on Wikipedia.
Instructions
1. Prepare the sausages: Lightly prick each sausage in several places with a fork to create steam escape paths. This step reduces pressure buildup and prevents sudden casing rupture.
2. Combine liquids: Place sausages in a microwave-safe dish with the oil and water; toss to coat. The water produces controlled steam while the oil supports surface sheen that helps mimic sizzle.
Power Settings and Timing
Set the microwave to medium-high (about 70–80% power) to allow energy to penetrate without blasting the outer layer. If the unit lacks percentage settings, use the medium setting and shorten intervals.
Cook for 2 minutes, turn sausages, then continue in 1-minute bursts until internal temperature reaches 160°F (71°C) for pork. Use a probe thermometer for accuracy.
Resting and Optional Finish
Let sausages rest for 1–2 minutes after microwaving; this redistributes juices and stabilizes internal temperature. Resting improves texture and reduces moisture loss when you finish with heat.
For authentic Maillard flavor and a glossy crust, sear sausages in a preheated skillet with a teaspoon of butter for 1–2 minutes per side. That brief surface contact creates real sizzle and aroma.
Science of Sizzle and Maillard
The familiar frying sizzle comes from hot fat evaporating and the Maillard reaction producing complex aroma compounds. Microwaves do not produce the same surface temperatures, so the sizzle sound differs.
To replicate browning, finish sausages on a hot surface. Read about the chemical reaction responsible for browning at Maillard reaction.
Heat Transfer Principles
Heat moves inside the sausage by conduction and convection of steam. The exterior warms progressively as internal water vapor migrates outward and escapes through vents.
Understanding basic heat transfer helps set realistic expectations for microwave cooking. For more on the physics, see heat transfer.
Tips for Success
Short cooking bursts with frequent turning reduce temperature gradients inside the sausage and prevent dry, rubbery texture. Use a thermometer rather than visual cues alone.
Moisture balance: A small amount of water in the dish creates steam that maintains juiciness; oil in the dish supports surface gloss and aids the sear if finishing in a pan.
 Expert Insight
Rotate sausages mid-cycle and monitor internal temperature; overcooking causes protein tightening and moisture loss. If your microwave has an inverter or variable power mode, use it for gentler heating.
 Pro-Caution
Serving Suggestions
Serve microwaved-and-finished sausages on toasted brioche buns with mustard and sautéed peppers for textural contrast. Fresh herbs add aromatic top notes that enhance perceived juiciness.
Pair the sausages with sides that offer acidity or brightness—acid cuts through fat and amplifies flavor. For more meal ideas, see our internal guides: Mastering Protein Cooking Techniques and Quick Breakfast Recipes.
Nutrition
| Nutrient | Amount (per sausage) |
|---|---|
| Calories | 220 kcal |
| Protein | 12 g |
| Carbohydrates | 2 g |
| Fat | 18 g |
Q&A
Clear, practical answers help you anticipate problems before they occur. Below are concise explanations to common microwave sausage questions.
Each response focuses on actionable steps and the science behind them so you can repeat success reliably.
Why does a sausage sometimes explode in the microwave?
Explosion happens when internal steam pressure exceeds the casing strength. Piercing the casing and using lower power prevents rapid steam buildup and reduces rupture risk.
How can I get that perfect sizzle without frying?
Controlled moisture and a finishing sear deliver the sensory cues of frying. Microwave to temperature, then sear briefly in a hot pan to trigger the Maillard reaction and produce audible sizzling.
What microwave power setting works best?
Medium-high (70–80%) usually provides the best balance. It allows heat to move inward without overcooking the surface, reducing splits and dryness.
Does sausage shape affect cooking?
Yes. Thinner, uniform sausages cook faster and more evenly. Irregular shapes trap steam and require longer, lower-power cycles to avoid uneven doneness.
Any safety tips for microwaving sausages?
Always check internal temperature (160°F / 71°C for pork). Avoid sealed containers and metal. For more appliance safety practices, consult our internal resource: Microwave Safety Tips.
The Way Forward
Applying controlled steam management, measured power, and a brief finishing sear yields a microwaved sausage that rivals pan-fried results for juiciness and aroma. Consistency depends on small procedural details more than gadgetry.
Use the steps here as a standard operating procedure: vent casings, cook at medium power, rest, and finish hot for a reliable sizzle. With practice, you will produce predictable, flavorful outcomes in minutes.
See also: microwave sausage
]]>
- Salt raises the boiling point of water slightly, not lowers it.
- The culinary effect is tiny at normal seasoning concentrations.
- Time-to-boil depends far more on pot choice, lid use, and burner power than on salt.
How salt affects boiling water temperature
Dissolving a non-volatile salt like sodium chloride increases a liquid’s boiling point because added ions reduce the solvent’s vapor pressure. This behavior is a classic colligative effect: boiling-point elevation depends on the number of dissolved particles, not their chemical identity.
Quantitatively, you can reference the basic theory in the colligative properties entry, which summarizes how solute concentration drives boiling-point elevation and related phenomena.
Quantifying the change with the ebullioscopic relation
Use ΔTb = Kb · m · i to estimate the boiling-point elevation. Here Kb is water’s ebullioscopic constant, m is the solution molality, and i is the van ‘t Hoff factor that counts dissociated particles per formula unit.
For table salt (NaCl) the van ‘t Hoff factor i ≈ 2 because it dissociates into Na+ and Cl−. Typical culinary doses — for example one tablespoon (~17 g) added to 3.8 kg of water — produce a molality near 0.077 mol/kg and a ΔTb on the order of 0.08 °C. That shift is effectively imperceptible when heating water on household equipment.
Energy and time implications for boiling water in a kitchen
The energy required to heat water increases with the tiny additional temperature rise caused by salt. Compute the extra heat with the specific heat capacity of water: Q = m·c·ΔT. The numbers remain small for normal seasoning levels.
Raising 3.8 kg of water by 0.078 °C uses roughly 1.26 kJ of extra energy. On a 2,000 W burner that extra energy equates to a fraction of a second of additional heating. In practical terms, adding a tablespoon of salt does not make boiling water sooner; physics predicts a negligible delay instead.
Relevant thermodynamic concepts
Two linked concepts are helpful for context: boiling point and vapor pressure. Both determine when a liquid begins sustained phase change at a given ambient pressure.
For concise background on temperature, vapor pressure, and the transition to gas, consult the boiling point page and the vapor pressure entry.
Practical kitchen impact and common misconceptions about boiling water
Cooks sometimes misinterpret what they see. Salted water at a full boil sits at a marginally higher temperature than unsalted water at its boil point. That higher temperature can change cooking chemistry slightly, but it does not shorten the *time* the water needs to reach boiling.
Other effects produce the illusion of faster boiling. For example, stirring when salt dissolves or using a different lid practice changes heat transfer and bubble behavior. Those behavioral or equipment differences explain most anecdotal reports that salt speeds boiling water.
Why recipes say “salt the water”
Recipes recommend salting because salt transfers flavor into starches and proteins during cooking, not because it saves time. When pasta and vegetables absorb salted water, they pick up sodium that improves perceived seasoning.
For properties of the ingredient itself, see the sodium chloride article. It explains why salt dissolves and how it behaves in aqueous solution.
Simple experiment you can run at home with boiling water
You can verify the effect with basic equipment. Use two identical pots, equal water masses, the same burner, and a reliable digital thermometer. One pot stays plain, the other receives a typical culinary dose of salt.
Record the time to the first sustained boil for each pot. Repeat trials multiple times and control lid use and starting temperature. Expect times to match within measurement uncertainty; only larger, laboratory-level salt concentrations produce clearly measurable time differences.
Design tips for valid results
Measure salt by weight to avoid the variability of measuring spoons (kosher versus fine table salt differ in density). Use a digital thermometer and repeat trials to address random noise in household burners.
For a deeper look at heat capacity and related calculations, consult the specific heat capacity resource. That page helps translate temperature shifts into energy and time estimates.
Pro-Caution
When experiments report large time differences, the cause almost always lies in equipment variation, lid use, or measurement error. In controlled conditions, the salt effect on time-to-boil is negligible for culinary concentrations.
Cooking consequences beyond time-to-boil
Although salt does not speed the approach to boiling, it affects final food quality. Salted cooking water seasons pasta and vegetables internally during hydration, which yields a better-balanced final flavor without only salting after cooking.
Small boiling-point elevations can also influence texture slightly. At household concentrations, these thermal differences remain modest, but they may interact with cooking time and agitation to alter the final bite in sensitive preparations.
Expert Insight
Chef’s practical checklist for faster boiling water
Use a lid. Covering a pot traps heat and cuts heat loss dramatically, shortening time to sustained boiling compared with leaving the pot open.
Match pot shape to volume. A wide, shallow vessel brings the same mass of water to near-boil faster than a tall, narrow pot because the surface area exposed to heat is larger.
Choose higher-power heat sources. High-BTU burners or induction elements heat large water masses much quicker than low-power hotplates. These choices move the needle on time-to-boil; salt does not.
FAQ
Does salt ever make water boil at a lower temperature?
No. Dissolved, non-volatile solutes such as sodium chloride raise the boiling point. Only reducing the ambient pressure — for example at high elevation — will lower the boiling temperature.
How much does salt raise the boiling point of water?
It depends on concentration. At culinary levels (a tablespoon in several liters), the rise is a few hundredths to a few tenths of a degree Celsius, negligible for time-to-boil. Laboratory concentrations produce larger, measurable shifts.
Will salt help food cook faster once the pot is boiling?
Technically, food in slightly hotter salted water cooks marginally faster because the liquid can reach a higher equilibrium temperature. However, typical seasoning concentrations give such a small temperature advantage that timing adjustments are unnecessary for most cooks.
Should I add salt before or after boiling?
Add salt when the water approaches a boil or after it boils; both methods season pasta effectively. Adding salt to cold water still seasons food, but the difference in dissolving speed is a practical, not a thermodynamic, factor.
Are there safety or dietary concerns with salting water?
Standard safety applies: avoid splashing and exercise care when adding salt to hot liquids. Also remember that excess salt increases sodium intake; season to taste and consider dietary limits.
Final practical summary
Salt does not make boiling water reach a boil faster. It raises the boiling temperature slightly, which requires a negligible extra energy input and typically delays the time-to-boil by an imperceptible amount.
For cooks seeking shorter wait times, focus on lid use, pot geometry, and burner power. Continue to salt cooking water for flavor benefits, but do not treat it as a time-saving technique.
See also: For reference reading on the underlying physical concepts, consult the linked Wikipedia entries on colligative properties, boiling point, and sodium chloride.
See also: boiling water
]]>
- Fast results: Cold cream + chilled tools = whipped peaks in under 5 minutes.
- Controlled texture: Use short pulses to stop at soft or stiff peaks.
- Stability options: Add cream cheese or gelatin to extend hold for cakes.
- Versatile uses: Sweet and savory applications expand what whipped cream can do.
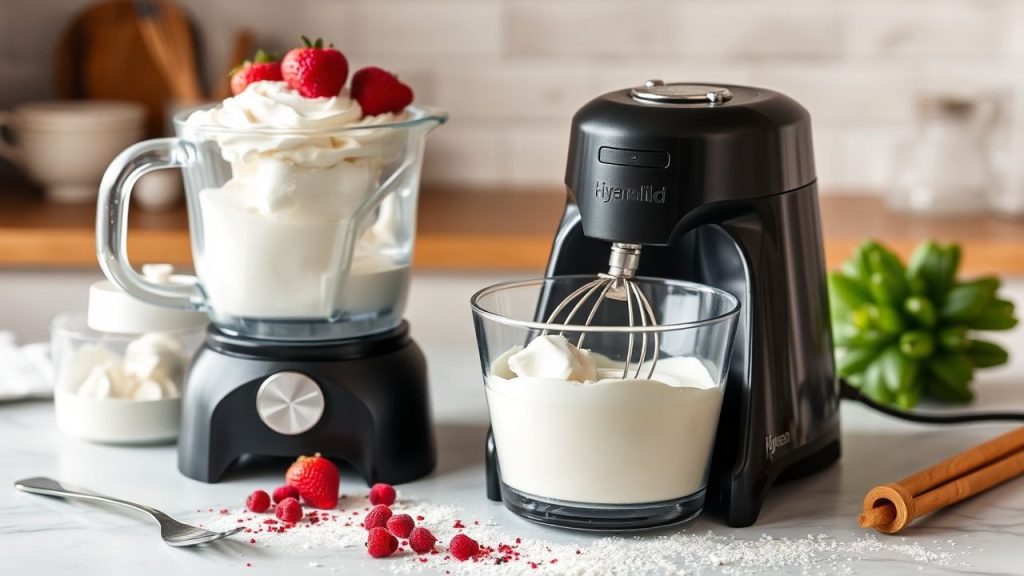
Whipping Cream Wonders: Texture and Consistency Mastered with Your Immersion Blender
Using an immersion blender gives you a high-speed, compact option to aerate cream. It works best when you combine equipment, temperature, and motion to build stable air cells.
Start with heavy cream that lists at least 35% milk fat for reliable volume. Learn the mechanics behind aeration to choose soft or stiff peaks with confidence. See heavy cream for composition details.
Prep and Timing
Prep time: 5 minutes. Whipping time: 3–5 minutes depending on batch and temperature. These are practical numbers from repeated kitchen tests.
Chill everything. Place the immersion blender attachment and container in the fridge or freezer for at least 10 minutes. Cold tools reduce heat transfer and speed coagulation of fat globules.
Prep and Cook Time
- Preparation: 5 minutes
- Whipping: 3–5 minutes
- Total: 8–10 minutes
Ingredients and Equipment
Use a tall, narrow container designed for immersion blenders. The shape concentrates the motor action and traps air. A deep jar or a dedicated beaker works best.
For ingredients keep it simple: chilled heavy cream, powdered sugar for sweetness, and vanilla if desired. For longer hold, add a teaspoon of cream cheese or a small amount of gelatin. Read about cream cheese if you plan to stabilize this way.
Yield
About 1 cup heavy cream yields roughly 2 cups whipped cream. This amount serves 4–6 as a topping, depending on usage and piping losses.
Difficulty Level
Easy. The technique fits cooks of all skill levels. Control comes from observing peaks rather than relying on timers alone.
Ingredients
- 1 cup heavy cream, chilled
- 2 tbsp powdered sugar, sifted
- 1 tsp vanilla extract, optional
- Pinch of salt to brighten flavor
Step-by-step Instructions
Set up cold equipment and a tall container. Pour the chilled cream into the container and add sugar and flavoring if used.
Attach the immersion blender and start on medium-high speed. Move the wand gently up and down to incorporate air and avoid splatter. The motion should be controlled and brief rather than frantic.
- Chill tools: Refrigerate the whisk attachment and container for 10 minutes.
- Pour cream: Add cream to a tall container to minimize splatter and air loss.
- Add sugar and flavor: Add powdered sugar and vanilla as the cream begins to thicken.
- Whip: Immerse and pulse on medium-high until soft peaks form, about 3 minutes. Continue to stiff peaks if needed, checking every 10–15 seconds.
- Stop on time: Once stiff peaks hold, stop. Overwhipping turns cream grainy as fat coalesces into butter.
- Store: Refrigerate in an airtight container for up to 24 hours. Re-whisk gently before serving if it loses volume.
Tips for Success
Cold is crucial. Cold cream and chilled equipment trap air faster and reduce whipping time. This lowers the risk of passing from peaks to butter.
Container shape matters. A narrow, tall vessel keeps the aeration focused. It also reduces splatter and lets the blade reach the full column of cream.
- Pulse don’t blast: Short bursts give you control over peak formation.
- Watch the texture: Soft peaks look glossy and fall back slowly. Stiff peaks hold shape when the whisk lifts.
- Stabilizers: Add a teaspoon of cream cheese or a small amount of gelatin for longer hold, useful for cakes.
- Fat content: Use cream with at least 35% fat for reliable structure.
For mechanical context, review the device specifics at the immersion blender entry. It explains motor and blade design and why container geometry matters. See immersion blender.
Expert Insight
When stabilizing with gelatin, bloom a small amount in cold water and warm gently before adding. Dissolve completely so you do not create strings in the foam.
Pro-Caution
If overwhipping begins, you can sometimes rescue the cream by adding a tablespoon of fresh cold cream and gently whipping to bring it back. This does not always work if the process moves too far toward butter.
Creative Uses Beyond Desserts
Whipped cream can balance heat and acidity in savory dishes. Fold in herbs and lemon zest for a bright, airy garnish on grilled fish or roasted vegetables.
Try herbed whipped cream as a dollop on soups or as a spread for brunch breads. The texture adds richness without weight, and the technique scales easily for small batches.
Use whipped cream to build layered parfaits, frost small cakes, or pipe decorations on cupcakes. For stability over long service, link to our detailed guide on dessert toppings and stabilizers at Homemade Dessert Toppings.
For more on kitchen tools and setup, see Kitchen Tools & Setup to optimize your workspace and tools for fast, clean whipping sessions.
Nutrition and Portioning
Whipped cream is calorie-dense. Two tablespoons typically contain about 50 kcal and several grams of fat. Use measured portions to manage calories and flavor balance in plated dishes.
For nutritional context consult general dairy composition references. The protein and carbohydrate values remain low; fat drives the texture and mouthfeel. For related reading see whipped cream.
| Nutrient | Per 2 tbsp serving |
|---|---|
| Calories | 52 kcal |
| Protein | 0.3 g |
| Carbohydrates | 0.4 g |
| Fat | 5.5 g |
For a science-focused read on aeration, consult resources on food structure and stabilizers. If you plan to use gelatin as a stabilizer, review its properties at gelatin.
FAQ
Can you really whip cream with an immersion blender?
Yes. An immersion blender can produce soft or stiff peaks quickly when you use chilled cream and the right container. It performs especially well for small batches and quick touch-ups.
How does an immersion blender compare with a hand mixer?
A hand mixer offers fine speed control and can be gentler on larger batches. An immersion blender provides compact speed and fast results for small to medium portions. Choose based on batch size and finish quality desired.
What is the secret to achieving perfect peaks?
Cold cream, chilled equipment, a tall container, and controlled pulsing. Stop early, check texture, and avoid continuous full-speed runs to prevent overwhipping.
Which containers work best?
Tall, narrow jars or beakers concentrate the whipping action and reduce splatter. Wide bowls force you to move the wand more and lose aeration efficiency.
How do I stabilize whipped cream for cakes?
Add a teaspoon of cream cheese or dissolve a small amount of gelatin and incorporate it while whipping. Both increase holding time and resistance to weeping under warm conditions.
Final Notes
An immersion blender is a practical, fast tool for mastering whipped cream. With temperature control and measured pulses you can achieve consistent, stable peaks.
Experiment with flavors and stabilizers to match your recipes. Use the internal guides linked above to expand technique and tool selection. Practical tests and consistency checks will make your whipped cream reliably excellent.
See also: whipped cream
]]>
- Start cold, salt early: Place potatoes in cold, salted water for even cooking.
- Match variety to use: Waxy vs starchy potatoes behave differently when boiled.
- Test doneness: A fork should slide in with slight resistance, not crumble the flesh.
- Cool correctly: Ice baths stop carryover cooking for salads and prep-ahead dishes.
Prep and Cook Time
Preparation: 10 minutes. Prepare potatoes by cleaning and cutting to uniform size so heat distributes evenly during boiling.
Cooking: 15–25 minutes depending on size and variety. Smaller whole new potatoes need less time than large Russets or split chunks.
Yield and Difficulty
Serves 4 as a side when using about 1.5 pounds of potatoes. The method scales reliably if you keep pieces uniform and adjust pot size.
Difficulty: Easy. This technique suits beginners and professionals who need repeatable texture for downstream dishes like mashed potato or potato salad.
Ingredients
Use quality, evenly sized potatoes and plain kosher salt for the cooking water. Cold water and a neutral finishing fat, such as unsalted butter or olive oil, preserve texture and flavor.
Stock a few fresh herbs for finishing and keep an ice bath ready if you plan a potato salad or make-ahead prep. Below are recommended basics you can adapt:
- 1.5 lb Yukon Gold or similar, scrubbed and trimmed
- 1 tsp kosher salt for the boiling water
- Cold water, enough to cover potatoes by ~2 inches
- 2 tbsp unsalted butter or 1 tbsp olive oil (optional finish)
- Fresh herbs such as parsley or chives for garnish
Instructions
Follow a clear sequence: choose the right variety, prepare for even heat transfer, control the boil, and finish deliberately. Each step reduces common failures like split skins or a raw core.
Below, the instructions break into focused sub-steps to ensure consistent outcomes. Read each step, then perform it without rushing.
Choose and Prepare Potatoes
Select potatoes with minimal blemishes and similar size. Larger tubers should be halved or quartered so all pieces finish at the same moment.
If you want rustic texture, keep the skins on; for ultra-smooth mashed potatoes, peel before boiling. Uniform pieces reduce the risk of mixed textures on the plate.
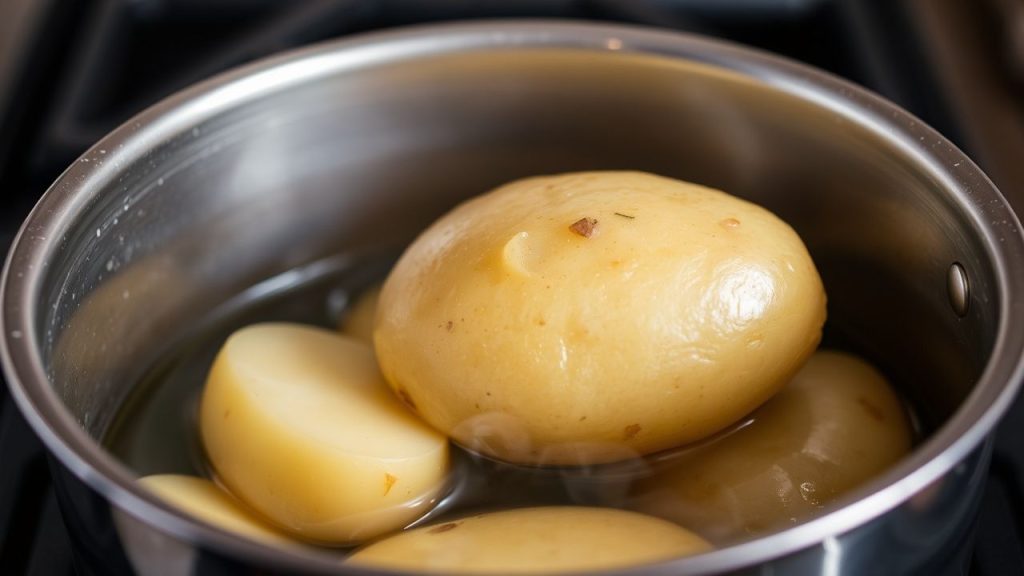
Place in Cold Water and Salt
Arrange potatoes in a single layer in a saucepan and add cold water to cover by about 2 inches. Starting from cold water heats the center gradually and prevents undercooked cores.
Add kosher salt to the water before heating; the salt penetrates as the water heats and seasons the potatoes internally. This step makes a notable difference in flavor compared with salting only at the end.
Bring to Boil, Then Simmer
Bring the pot to a gentle boil over medium-high heat. Once boiling, reduce to a steady simmer to avoid agitation that breaks the potato flesh.
Cooking times vary: waxy reds and new potatoes usually take ~15 minutes; medium Yukon Golds about 18–22 minutes; large starchy Russets can need 20–25 minutes. Use a fork to test—pierce center and observe resistance.
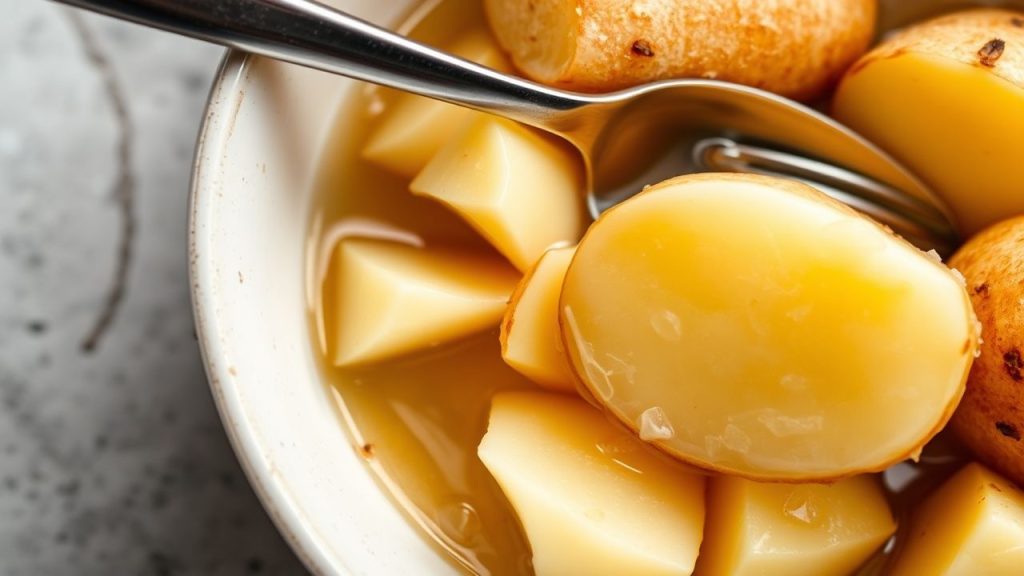
Drain, Cool, and Finish
Drain potatoes immediately when tender. For salads or staging, plunge into an ice bath to halt residual cooking and lock in texture.
For serving warm, return drained potatoes briefly to the pot off heat to steam-dry, then toss with butter and herbs. For mashed textures, return hot to the mixing bowl and proceed while still warm.
Tips for Success
Understanding potato biology helps: starchy potatoes lose structure when agitated; waxy potatoes hold shape due to lower starch and higher moisture. Match the variety to the dish you plan to make.
Cut pieces the same size, monitor the simmer, and test early. Those three habits eliminate most textural problems and increase consistency across batches.
Expert Insight
Adjust seasonings after boiling because the interior will already carry salt. For potato salad, chilling in an ice bath keeps pieces intact for tossing and dressing.
Pro-Caution
Serving Suggestions
Serve boiled potatoes simply: toss warm chunks with butter and herbs, or chill and dress with a vinaigrette for a classic potato salad. Both approaches reward precise boiling with intact shapes and clean flavors.
Use boiled potatoes as a base: mash them for a silky side, halve them for a composed salad, or pan-sear briefed chunks for crisp edges. For detailed creamy-mash technique, see our Ultimate Creamy Mashed Potatoes Guide and for storage best practices visit Best Potato Storage Tips.
For background on the crop and its culinary roles, read about the potato. For cooking science related to heating liquids, consult the boiling entry.
Nutrition (approx. per serving)
| Nutrient | Per Serving |
|---|---|
| Calories | 130 |
| Protein | 3 g |
| Carbohydrates | 30 g |
| Fat | 0.2 g |
For recipe inspiration using boiled tubers, explore the related techniques for mashed potatoes and potato salad. Those pages summarize common culinary uses and variations that benefit from precise boiling.
FAQ
How long should I boil medium potatoes?
Medium whole potatoes usually take 18–22 minutes at a simmer. Check doneness by inserting a fork: it should slide through with slight resistance but without crumbling the potato.
Do I need to peel before boiling?
No; you can boil with skins on to preserve nutrients and texture, especially for salads. Peel first only when you need a smoother mash.
Why start in cold water?
Starting from cold water lets the center heat gradually, matching interior and exterior temperatures. This prevents an undercooked core and reduces burst skins.
Can I boil potatoes ahead of time?
Yes. Chill boiled potatoes quickly and store in an airtight container in the refrigerator for up to 3 days. Reheat gently to avoid drying or turning them mealy.
What if my potatoes turn mushy?
Mushy results usually come from overcooking or using a very starchy variety for a shape-dependent dish. Repurpose mushy potatoes into soups, gnocchi, or blended spreads to avoid waste.
Key Takeaways
Control three variables—variety, uniform size, and heat profile—to achieve consistent results. Use an ice bath for salads and finish warm dishes with butter or oil to enhance mouthfeel.
Practice a clear sequence and test early; those habits produce reliably tender, intact potatoes you can use across many preparations. Precise boiling elevates simple potatoes into a dependable culinary component.
See also: boiled potatoes
]]>
- Vinegar speeds coagulation so whites firm around the yolk.
- Very fresh eggs reduce spreading and improve shape.
- Gentle simmer and a light vortex encourage neat wrapping of the white.
- Timing and rapid cooling lock the desired yolk texture.
Why vinegar helps for poached eggs: the chemistry in plain terms
Acid from vinegar lowers the pH of the poaching water and shifts protein charges in the albumen so proteins denature and bond at lower temperatures. That faster coagulation reduces feathering and helps the white cling to the yolk.
Egg-white structure and protein behavior explain the result: long protein chains unfold when heated and then cross-link to form a firm matrix. Acid accelerates that cross-linking, so the white sets quickly around the yolk rather than dispersing through the water. For a technical overview, see egg white and the broader discussion of vinegar.
Choosing vinegar and dose for poached eggs
Most vinegar varieties contain acetic acid, the active agent that speeds protein set. White distilled vinegar has the most neutral taste and minimizes off-flavors; fruit-based vinegars add a faint note you may or may not want.
Use about 1–2 teaspoons of vinegar per quart (liter) of water. That concentration reliably accelerates coagulation without making the egg taste sour. Avoid heavy doses: excess acid can toughen the white and alter mouthfeel.
Preparation basics for poached eggs: eggs, water, and temperature
Start with very fresh eggs; fresh albumen is thicker and holds together better when submerged. If you cannot get very fresh eggs, poach them singly or reduce water movement to limit spread.
Bring water to a gentle simmer and maintain roughly 80–90°C (176–194°F). Visible, violent boiling fragments whites and creates ragged edges, while calm simmering produces glossy, tender surfaces on poached eggs.
Water depth and pan selection
Use a wide, shallow pan for multiple poached eggs so you can space them and control water motion. A narrow pan concentrates heat and suits single or double eggs, giving a steadier surface for the vortex method.
Keep 3–4 inches (7–10 cm) of water in the pan so eggs are fully submerged yet easy to lift with a slotted spoon. That depth balances heat retention with gentle circulation around the egg.
Vortex technique and single-egg method for poached eggs
Create a gentle vortex by stirring the water before adding the egg; the circular flow encourages the white to wrap neatly around the yolk. Crack the egg into a small cup first so you can slide it smoothly into the center of the vortex.
When poaching multiple eggs, avoid crowding: use separate cups and space eggs at least a few inches apart. You can poach sequentially in the same pot to conserve effort while keeping water temperature consistent.
Alternative: no-vortex method
For very fresh eggs, skip the vortex and simply slide the egg gently into calm water; the thick albumen will hold shape without stirring. This method is forgiving when you have premium, recently-laid eggs.
Another option is to use a small fine-mesh strainer to remove the thinnest outer white before poaching; that reduces feathering and produces a tighter cup around the yolk.
Step-by-step poached eggs method (chef-tested)
1) Fill a wide, shallow pan with 3–4 inches (7–10 cm) of water and bring it to a gentle simmer. Add the measured vinegar and stir once to mix evenly.
2) Crack each egg into a small cup. Create a gentle vortex and slide the egg from the cup into the center. Cook 3–4 minutes for a runny yolk and 4–5 minutes for a slightly firmer center. Lift with a slotted spoon and drain briefly.
Shocking and finishing for poached eggs
If you want to halt cooking immediately, transfer the poached eggs to an ice bath for 30–60 seconds; that firms the white while preserving yolk softness. Pat dry and rewarm in warm (not boiling) water before serving.
Alternatively, finish poached eggs directly on hot toast or a warm plate; residual heat will continue to cook the yolk slightly. Account for that carryover when choosing your target cook time.
Troubleshooting common problems with poached eggs
If whites spread too much, check egg freshness and ensure you used the recommended vinegar concentration. Older eggs have thinner albumen that drifts in the water, so freshness matters more when you skip acid entirely.
If whites become rubbery, reduce the vinegar amount or shorten cook time. Over-acidification and overcooking both stiffen the protein matrix and create a tough texture on poached eggs.
Pro-Caution
When eggs stick to the spoon or break during transfer, support the base of the white and use a slotted spoon with a shallow bowl for better control. Lift gently and drain before plating to preserve the egg’s shape.
Expert insight for consistent poached eggs
Many cooks maintain water temperature slightly below visible simmer and choose pan size based on egg count; narrow pans for single eggs, wide for multiples. That balance preserves calm motion while enabling efficient protein set.
Use a kitchen thermometer to monitor water temperature and keep a simple log—egg pack date, vinegar dose, water temp, and cook time. Small adjustments guided by short records yield rapid improvement in consistency.
Expert Insight
Quick practice drills
Run three short trials at the same temperature, changing only one variable per trial: vinegar dose, cook time, or vortex strength. That isolates the factor that most affects shape and yolk runniness for your kitchen setup.
Repeat the winning combination until muscle memory forms. Consistent technique beats ad-hoc adjustments when you need reliable poached eggs for service.
Advanced variations and applications for poached eggs
Acid-driven protein control also appears in other preparations, for example in ceviche, where acid firms fish proteins. The principle is the same: acid changes protein behavior predictably.
Try poaching eggs in mild broths or a light court-bouillon for subtle flavor. Keep the acidity balanced so the egg texture remains delicate; flavored liquids can enhance complexity without overpowering the yolk.
Why timing and cooling matter for poached eggs
Texture depends on precise control of time and temperature; shorter exposure yields runnier yolks and tender whites, while longer exposure yields a firmer result. Track timing carefully to repeat desired outcomes for poached eggs.
Cooling in ice water stops heat transfer and locks the chosen texture. If you plan to reheat poached eggs, cool them immediately after cooking, store chilled, and rewarm gently in warm water for no more than 60 seconds to avoid overcooking.
At-home practice drills to build consistent poached eggs
Practice with the same egg size and type to internalize timing. Use a thermometer to note water temperature and adjust the burner setting rather than guessing by eye.
Keep a short log: egg freshness date, vinegar amount, water temperature, and cook time. That simple dataset highlights the variables that most influence the finished poached eggs.
Resources and method context for poached eggs
For historical and technical context about the cooking technique, consult the poaching overview at poaching (cooking). The page aligns with the methods here and adds useful background.
General egg handling and safety considerations are covered in the broader food-egg literature; for a concise food reference, see egg (food). These sources complement the practical steps in this guide.
FAQ
Is vinegar necessary to make poached eggs?
No. You can make good poached eggs using very fresh eggs and gentle technique alone. Vinegar, however, improves repeatability by accelerating white coagulation, which helps when cooking multiple eggs.
Which vinegar gives the least flavor to poached eggs?
White distilled vinegar provides the most neutral profile and is the standard choice when you want no added tang. Rice or apple-cider vinegars add subtle notes; choose by taste and dish pairing.
What if I overcook the yolk of my poached eggs?
Rescue options are limited: shock in ice water to stop further cooking, then rewarm briefly in warm water before serving. For service, poach ahead, chill in ice, and reheat gently to preserve yolk softness.
Can I poach eggs ahead of time and reheat?
Yes. Chill poached eggs immediately in an ice bath, store refrigerated up to 24 hours, and rewarm in warm water for 30–60 seconds before serving. This approach supports batch cooking for brunches or catering.
How do I get a glossy finish on poached eggs?
Short cook times, correct vinegar dose, and gentle handling deliver glossy, tender whites. Avoid excessive agitation and high heat, which cause pitting, matte surfaces, and ragged edges on poached eggs.
Final practice note: Repetition with controlled variables—egg freshness, vinegar dose, water temperature, and timing—turns poaching from a hit-or-miss task into a reliable technique. Track results, adjust incrementally, and you will achieve consistent, attractive poached eggs.
See also: poached eggs
]]>