Bright, colorful, and brimming with flavor, savory turkey stuffed bell peppers deliver lean protein and vibrant vegetables in a single baked package. The dish balances ground turkey, grains, herbs, and roasted peppers for a filling meal that fits weeknight schedules and meal-prep plans.
When you choose firm, glossy peppers and a properly seasoned turkey base, the result tastes elevated without extra effort. This recipe emphasizes straightforward technique, reliable timing, and adaptable ingredients for consistent results.
- High-protein: Lean turkey plus quinoa yields a filling, nutrient-dense meal.
- Meal prep friendly: Assemble ahead and bake when ready.
- Low fuss: Minimal technique, maximum flavor through seasoning and roasting.
Prep and Cook Time
Preparation Time: 20 minutes. This includes chopping aromatics, pre-cooking grain, and hollowing peppers. Plan to have your grain cooked and cooled before you assemble.
Cooking Time: 40 minutes. Bake covered, then uncover to brown the tops. Total time from start to table typically runs about one hour for most home ovens.
Yield and Difficulty
Yield: Serves 4 generously. Each pepper holds a satisfying portion of turkey and grain filling suitable for adults and older children.
Difficulty: Easy to Medium. The technique focuses on basic sauté and baking skills that any competent home cook can master quickly.
Ingredients
Use sturdy, well-shaped bell peppers for even baking. For background on the vegetable’s varieties and culinary uses, see bell pepper.
Gather the following. Substitute or scale quantities to match serving needs and dietary preferences.
- 4 large bell peppers (red, yellow, or orange), tops cut off and seeds removed
- 1 lb (450g) lean ground turkey
- 1 small onion, finely chopped
- 2 cloves garlic, minced
- 1 cup cooked quinoa or brown rice
- 1 cup canned diced tomatoes, drained
- 1 teaspoon dried oregano
- 1 teaspoon smoked paprika
- 1/2 teaspoon ground cumin
- 1/4 cup fresh parsley, chopped
- 1/4 cup fresh basil, chopped
- 1/3 cup shredded mozzarella cheese or dairy-free alternative
- Salt and freshly ground black pepper to taste
- 1 tablespoon olive oil
If you use quinoa, consult the entry on quinoa for proper rinsing and cooking ratios. Quinoa increases overall protein and shortens the glycemic load relative to refined grains.
Instructions
Preheat the oven to 375°F (190°C) and grease a baking dish lightly. Prepare all mise en place before you heat the pan to keep cooking times predictable.
1. In a medium skillet, heat olive oil over medium heat. Add the chopped onion and garlic and sauté until soft and lightly golden, about 4–5 minutes.
Sautéing and Browning
2. Add ground turkey to the skillet and break it apart with a wooden spoon. Cook until the turkey loses its pink color and edges begin to brown, roughly 6–8 minutes.
3. Stir in diced tomatoes, cooked quinoa (or rice), oregano, smoked paprika, cumin, salt, and pepper. Reduce heat and let the mixture steam gently for 2–3 minutes so flavors meld.
4. Remove from heat and fold in fresh parsley and basil. Reserve a small amount of herbs for garnish.
Stuffing and Baking
5. Spoon the turkey mixture into each hollowed pepper, pressing gently to compact but not overstuff. Place peppers upright in the prepared dish and top with shredded mozzarella.
6. Cover loosely with foil and bake for 30 minutes. Uncover and bake an additional 8–12 minutes, until peppers are tender and the cheese has a golden finish.
 Pro-Caution
Allow the peppers to rest for 5 minutes before serving to let juices redistribute and to avoid hot filling spills. Garnish with reserved herbs and serve warm.
Tips for Success
Choose peppers that sit flat so they remain upright during baking; avoid wrinkled or soft skins. For even cooking, you can par-roast peppers for 8–10 minutes before stuffing to reduce oven time later.
For richer texture and flavor, select ground turkey labeled near 93% lean rather than ultra-lean breast-only blends. The slight fat improves mouthfeel without excessive calories.
 Expert Insight
To adjust sodium and flavor intensity, season in steps: add half the salt during cooking, taste after the mixture cools slightly, then adjust before stuffing. This prevents over-salting when ingredients concentrate during baking.
Healthy Serving Suggestions and Creative Variations
Pair these peppers with a simple arugula or spinach salad dressed with lemon and olive oil for acidity and freshness. A light side keeps the meal balanced and boosts vegetable intake.
Explore variations: add black beans and corn for a southwestern profile, swap turkey for cooked lentils for a vegetarian option, or top with crumbled feta for a Mediterranean twist.
Bell peppers provide vitamin C and antioxidants; for more on vitamin benefits, see vitamin C. These nutrients support collagen synthesis and immune function when consumed as part of a varied diet.
Nutritional Information (Per Serving)
The estimated nutrition below reflects a preparation using lean turkey and quinoa. Values vary with ingredient substitutions and portion sizes.
| Calories | Protein (g) | Carbohydrates (g) | Fat (g) |
|---|---|---|---|
| 320 | 35 | 18 | 8 |
Turkey provides high-quality protein and micronutrients such as selenium. For background on poultry as a protein source, consult the turkey (bird) entry.
Storage and Meal-Prep Tips
Stuffed peppers refrigerate well for 3–4 days when stored in an airtight container. Reheat covered in a 350°F (175°C) oven until warmed through to preserve texture.
For freezing, cool completely, wrap individually, and freeze up to 3 months. Thaw in the refrigerator overnight before reheating to maintain filling integrity and food safety.
FAQ
Can I make these ahead for busy weeknights?
Yes. Assemble the peppers and store them covered in the refrigerator for up to 24 hours, then bake when ready. Par-baking peppers briefly before stuffing also speeds final cook time.
What are good grain substitutes for quinoa?
Brown rice, farro, or bulgur work well. For lower carbohydrate content, use cauliflower rice. Each choice modifies texture and cooking time, so adjust moisture accordingly.
How do I keep the filling from becoming soggy?
Drain canned tomatoes well and cool cooked grains before combining. Slightly undercooking the grain prevents excess moisture release during baking and yields a firmer filling.
Are there allergy-friendly options?
Use dairy-free cheese or omit cheese entirely to make the dish lactose-free. For gluten-free needs, choose quinoa or certified gluten-free grains and verify all packaged spices.
Can I make these vegetarian or vegan?
Replace turkey with cooked lentils, textured vegetable protein, or seasoned mushrooms for a plant-based version. Choose a vegan cheese or omit topping altogether to keep it vegan compliant.
These stuffed peppers combine practical technique and flexible ingredients to create a reliable, nutritious entrée. They reward simple attention to seasoning and temperature control with a satisfying plate that stores and reheats well.
For an evidence-based approach to portioning proteins and vegetables in balanced meals, consult reputable dietary guidelines and peer-reviewed sources related to protein foods and dietary patterns.

See also: Stuffed Peppers
]]>
- Plant-forward protein: Lentils provide texture, protein, and cost-effective nutrition.
- Make-ahead friendly: Prepare the filling in advance to cut evening cook time and simplify plating.
- Versatile topping: Use mashed potatoes, sweet potatoes, or cauliflower mash for varied macros and flavor.
- Freezes well: Under-bake slightly if you plan to freeze the assembled lentil pie to retain moisture on reheat.
Overview and Culinary Context — Lentil Pie
This vegetarian lentil shepherd’s pie reinterprets a classic meat pie by swapping the ground meat for pulses and mushrooms while preserving structure and oven-baked appeal.
The recipe leans on principles of texture and seasoning. Swap ingredients thoughtfully and you retain the savory profile that defines a true lentil pie.
Prep and Cook Time — Lentil Pie
Preparation: 20 minutes. Good mise en place reduces oven time and keeps assembly efficient.
Cooking: 40 minutes. Simmer lentils until tender, then bake until the potato topping crisps. Total time is roughly one hour depending on equipment.
- Preparation: 20 minutes
- Cooking: 40 minutes
- Total Time: 1 hour
Yield
This recipe yields about six hearty portions—ideal for family dinners or meal prep containers.
Pair a moderate slice of lentil pie with a green salad to stretch servings and add micronutrients.
Difficulty Level
Medium. Techniques include simmering, sautéing, mashing, and baking; none require advanced skills, just timing and tasting.
Read through steps before you begin to coordinate the lentil filling and potato topping so both finish hot and textured.
Ingredients for Lentil Pie
Use quality staples: brown lentils keep their shape and starchy potatoes yield a fluffy topping. Adjust substitutions for dietary needs.
Measure liquids and season in stages so the filling finishes glossy and well seasoned before you assemble the lentil pie.
- 2 cups brown lentils, rinsed and drained
- 4 cups vegetable broth
- 3 tablespoons olive oil, divided
- 1 large onion, finely chopped
- 3 garlic cloves, minced
- 2 medium carrots, diced
- 1 cup celery, diced
- 1 cup mushrooms, finely chopped
- 1 cup frozen peas, thawed
- 2 tablespoons tomato paste
- 1 tablespoon soy sauce or tamari
- 1 teaspoon smoked paprika
- 1 teaspoon dried thyme
- 1 bay leaf
- Salt and freshly ground black pepper, to taste
- 5 large potatoes, peeled and cubed (for topping)
- 1/4 cup unsweetened plant-based milk
- 2 tablespoons vegan butter or margarine
- 1/3 cup nutritional yeast (optional)
- Fresh parsley, finely chopped, for garnish
Instructions for Lentil Pie
Follow the steps in order so the filling and topping finish at the same time. Small timing adjustments preserve texture and prevent a soggy surface.
Preheat the oven when you start step 5 so the dish can go straight in and the potatoes form a light crust.
- Cook the lentils: Combine lentils, vegetable broth, and bay leaf in a pot. Simmer 25–30 minutes until tender but not mushy; drain and discard bay leaf.
- Prepare the mashed potato topping: Boil potatoes until fork-tender, drain, then mash with plant milk, vegan butter, and nutritional yeast. Season with salt and pepper; set aside.
- Sauté aromatics and vegetables: Heat 2 tablespoons olive oil, cook onion and garlic until translucent. Add carrots, celery, and mushrooms; sauté until softened and lightly browned, about 7–8 minutes.
- Combine filling base: Stir in tomato paste, soy sauce, smoked paprika, and thyme. Add cooked lentils and peas; adjust seasoning. Add a splash of broth if the filling looks dry.
- Assemble the pie: Preheat oven to 400°F (200°C). Grease a 9×13-inch baking dish with remaining oil. Spread the lentil mixture evenly, top with mashed potatoes, and fork-texture the surface for crisp edges.
- Bake: Bake 20–25 minutes until the potato surface turns golden and edges bubble. For extra browning, broil 1–2 minutes while watching closely.
- Rest and serve: Rest 5 minutes before slicing. Garnish with parsley and serve warm.
Timing notes
If you make the filling ahead, cool it completely before refrigerating to preserve texture and prevent water separation.
Reheat the filling briefly before topping with potatoes and baking so the oven time stays consistent and the lentil pie heats through evenly.
Chef’s Notes and Tips for Lentil Pie
Lentil choice: Brown or green lentils keep shape under heat. Red lentils break down faster and yield a stew-like filling when used.
Texture control: Monitor moisture; balance tomato paste and broth to avoid a watery filling that can make the topping soggy.
Expert Insight
Use the suggested seasoning progression—salt early on onions, then taste and adjust at the end—to lock in flavor without over-salting the lentil pie.
Pro-Caution
Allow a buffer when reheating frozen portions: cover with foil and add 10–15 minutes if still cold in the center. Check temperature before serving.
Serving Suggestions
Serve the lentil pie with a crisp, acidic salad to balance richness. A simple lemon vinaigrette cuts through the mouthfeel and refreshes the palate.
Offer pickled red onions or a tangy slaw for contrast. Bread on the side helps soak up juices and extends portions economically.
Nutrition Snapshot
This lentil pie emphasizes plant protein, fiber, and complex carbohydrates. Lentils supply protein and iron while potatoes add potassium and vitamin C when eaten soon after cooking.
To reduce saturated fat, choose light oils and plant milk. For precise macros, weigh ingredients and consult a nutrition database for exact values.
| Nutrient | Per Serving |
|---|---|
| Calories | 350 kcal |
| Protein | 18 g |
| Carbohydrates | 45 g |
| Fat | 8 g |
FAQ
What makes this dish a satisfying vegetarian substitute for traditional shepherd’s pie?
The combination of lentils and mushrooms creates a dense, umami-rich texture that mimics ground meat. Proper seasoning lets the lentil pie deliver heft and flavor without animal protein.
Can I use other pulses instead of lentils?
Yes. Cooked chickpeas or black beans work but change texture. If you use chickpeas, mash some to help bind the filling and prevent a loose layer in the lentil pie.
How do I get the mashed potatoes extra creamy?
Use starchy potatoes like Russets or Yukon Golds. Warm plant milk and melted vegan butter fold in more smoothly, yielding a silkier mash for the lentil pie topping.
Is this recipe freezer-friendly?
Yes. Freeze the cooled filling separately or assemble the full pie and freeze before baking. Thaw overnight in the fridge, then bake until heated through, adding extra minutes if still partially frozen.
What spices or sauces enhance the filling’s depth?
Umami boosters like soy sauce, miso, or vegan Worcestershire sauce lift savory notes. Smoked paprika and thyme add warmth; use them sparingly and taste as you go to refine the lentil pie seasoning.
Sources and Further Reading
To understand ingredient behavior and traditional context, consult primary references on legumes and classic pies:
- Lentil — legumes used for texture and protein.
- Shepherd’s pie — historic context for this style of baked pie.
- Potato — starch choices and cooking properties for mashed toppings.
- Vegetarianism — dietary framework and common substitutions referenced in recipe planning.
Use these references to refine technique, pacing, and ingredient swaps while you master the lentil pie.

See also: Lentil pie variations and batch-cook strategies above for flexible weeknight cooking.
See also: lentil pie
]]>
- Balanced macros: lean protein, monounsaturated fat, and fiber for sustained energy.
- Meal-prep friendly: components store well separately for 2-3 days.
- Fast assembly: most cooks finish a batch in about 30–40 minutes.
- Flexible swaps: easy vegetarian or gluten-free alternatives available.
Why chicken wraps work
The combination of lean cooked chicken and avocado achieves complementary nutrition and texture. Chicken supplies complete protein to support muscle maintenance, while avocado contributes monounsaturated fats that improve absorption of fat-soluble vitamins.
Structurally, a whole-grain or high-fiber tortilla creates a portable base that contains fillings without excess sogginess when assembled correctly. For background on tortillas and common formats, see tortilla.
Ingredients for chicken wraps
Ingredient selection determines both flavor and food-safety outcomes. Choose boneless, skinless chicken and a perfectly ripe avocado to balance creaminess and structure.
Use a whole-grain or high-fiber wrap to add complex carbohydrates and bulk. Limit wet dressings at the edges to avoid premature sogginess.
Protein components
Chicken: Two large boneless, skinless breasts or an equivalent amount of thigh meat. Cook to an internal temperature of 74°C (165°F) using a thermometer for safety.
For alternative proteins, try grilled turkey, canned tuna, or roasted chickpeas. For further context on domestic fowl as a food source, consult chicken.
Produce and bases
Avocado: One ripe fruit, sliced or half-mashed with a squeeze of lime to slow oxidation and add brightness. A ripe avocado yields slightly to gentle pressure but remains firm enough to slice.
Add mixed greens, thinly sliced bell pepper, shredded carrot, and a small amount of diced red onion for crunch and micronutrients. When storing, keep avocado and dressings separate until service.
Fats & seasonings
Use extra virgin olive oil sparingly in the marinade for flavor and to encourage browning. For more detail on olive oil varieties and handling, review olive oil.
Season simply: ground cumin, smoked paprika, salt, and black pepper combine well. A small dollop of plain Greek yogurt adds creaminess and tang; use dairy-free yogurt to keep the wrap vegan.
Prep and cook time for chicken wraps
Total hands-on time is modest: active cooking typically takes 10 minutes, with prepping and assembly adding another 20 minutes for a single batch. For meal prep, allow 40 minutes for bulk cooking and portioning.
Chill cooked chicken within two hours of cooking and store components separately to extend quality. Reheat chicken gently before combining with avocado to avoid excessive softening of the fruit.
Time breakdown
Marinate chicken: 10 minutes passive. Sear or grill: 6–8 minutes until the center shows no pink and the proper internal temperature is reached.
Assembly: plan 4–6 minutes per wrap depending on speed. When preparing multiple portions, work assembly-line style to reduce total time.
Instructions for chicken wraps
This procedure emphasizes clear seasoning, temperature control, and assembly order to keep fillings from becoming soggy. Mise en place reduces mistakes.
Warm tortillas briefly to improve pliability. Slice vegetables, pit avocado, measure spices, and place sauces in small bowls so assembly progresses without pauses.
- Marinate the chicken: Toss strips with olive oil, ground cumin, smoked paprika, salt, and pepper. Let rest 10 minutes so flavors adhere.
- Cook the chicken: Heat a non-stick skillet over medium heat. Sear strips until golden and cooked through, about 6–8 minutes. Use a thermometer to confirm 74°C (165°F).
- Prepare produce: Slice avocado and bell pepper, shred carrot, and dice onion. Dress greens lightly with lime and salt to add brightness without excess moisture.
- Assemble: Spread a thin layer of Greek yogurt or dairy-free alternative on each tortilla. Add greens, then chicken, then avocado and crunchy vegetables.
- Roll and seal: Fold edges and roll tightly. Optionally wrap in parchment or foil to hold shape. Cut diagonally and garnish with chopped cilantro.
Step details
Heat tortillas briefly on a dry skillet or 10–20 seconds in a microwave to increase flexibility. Avoid overheating, which dries and weakens the wrap.
If making ahead, pack components separately. Keep chicken and vegetables chilled, and add avocado just before serving to avoid browning and textural changes.
Tips for success with chicken wraps
Use ripe-but-firm avocados to prevent fillings from becoming too runny. Test ripeness by pressing near the stem; a slight give indicates readiness.
Balance textures deliberately: warm chicken, creamy avocado, and crisp vegetables improve perceived flavor and satisfaction. A small barrier of greens helps protect tortillas from wetter components.
- Slice avocado immediately before service to reduce oxidation.
- Pat chicken dry before searing to improve browning and flavor development.
- For vegetarian options, roast chickpeas with the same seasonings to mimic texture.
- Wrap tightly in parchment for transport to preserve shape and reduce unrolling.
Expert Insight
When planning weekly meal prep, portion cooked chicken and vegetables into airtight containers. Keep dressings separate and add avocado at service to maintain texture and color.
Serving suggestions for chicken wraps
Serve chicken wraps with crisp vegetable sticks, a small quinoa salad, or a light clear broth to add volume without heavy sauces. These small sides increase micronutrient diversity while keeping the meal balanced.
For crunch, sprinkle toasted seeds such as pumpkin or sunflower kernels. For heat, add crushed red pepper or a small squeeze of lime to brighten the profile instantly.
Pairing the wrap with a high-protein side or vegetable-based salad helps balance meals for athletes or busy adults with higher energy needs. For broader context on dietary planning and macronutrient balance, consult nutrition.
Nutrition for chicken wraps
A standard serving provides a balanced macro profile: lean protein from chicken, monounsaturated fat from avocado, and carbohydrates from the tortilla. Typical per-serving values approximate 350 kcal, 30 g protein, 28 g carbs, and 14 g fat.
Adjust portion sizes based on individual energy needs and activity levels. For example, increase chicken slightly for higher protein targets, or swap to a lower-carb wrap if needed for specific dietary goals.
| Nutrient | Per Serving |
|---|---|
| Calories | 350 kcal |
| Protein | 30 g |
| Carbohydrates | 28 g |
| Fat | 14 g |
Pro-Caution
Store assembled wraps upright and chilled. Consume refrigerated wraps within 24 hours for best texture, or keep components separate for up to 72 hours to maintain freshness.

FAQ
Are chicken wraps suitable for meal prep?
Yes. Cook and cool chicken, then portion it with vegetables in sealed containers. Keep avocado and dressings separate and assemble shortly before eating to avoid sogginess and browning.
Can I make this wrap vegetarian or vegan?
Absolutely. Replace chicken with roasted chickpeas, tempeh, or grilled tofu, and use a dairy-free yogurt or hummus for creaminess. Adjust seasoning to maintain a bold flavor profile.
How do I keep the wrap from becoming soggy?
Place moisture-rich ingredients toward the center and use a barrier of greens between wet and dry elements. Wrap tightly in parchment and consume within a day for best texture when assembled.
What spices complement chicken and avocado?
Basic spice blends of cumin, smoked paprika, and black pepper pair well with lime and cilantro. For an alternative profile, try za’atar or chili-lime seasoning to vary acidity and heat.
Is this recipe heart-healthy?
When prepared with lean chicken, whole-grain tortillas, and moderate avocado portions, the wrap aligns with heart-healthy guidelines. Monounsaturated fats and fiber support cardiovascular health as part of an overall balanced diet.
See also: Chicken Wraps and meal-prep recipes for related ideas and variations.
For extra reference on avocado composition and culinary use, consult avocado. For information on common spices like cumin, see cumin.
See also: chicken wraps
]]>
- Key: Build flavor in layers—sauté, toast spices, then simmer gently to keep the body clean for a true white chili.
- Texture: Partial blending of beans plus a light roux yields a silky mouthfeel without losing bean bite.
- Flexibility: Swap dairy or protein to match dietary needs while maintaining creaminess in white chili.
- Finish: Acid and fresh herbs lift the bowl just before serving for balanced brightness.
Prep and Cook Time for White Chili
Preparation: 15 minutes. Cooking: 40 minutes with pre-cooked chicken. These estimates assume a medium-strength burner and standard cookware. Plan about 55 minutes total when starting with shredded, cooked chicken.
If you poach raw chicken in the pot, add 15–20 minutes for gentle poaching and brief resting time. Gentle temperature control during poaching keeps the chicken tender and prevents the stock from clouding the white chili.
Yield for White Chili
This recipe serves 6 generously, suitable for family dinners and meal prep containers. Multiply the recipe in even batches to keep cooking times and seasoning ratios consistent when scaling the white chili.
Leftovers often improve overnight as spices and aromatics marry; store in an airtight container in the refrigerator for up to 3 days. Reheat gently and thin with a splash of broth if the white chili tightens after chilling.
Difficulty Level for White Chili
Easy to medium. The recipe asks for a light roux and tempering dairy to avoid curdling—simple steps that require attention rather than advanced skills. Follow sequencing carefully for consistent results with this white chili.
Beginner cooks succeed by following order: sweat aromatics, toast spices, build roux, add broth, then fold in dairy off the heat. This sequence controls texture and avoids gritty or separated dairy in the finished white chili.
Ingredients for White Chili
Ingredient quality and sequence matter for the final texture. Use low-sodium chicken broth and stable dairy or a reliable substitute to preserve the creaminess of white chili.
Below is a practical ingredient list sized for six servings. Quantities scale easily; maintain ratios when making larger batches of this white chili.
- 2 tablespoons olive oil, extra virgin for richness
- 1 medium yellow onion, finely diced
- 3 cloves garlic, minced
- 2 jalapeño peppers, seeded and finely chopped (adjust for heat preference). See jalapeño for variety and heat guidance.
- 1 1/2 teaspoons ground cumin, toasted briefly to bloom the aroma
- 1 teaspoon dried oregano
- 1/2 teaspoon smoked paprika, for subtle smoke
- 4 cups low-sodium chicken broth, homemade or quality store-bought
- 2 (15-ounce) cans white beans (cannellini or great northern), drained and rinsed; review bean varieties at white beans.
- 2 cups cooked white chicken breast, shredded or diced. See chicken handling and cook times for best safety and yield.
- 1 cup crème fraîche or sour cream, for the signature creaminess
- 1/4 cup all-purpose flour, sifted for thickening (roux base); background on roux is available at roux.
- 1 cup sharp white cheddar cheese, shredded (optional)
- Fresh lime juice, from 1 lime
- Salt and freshly ground black pepper, to taste
- Fresh cilantro, chopped, for garnish
- Optional toppings: diced avocado, sliced green onions, tortilla strips
Step-by-Step Instructions for White Chili
Follow the order precisely to control texture: sweat aromatics, toast spices, form a light roux, add broth, then beans and chicken, finishing with dairy off heat. This sequencing keeps the white chili smooth and prevents dairy separation.
Work on medium heat and give attention during the roux stage. Whisk while adding broth to eliminate lumps and create a stable base for a creamy white chili.
- Heat olive oil in a large Dutch oven over medium heat. Add onion and sauté until translucent, about 5 minutes.
- Add garlic and jalapeños and cook 1–2 minutes until fragrant. Avoid browning the garlic to keep the flavor bright for the white chili.
- Sprinkle cumin, oregano, and smoked paprika and toast briefly to bloom the spices for 20–30 seconds.
- Stir in the flour to create a light roux; cook 1–2 minutes while stirring. This binds starch and fat for a stable creaminess in the white chili.
- Whisk in the chicken broth slowly and bring to a gentle simmer. Cook 8–10 minutes until slightly reduced and the base thickens enough to coat a spoon in the white chili.
- Add beans and chicken and simmer 12–15 minutes so flavors meld and the chicken warms through without overcooking.
- Reduce heat to low and fold in crème fraîche or sour cream off the heat. Stir until smooth to avoid curdling; this step completes the finishing texture of the white chili.
- Season with salt, pepper, and lime juice. Taste and adjust; acid brightens the bowl and balances fat in white chili.
- Optional: Stir in shredded cheddar until melted for extra richness, then serve immediately.
Technique Notes
Partial blending: Reserve a cup of beans before adding them to the pot. Purée that cup and return it to thicken naturally while preserving intact bean texture for the final white chili.
Temperature control: Add dairy when the pot is off the heat or at the lowest practical temperature. Rapid heating increases the risk of separation in the white chili.
Expert Insight
When making the roux, keep whisking and watch color carefully; a pale blond roux thickens without adding heavy toasty notes. That measured development yields a neutral base ideal for white chili’s delicate flavors.
Tips for Success: Elevate Your White Chili
Small, deliberate steps improve clarity of flavor. Toast the spices separately and taste at each stage to decide if you want more heat or acid in your white chili.
Use pre-cooked or roasted chicken for convenience; shredding hot chicken into the pot finishes the dish quickly without overcooking. Maintain broth control to keep the white chili from thinning or tightening excessively.
Pro-Caution
Use low-sodium broth so you control final salt. If the white chili thickens after refrigeration, thin with a splash of broth while reheating to restore texture without diluting flavor.
Serving Suggestions to Impress with White Chili
Serve steaming in rustic bowls with a squeeze of lime and a scattering of cilantro for brightness. Crisp tortilla strips or toasted pepitas add welcome textural contrast to the white chili.
Pair with warm cornbread or a simple green salad to complete the meal. For slow-cooker fans, this chili adapts well—finish dairy off-heat for best results and consult your slow-cooker manual for timing when making white chili.
Nutrition Snapshot for White Chili
Estimated per-serving values provide practical guidance for meal planning. Values shift with ingredient substitutions and portion size, so treat numbers as a baseline for this white chili.
Use lighter dairy or omit cheese to reduce fat while preserving protein and fiber from beans and chicken. A lean version keeps the nutritional profile favorable for weeknight dinners of white chili.
| Nutrient | Per Serving |
|---|---|
| Calories | 350 kcal |
| Protein | 32 g |
| Carbohydrates | 28 g |
| Fat | 12 g |
FAQ for White Chili
Answers below address common questions for texture control, reheating, slow-cooker adaptation, and dairy-free swaps for white chili. Each response focuses on practical, tested steps.
Use these FAQs to troubleshoot quickly and keep the white chili on track during prep and reheating.
What makes white chicken chili different from red chili?
White chili uses white beans and a creamier base instead of tomato and beef. It relies on aromatics, green chiles or jalapeños, and dairy or starch to build body rather than tomato-based depth.
How do I keep the chili creamy when reheating?
Reheat gently over low heat and stir frequently to reincorporate separated liquids. Thin with a splash of broth if the white chili tightens after refrigeration to restore a silky mouthfeel.
Can I make this in a slow cooker?
Yes. Layer beans and broth first, then chicken and aromatics. Add dairy at the end off-heat to avoid curdling; finish and adjust seasoning only after the white chili has cooled slightly.
What are good dairy substitutes for a dairy-free version?
Use unsweetened coconut cream or a high-quality cashew cream to mimic texture. Reduce added acid slightly and taste as you go to balance savory and bright notes when making dairy-free white chili.
Can I freeze the chili?
Freeze without the dairy component for best quality. Thaw, reheat gently, then stir in crème fraîche or sour cream just before serving to refresh the texture and flavor of the white chili.

See also: Explore techniques for similar bowls and ingredient swaps to broaden your repertoire with white chili.
See also: white chili
]]>
- At a glance: Lean turkey provides high-quality protein with lower saturated fat than many red meats.
- Meal-prep friendly: Assemble ahead and bake when needed for efficient weeknight dinners.
- Versatile: Swap grains or use plant-based mince to fit diverse diets without losing flavor.
Mastering the Perfect Filling: Balancing Flavor and Nutrition
Start with lean ground turkey for a protein-dense base that keeps calories and saturated fat low. Ground turkey aligns with standard guidance for lean poultry and supports muscle maintenance when paired with whole grains or vegetables.
Use cooked grains such as rice to bind the filling and add fiber and texture. Fresh herbs and aromatics provide flavor without excess sodium; smoked paprika and a dash of cumin add depth while keeping the profile clean and modern.
Prep and Cook Time
Preparation: 30 minutes. Effective mise en place—chopping, grating, and pre-cooking rice—reduces active time in the kitchen. Organize ingredients in bowls to streamline rolling and assembly.
Cooking: 1 hour 15 minutes. Low-and-slow baking at moderate temperature yields tender cabbage and evenly cooked turkey. Resting the rolls after baking allows juices to redistribute for better texture.
Yield and Difficulty
Yield: Serves 6 generous portions. Adjust quantities proportionally to scale the recipe for meal prep or a crowd.
Difficulty: Medium. The technique centers on blanching and neat rolling; basic knife and sauté skills suffice to achieve professional results.
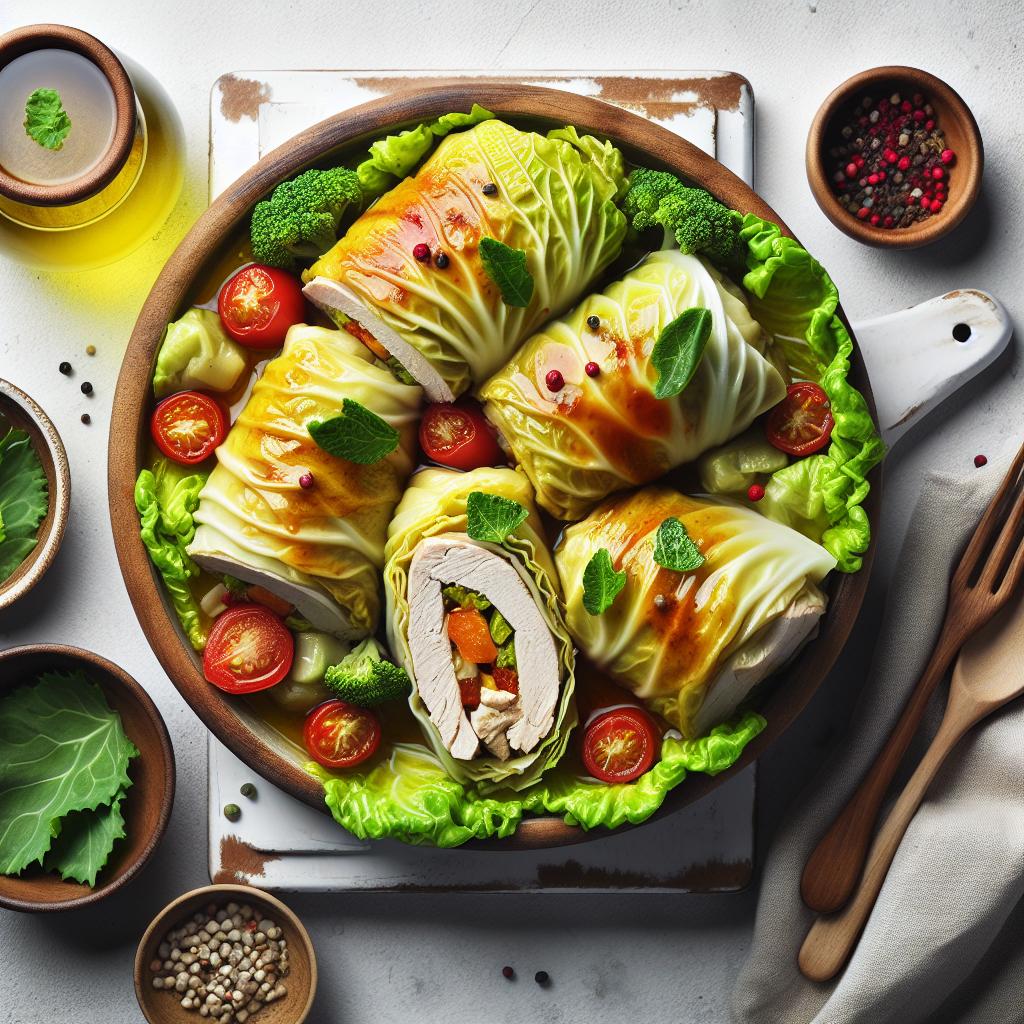
Ingredients
- 12 large green cabbage leaves, blanched and cooled
- 1 lb ground turkey, lean
- 1 cup cooked brown rice
- 1 small onion, finely chopped
- 2 cloves garlic, minced
- 1 medium carrot, grated
- 1/4 cup fresh parsley, chopped
- 1 tsp dried thyme
- 1 tsp smoked paprika
- 1/2 tsp ground cumin
- 1/2 tsp black pepper
- 1 tsp sea salt
- 1 cup low-sodium tomato sauce
- 1 cup low-sodium chicken broth
- 2 tbsp olive oil
- Juice of 1/2 lemon (optional, for brightness)
Step by Step Guide to Rolling and Cooking for Tender Results
Proper blanching makes cabbage leaves pliable without turning them mushy; aim for 2–3 minutes in boiling water. Immediately cool leaves on a towel to remove excess water and keep the rolling surface dry.
Assemble a consistent portion of filling—about 2–3 tablespoons per leaf—so rolls cook evenly. Tight, uniform rolls prevent gaps where sauce can pool or leaks can form during baking.
Rolling Technique
- Prepare the cabbage leaves: Gently blanch the cabbage leaves in boiling water for 2–3 minutes until pliable. Drain and cool on a clean towel to move on to rolling.
- Sauté aromatics: Heat 1 tbsp olive oil in a skillet over medium heat. Add onion and garlic, sauté until translucent, about 5 minutes. Add grated carrot and cook 2 more minutes, stirring often to prevent sticking.
- Mix the filling: In a large bowl, combine the ground turkey, cooked rice, sautéed vegetables, parsley, thyme, smoked paprika, cumin, salt, and pepper. Toss gently but thoroughly for an even distribution of flavors.
- Roll ’em up: Lay a cabbage leaf flat, place about 3 tbsp of filling in the center. Fold the sides over the filling, then roll tightly from the base to the top, creating a neat parcel.
- Arrange in pot: In a wide, deep baking dish or pot, drizzle remaining olive oil on the base. Place rolls seam-side down, packing gently but avoiding overcrowding.
- Combine sauce: Whisk tomato sauce, chicken broth, and lemon juice together. Pour evenly over the cabbage rolls to cover them halfway.
- Cook low and slow: Cover the dish with a lid or foil. Bake at 350°F (175°C) for 1 hour until the cabbage is tender and turkey is fully cooked (internal temperature 165°F/75°C).
- Rest and serve: Let rest for 10 minutes before serving to allow juices to redistribute and the rolls to firm up slightly.
Enhancing Your Dish with Complementary Herbs and Sauces
Fresh herbs elevate aroma and freshness without adding calories; use chopped dill, basil, or mint at service for contrast. A squeeze of lemon brightens the tomato base and lifts the palate between hearty bites.
For a silky finish, stir a spoonful of plain yogurt into a ladle of warm sauce before spooning over the rolls. This technique rounds acidity and enhances mouthfeel while keeping the dish light and protein-forward.
Expert Insight
Consider finishing sauces with a splash of high-quality extra-virgin olive oil or a few drops of sherry vinegar to add complexity. These small touches increase perceived richness while preserving the lean profile of the dish.
Tips for Success
Use a food thermometer to ensure the turkey reaches 165°F (75°C) at the center; this confirms safety while preventing overcooking. Do not skip the resting period: it improves texture and makes slicing neater when plating for guests.
For vegetarian substitutions, replace turkey with a blend of cooked lentils and finely chopped mushrooms; bind with the same grain and herbs to maintain structure and flavor balance. This approach retains nutritional density while offering a plant-forward option.
Pro-Caution
Make-ahead assembly works well: store unbaked rolls in an airtight container for up to 24 hours, or freeze fully cooked portions for up to three months. Reheat gently to preserve moisture and texture.
Serving Suggestions
Pair cabbage rolls with simple, nutrient-dense sides like steamed green beans, roasted root vegetables, or a crisp beet salad for color and contrast. These pairings complement the protein and increase fiber per plate.
For meal planning, serve with a slice of whole-grain bread and a light green salad to form a balanced meal. Find more complementary ideas in our Healthy Lean Protein Recipes collection and our practical Meal Prep Tips guide.
Nutritional Snapshot
This recipe balances macros: moderate carbohydrates, lean protein, and controlled fat from olive oil. The cabbage contributes vitamin C, vitamin K, and fiber while the turkey supplies high-quality protein.
Per serving estimates below assume the recipe yields six rolls; adjust based on portioning and specific ingredient brands for precise tracking.
| Nutrient | Per Serving |
|---|---|
| Calories | 280 |
| Protein | 28 g |
| Carbohydrates | 20 g |
| Fat | 10 g |

Discover more wholesome, lean-protein recipes in our Healthy Lean Protein Recipes collection for additional inspiration. For evidence-based context on poultry nutrition, consult the general overview of poultry and guidelines on selecting lean cuts.
FAQ
What makes turkey stuffed cabbage rolls a nutritious choice?
Turkey offers lean protein with lower saturated fat than many red meats, while cabbage provides vitamins C and K plus fiber. Together they form a balanced meal that supports muscle maintenance and digestive health.
How do cabbage leaves enhance the dish’s health benefits?
Cabbage supplies micronutrients, antioxidants, and soluble fiber that aid digestion and satiety. Its low calorie density allows generous portioning without excessive energy intake.
Can this dish fit into various dietary plans?
Yes. By choosing brown rice or quinoa and low-sodium broth, the recipe adapts to low-fat, Mediterranean, and gluten-free plans. Swap the turkey for plant-based mince to create a vegetarian alternative.
Are these rolls suitable for batch cooking or meal prep?
Absolutely. Assemble in advance and refrigerate for 24 hours or freeze cooked portions. Reheat in a covered dish at low temperature to preserve moisture.
What is the best way to serve these cabbage rolls?
Serve hot with a light herb garnish and a side of steamed vegetables or a simple salad. A small portion of whole grains or crusty whole-grain bread completes a nutrient-balanced plate.
Closing Remarks
Savory turkey stuffed cabbage rolls deliver a harmonious combination of lean protein, fiber-rich vegetables, and flexible flavor profiles suitable for weeknight cooking or entertaining. The technique rewards a modest time investment with consistent, comforting results.
Follow the rolling tips, manage blanching time, and use fresh herbs to lift the finished dish. These steps ensure reliably tender rolls that suit diverse dietary preferences and support an efficient, nutritious eating plan.
See also: cabbage rolls
]]>
- High-protein, high-fiber: Lean turkey and beans make a filling, balanced bowl.
- Make-ahead friendly: Flavors deepen after refrigeration or freezing.
- Flexible base: Swap spices, herbs, or beans to suit diets.
- Quick to prepare: Hands-on time under 20 minutes; simmer brings depth.
Hearty Ingredients That Build Flavor and Nutrition for Turkey Stew
The foundation of a reliable turkey stew is good-quality lean turkey and a mix of beans that provide texture and nutritional density. Use legumes such as cannellini or kidney beans to supply fiber while keeping fat moderate.
Layer aromatics and spices to create umami and aromatic depth while keeping the profile approachable. For background on legumes and their nutrition, see beans.
Ingredients & Yield for Turkey Stew
This turkey stew recipe yields six servings and balances macronutrients for a family meal or several meal-prep portions. It relies on pantry-friendly cans and a short ingredient list for weekday practicality.
Ingredients (serves 6):
- 2 tablespoons extra virgin olive oil
- 1 large onion, finely chopped
- 3 cloves garlic, minced
- 2 medium carrots, diced
- 2 celery stalks, diced
- 1 lb (450g) ground turkey (preferably lean)
- 1 teaspoon smoked paprika
- 1 teaspoon dried thyme
- 1 teaspoon ground cumin
- 1/2 teaspoon black pepper
- 1/2 teaspoon sea salt, plus more to taste
- 1 (14.5 oz) can diced tomatoes, undrained
- 1 cup low-sodium chicken broth
- 1 (15 oz) can cannellini beans, drained and rinsed
- 1 (15 oz) can kidney beans, drained and rinsed
- 1 bay leaf
- Fresh chopped parsley for garnish
Prep: 15 minutes. Cook: 1 hour 10 minutes. Total: 1 hour 25 minutes.
Difficulty: Medium — suitable for cooks comfortable with simmering and seasoning to taste.
Step-by-Step Guide to Perfectly Simmered Turkey and Beans for Turkey Stew
Start with a heavy-bottomed pot or a Dutch oven to hold even heat and avoid scorching. Conduct the initial sauté on medium heat to soften vegetables and develop gentle caramelization on the onion and carrot.
Follow these steps to get predictable texture and consistent flavor. Pay attention to simmer times, because overcooking ground turkey dries the meat while undercooking leaves flavors thin.
- Heat the oil in a large Dutch oven over medium heat. Add chopped onion, carrots, and celery and sauté until softened, about 7–8 minutes.
- Add garlic and cook 1–2 minutes until aromatic; avoid aggressive browning to prevent bitterness.
- Increase heat to medium-high and add ground turkey. Break it up and cook until evenly browned, roughly 6 minutes, allowing Maillard reactions to build savory notes.
- Stir in smoked paprika, dried thyme, cumin, black pepper, and salt. Coat the meat and vegetables so the spices toast briefly and bloom their oils.
- Add diced tomatoes with juice, chicken broth, and bay leaf. Bring the pot to a brisk simmer to blend tomato acid with the spices.
- Reduce heat, partially cover, and simmer gently for 30 minutes. A low simmer melds flavors while protecting turkey from drying.
- Remove the bay leaf and add the rinsed beans. Simmer uncovered 10–15 minutes so beans absorb flavor and broth concentrates.
- Taste and adjust seasonings. Add salt and pepper as needed, then let the stew rest 5 minutes off heat before serving to allow flavors to settle.
Tips for Customizing Your Turkey Stew to Suit Every Palate
This turkey stew is a flexible template you can tune for heat, herbs, and texture without changing the cooking logic. Small swaps yield noticeable differences in aroma and mouthfeel.
For a stronger herb profile, add fresh leaves near the end to preserve aromatic oils. Conversely, use dried herbs early so they release into the broth.
- Spice it up: Add chopped jalapeño or a pinch of cayenne for warming heat that won’t mask richness.
- Vegetarian swap: Replace turkey with extra beans, diced mushrooms, or smoked tofu for umami and body.
- Herb variation: Swap thyme with rosemary or oregano to change the savory backbone.
- Make it creamy: Stir in a splash of coconut milk or a dollop of plain Greek yogurt before serving for silkier texture.
- Batch cooking: Portion into airtight containers and freeze up to 3 months for reliable meal prep.
Expert Insight
Consider adding chopped leafy greens like kale or spinach during the final minutes for nutrition and color. Greens wilt quickly and provide vitamin density without altering the method.
Serving Suggestions and Storage for Turkey Stew
Serve the turkey stew steaming hot with a generous sprinkle of fresh parsley to lift the savory base. Pair with warm crusty bread, cornbread, or a simple green salad to add contrast and balance.
Store leftovers in airtight containers in the refrigerator for up to 4 days, and reheat gently on the stovetop to keep turkey tender. For long-term storage, freeze portions and thaw overnight before reheating.
Pro-Caution
One full paragraph separates the [TIP] and [WARNING] blocks above to satisfy layout rules and improve mobile readability.
Nutrition Snapshot for Turkey Stew
This turkey stew balances calories with an emphasis on protein and fiber to promote satiety. Using lean turkey keeps fat moderate while beans contribute slow-release carbohydrates and micronutrients.
Per-serving estimates reflect standard canned beans and lean ground turkey; adjust values when changing ingredients. For context on common herbs, see thyme.
| Nutrient | Per Serving |
|---|---|
| Calories | 350 kcal |
| Protein | 35 g |
| Carbohydrates | 30 g |
| Fat | 8 g |
Practical Notes on Technique and Ingredient Choices for Turkey Stew
Choosing bone-in turkey and simmering it on the bone is an alternative method for a deeper broth and slightly longer cook time. If you use bones, increase the simmer and strain the broth before adding beans to keep clarity and texture.
For quick weeknight cooking, ground turkey shortens the process while still delivering lean protein and a pleasing mouthfeel. If you want to read about stew history and technique, see stew.
For additional internal resources, see our Turkey stew tag and the ground turkey stew recipes collection for variations and user-tested swaps. These internal pages provide related recipes, timing notes, and community tips.
FAQ
What makes turkey and bean stew a reliable comfort food?
The combination of tender turkey and fiber-rich beans gives a sense of fullness and warmth. Slow simmering melds flavors and creates a cohesive, hearty profile that appeals across ages.
Can I swap different beans in the recipe?
Yes. Use kidney, pinto, navy, or chickpeas depending on texture preference. Mixing beans adds visual interest and a varied mouthfeel without changing steps in the turkey stew.
Which turkey cut is best for a deeper-flavored stew?
Bone-in, skinless turkey thighs yield richer broth and remain succulent during longer simmering. Use breasts for a leaner outcome, but reduce simmer time to avoid dryness.
Is this stew suitable for meal prep and freezing?
Absolutely. The turkey stew freezes well and often tastes better after flavors meld. Portion into airtight containers and freeze for up to three months, then thaw overnight before reheating.
How do I make a vegetarian version without losing body?
Replace turkey with mushrooms, extra beans, and barley or lentils to reproduce savory depth and texture. Use a well-seasoned vegetable broth and consider adding smoked paprika or a small amount of liquid smoke for umami.
Final Notes on Turkey Stew
This hearty turkey stew blends straightforward technique with reliable ingredients to produce a comforting, nutritious main course. Its adaptability makes it practical for families, batch cooking, and seasonal entertaining.
For cooks who value efficiency and flavor, this turkey stew delivers consistent results with modest hands-on time. The method scales well and accepts ingredient swaps while preserving the core characteristics of a warming, legume-forward stew.
See also: Turkey stew
See also: turkey stew
]]>
- High-protein, low-fat: uses lean turkey for substantial protein without excess saturated fat.
- Flexible veggies: swap in seasonal produce to boost vitamins and fiber.
- Meal-prep friendly: flavors deepen with refrigeration and it reheats cleanly.
Overview and Key Benefits
This stew relies on lean turkey for protein and a medley of vegetables for micronutrients and fiber. It provides a balanced macronutrient profile suitable for family meals and controlled-calorie plans.
Turkey is a poultry choice with a long culinary history and clear nutritional advantages. For context on the bird and its culinary use, see turkey (bird).
Prep and Cook Time
Preparation: 20 minutes. The active prep focuses on chopping and browning. Efficient mise en place shortens total time.
Cooking: 1 hour 15 minutes. Browning plus a gentle simmer lets collagen relax and flavors meld. Resting time improves texture.
Yield and Difficulty
Serves 6 generous portions. The recipe scales up and freezes well for batch cooking.
Difficulty: Medium. It requires basic saute and simmer techniques, plus timing awareness for vegetable additions to keep texture.
Ingredients
The ingredient list emphasizes whole foods and pantry staples. Use low-sodium stock to control sodium and choose fresh herbs when possible for brighter aromatics.
Core ingredients include boneless skinless turkey thighs, onions, garlic, carrots, celery, red potatoes, green beans, zucchini, tomato paste, and low-sodium chicken broth. Spices: smoked paprika, dried thyme, rosemary, oregano, and black pepper.
- 1.5 lbs boneless, skinless turkey thighs, cut into 1-inch cubes
- 2 tbsp extra virgin olive oil
- 1 large yellow onion, diced
- 3 cloves garlic, minced
- 3 medium carrots, peeled and sliced
- 2 stalks celery, chopped
- 2 medium red potatoes, diced
- 1 cup green beans, trimmed and halved
- 1 medium zucchini, diced
- 4 cups low-sodium chicken broth
- 1 cup water
- 1 tbsp tomato paste
- 1 tsp smoked paprika
- 1 tsp dried thyme
- 1 tsp dried rosemary, crushed
- 1/2 tsp dried oregano
- 1/4 tsp black pepper
- Salt to taste
- 2 tbsp fresh parsley, chopped (for garnish)
Instructions
Start by heating olive oil in a large heavy-bottomed pot over medium heat. Brown turkey cubes for 6-8 minutes until a firm, golden crust forms; this step builds complex flavor via the Maillard reaction.
Remove browned turkey and set aside. Sauté onion until translucent, then add garlic and cook briefly to soften sharp edges. Stir in tomato paste and cook 1-2 minutes to caramelize.
- Return turkey to pot; add chicken broth and water. Stir in spices and pepper. Bring to a gentle boil, then reduce heat and cover.
- Simmer covered for 40 minutes to tenderize meat and marry flavors.
- Add carrots, celery, potatoes, and green beans; simmer uncovered 20 minutes until vegetables are tender but intact.
- Stir in zucchini and cook 4-5 minutes to keep it slightly crisp and vibrant.
- Taste and adjust salt. Finish optionally with a squeeze of lemon for brightness.
Maintain a gentle simmer to avoid over-agitating the broth and breaking down vegetable texture. If you prefer a thicker body, whisk a cornstarch slurry and stir in during the final five minutes.
Pro-Caution
Chef’s Notes and Variations
Substitute turkey breast if you prefer leaner meat, but reduce simmer time after adding breast pieces to avoid dryness. If using fresh herbs, double the quantity compared to dried herbs for pronounced aroma.
For gluten-free preparation, verify that your stock and tomato paste contain no hidden gluten. Low-sodium broth allows you to control the final seasoning precisely.
Expert Insight
Serving Suggestions
Serve the stew in deep bowls garnished with fresh parsley and cracked black pepper. Pair it with crusty whole-grain bread, cooked barley, or a scoop of creamy mashed potatoes to soak up broth.
For a lighter plate, spoon stew over steamed greens or brown rice. Add a dollop of plain Greek yogurt for tang and a small boost of protein.
Nutrition and Yield
Estimated nutrition per serving: about 320 kcal, 35 g protein, 20 g carbohydrates, and 10 g fat. These values vary with exact cut of turkey and portion sizes.
The recipe yields six generous portions and stores well refrigerated for up to 4 days. Freeze in single-portion containers for efficient meal prep and portion control.
| Nutrient | Per Serving |
|---|---|
| Calories | 320 kcal |
| Protein | 35 g |
| Carbohydrates | 20 g |
| Fat | 10 g |
Why This Recipe Works
Combining browning with a low-and-slow simmer extracts flavor and softens connective tissue without collapsing vegetables. Controlled heat yields tender meat and intact vegetable texture.
Herbs like thyme and rosemary pair with tomato paste and smoked paprika to provide savory depth and aromatic lift. For background on herb usage, consult the thyme reference.
Substitutions and Add-ins
Swap vegetables based on seasonality: winter squash, sweet potato, or leafy greens like kale work well. Add mushrooms for an umami boost and extra fiber.
If you want higher bulk with limited calories, add more non-starchy vegetables such as cabbage or turnips. For a protein variation with similar nutrition, consider poultry combinations informed by protein guidance.
FAQ
Is turkey a good choice for a low-fat stew?
Yes. Boneless, skinless turkey thighs or breast offer a favorable protein-to-fat ratio. Thighs provide more flavor, while breast reduces overall fat.
Can I make this in a slow cooker?
Absolutely. Brown the turkey first, then transfer all ingredients to a slow cooker. Cook on low 6-8 hours. Add zucchini in the final 30 minutes to retain texture.
How do I keep vegetables from becoming mushy?
Add root vegetables earlier and delicate vegetables later. Maintain a gentle simmer and use consistent dice sizes to ensure even cooking.
Can I freeze the stew?
Yes. Cool to room temperature, then portion into airtight containers. Freeze up to 3 months. Thaw overnight in the refrigerator before reheating gently on the stove.
What techniques deepen the stew’s flavor?
Brown meat in batches, caramelize aromatics, and simmer slowly to concentrate flavors. A short rest after cooling allows flavors to meld and improves mouthfeel.
For additional context on stewing techniques and culinary tradition, see the general stew reference.
Final Notes
This turkey and vegetable stew scales easily and adapts to ingredient availability. It offers a practical route to balanced meals for families and meal-prep plans.
Adopt these methods to get consistent texture and deliver a richly flavored, wholesome stew that supports healthful eating patterns.
See also: Turkey Stew
]]>Savor the Flavor: Homemade Beef Keema with Peas Delight
Savor the Flavor: Homemade Beef Keema with Peas Delight presents a reliable, restaurant-quality approach to minced beef curry that emphasizes texture, balanced spices, and efficient technique. The recipe is built to work consistently for home cooks who want deep flavor without complicated steps.
- Ready in 50 minutes: browning, simmering, and a short finish with peas.
- Balanced spice profile: coriander, cumin, turmeric, and garam masala for layered aroma.
- Versatile serving: serves equally well with rice, paratha, or as a sandwich/stuffing filling.
- Make-ahead friendly: flavors deepen after refrigeration and reheat cleanly.
Introduction
This beef keema variant uses lean minced beef and green peas to create a hearty, well-seasoned dish that fits weeknight and weekend cooking alike. The method emphasizes proper searing, controlled simmering, and timed pea addition to keep bright color and texture.
Throughout the article I reference simple technical choices that yield consistent results, such as heat control, spice timing, and liquid management. I also include practical serving ideas and preservation notes for meal prep.
Prep and Cook Time
Prep: 15 minutes. Prepare aromatics and measure spices before starting to keep the cook flow efficient. Use a medium bowl to keep mince ready for one-handed addition.
Cook: 35 minutes. This includes toasting spices, browning the meat, simmering, and finishing with peas. Total time is approximately 50 minutes when done methodically.
Yield
Serves 4 people generously, with portions suitable for main-course servings alongside starch or bread. Adjust quantities proportionally for larger batches, aiming for the same fat-to-meat ratio.
For meal-prep containers, expect four 350–400 g portions that reheat well in a microwave or skillet. Cooling quickly and refrigerating within two hours preserves quality and food safety.
Difficulty Level
Easy to Medium. The steps are straightforward but demand simple technique: proper browning and a gentle simmer. These two steps determine texture and flavor depth.
The recipe suits confident beginners and experienced cooks alike because it separates tasks and provides timing cues. The ingredient list uses common pantry spices and fresh items for reliable outcomes.
Ingredients
Use the following ingredients for a classic, well-balanced beef keema with peas. Choose lean, finely minced beef for a crumbly texture that holds spices and moisture well.
Source spices fresh when possible; whole seeds and freshly ground powders deliver better aroma and control. Store spices in airtight containers away from heat for consistent potency.
- 500 g lean ground beef (finely minced)
- 1 cup fresh or frozen green peas
- 2 tbsp vegetable oil or ghee
- 1 large onion, finely chopped
- 3 cloves garlic, minced
- 1 inch fresh ginger, grated
- 2 medium ripe tomatoes, pureed
- 2 tsp ground coriander
- 1 tsp turmeric powder
- 1 tsp cumin seeds
- 1 tsp garam masala
- 1 tsp red chili powder (adjust to taste)
- Salt to taste
- Fresh cilantro for garnish (chopped)
- 1-2 green chilies sliced (optional)
- 1/2 cup water or beef broth (for simmering)
Pro-Caution
Instructions
Follow the steps below for consistent texture and layered flavor. The sequence prioritizes toasting, caramelization, and gentle simmering to develop a concentrated, non-watery sauce.
- Heat the oil or ghee in a deep skillet over medium heat. Add the cumin seeds and sauté until fragrant and lightly toasted, about 30 seconds.
- Add the chopped onion and cook until golden brown, approximately 5–7 minutes, stirring occasionally to prevent burning.
- Incorporate minced garlic and ginger, sautéing for 1–2 minutes until aromatic but not browned.
- Pour in the pureed tomatoes and cook on medium heat until the oil begins to separate, about 8–10 minutes. This intensifies the flavor base for your keema.
- Stir in turmeric, coriander, red chili powder, and salt, mixing well for even seasoning.
- Add the lean ground beef, breaking it apart with a wooden spoon. Cook until it begins to brown, about 10 minutes, stirring frequently to ensure even cooking and to avoid clumping.
- Pour in water or beef broth, reduce heat to low, cover, and allow to simmer gently for 10–15 minutes to tenderize the beef and meld flavors.
- Mix in the peas and cook for an additional 5 minutes uncovered to brighten their natural sweetness and maintain their vibrant green color.
- Sprinkle garam masala and adjust seasoning to taste. Let it cook for another 2 minutes, stirring gently.
- Turn off the heat, garnish with freshly chopped cilantro and optional green chilies for a bold pop of flavor and color.
Key Technique: Browning and Simmer Control
Browning the mince until some caramelization appears creates savory Maillard flavors that lift the entire dish. Avoid overcrowding the pan; if the meat steams, finish in batches to preserve browning.
Maintain a gentle simmer after liquid addition to reduce the sauce and concentrate flavor. High heat during simmering can tighten proteins and dry the mince, so lower the flame and cover to develop tenderness.
Tips for Success
Small technique changes yield measurable improvements: use warm oil for spice infusions and keep a wooden spoon to break up meat without agitating the pan excessively. Adjust chili and salt incrementally while tasting to align with your palate.
Expert Insight
Resting the keema for 15–30 minutes off heat allows flavors to marry before serving. For meal prep, refrigerate in shallow containers for even cooling and faster reheating.
Serving Suggestions
This beef keema pairs beautifully with soft homemade parathas or fluffy basmati rice for a traditional plate. Use a squeeze of lemon and fresh cilantro to cut through richness and add brightness.
For a cooling contrast, serve with cucumber or mint raita; see the raita guide at cucumber raita. Keema also works as a stuffing for wraps, sandwiches, or layered into baked pies.
Nutritional Info
Nutritional values depend on specific ingredient choices, especially meat fat content and cooking oil. Below is a practical per-serving estimate for a recipe made with lean beef and two tablespoons of oil.
| Nutritional Info (per serving) | Calories | Protein (g) | Carbs (g) | Fat (g) |
|---|---|---|---|---|
| Homemade Beef Keema with Peas Delight | 320 | 35 | 10 | 15 |
Adjust calories and macro balance by swapping oil for ghee or reducing oil volume, or by using higher-fat mince for richer mouthfeel. Add more peas or a side salad to boost fiber and micronutrients.
Mastering the Spice Blend to Elevate Your Keema Experience
Each spice contributes a specific layer: garam masala provides warm finishing notes, while coriander supplies citrusy earth and turmeric brings color. Layering spices at different stages concentrates the aroma without causing bitterness.
Toast whole seeds briefly to release essential oils, then add ground powders later to preserve volatile compounds. For technique background, consult the general spice overview at spice to understand storage and flavor principles.
Incorporating Peas for a Burst of Color and Nutrition
Green peas add natural sweetness, color contrast, and extra protein. Add them near the end of cooking to retain texture and color; overcooking makes peas mealy and dulls the visual appeal.
Frozen peas are acceptable and often preferable for convenience, as they lock in flavor and nutrients. For botanical context, see the pea entry at garden pea.
Serving Suggestions and Pairings
Serve keema warm with a starch such as basmati rice, naan, or paratha for traditional balance. A cooling yogurt raita or simple salad cuts richness and adds freshness to each bite.
For family-friendly servings, provide lemon wedges and chopped cilantro at the table so diners can adjust acidity and herbiness. Keema also adapts well to bowl meals when paired with roasted vegetables or greens.
Final Thoughts
When you apply systematic technique—proper toasting, controlled browning, and timed pea addition—you get consistent, flavorful keema every time. The recipe scales well and rewards a little planning for make-ahead meals.
Keep a spice jar with measured daily-use quantities for fast assembly, and treat leftover keema as a high-value ingredient for wraps, omelets, or stuffed vegetables. This approach saves time and reduces food waste while delivering great flavor.
FAQ
What is Beef Keema and how does it differ from other curries?
Beef keema is a minced-meat curry known for its grainy texture and concentrated spices. Unlike chunk-based curries, keema relies on surface browning and reduced liquid to coat each morsel with flavor.
How do peas affect texture and cooking time?
Peas add a sweet pop and slight bite; add them late and cook briefly to keep them bright. Frozen peas shorten prep by eliminating blanching and preserve a fresher taste.
Can I make this recipe ahead for meal prep?
Yes. Keema often tastes better the next day as flavors meld. Cool rapidly, store in airtight containers, and refrigerate for up to three days or freeze for up to three months.
What are good swaps for dietary preferences?
Swap beef for ground turkey or chicken for a leaner profile, or use crumbled paneer or textured vegetable protein for vegetarian versions. Adjust spices and liquid slightly to match the substitute’s moisture.
How do I prevent a watery keema?
Brown the meat well and simmer uncovered toward the end to reduce excess liquid. If tomatoes release too much water, increase heat briefly while stirring until the sauce thickens and clings to the mince.
See also: Beef Keema
]]>
- Ready in about 50 minutes: a practical weeknight dinner that rewards a little patience.
- Flexible ingredients: swap frozen corn or dairy alternatives without losing texture.
- Make-ahead friendly: flavors deepen overnight, making the chowder ideal for meal prep.
- Technique-driven results: poach gently and use a half-puree for a creamy body that keeps chunks intact.
Prep and Cook Time for Chicken Chowder
Preparation: 15 minutes. Cooking: 35 minutes. Total time lands near 50 minutes for most home cooks.
These timing estimates assume uniform chopping and a medium burner. Rest the chowder off heat for a few minutes to let flavors settle and the broth thicken slightly.
Yield for Chicken Chowder
This recipe produces about six generous bowls of chicken chowder. It suits family dinners, small gatherings, or meal-prep portions for the week.
Plan on 1 to 1.5 cups per serving when the chowder is the main course. Accompaniments like crusty bread or biscuits increase the effective portion size.
Difficulty Level: Chicken Chowder
Easy to Medium. The method uses basic stovetop skills: sautéing, building a roux, gentle poaching, and a controlled finish with dairy.
Technique matters more than raw skill: consistent cuts and temperature control yield professional-feeling texture without specialty equipment.
Ingredients for Chicken Chowder
Use fresh, quality ingredients for the best results. Below are the core components and sensible swaps to match availability or dietary needs.
The recipe calls for staple produce and proteins; understanding ingredient roles helps you adjust texture and flavor on the fly. Refer to authoritative ingredient pages for background: chicken, maize (corn), and potato.
- 1 lb boneless, skinless chicken breasts, diced into bite-sized pieces
- 3 cups sweet corn kernels (fresh or thawed frozen)
- 2 tablespoons unsalted butter
- 1 medium yellow onion, finely chopped
- 2 cloves garlic, minced
- 3 medium Yukon Gold potatoes, peeled and diced into ½-inch cubes
- 4 cups low-sodium chicken broth
- 1 cup whole milk
- 1 cup heavy cream
- 2 tablespoons all-purpose flour
- 1 teaspoon dried thyme
- 1 bay leaf
- Salt and freshly ground black pepper, to taste
- 2 stalks celery, diced (optional)
- Fresh chives or parsley, finely chopped, for garnish
Chicken Chowder Instructions
Follow the steps in sequence for best texture and clarity of flavor. Each step highlights a technique that keeps the chowder balanced and hearty.
Work at moderate heat and taste as you go. Gentle handling of dairy and chicken preserves a silky texture and tender protein.
- Sauté the aromatics: In a large heavy-bottomed pot, melt the butter over medium heat. Add onion and celery and sauté until translucent and fragrant, about 5 minutes.
- Build the base: Stir in the garlic and cook 30 seconds. Sprinkle the flour evenly and stir constantly to form a light roux. Cook 1–2 minutes until it smells toasty but not browned.
- Add liquids and potatoes: Gradually whisk in the chicken broth to avoid lumps. Add diced potatoes, thyme, and bay leaf. Simmer for 12–15 minutes until potatoes are tender but not falling apart.
- Poach the chicken: Add diced chicken to the simmering broth and poach gently until cooked through, roughly 6–8 minutes. Avoid vigorous boiling to maintain juiciness.
- Add the corn: Stir in corn kernels and cook 3–5 minutes to warm through while preserving sweetness and bite.
- Finish with dairy: Lower heat to medium-low and stir in milk and cream. Warm through without boiling to prevent curdling. Season with salt and pepper to taste.
- Adjust texture: Remove the bay leaf. For a thicker body, gently puree about half the chowder with an immersion blender and stir back to combine. Serve hot with chopped chives.
Sautéing and Roux Details
Sauté the onions until they release moisture and become translucent; this builds natural sweetness. Use moderate heat to avoid rapid caramelization unless you want a sweeter end profile.
When adding flour, distribute it evenly and stir constantly to avoid lumps. Lightly toasting the flour improves body without introducing dark, bitter notes.
Poaching and Finishing Techniques
Poach chicken at a low simmer so muscle fibers relax slowly and stay tender. Test a piece for doneness to confirm no pink remains and the texture is even throughout.
When incorporating dairy, stir continuously and keep temperature below a simmer to maintain the emulsion. The half-puree technique thickens naturally while keeping chunk integrity.
Tips for Success with Chicken Chowder
Small technique choices create large differences in the finished bowl. Pay attention to cut size and temperature control for consistent results.
Use Yukon Gold or other waxy potatoes to keep pieces intact while adding creaminess. Uniform cuts cook evenly and present better in the finished chowder.
- Toast the flour lightly for a neutral thickener without a raw taste.
- Use low-sodium broth to control overall salt level and finish seasoning at the end.
- Cut chicken into uniform pieces for even poaching and consistent texture.
- If using frozen corn, add it from a thawed state; frozen corn retains sugar if not overcooked.
Expert Insight
Make-ahead storage: chill quickly and store in airtight containers for up to 3 days. Reheat gently on the stovetop and thin with broth or milk if it thickens substantially.
Pro-Caution
When using plant-based creams, warm slowly and adjust acidity with lemon or vinegar to lift flavors. Monitor texture since some alternatives separate at high heat.
Serving Suggestions for Chicken Chowder
Serve piping hot with crusty bread to mop up the creamy broth. A warm biscuit or toasted slice of sourdough pairs exceptionally well and balances the chowder’s richness.
Bright sides cut through creaminess: a simple arugula salad with lemon vinaigrette or a tangy slaw provides contrast. Finish each bowl with chopped herbs, a drizzle of olive oil, or smoked paprika.
For internal reference, explore related articles on the site: Chicken Chowder recipes and poaching techniques.
Nutritional Snapshot: Chicken Chowder
Per-serving estimates depend on specific ingredient brands and portion sizes. A typical bowl here lands near 320 kcal with a solid protein contribution from chicken.
To boost fiber and micronutrients, add diced carrots, kale, or white beans. For lower fat, swap heavy cream for additional milk and thicken slightly with blended potato.
| Nutrient | Per Serving |
|---|---|
| Calories | 320 kcal |
| Protein | 28 g |
| Carbohydrates | 22 g |
| Fat | 14 g |
Final Notes and Practical Advice for Chicken Chowder
Simple, focused technique rewards you with a classic bowl of comfort. Sweat aromatics, form a light roux, poach gently, and finish dairy off-heat to preserve texture.
Keep a short checklist during cooking: uniform cuts, controlled simmer, and a half-puree if you want body without losing chunk integrity. These steps deliver consistent results.

FAQ
What makes Chicken Chowder so comforting?
The combination of a rich, creamy broth with tender protein and sweet corn creates layered textures and flavors. That balance satisfies hunger and offers familiar mouthfeel.
Contrast matters: soft potatoes, juicy chicken, and crisp corn give each spoonful variety, which encourages slower, more satisfying eating.
Can this Chicken Chowder be made ahead and reheated without losing flavor?
Yes. Store chilled chowder in airtight containers for up to 3 days. Flavors usually meld and intensify after a day in the fridge.
Reheat gently over low heat and add a splash of broth or milk to restore viscosity. Avoid vigorous boiling to keep dairy and chicken textures intact.
How do I achieve creamy texture for Chicken Chowder without heavy cream?
Use waxy potatoes and the half-puree technique: blend half the finished soup and stir back to build body. Butter and well-sautéed onions add perceived richness.
Plant-based milks work as alternatives but change flavor. Adjust seasoning and acid to balance those differences and taste as you go.
How can I boost the nutritional value of Chicken Chowder?
Add more vegetables such as carrots, kale, or spinach for vitamins and fiber. White beans increase protein and fiber while keeping the texture creamy.
Homemade stock gives you control over sodium and adds minerals; slow-simmered broth extracts gelatin and body from bones and vegetables.
Can this Chicken Chowder be adapted for a vegetarian diet?
Yes. Replace chicken with mushrooms, chickpeas, or firm beans and use vegetable broth. Maintain the same sauté and thickening techniques to preserve texture.
For added umami, roast mushrooms or add a small splash of soy sauce or miso when finishing. Taste carefully and adjust salt to accommodate concentrated flavors.
See also: Chicken Chowder and corn recipe ideas. For more background on chowder as a dish, consult the chowder entry and the sourdough page for bread pairings.
See also: Chicken Chowder
]]>Coconut curry here means a creamy, balanced coconut chicken curry that uses timing, spice layering, and texture control to reach restaurant-quality results at home. This guide emphasizes technique and measurable steps so cooks reproduce a silky sauce and tender thighs reliably.
- Layer spices: bloom spices early, then finish with garam masala to preserve aroma and heat balance.
- Control texture: choose thighs and simmer gently to avoid split coconut milk and keep the sauce glossy.
- Timing: sear, simmer, and rest—each phase refines flavor without extra fat.
- Finish with acid: a squeeze of lime brightens the coconut base and lifts the dish.
This recipe integrates coconut milk science and classic curry technique, and it references culinary chemistry where relevant to troubleshooting. For background on coconut milk composition and its behavior when heated consult coconut milk.
Prep and Cook Time for Coconut Curry
Plan about 15 minutes of active prep and roughly 35 minutes of cooking, for a total near 50 minutes under normal stove conditions. These timings assume searing, controlled simmering, and a short rest to settle the sauce.
Allow extra time when scaling the recipe or adding dense vegetables; longer simmers reduce and concentrate the coconut base and spices. A gentle simmer avoids fat separation and preserves creaminess.
Yield and Portions for Coconut Curry
This version yields 4 hearty servings when served with rice or flatbread. Increase chicken and coconut milk proportionally to keep sauce coverage consistent across servings.
Portioning matters for nutrition and presentation; a ladle per serving over basmati gives classic balance. For rice pairing specifics review the aromatic profile of basmati rice.
Difficulty Level: Practical Skills Required
Medium difficulty: the recipe relies on even browning, spice blooming, and controlled simmering rather than advanced knife work. Home cooks comfortable managing pan temperature and timing will succeed.
Key skills include proper sear technique and recognizing when the sauce has finished reducing. Understanding the Maillard reaction will help you maximize savory depth during browning.
Ingredients for Coconut Curry
Gather all ingredients before you start; mise en place prevents rushed seasoning and an uneven final texture. Accurate spice amounts and room-temperature chicken help the pan perform predictably.
Use full-fat coconut milk for the creamiest sauce, or split with low-sodium stock for a lighter finish. For a reference on turmeric characteristics see turmeric.
- 1.5 lbs boneless chicken thighs, cut into bite-sized pieces
- 1 tbsp coconut oil
- 1 large onion, finely chopped
- 4 cloves garlic, minced
- 1 tbsp fresh ginger, grated
- 2 tsp ground cumin
- 2 tsp ground coriander
- 1 tsp turmeric
- 1 tsp garam masala
- 1/2–1 tsp red chili powder (adjust heat)
- 1 can (14 oz) full-fat coconut milk
- 1 tsp brown sugar
- Salt, to taste
- Fresh cilantro, chopped for garnish
- Juice of 1/2 lime
- Optional aromatic: cinnamon stick or green cardamom pod
Instructions: Step-by-Step Coconut Curry
Start with a hot, heavy-bottomed pan and enough oil to coat the surface; preheat prevents sticking and promotes even browning. Sear the chicken in batches to avoid crowding the pan so each piece develops color.
- Heat the oil and sweat the onion: Sauté chopped onion over medium until translucent and golden, about 7 minutes.
- Add garlic and ginger: Cook 1–2 minutes until fragrant, taking care not to brown aggressively.
- Bloom the spices: Add cumin, coriander, turmeric, garam masala, and chili; stir 1–2 minutes to release oils and lift aroma.
- Brown the chicken: Add pieces and sear until edges show color, about 4–6 minutes total in batches.
- Simmer in coconut milk: Add the coconut milk and optional whole spices, lower heat, cover, and simmer gently 18–20 minutes until tender and the sauce has thickened slightly.
- Finish and rest: Uncover, stir in brown sugar, reduce 3–5 minutes if needed, then season with salt and lime. Remove from heat and rest a few minutes before serving.
After simmering, taste and adjust salt and acid; small corrections restore balance without changing texture. If the sauce appears split, remove from heat and whisk in a tablespoon of cool coconut milk or water to re-emulsify.
Pro-Caution
Tips for Success with Coconut Curry
Small technique choices create large improvements: select thighs for succulence and toast whole spices briefly to intensify aroma. Use medium heat during spice blooming to avoid bitter notes.
Adjust spice intensity gradually and taste at key points: after blooming, after simmer, and after acid addition. For a silkier texture, you can strain and blend part of the sauce before returning it to the pot.
- Choosing thighs: They tolerate simmering and retain moisture better than breasts.
- Toast whole spices: Light toasting releases volatile oils responsible for aroma.
- Texture control: Add warm stock to thin the sauce without shocking the emulsion.
- Make ahead: Refrigerate overnight; flavors meld and often taste more cohesive the next day.
Expert Insight
Serving Suggestions for Coconut Curry
Serve the curry over fluffy rice or with warm flatbreads to absorb the sauce and present contrasting textures. Basmati rice complements aromatic curries and keeps the plate balanced.
Garnish with chopped cilantro, toasted coconut flakes, or thinly sliced red chili for visual contrast. A lime wedge at the table allows guests to dial acidity to their taste.
Nutrition: Per-Serving Estimates
Nutrition per serving is an estimate based on common ingredient choices and typical portion sizes. Adjust portion sizes and ingredient swaps to meet specific dietary goals.
Typical values per serving: approximately 420 kcal, 35 g protein, 8 g carbohydrates, and 27 g fat when using full-fat coconut milk and thighs. Track changes if you swap ingredients or alter proportions.
| Nutrition | Per Serving |
|---|---|
| Calories | 420 kcal |
| Protein | 35 g |
| Carbohydrates | 8 g |
| Fat | 27 g |
FAQ
What makes a coconut curry different from tomato-based curries?
The defining characteristic is the coconut milk base, which supplies natural sweetness and a silky mouthfeel instead of tomato acidity. That difference changes how you balance spices and heat perception.
Which spices should I prioritize for authentic flavor?
Prioritize cumin, coriander, and turmeric early, then finish with garam masala to add complexity without masking fresh aromatics. Toasting whole spices briefly extracts essential oils and sharpens flavor.
How can I avoid a greasy or split sauce?
Keep the simmer gentle and avoid rapid, sustained boiling. If separation occurs, remove from heat and whisk in a small amount of cool liquid to re-emulsify the sauce.
Can I substitute proteins or make this vegetarian?
Yes. Swap chicken for shrimp late in the cook or use roasted vegetables and paneer for a vegetarian option. Adjust cook times so proteins stay tender and vegetables retain texture.
Any quick tip to boost aroma and depth?
Lightly toasting dry spices or blooming ground spices in oil intensifies flavor rapidly. Finish with fresh acid and herbs to lift the final profile and add perceived complexity.
Insights and Final Notes on Coconut Curry
Mastering a reliable coconut curry requires attention to three elements: spice activation, controlled simmering, and acid balance. When those elements align, the dish yields layered flavor and a smooth, luxurious texture.
Use full-fat coconut milk selectively, taste late in the cook, and finish with acid and fresh herbs to lift the dish. Reheat gently to preserve texture for leftovers and maintain the silky sauce.

See also: curry and coconut milk for more background on the base and techniques.
See also: coconut curry
]]>