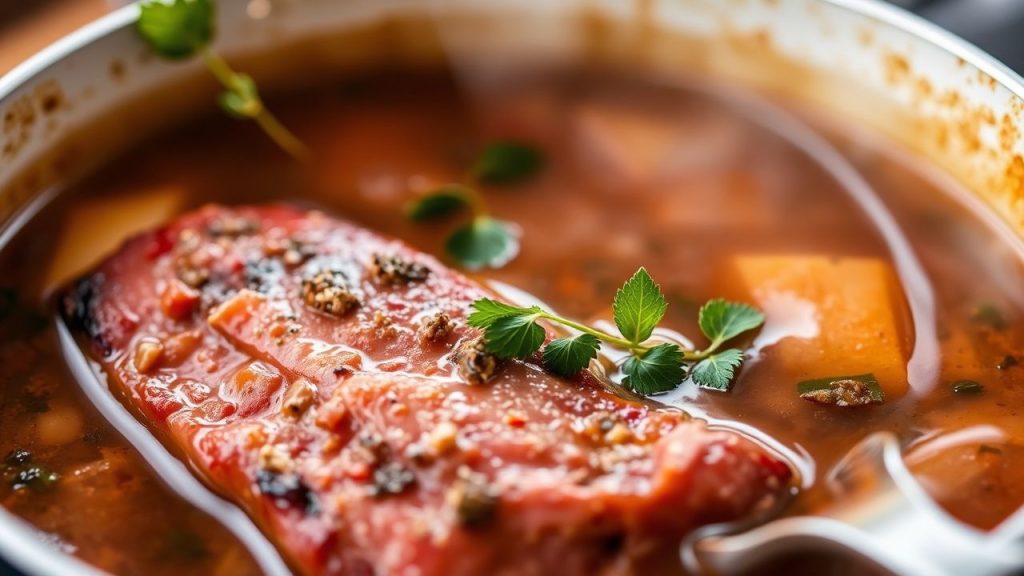
- Short marinating brightens surface flavor and adds quick umami lift.
- Medium marinating improves tenderness while preserving texture.
- Long marinating deeply infuses dense proteins but can break down delicate ones.
- Temperature and container matter for safety and consistent results.
How marinating works: the science behind time and taste
Marinating relies on chemical and physical processes to change flavor and texture. Acids, enzymes, salts, and oil interact with muscle fibers and surface fats to alter how food tastes and feels.
For a technical overview, consult marinade chemistry on Wikipedia. Enzymes such as proteases accelerate breakdown; read more about enzymes and protein action for context.
Prep and cook time
Plan your workflow. Effective marination requires scheduling: prep, chill, and cook slots must align to get the texture you expect. Short on time? Target quick infusions that still improve surface taste.
Below are practical windows that balance safety and flavor. These ranges work across home kitchens when you store items properly at refrigeration temperatures.
- Preparation time: 15 minutes
- Marination time: 30 minutes to 24 hours (depends on protein density)
- Cooking time: 10-30 minutes (varies by method)
Ingredients and ratios
Use a balance of acid, oil, umami, aromatics, and salt for consistent results. For many proteins, a simple rule: 3 parts oil to 1 part acid gives flavor without over-tenderizing.
Adjust components for the protein type. For example, add a salty element like soy to increase umami; read more about umami to understand its effect on perceived savoriness.
- 1/2 cup extra virgin olive oil
- 1/4 cup fresh lemon juice or vinegar
- 3 cloves garlic, minced
- 2 tbsp soy sauce or miso
- 1 tbsp honey or sugar
- 1 tsp smoked paprika, 1 tsp black pepper, 1 tsp salt
- 1 tbsp fresh rosemary or thyme
- Proteins: chicken breasts, flank steak, firm fish, or tofu
Step-by-step instructions
Whisk oil, acid, aromatics, salt, and sweetener until you achieve a light emulsion. Add herbs last to preserve volatile aromas and store the marinade chilled until use.
Pat proteins dry and score dense cuts to increase penetration. Use resealable bags or non-reactive containers to coat items evenly; remove excess marinade before cooking to promote caramelization.
Timing tips for proteins
Match time to density. Thin, delicate items need minutes; dense muscles need hours. Adjust times based on thickness rather than strictly by ingredient name.
- Chicken breasts: 1–4 hours for juiciness without mushy texture
- Flank steak: 6–12 hours to enhance flavor and reduce chew
- Firm fish (salmon, tuna): 30 minutes to 1 hour to avoid protein breakdown
- Tofu: 30 minutes to 2 hours to absorb flavors without disintegrating
Tips for success: balancing patience and practicality
Use acids like lemon or vinegar with care; they tenderize by altering proteins but can over-soften tissue. Oils and herbs slow acid contact and add complexity, so include them for longer marinades.
Control temperature and container: always marinate in the refrigerator and use glass, stainless steel, or food-grade plastic. This practice limits bacterial growth and helps maintain consistent infusion.
- Adjust by thickness: thicker cuts need longer contact time than thin ones.
- Avoid metal bowls with high-acid marinades: reactive metals can alter flavor and color.
- Reserve some fresh herbs for finishing: heat reduces volatile aromas.
 Expert Insight
Serving suggestions and pairings
Serve marinated proteins on neutral grains like jasmine rice or quinoa to let the marinated flavors stand out. Add a bright acid finish such as a squeeze of citrus to lift richness right before serving.
Garnish with fresh herbs, a drizzle of quality oil, or a dollop of chimichurri for contrast. For texture, sprinkle toasted seeds or nuts to add crunch and visual appeal.
Food safety and storage
Store all marinating items in the refrigerator at or below 4 °C (40 °F). This temperature control reduces microbial growth while the marinade changes flavor and texture.
Never reuse marinade that held raw protein unless you boil it for at least 1–2 minutes to destroy pathogens. For formal guidance, review food safety resources.
 Pro-Caution
Resources and further reading
For technique-focused articles, see internal guides such as best marinades for grilling and practical storage tips at marinade safety guide. These pages offer recipe variations and quick reference timing charts.
To expand your technical knowledge, consult broader topics such as umami and the role of enzymes in food transformation. Those entries contextualize why specific ingredients change texture and flavor.
FAQ
How long should I marinate chicken?
Marinate chicken breasts for 1–4 hours to gain flavor while preserving a firm, juicy texture. Thin cutlets need less time; thick pieces benefit from longer contact up to four hours.
Can acidic marinades ‘cook’ fish?
Yes. High-acid marinades denature proteins and firm the flesh, which can mimic a cooked texture. Limit time to 30–60 minutes for firm fish to avoid an over-firm or mushy result.
Does marinating change nutrition?
Marinating primarily alters flavor and texture, not macronutrient totals. However, adding sugar or oil increases calories; herbs and spices can add antioxidants and micronutrients in small amounts.
Is it safe to marinate at room temperature?
No. Marinate in the refrigerator to keep food below 4 °C (40 °F). Warm environments increase bacterial risk even when acids are present.
Can I freeze proteins in marinade?
Yes. Freezing in marinade locks in flavor and saves time on thaw. Thaw under refrigeration and cook promptly for best safety and quality.
See also: marinating time
]]>
- Fat shields food: it limits air exposure and slows spoilage.
- Fat softens proteins: it infiltrates fibers and helps break down collagen.
- Fat amplifies flavor: it stores and releases aroma compounds efficiently.
- Use technique: rendering, basting, and emulsifying maximize fat’s benefits.
How fat preserves food
Fat creates a physical barrier that reduces exposure to oxygen and microbes. When you coat or confit food in fat, you slow oxidation and dehydration and extend shelf life.
Animal fats and vegetable oils differ in stability and flavor. For context on animal-derived fats, see animal fat and refer to rendering techniques in our rendering fat guide.
How fat tenderizes meat
Fat penetrates muscle and connective tissue during slow cooking. It lubricates fibers and helps heat break down collagen into gelatin, which yields a tender bite and a richer mouthfeel.
Heat and time govern this process: low-and-slow methods let fat migrate and collagen dissolve without toughening proteins. For theory on fats and cell structure, see lipid basics.
Practical recipe and timing
This section pairs the science with a tested roast recipe that demonstrates preservation and tenderizing in practice. Follow technique closely: sear, slow-cook, and finish with a fat-based sauce.
Prep and cook times suit a medium-complexity home project. The method stresses fat management—render, retain, and integrate fats to gain both shelf stability and texture.
Prep and Cook Time
Prep Time: 20 minutes. Cook Time: 40 minutes. Use active heat control during searing to avoid burning the fat.
Total Time: 1 hour. Resting time counts toward final tenderness; do not skip rest.
Yield
Serves 4 generously. Portioning influences reheating and preserving outcomes; slice and store with a thin fat layer to extend freshness.
Leftovers keep better when covered with sauce or fat and chilled promptly.
Difficulty Level
Medium. This recipe requires basic searing and an understanding of low-heat braising. Maintain steady, low oven or stovetop temperature to let fat do its work.
Recommended for cooks ready to refine technique. See our companion notes on choosing fats in best fats for cooking.
Ingredients
Use well-marbled cuts and quality fats to maximize preservation and tenderness. Quality of fat affects flavor, melting behavior, and stability during cooking.
- 1.5 lbs (680 g) beef chuck roast, well-marbled
- 2 tbsp unsalted butter, softened
- 2 tbsp olive oil
- 3 garlic cloves, minced
- 1 tbsp fresh rosemary, chopped
- 1 tsp smoked paprika
- Salt and freshly ground black pepper, to taste
- 1 cup beef broth, low sodium
- 2 medium onions, sliced thin
- 1/2 cup heavy cream
Note: if you avoid dairy, substitute suitable plant fats with stable behavior under heat. See the notes below for alternatives.
Instructions
Sequence matters. Dry the meat, season it, sear to develop crust, then slow-cook with retained fat to allow penetration and collagen breakdown.
Finish by enriching pan juices with cream or additional butter for mouthfeel. Strain and cool properly if you plan to store the dish under a protective fat layer.
- Prepare the beef: Pat the roast dry and season with salt, pepper, smoked paprika, and half the rosemary to ensure even seasoning.
- Heat the fat base: Warm olive oil and 1 tbsp butter in a heavy skillet until shimmering. A fat blend helps flavor and browning performance.
- Sear the beef: Sear on all sides until a deep golden-brown crust forms, about 3–4 minutes per side. Browning concentrates flavor via the Maillard reaction.
- Sauté aromatics: Reduce heat to medium and cook garlic and onions until soft and caramelized, about 6–8 minutes. The fat carries aromatic compounds into the sauce.
- Deglaze with broth: Add beef broth to lift fond and dissolve concentrated flavors. Stir and scrape the pan bottom to incorporate browned particles.
- Slow cook and infuse: Return beef with rendered fat. Cover and simmer gently or use a 300°F (150°C) oven for 30–40 minutes until fork-tender. Slow heat allows fat to penetrate fibers and collagen to convert to gelatin.
- Finish the sauce: Remove the beef to rest. Stir cream and remaining butter into pan juices and reduce until slightly thickened for a silky finish.
- Serve: Slice against the grain and spoon sauce over the meat. Garnish with the remaining rosemary for a fresh contrast.
Chef’s Notes
Choose fats based on desired flavor and melting point. Butter adds sweetness and gloss; olive oil contributes a fruity note and stability.
Animal fats like lard and tallow perform well for sealing and preservation. For more on emulsions and fat behavior, consult the emulsifier reference.
- For dairy-free cooking, use coconut milk and refined coconut oil for richness and mouthfeel.
- Always rest meat after cooking to let juices and fat redistribute; this step increases tenderness and juiciness.
- Use well-marbled cuts for maximum natural fat; for lean cuts, consider adding rendered pork fat or frequent basting.
Expert Insight
When storing, cool food quickly and keep below 5°C to limit bacterial growth. Fat reduces oxidation but does not replace proper refrigeration.
Pro-Caution
Serving suggestions
Serve slices over buttered mashed potatoes or roasted roots to complement richness. Fresh herbs or a dressed bitter green cuts through fat and refreshes the palate.
Light vinaigrettes, pickled vegetables, or acid-based condiments balance the dish and reduce the perception of heaviness while highlighting tender texture.
Nutritional snapshot
This recipe yields a high-protein, moderate-carbohydrate plate with substantial fat content. Tailor portions and fat choices to fit dietary goals.
| Nutrient | Amount per Serving |
|---|---|
| Calories | 530 kcal |
| Protein | 45 g |
| Carbohydrates | 8 g |
| Fat | 35 g |
Explore related technique articles such as our rendering fat guide and a primer on choosing cooking fats for further skill-building.
FAQ
Why does fat improve flavor?
Fat dissolves and carries flavor compounds, releasing them as you eat. This transport of volatile aromas makes herbs, spices, and browned surfaces more intense.
Fats also coat the tongue, prolonging flavor release and enhancing perceived richness.
How does fat slow spoilage?
When food is submerged in or coated with fat, the surface sees less oxygen and moisture loss. This reduces oxidative rancidity and surface dehydration.
Combine fat coverage with refrigeration for safe, extended storage; fat alone is not a sterilization method.
Which fats are best for slow cooking?
Choose fats with stable melting behavior and a flavor that complements the dish. Tallow, lard, butter, and medium-stability vegetable oils all work, depending on taste goals.
For neutral preservation use rendered animal fats; for aromatic results, select olive oil or butter according to the recipe.
Can I get tenderness without high fat content?
Yes. Acids, enzymes, mechanical tenderizing, and proper low-and-slow heat also break down connective tissue. Fat accelerates lubrication and mouthfeel but is not the sole route to tenderness.
Combine modest fat with acids or slow braise to turn lean cuts into tender dishes.
Where can I learn more about fat chemistry?
Authoritative resources include texts on lipid chemistry and culinary science. For quick reference on rendering methods and emulsification, see the linked Wikipedia pages for rendering and emulsification.
Apply tested technique frequently to refine your sense of fat behavior across recipes.
Fat remains a tool. Use it with intention: select the right type, control temperature, and apply storage best practices to preserve and tenderize reliably.
See also: Fat
]]>
- Slow cooking converts collagen into gelatin, creating moist, silky meat.
- Control of temperature and time matters more than exact seasonings.
- Sear first to build flavor, then finish low and slow for tenderness.
- Rest and slice against the grain for the best mouthfeel.
Understanding Connective Tissue and Its Transformation
Tough cuts are tough because they contain dense connective tissue and more collagen. These proteins give muscles structure for movement, which is why shoulder, shank and brisket are economical but firm.
When you apply steady, low heat, collagen denatures and becomes gelatin. That gelatin dissolves into the cooking liquid, improving mouthfeel and moisture retention.
The Role of Collagen Breakdown in Tenderizing Tough Cuts
Collagen is the structural protein that keeps fibers bound. Over hours at low temperatures, collagen hydrolyzes into gelatin, which feels silky and coats meat fibers.
As gelatin forms, it also thickens the braising liquid and traps juices close to the meat. That dual effect both tenderizes and boosts savory depth.
Optimal Temperature and Timing for Maximum Flavor Extraction
Temperature control is decisive. Aim for steady heat that allows collagen to dissolve without drying muscle fibers; typically that means oven or slow-cooker ranges where liquid simmers gently.
For many large cuts, plan on 6–12 hours depending on size and connective tissue. Use an instant-read thermometer and focus on feel: when the meat yields easily to a fork, collagen has softened sufficiently.
Choosing the Right Cuts and Enhancing Flavor
Select cuts with visible connective tissue and a tone of marbling: beef brisket, chuck roast, pork shoulder, lamb shanks and oxtail perform predictably. Those cuts respond to low heat and long time because they have the collagen to convert.
Marinades with moderate acid—vinegar or citrus—help tenderize the surface before cooking. Also, apply a dry rub and sear to develop the Maillard reaction for deeper flavor; learn more about the Maillard reaction to use heat to your advantage.
Practical Recipe & Timing Details
This section converts the science above into a practical plan for a classic slow-cooked brisket. Follow the sequence: season, sear, braise slowly, rest, then slice against the grain.
For more technique notes, visit our internal guide on slow-cooking basics and check a related brisket build at brisket recipes. These pages expand on tools and vessel choice.
Prep and Cook Time
Preparation: 20 minutes for trimming and assembling a rub. Reserve time if you plan to marinate overnight.
Marinating (optional): 4–12 hours. Cooking: 6–8 hours on low heat; larger pieces need up to 12 hours.
Yield & Difficulty
Serves 6–8 depending on side dishes. Expect some shrinkage during cooking as moisture concentrates.
Difficulty: Medium. The work is front-loaded. After searing and setup, most of the time is hands-off.
Ingredients
The ingredient list below supports a classic savory brisket. Quantities are scalable.
- 3 lb beef brisket, trimmed
- 1 cup beef broth
- 1/2 cup apple cider vinegar
- 2 tbsp olive oil
- 1 tbsp smoked paprika
- 2 tsp garlic powder
- 1 tsp ground cumin
- 1 tsp black pepper
- 1 tsp kosher salt
- 1 large onion, sliced
- 4 cloves garlic, smashed
- 2 bay leaves
Instructions
Follow a three-stage sequence: build flavor, denature collagen, and finish to serve. Each step affects final texture and sauce quality.
- Mix the rub: Combine vinegar, olive oil, smoked paprika, garlic powder, cumin, pepper, and salt. The rub both seasons and primes the surface for searing.
- Apply and rest: Rub the brisket thoroughly. For deeper penetration, refrigerate 4–12 hours. Bring meat to near room temperature before searing.
- Sear: Brown brisket on all sides in a hot skillet until a rich crust forms. This step creates flavor compounds that enrich the braise.
- Set up to braise: Place sliced onion and smashed garlic in the bottom of a Dutch oven or slow cooker. Nestle the seared brisket on top, add bay leaves, and pour beef broth around—not over—the meat to preserve the crust.
- Slow cook: Maintain a gentle simmer or use the low setting on a slow cooker. Cook 6–8 hours, or until the meat pulls apart with minimal resistance.
- Rest and slice: Rest 10–20 minutes before slicing against the grain. Resting redistributes juices and improves texture.

Expert Insight
Finishing touches matter. A light sprinkle of fresh herbs or a squeeze of acid at service can brighten the rich sauce and cut perceived fattiness.
Pro-Caution
Storage is straightforward: refrigerate leftovers in an airtight container up to 3 days or freeze portions for longer storage. Reheat gently to preserve texture.
Chef’s Notes & Troubleshooting
If meat remains firm after the recommended time, extend the cook rather than increase the heat. Low, additional hours allow collagen to finish breaking down.
Use a fork to test for correct pull: when the fork slides in with little resistance and the meat flakes loosely, it is ready. Overcooking can make thin portions stringy, so consider slicing larger pieces thicker for service.
Variations
Swap proteins to change flavor: pork shoulder and lamb shank behave similarly due to collagen content. Adjust cook time to account for bone-in pieces and shape.
Try adding aromatic vegetables, mushrooms, or a splash of fortified wine to the braising liquid for flavor variation while maintaining the same low-and-slow approach.
Serving Suggestions
Pair slow-cooked brisket with creamy mashed potatoes, polenta, or buttered noodles to match the sauce’s richness. Add a crisp vegetable or a bright slaw for contrast.
Garnish with parsley and a light dusting of smoked paprika to make plates pop visually and to add a final aromatic lift.
| Nutrient | Amount (per serving) |
|---|---|
| Calories | 410 kcal |
| Protein | 38 g |
| Carbohydrates | 6 g |
| Fat | 24 g |
FAQ
Why does slow cooking transform tough cuts into tender meat?
Slow cooking exposes collagen to steady, moderate heat so it can hydrolyze into gelatin. That gelatin lubricates and softens fibers, producing a tender mouthfeel and richer sauce.
What temperatures and internal doneness should I aim for?
Maintain a gentle simmer or use a slow-cooker low setting. Rather than a single internal temperature, judge doneness by tenderness: when a fork meets little resistance and meat pulls apart, it is done.
Are there cuts that should not be slow-cooked?
Lean, tender cuts such as tenderloin or sirloin lack connective tissue and can dry out with prolonged cooking. Reserve slow methods for collagen-rich cuts and use quick, high-heat techniques for lean steaks.
Does searing matter if I plan to cook the meat for many hours?
Yes. Searing builds flavor via surface browning and creates compounds that enrich the braising liquid. The extra 5–10 minutes of searing translates to a deeper finished flavor.
How should I store and reheat leftovers to retain texture?
Cool brisket quickly, then refrigerate in an airtight container up to 3 days. Reheat gently in a low oven with a splash of braising liquid or in a covered skillet to avoid drying the meat.
Embrace the process: time and controlled heat will transform inexpensive cuts into meals with complex aroma and luxurious texture. Use technique, test by feel, and trust patient cooking.
See also: Slow cooking
]]>Cornstarch gives you a repeatable way to keep meat juicy and tender during high-heat cooking. Applied correctly, it forms a thin protective layer that slows moisture loss and improves mouthfeel without masking flavor.
- Creates a moisture barrier that preserves juices during searing and stir-frying.
- Improves texture by smoothing the meat surface and reducing toughness.
- Works with most proteins—poultry, pork, beef and some game respond well.
How Cornstarch Works
Cornstarch functions primarily by absorbing surface moisture and then gelatinizing when heated. That gelatinized film reduces direct heat-driven water loss and limits protein tightening at the surface.
At the molecular level, heated starch granules swell and form a semi-cohesive layer that traps water and any marinade components close to the muscle fibers. For background on starch behavior, see starch gelatinization.
Science Behind Tenderness
Meat toughening arises when muscle proteins denature and expel water under high heat. Controlling that surface process preserves succulence and improves perceived tenderness.
To understand protein changes during cooking, review protein denaturation. Also consider how surface reactions like the Maillard reaction influence flavor once moisture is managed.
Ingredients & Prep
Use thinly sliced meat for even coating and fast, consistent cooking. For home cooks, boneless chicken thighs, flank steak, or pork shoulder cut into strips work reliably.
Core ingredients: protein, a small amount of soy or salt for seasoning, and cornstarch. Keep cornstarch dry-sifted to avoid clumps and measure accurately for a light veil rather than a paste.
Key ingredient roles
Cornstarch forms the tender shield and minimizes moisture escape. Use roughly 2–3 tablespoons per pound of thinly sliced meat for velveting-style results.
Salt or soy seasons and aids water retention; small amounts in the marinade improve overall texture. For longer marination, reduce salt to avoid excessive extraction of juices.
Step-by-Step: Velveting with Cornstarch
Velveting is the practical application of cornstarch to protect meat. The technique combines a brief marinade, a light cornstarch coating, and quick, high-heat cooking.
Follow these clear actions: season and marinate briefly, pat the meat dry, dust with cornstarch, rest to hydrate the coating, then sear or stir-fry. This sequence ensures the film can form and perform during heat exposure.
- Marinate briefly: Mix a splash of soy or salt, a little oil, and aromatics. Keep the marination under 30 minutes for thin pieces so you do not draw out juices.
- Dry and coat: Pat meat to remove surface moisture. Toss lightly in sifted cornstarch until evenly coated; shake off any excess.
- Rest to hydrate: Let the coated meat sit 5–10 minutes. The cornstarch absorbs surface moisture and bonds to proteins to form the shield.
- Cook hot and fast: Use medium-high heat and avoid overcrowding. Sear until edges brown and internal temperature reaches the safe range for that protein.
- Finish with brief steam (optional): Add a small splash of stock or water and cover briefly to complete cooking gently without drying the meat.
Practical Tips for Success
Measure cornstarch carefully; too much creates gummy texture, too little offers no protection. Maintain a thin, even layer for crisp or silky results depending on sauce and heat.
Control pan temperature. Medium-high heat develops color without burning the starch. If oil smokes, lower the heat to avoid bitter notes and ruined texture.
Expert Insight
Layer flavors in the marinade but avoid heavy acidity when velveting. Acidic agents break down proteins chemically and can alter how the starch adheres if left too long.
Pro-Caution
Technique Adjustments by Protein
Poultry benefits from slightly longer resting after coating; this helps the film bond and prevents dryness when internal temperature rises rapidly. For lean cuts like chicken breast, shorter high-heat searing followed by a brief covered finish works well.
Beef responds to this technique when thinly sliced. Tougher cuts cut small and cooked briefly become tender and silky. For very tough cuts, combine cornstarch velveting with low-and-slow braising for best results.
Serving Suggestions and Nutrition
Serve velveted meat over steamed rice, noodles, or alongside stir-fried vegetables. The cornstarch layer holds sauce well, producing a glossy glaze that adheres to the protein.
Nutrition impact is minor: cornstarch adds a small carbohydrate amount per serving but contributes no saturated fat. To compare methods, consult internal guides or your nutrition advisor for portion control and dietary needs.
Explore related in-house resources for complementary techniques: Ultimate Marination Guide and Velveting & Stir-Fry Techniques. These pages expand on timing, seasoning ratios, and temperature control for home cooks.
Common Mistakes and Fixes
Common errors include over-coating, marinating too long with heavy acid, and pan overcrowding. Each mistake undermines the protective function of cornstarch and risks texture failure.
Fixes are simple: use less cornstarch, shorten acidic contact time, and cook in smaller batches over consistent heat. Re-test with one or two slices before finishing the full batch to confirm timing.
FAQ
How much cornstarch should I use per pound of meat?
Use about 2–3 tablespoons per pound of thinly sliced meat. That quantity produces a light veil rather than a paste and reliably improves texture during quick cooking.
Will cornstarch change the flavor of my dish?
Cornstarch itself is neutral and does not alter flavor significantly. It helps sauces cling and concentrates existing seasonings by preventing loss of juices during cooking.
Can I replace cornstarch with another starch?
Yes. Potato starch or tapioca starch can work similarly but behave slightly differently under heat. Test ratios for alternative starches because some gelatinize at different temperatures.
Is the technique safe for all cooking methods?
Velveting with cornstarch suits high-heat stir-frying, pan-searing, and quick sautés. It does not replace mechanical tenderizing or long braises for very tough cuts, but it enhances fast-cook methods.
How do I store velveted meat before cooking?
You can marinate and coat up to 24 hours ahead; keep covered in the refrigerator. Bring pieces close to room temperature for more even cooking, then pat dry and proceed with the coating step if needed.
For supplemental theory, read the cornstarch overview and practical notes on stir-frying to connect technique with heat management and flavor development.
Closing note: Apply cornstarch with precision and consistent timing to transform ordinary meat into reliably tender results. Precise measurement, controlled heat, and small batches deliver professional-level texture at home.
See also: Cornstarch
]]>