- Controlled temperature and warm broth keep starch extraction steady for gloss and flow.
- Choose meaty mushrooms to add concentrated umami without watering down the pan.
- Use the right rice (short-grain varieties) and add broth in measured ladles for even absorption.
- Finish off heat with cold butter and Parmigiano-Reggiano for a true emulsion and sheen.
Mushroom Risotto: Selecting Ideal Mushrooms for Deep Flavor
Pick mushrooms that deliver concentrated flavor and low internal water. Cremini and shiitake provide meaty texture, while rehydrated dried porcini concentrate savory notes that persist after cooking.
Firm caps brown better than soft ones; browning builds Maillard flavor that complements the rice. For an overview of mushroom biology and culinary use, consult mushroom varieties and uses.
Which mushroom varieties to prefer
Cremini (baby bella) and shiitake add texture and savory depth without excess moisture. Dried porcini contribute an intense, almost smoky base when rehydrated and their soaking liquid is a concentrated stock booster.
Avoid very watery fungi such as enoki or young button mushrooms if your goal is concentrated mushroom flavor. Pat sautéed mushrooms dry before folding them into the rice to prevent dilution.
 Expert Insight
Mushroom Risotto: Achieving the Silky Creamy Texture
Creaminess in risotto comes from released rice starch rather than added cream. Toasting the rice briefly and then adding warm broth in controlled ladles encourages even starch release and a glossy finished sauce.
Finish off the heat with cold butter and finely grated Parmigiano-Reggiano to emulsify the pan juices and produce a silky mouthfeel. For background on the cheese, see Parmigiano-Reggiano production and profile.
Temperature and finishing techniques
Keep the broth at a steady gentle simmer so each ladle raises the pan temperature just enough to coax starch. Cold liquid and abrupt temperature drops interrupt starch extraction and yield uneven texture.
Remove the pan from the heat before adding cheese and the last knob of cold butter, then stir briskly off heat to form an emulsion. That motion and temperature balance give classic risotto its sheen and flow.
Expert Insight
Mushroom Risotto: Choosing the Right Rice and Broth for Absorption
Select rice bred for risotto. Arborio releases starch readily and creates cream, while Carnaroli retains shape under longer stirring, so chefs prefer it for more forgiving timing.
Use a mushroom-infused vegetable stock, or a clear homemade stock, to complement the sautéed mushrooms without masking them. Keep the stock warm so it does not chill the rice during additions. See details on rice varieties at Arborio rice and Carnaroli rice.
Broth choice and preparation
Make or choose a stock with restrained seasoning and a clear mushroom presence. Strongly flavored or overly salted broths will dominate the delicate balance between mushroom and cheese.
Keep the broth on a low flame and measure ladles so each addition absorbs before adding more. A steady rhythm produces a saucy, flowing mushroom risotto rather than a watery or gluey result.
Mushroom Risotto: Stirring Techniques and Timing for Perfect Consistency
Stirring moderates the release of starch and the development of a creamy sheath around each grain. Begin with energetic stirring to coat and toast the grains, then switch to regular, steady strokes as broth is added.
Add the next ladle when the rice nearly absorbs the previous portion. That cadence keeps moisture consistent and allows the grains to swell evenly into a balanced texture.
When to reduce stirring and why
As the rice reaches al dente, reduce stirring and finish off heat. Overworking the grains in the final minutes can shear starches and create a sticky, gluey mouthfeel rather than silk.
Trust the grain: aim for tender with a slight center bite. Resting the risotto off heat for two minutes lets the carryover heat equalize and the texture to settle into a cohesive sauce around the rice.
 Pro-Caution
Mushroom Risotto: Recipe and Practical Details
This recipe yields a restaurant-style mushroom risotto for four and balances timing with repetition to deliver consistent outcomes. Read the full method before you begin to synchronize mise en place and pan workflow.
All steps below follow tested professional technique. Adjust single components only after you master the base method and the timing that works with your stove and pan size.
Prep and Cook Time
- Preparation: 15 minutes
- Cooking: 35 minutes
- Total: 50 minutes
Yield and Difficulty
Yield: Serves 4 generously.
Difficulty: Medium — attention to timing and stirring required, but the steps are straightforward and repeatable.
Ingredients
- 1 ½ cups Arborio rice
- 4 cups warm mushroom or vegetable broth
- 1 cup mixed mushrooms (cremini, shiitake, dried porcini rehydrated), sliced
- 1 small onion, finely chopped
- 3 cloves garlic, minced
- 3 tablespoons unsalted butter
- 2 tablespoons olive oil
- ½ cup freshly grated Parmigiano-Reggiano
- Salt and freshly ground black pepper, to taste
- Fresh parsley, chopped, for garnish
Instructions
- Prepare broth and porcini: Warm the broth gently. Rehydrate dried porcini in a small portion of the warm broth for ten minutes, then reserve the strained soaking liquid to boost flavor.
- Sauté mushrooms: Heat 1 tablespoon olive oil and 1 tablespoon butter over medium. Add mushrooms with a pinch of salt and sauté until golden and the moisture evaporates, about six minutes. Set aside.
- Sauté aromatics: In a large pan, heat the remaining oil and butter. Cook the onion and garlic gently until translucent, about five minutes, being careful not to brown the garlic.
- Toast the rice: Add rice to the aromatics and stir for two minutes until the grain edges look translucent and the rice smells nutty.
- Add broth gradually: Add a ladle of warm broth and stir until nearly absorbed. Continue ladling broth one portion at a time while stirring frequently and maintaining a gentle simmer.
- Fold in mushrooms: When the rice is roughly halfway cooked, fold the sautéed mushrooms into the pan and continue adding broth until the rice is al dente and the sauce flows.
- Finish: Remove from heat. Stir in Parmigiano-Reggiano and adjust seasoning. Emulsify with a small knob of cold butter if you want extra silk and shine.
- Rest and serve: Rest two minutes, garnish with parsley, and serve immediately in warmed shallow bowls.
See a practical mushroom risotto recipe for a printable format and shopping checklist. For technique variations, consult our risotto stirring and timing guide.
Mushroom Risotto: Tips for Success
Use warm broth to maintain a steady pan temperature and to support continuous starch extraction. Monitor each ladle by texture rather than strict timing and adjust as the rice cooks.
For a dairy-free version, replace the butter with extra olive oil and use a fermented nutritional yeast or a plant-based cheese. Reheat leftovers gently with a splash of warm broth to revive creaminess.
Mushroom Risotto: Serving Suggestions
Serve risotto in warmed, shallow bowls so the sauce remains flowing and accessible. Bright garnishes such as chopped parsley or chives cut through the richness and provide contrast.
Finish with a few shavings of aged cheese or a light drizzle of high-quality olive oil for gloss. Pair with a crisp green salad or a simple roasted vegetable side to balance the plate.
Mushroom Risotto Nutrition per Serving
Per serving, this classic mushroom risotto provides a balanced carbohydrate base, a modest amount of protein, and fat from butter and cheese. The calories and macronutrient profile vary with ingredient swaps such as vegan butter replacements.
Estimated per serving values: ~370 kcal, 11 g protein, 55 g carbohydrates, and 9 g fat. Adjust portions to match dietary needs and use whole-grain rice alternatives cautiously as they change cooking time significantly.

For general technique background on risotto, see risotto fundamentals. For additional context on rice varieties and their properties, review Arborio rice. For mushroom categories and nutrition, consult mushroom nutrition.
FAQ: Mushroom Risotto Questions
What rice should I use for the creamiest result?
Use short-grain varieties crafted for risotto such as Arborio or Carnaroli. Arborio gives reliable cream while Carnaroli holds its shape better under longer stirring, which many cooks prefer.
Choose based on your tolerance for timing: Carnaroli tolerates extended stirring; Arborio reaches creaminess faster but can lose structure if overworked.
Do I need white wine in the recipe?
White wine adds acidity and aromatic lift, but it is not mandatory. You can substitute a splash of lemon juice or a little extra warm broth to keep non-alcohol versions balanced.
If using wine, add it after toasting the rice and let it reduce almost completely before the first ladle of broth so the alcohol cooks off and the flavor concentrates.
Can I make mushroom risotto vegan and still keep it creamy?
Yes. Replace butter with extra virgin olive oil and use nutritional yeast or a vegan parmesan alternative to mimic the savory, nutty finish. Robust mushroom selection and patient stirring still produce a creamy result.
Also finish off heat with a swirl of high-quality olive oil to add mouth-coating fat and sheen if you avoid dairy.
How do I fix risotto that is too thick or too loose?
If it is too thick, stir in warm broth a little at a time off heat until it flows. If it is too loose, simmer gently while stirring to reduce excess liquid until the grains concentrate and the sauce clings to the rice.
Adjust seasoning only after the texture is corrected, since salt levels concentrate as the sauce reduces.
Is it OK to prepare risotto ahead of time?
Risotto is best served fresh. You can undercook it slightly, chill, and reheat with warm broth; however, you will lose some of the immediate creaminess present in freshly finished risotto.
For make-ahead service, reheat gently with broth and finish off heat with butter and grated cheese to revive emulsion and shine.
Mastering mushroom risotto requires focused technique: the right rice, warm broth, steady stirring, and a careful finish. Follow these ten professional secrets and practice the rhythm; your mushroom risotto will gain consistent creaminess and depth.
See also: mushroom risotto
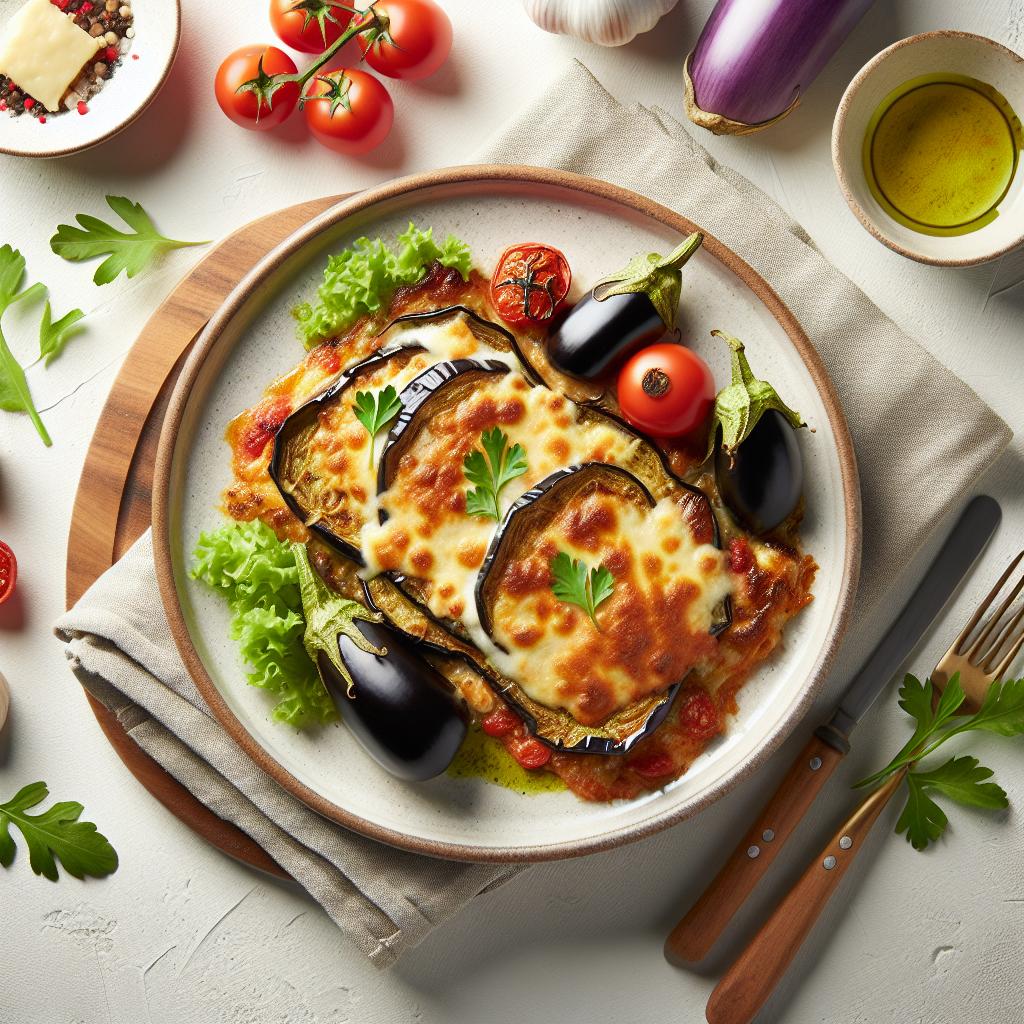
]]>There is a precise technique behind a perfectly baked Eggplant Parmesan: a crisped breadcrumb crust, balanced moisture control, and layered cheeses that melt into a silky interior. I wrote this guide from long practice in test kitchens and home ovens, focusing on reproducible steps that deliver consistent texture and flavor.
The method emphasizes salting, panko breading, and oven timing so you end up with golden edges and a creamy core every time. These strategies apply whether you make one 9×13 casserole or individual portions for a crowd.
- Key takeaway: Salt the eggplant to draw out moisture for a non-soggy result.
- Key takeaway: Panko plus Parmigiano-Reggiano gives lasting crunch and savory depth.
- Key takeaway: Bake, don’t over-sauce: modest marinara preserves the crust.
- Key takeaway: Rest the casserole 10 minutes before serving to set layers.
Prep and Cook Time
Preparation: 30 minutes for slicing, salting, and breading; allow 20–30 minutes for sweating the slices. Keeping prep efficient prevents the salted eggplant from over-salting.
Cooking: 40–45 minutes in the oven at 375°F (190°C) including a covered phase and a browning phase. Total time depends on whether you par-bake slices or oven-roast the assembled dish.
Yield and Difficulty
This recipe yields about six generous servings, enough for a family meal or to portion for leftovers. Portions scale linearly: two medium eggplants become one 9×13 casserole; multiply for larger gatherings.
Difficulty is medium. The technical tasks include consistent slicing, proper salting to control moisture, and an even breadcrumb coat. With clear steps, a home cook will master this in one or two tries.
Ingredients
Quality and technique matter more than a long ingredient list. Use fresh whole-milk cheeses and firm, uniform eggplants for even cook time.
Core ingredients include: eggplant (aubergine) rounds, all-purpose flour, eggs, panko breadcrumbs, grated Parmigiano-Reggiano, shredded mozzarella, ricotta, and a good marinara sauce. For more on eggplant selection, see eggplant (aubergine).
- 2 medium eggplants (about 1½ pounds), sliced into ½-inch rounds
- 1 cup all-purpose flour
- 3 large eggs, lightly beaten
- 1½ cups panko breadcrumbs mixed with ¼ cup grated Parmigiano-Reggiano
- ½ cup finely grated Parmigiano-Reggiano
- 2 cups shredded mozzarella
- 1 cup ricotta
- 4 cups marinara sauce (use a moderate-acidity sauce)
- Salt, black pepper, olive oil, garlic powder, dried oregano, fresh basil
Why these ingredients work
Panko provides the loft and crispness that standard breadcrumbs often lack; combine it with Parmigiano-Reggiano for savory browning and structure. Read more about Parmigiano-Reggiano on Parmigiano-Reggiano.
Ricotta acts as a moisture buffer and creates a smooth mouthfeel when layered with mozzarella. A restrained amount of sauce prevents the crust from softening too quickly.
Instructions
Follow these steps in order. Prepare a dredging station and work in batches to keep the breading crisp and the oven workflow steady.
Step 1: Preheat the oven to 375°F (190°C). Line a rimmed baking sheet with parchment and arrange a cooling rack over a tray for the salted eggplant.
- Salt the eggplant slices on both sides and rest them for 20–30 minutes to draw out excess moisture. Pat dry thoroughly with paper towels.
- Set up three shallow bowls: flour; beaten eggs; panko mixed with ¼ cup Parmigiano-Reggiano, garlic powder, oregano, salt and pepper.
- Coat each slice in flour, shake off excess, dip in egg, then press into the breadcrumb mix to build a generous, even coat.
- Arrange the coated slices on the baking sheet and brush lightly with olive oil. Bake for 18–22 minutes, flipping once so both sides crisp evenly.
- Layering: Spread a thin base of sauce in a 9×13 dish. Place a single layer of baked eggplant, dollop ricotta, sprinkle mozzarella and Parmigiano-Reggiano, then add a modest spoonful of marinara.
- Repeat to build two or three layers depending on pan depth. Cover loosely with foil, bake 20 minutes, then remove foil and bake an additional 10–15 minutes until golden and bubbling.
- Rest 10 minutes before cutting so the layers set. Garnish with torn fresh basil and a drizzle of extra virgin olive oil if desired.
Tips for Success
Salting is non-negotiable for optimal texture. Draw out moisture to prevent soggy interiors and to concentrate flavor; pat dry before breading to ensure the coating adheres.
Use panko for texture and a light hand with sauce to protect crisp edges. If you prefer a faster route, par-bake slices and assemble while warm for a shorter final bake time.
Expert Insight
Layer cheeses strategically: ricotta for cream, mozzarella for melt, and Parmigiano-Reggiano for sharp, savory finish. Avoid over-saucing between layers; a thin ribbon of sauce preserves texture.
Want more technique notes? See our short guide on salting and prepping eggplant at how to salt eggplant for step-by-step visuals and timing tips.
Make-Ahead and Storage
You can assemble the casserole up to 24 hours ahead and refrigerate covered; add 8–12 minutes to bake time when baking cold. This makes the dish ideal for entertaining with minimal last-minute work.
Leftovers keep well in the refrigerator for 3–4 days and reheat covered at 350°F (175°C) until warm and bubbling. For meal-prep, cut into portions and freeze wrapped for up to 3 months, then thaw overnight before baking.
Pro-Caution
When reheating, avoid microwaving from frozen—use the oven to preserve crispness. A quick 5-minute broil at the end restores surface crunch if needed.
Serving Suggestions and Pairings
Serve hot with a crisp green salad dressed with lemon vinaigrette to cut the richness. Contrast and acidity lift the cheese and balance the savory layers.
Accompaniments that work well include garlic bread, rosemary focaccia, or a simple sautéed green vegetable. For tomato sauce variety, explore our internal roundup at best Italian tomato sauces.
To finish, garnish with fresh basil and a fine grate of Parmigiano-Reggiano. A light drizzle of high-quality extra virgin olive oil just before serving amplifies aroma and mouthfeel.
Practical Notes on Sauce and Variations
Use a moderately seasoned marinara to keep the dish balanced; heavy, oily sauces can separate and weigh down the crust. For background on marinara styles, refer to the marinara sauce entry.
Variations include adding grilled zucchini or mushrooms between layers, swapping provolone or fontina for mozzarella, or creating a vegan version with plant-based cheeses. Keep layer ratios similar to maintain texture contrast.
Q&A
Q1: What makes eggplant Parmesan both crispy and creamy?
A: Crisp comes from the panko-Parmesan crust baked to color; cream comes from ricotta and melted mozzarella layered with sauce. The contrast relies on moisture control and restrained sauce portions.
A: Use the right sequence: salt, dry, bread, par-bake, then layer. Each step preserves structure and mouthfeel.
Q2: Why bake eggplant Parmesan instead of frying it?
A: Baking reduces absorbed oil while still producing a crisp exterior when you use panko and high-heat oven techniques. It also simplifies cleanup and scales better for baking in larger pans.
A: If you prefer a richer finish, lightly pan-fry the breaded slices in minimal oil before layering; then finish in the oven to meld flavors.
Q3: How do I avoid soggy eggplant slices?
A: Salt slices for 20–30 minutes, then blot dry to remove drawn-out moisture. Work in single layers in the oven and avoid over-saucing between layers to keep the crust intact.
A: Use panko for a dryer, loftier crust. Give baked slices space on the sheet pan so steam can escape and crisping completes.
FAQ
How long should I salt eggplant before breading?
Salt for 20–30 minutes, then pat dry thoroughly. This timeframe reliably removes excess moisture without changing texture dramatically.
Can I use regular breadcrumbs instead of panko?
Regular breadcrumbs work but yield a denser crust. Panko creates more surface area and a lighter, longer-lasting crunch.
Do I need ricotta in every layer?
Ricotta adds cream and keeps layers from becoming dry; you can use less or swap for béchamel for a different texture. Keep overall moisture balance in mind.
Can I freeze assembled eggplant Parmesan?
Yes. Assemble in a freezer-safe pan, wrap tightly, and freeze up to 3 months. Thaw overnight in the fridge and bake until hot and bubbling.
What temperature and time produce the best browning?
Bake at 375°F (190°C) covered for the initial phase, then uncover and roast at the same temperature for 10–15 minutes to brown the top. A short broil (1–2 minutes) can finish the top if needed.
In Summary
Eggplant Parmesan becomes reliably crispy and creamy when you control moisture, use panko with Parmigiano-Reggiano, and layer cheeses judiciously. These technical steps prevent sogginess and maximize flavor.
Practice the sequence once or twice to dial in your oven and pan. The result rewards effort with a richly textured, vegetarian main that stands up to slices, sides, and shared meals.

See also: Eggplant Parmesan
]]>
- Salt and dry to remove excess moisture and firm the flesh.
- Panko + Parmigiano produces an airy crust that browns in the oven.
- Bake on a rack for full air circulation and even crunch.
- Layer sparingly so sauce does not soften the crumb.
Perfecting the Eggplant Selection and Prep for Ultimate Crispiness
Select firm, youthful fruit with glossy skin and a heavy feel for size. Globe varieties give predictable texture and even slices for a uniform Eggplant Parmesan.
Slice to 1/2-inch rounds and salt both sides to draw out water; rinse and pat dry after 30–45 minutes to leave a drier surface that bonds to breading. For cultivar context, review aubergine.
Crafting the Ideal Breading Blend for a Golden Crunch
Use panko as the structural base: its flakes create air pockets that crisp under dry heat. Lightly toasting panko deepens aroma and improves crunch before mixing with cheese for Eggplant Parmesan.
Blend 2 cups panko with 1 cup finely grated Parmigiano-Reggiano and season with garlic powder, smoked paprika, dried oregano, and black pepper. Refer to panko and Parmigiano-Reggiano for ingredient context.
Techniques for Baking to Achieve Tenderness Without Greasiness
Preheat to high heat (around 425°F / 220°C) to set the crust quickly while letting the interior soften. Arrange coated slices on a wire rack above a baking tray to encourage hot air circulation and a consistent crust on both sides.
Use a light brush or spritz of olive oil to aid browning; moderate application saves calories while improving color and flavor. For oil behavior and smoke points, see olive oil.
Expert Insight
After the par-bake, apply a second light spritz of oil to exposed crumbs to boost Maillard browning without adding excess fat. Use a convection setting if available to accelerate dry heat circulation and shorten bake time.
Layering and Sauce Pairings to Elevate Every Bite
Build the casserole with restraint: a thin base of tomato sauce, a single layer of baked eggplant, scattered mozzarella, and a light dusting of Parmesan. Avoid drowning the slices; excess sauce softens the breading and flattens texture in Eggplant Parmesan.
Choose a bright marinara that balances acidity and sweetness so the layers remain lively during the final bake. For style reference, consult marinara sauce.
Allow the assembled casserole to bake at moderate heat (about 375°F / 190°C) until cheese melts and edges bubble. Rest the dish 8–12 minutes before cutting so the layers set and slices hold their shape.
Pro-Caution
Prep, Timing and Yields
Prep Time: About 1 hour including salting and drying; active time is shorter. Accurate timing prevents a soggy crust and ensures consistent doneness for Eggplant Parmesan.
Cook Time: 30–40 minutes for slices plus a 20–25 minute final bake; yield typically serves six as a main course. Adjust slice thickness or oven temperature for smaller yields.
Ingredients (serves 6)
2 large globe eggplants, sliced to 1/2-inch rounds; 1 cup all-purpose flour; 3 large eggs, beaten. Coating: 2 cups panko breadcrumbs and 1 cup finely grated Parmigiano-Reggiano.
Seasoning: 1 tsp garlic powder, 1 tsp smoked paprika, 1 tsp dried oregano, and ½ tsp cracked black pepper. Finish with 2 cups fresh mozzarella, 3 cups marinara sauce, fresh basil, and olive oil for brushing.
Step-by-step Instructions
1. Lay slices on a rack and salt both sides. Rest 30–45 minutes, rinse, and pat dry to reduce bitterness and moisture for firmer crumb attachment.
2. Set up three stations: flour, beaten eggs, and seasoned panko-Parmesan. Dredge flour, dip in egg, then press into crumbs. Ensure even coverage and press gently so crumbs adhere without crushing the flesh.
3. Bake slices at 425°F/220°C on a wire rack for 12–15 minutes, flip, and bake another 10–12 minutes until golden. Lightly brush oil before the first bake and after flipping to improve color.
4. Assemble a thin layer of sauce in the dish, add half the slices, mozzarella, basil, and sauce; repeat. Top with Parmesan and a small drizzle of olive oil. Reduce oven to 375°F/190°C and bake 20–25 minutes uncovered until bubbly.
Tips for Success
Toast panko lightly in a dry skillet before mixing to increase crunch and add a nutty aroma. Maintain moderate oven heat and avoid overcrowding; slices should not touch for best airflow and browning.
Make ahead by breading and baking slices a day in advance; refrigerate and assemble the casserole just before the final bake. This approach saves service-day time while preserving texture when you briefly re-crisp the crust.
Serving Suggestions
Serve Eggplant Parmesan with a crisp green salad tossed in lemon vinaigrette or sautéed garlic spinach to cut through richness. Garnish with fresh basil and a final shower of finely grated Parmigiano-Reggiano for contrast and savory depth.
Pair the dish with a medium-bodied red wine or sparkling water with lemon to cleanse the palate between bites. For internal recipe cross-reference, see related Eggplant Parmesan recipes and an ingredient note at Parmigiano-Reggiano guide.
Nutrition and Variations
Estimated per serving: roughly 380 kcal with a balance of protein and carbohydrates from cheese and breadcrumbs. Monitor portion size to control calories and trim oil usage where possible to reduce fat content.
For variations, add part-skim ricotta between layers for creaminess or swap mozzarella with provolone or fontina for different melting profiles. Vegetarians and flexitarians will find this baked version hearty without deep-frying.
FAQ
What makes baked Eggplant Parmesan different from fried versions?
Baking replaces deep-frying, so the dish uses less oil and yields a cleaner mouthfeel. Proper breading and high-heat baking produce crispness similar to frying but with lower fat.
How do I achieve the crispiest breading in the oven?
Salt and dry the slices first, use panko mixed with grated hard cheese, and bake on a wire rack with light oil spritzing. High initial temperature helps the crumbs set quickly into a crunchy shell.
Can I prepare components ahead of time?
Yes. Bread and bake slices a day ahead, refrigerate, then assemble and complete the final bake before serving. This method maintains texture while saving active time on service day.
Which cheeses work best in this dish?
Mozzarella provides melt and stretch while Parmigiano-Reggiano adds savory umami. Provolone, fontina, or a ricotta layer will change creaminess and flavor complexity as desired.
How do I keep the dish flavorful while lightening it?
Focus on a quality marinara, fresh herbs, and restrained cheese portions. Baking instead of frying cuts oil; to reduce salt impact, adjust initial salting and use a low-sodium sauce.
See also: Eggplant Parmesan tag
See also: Eggplant Parmesan
]]>
- Glutamate underpins umami and increases as tomatoes ripen and cheese ages.
- Cooking technique—gentle simmering and proper grating—releases more free glutamate into sauces.
- Smart pairing (acid balance, aged cheese, optional anchovy) amplifies savory perception without extra salt.
- Make-ahead resting deepens flavor through molecular interactions; reheat gently for best results.
Prep and Cook Time
Prep: 15 minutes | Cook: 25 minutes | Total: 40 minutes. These timings assume peeled, chopped tomatoes and standard stovetop equipment.
Allow extra time if you choose to refrigerate the sauce overnight; resting concentrates flavor and eases seasoning adjustments. Plan a short cool-down before storing to preserve texture and aroma.
Yield
Serves 4 hearty portions. The recipe produces enough sauce for pasta or as a topping for vegetables and proteins.
Scale quantities linearly: double tomatoes and oil for 8 portions, or halve for two. Keep seasoning proportional to taste and ingredient maturity.
Difficulty Level
Medium. This recipe suits home cooks who want to apply basic technique to extract maximal umami.
It requires attention to heat control and timing rather than advanced skills. Follow the steps and taste as you go.
Ingredients
Use high-quality components to leverage natural glutamate: ripe tomatoes and an aged hard cheese deliver the biggest impact. I list optional ingredients to boost savoriness without overwhelming the sauce.
Substitutes matter: avoid mild cheeses or underripe tomatoes if your goal is concentrated umami. See the list and notes below for specifics.
- 5 lbs ripe plum tomatoes, peeled and chopped
- 3 tbsp extra-virgin olive oil
- 1 small onion, finely diced
- 3 cloves garlic, minced
- 1 tsp sea salt
- 1/2 tsp freshly cracked black pepper
- 1 tsp dried oregano
- 1/4 cup aged Parmesan cheese, grated (Parmigiano-Reggiano preferred)
- 1 tbsp anchovy paste (optional; adds free glutamates)
- Fresh basil leaves for garnish
- 1 tsp balsamic vinegar (to enhance umami depth)
Instructions
Follow these steps for a tomato-Parmesan sauce that showcases glutamate. Read all steps before starting so you manage timing and heat correctly.
Adjust anchovy paste quantity to taste; it dissolves into the sauce and amplifies savory notes without a fishy character when cooked briefly.
- Prepare the tomatoes: Score an X on each tomato base and blanch briefly in boiling water, then plunge into ice water. Peel, core, and chop finely; set aside.
- Sauté aromatics: Heat oil in a medium saucepan over medium heat. Add diced onion and cook until translucent, about 5 minutes, stirring frequently to avoid browning.
- Add garlic and anchovy paste: Stir in minced garlic and anchovy paste. Sauté 1–2 minutes until fragrant but not browned to avoid bitter notes.
- Simmer tomatoes and seasonings: Add chopped tomatoes, sea salt, black pepper, and oregano. Reduce heat to low and simmer gently for about 20 minutes, stirring occasionally.
- Enhance umami: Stir in balsamic vinegar and half the grated Parmesan so it melts into the sauce for balanced depth. Taste and adjust salt and acidity.
- Finish and serve: Spoon sauce over freshly cooked pasta, roasted vegetables, or grilled protein. Sprinkle remaining Parmesan and garnish with basil and a lemon zest twist if desired.
Instruction Notes
Use a gentle simmer to encourage cell breakdown in tomatoes; this releases free glutamate without reducing volatile aromatics excessively. Rapid boiling drives off moisture and can flatten flavor.
Grate Parmesan finely; smaller particles disperse and deliver immediate flavor to each bite. If you plan to reheat, stir in extra cheese at the end of reheating to refresh the umami intensity.
Tips for Success
Technique and ingredient choice influence perceived umami as much as the ingredients themselves. Apply these practical tips to get consistent results.
Taste at key points: after simmering, after adding Parmesan, and before serving. Small adjustments to acid or salt dramatically change savory balance.
- Use ripe tomatoes: Fully ripened tomatoes contain higher levels of free glutamate. Choose in-season or vine-ripe fruit for best results.
- Choose aged cheese: Parmigiano-Reggiano releases free glutamate during aging; use aged, hard cheese rather than young, mild varieties.
- Try anchovy paste judiciously: It melds into sauces to provide umami depth without overt fishiness when cooked briefly.
- Slow simmer: Gentle heat helps break down tomato structure and concentrate savory compounds while preserving freshness.
Expert Insight
A little patience improves flavor. Refrigerate the sauce and taste it cold the next day; you will notice deeper, more integrated savory notes after resting.
Pro-Caution
Serving Suggestions
This sauce performs well with long pasta shapes that catch sauce or as a topping for roasted vegetables and grilled chicken. Finish with fresh basil and a light drizzle of olive oil to lift flavors.
For a simple composed plate, toss al dente spaghetti with sauce, reserve a bowl for extra sauce, and dust with additional grated Parmesan. Pair with a crisp white wine if desired.
Science of Glutamate and Umami
Umami results from specific receptor activation on the tongue by free glutamate and certain nucleotides. That molecular interaction produces the characteristic savory, mouth-filling sensation.
Glutamate appears in higher concentrations in ripened tomatoes and aged cheeses because of enzymatic protein breakdown. This process frees amino acids that directly stimulate taste receptors.
Key Concepts and Evidence
Glutamic acid chemistry explains why certain foods taste especially savory. For background on the taste category, see umami on Wikipedia.
For the molecule itself and its biochemical role, consult glutamic acid on Wikipedia. Both pages summarize peer-reviewed findings and receptor biology clearly.
To understand ingredient-specific contexts, read about tomato ripening on Wikipedia and Parmigiano-Reggiano on Wikipedia for aging processes that concentrate free amino acids.
Nutrition Snapshot
The sauce provides moderate calories with a mix of carbohydrates, protein, and fat. Protein derives partially from the cheese; glutamate itself serves taste rather than nutrition at culinary levels.
Per serving estimates: ~210 kcal, 8 g protein, 12 g carbohydrates, 14 g fat. Adjust based on portion size and added ingredients like pasta or oil.
Internal Resources
For related techniques and deeper guides, consult our internal pages on sauce-building and ingredient science. These links lead to additional recipes and technical notes housed on this site.
Explore these two resources for more context: The Magic of Umami-Enhancing Sauces and How Aging Cheese Concentrates Flavor. Both pages expand on practical steps and kitchen science.
FAQ
What is umami and how does it differ from other tastes?
Umami is the savory taste linked to amino acids such as glutamate and nucleotides. It differs from sweet, salty, sour, and bitter by creating a long-lasting, mouth-filling impression rather than a single, sharp sensation.
For a technical overview of taste classification, refer to the Wikipedia article on umami.
How does cooking change glutamate levels in tomatoes?
Cooking concentrates free glutamate by breaking cell walls and reducing water content, which increases perceived umami. Gentle simmering releases glutamates while preserving volatile aromas that contribute to overall flavor.
Excessive heat and long high-temperature cooking can degrade volatile compounds, so balance time and temperature to maximize savory complexity.
Is Parmesan the best cheese for umami?
Aged, hard cheeses like Parmigiano-Reggiano rank high in free glutamate because proteolysis during aging liberates amino acids. These cheeses deliver potent umami without adding excessive moisture.
Use authentic aged cheeses when you want a concentrated savory boost; younger cheeses supply texture and creaminess but fewer free glutamates.
Are there health concerns with dietary glutamate?
Naturally occurring glutamate in foods differs from isolated additives in perception but not chemistry. In typical culinary amounts, dietary glutamate poses no special health risk for the general population.
For context on public discussions around additives, read the Wikipedia page on monosodium glutamate to understand differences between MSG and food-borne glutamate.
How can I maximize umami in my home cooking?
Combine high-glutamate ingredients (ripe tomatoes, aged cheese), use gentle heat to release free amino acids, and balance with acid or sweetness. Small amounts of anchovy or mushroom can boost savoriness without overpowering the dish.
Reserve finishing touches—freshly grated aged cheese and bright herbs—until the end to preserve aromatics while delivering umami to the palate.
Final Thoughts
Understanding glutamate gives you practical leverage: ingredient choice and technique determine how savory a dish will taste. Ripe tomatoes and aged Parmesan provide a reliable foundation for umami-rich sauces.
Apply these methods and internal references to refine your approach. Taste intentionally, adjust with acid or aged cheese, and allow brief resting time for flavors to marry before serving.
See also: umami
]]>