- Sugar syrup stabilizes and glosses whipped egg whites for reliable results.
- Temperature and timing determine whether you get silky Italian or airy Swiss meringue.
- Technique beats tricks: slow syrup addition and steady whipping prevent graininess.
- Adaptable: syrup works with aquafaba for vegan meringues.
Sugar syrup and meringue stability
Sugar syrup acts as a binding and protective agent for whipped egg whites. It coats protein strands and slows water migration, which reduces weeping and collapse.
The process relies on protein behavior and controlled sugar concentration. For technical background on the foam structure and proteins, see meringue and egg white.
Prep and Cook Time
Preparation and execution take roughly 30 minutes for Italian or Swiss-style meringue. Set up equipment before you heat the syrup to keep the process continuous and safe.
Typical timing breakdown: 10 minutes prep, 10 minutes for syrup to reach soft-ball stage, and 10 minutes to whip and cool the meringue. Use a candy thermometer to verify the syrup temperature precisely.
- Preparation: 10 minutes
- Cooking Sugar Syrup: 10 minutes
- Whipping and Assembly: 10 minutes
- Total Time: 30 minutes
Yield
This recipe yields about 4 cups of stable Swiss or Italian meringue suitable for frosting or piping. The final volume depends on egg white temperature and whipping vigor.
Adjust yield by scaling egg whites and syrup proportionally. Keep the water-to-sugar ratio consistent to maintain syrup concentration and final texture.
Difficulty Level
Skill level: Medium. The method requires accurate temperature control and steady timing. With practice, the technique becomes reliable.
Expect a learning curve mainly around syrup stage recognition and slow incorporation into whipped whites. A candy thermometer reduces guesswork and improves repeatability.
Ingredients
Keep ingredients simple and precise. Use room-temperature egg whites for better volume and a measured sugar-to-water ratio for consistent syrup behavior.
If you want a vegan option, aquafaba performs similarly; read about its properties at aquafaba. Below are the standard ingredients for a classic Italian meringue.
- 4 large egg whites, at room temperature
- 1 cup granulated sugar
- 1/4 cup water
- 1/4 teaspoon cream of tartar or a few drops of lemon juice (optional)
- 1 teaspoon vanilla extract (optional)
Instructions
Clear sequencing keeps the whites stable and prevents grainy meringue. Prepare bowls, beaters, and thermometer before you start to maintain tempo.
Follow these steps precisely for best texture: heat syrup to soft-ball stage, whip whites to near-stiff peaks, then drizzle syrup slowly while whipping continuously.
Sugar syrup stages
Combine sugar and water in a deep saucepan and dissolve over medium heat. Bring the syrup to the soft-ball stage, about 235–240°F (113–116°C), verified by a candy thermometer or calibrated experience.
Avoid stirring once boiling begins to prevent premature crystallization. Keep the syrup hot and fluid until you begin to pour it into the whites to ensure smooth integration.
Whipping technique
Start whipping egg whites with cream of tartar on medium speed until soft peaks form. This gives the foam structure needed to absorb hot syrup without collapsing.
With the mixer running at medium, drizzle the hot syrup in a thin, steady stream into the whites. After all syrup is added, increase speed to high and beat until the bowl feels cool and the meringue is glossy and forms stiff peaks.
Tips for Success
Small details make a big difference: clean bowls, room-temperature whites, and a steady hand for pouring the syrup. Each factor affects final stability and mouthfeel.
If the meringue looks grainy, return it to the mixer over a warm water bath and whisk gently to re-emulsify. For scientific context on protein behavior, consult protein denaturation.
- Use a clean, grease-free bowl and beaters; fat kills volume.
- Room-temperature egg whites trap air more efficiently.
- A candy thermometer ensures the correct syrup temperature to avoid graininess.
- Pour syrup slowly to avoid deflating the foam.
- For humid conditions, a tablespoon of corn syrup or cream of tartar increases resilience.
 Expert Insight
Rest a minute after the tip and then continue whipping to cool the meringue. Cooling while whipping locks the structure and avoids overcooking pockets of egg.
 Pro-Caution
Serving Suggestions
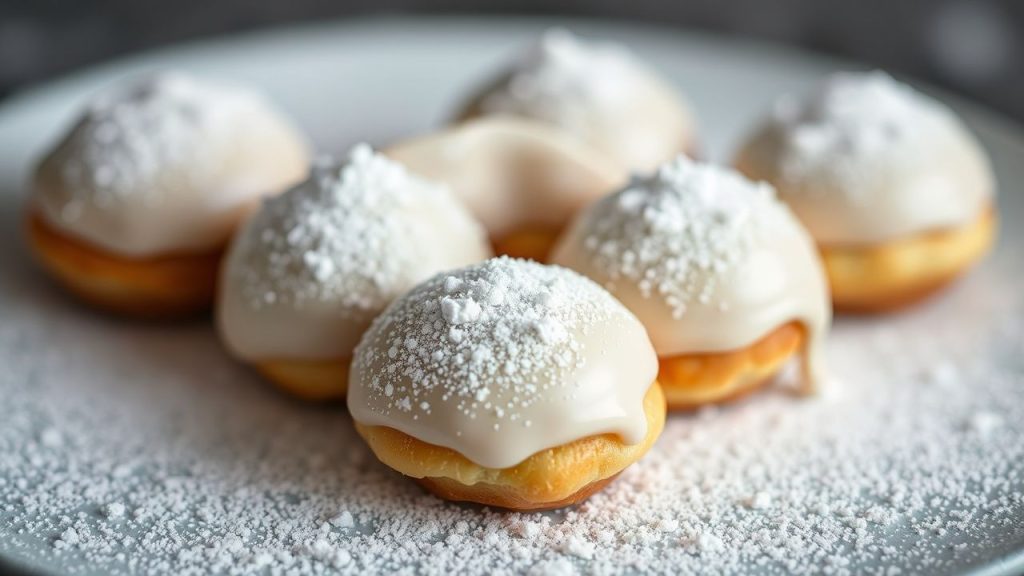
Use this meringue to frost cakes, pipe kisses, or top pies. It holds shape well and browns nicely with a quick torch pass for texture contrast.
Try it on a classic lemon meringue pie or experiment with variations; see ideas at classic lemon meringue pie and meringue variations. Garnishes like toasted nuts or fresh berries add flavor balance.
| Nutrient | Per 1/2 cup |
|---|---|
| Calories | 130 |
| Protein | 3g |
| Carbohydrates | 33g |
| Fat | 0g |

FAQ
What exactly is sugar syrup for meringue?
Sugar syrup is a concentrated solution of sugar and water heated to a precise stage. It integrates into whipped whites to stabilize the foam and provide a glossy finish.
The liquid form prevents graininess and locks in air bubbles by coating proteins and slowing moisture movement.
Why must the syrup reach soft-ball stage?
The soft-ball stage (about 235–240°F / 113–116°C) achieves the right sugar concentration and viscosity. At this point, syrup blends smoothly into the foam without crystallizing.
If the syrup falls short of that temperature, it may leave a grainy texture; if it exceeds that range, it risks becoming too thick and difficult to combine.
Can I use different sugars for syrup?
Yes. Granulated white sugar is standard, but caster or superfine sugar dissolves faster. Brown sugar will add flavor and color but requires temperature adjustments for the same behavior.
Whatever sugar you choose, keep water ratios and final temperature consistent to preserve the meringue’s structure.
How do I fix grainy or separated meringue?
If the meringue separates or looks grainy, gently rewarm the mixture over a double boiler while whisking. This helps dissolve sugar crystals and re-emulsify the foam.
After smoothing, return the bowl to the mixer and whip to cool and firm the meringue again.
Is there a vegan alternative using the same technique?
Yes: aquafaba (the liquid from cooked chickpeas) mimics egg white behavior and accepts hot sugar syrup similarly. Treat its whipping and syrup incorporation like egg whites for consistent results.
For more on aquafaba properties, review the overview at aquafaba.
Mastering sugar syrup techniques turns a fragile foam into a dependable pastry component. Focus on temperature control, steady syrup addition, and clean equipment to produce glossy, stable meringue every time.
See also: Sugar syrup
]]>
- Steam is the leavening agent: water content and oven heat control rise.
- Starch gelatinization builds structure: the panade step matters.
- Eggs tune texture: protein and moisture determine pipeability and hold.
- Consistent technique yields repeatable results.
Understanding the Chemistry of Choux Dough for Flawless Texture
The classic pâte à choux creates its lift with steam rather than chemical leaveners. A cooked dough called a panade traps moisture; when heated in the oven, that moisture flashes to steam and expands the matrix, forming a hollow interior.
Starch gelatinization during the stovetop cook step sets the structure so the dough expands without collapsing. Read more about starch gelatinization on Wikipedia: Starch gelatinization.
Gluten plays a controlled role. We do not develop a strong gluten web as with bread; instead, limited protein alignment gives elasticity for puffing while remaining tender. For background see Wikipedia: Gluten.
Eggs supply liquid, fat, and protein that both strengthen and plasticize the dough. The balance between liquid and egg proteins dictates whether the dough is pipeable and whether it holds shape in the oven. See Wikipedia: Egg (food).
Ingredients, Yield and Equipment
Use precise measures. A kitchen scale beats volume cups for repeatability. Standard proportions are about equal parts water and flour by weight once accounting for butter and eggs.
Yield: approximately 24 medium choux buns. Equipment: saucepan, wooden spoon, piping bag with large tip, baking sheets, and a wire rack. For pastry technique context, review Wikipedia: Pâte à choux.
Prep and Cook Time
Preparation: 20 minutes. Use room-temperature eggs for easier incorporation.
Cooking (stovetop + baking): 40 minutes. Bake on middle rack for consistent heat exposure.
Yield
Approximately 24 medium-sized choux buns. Adjust piping size to vary counts.
Difficulty Level
Intermediate. Basic pastry experience helps, but methodical technique yields excellent results for precise bakers.
Ingredients
- 1 cup water, preferably filtered
- 8 tbsp (113g) unsalted butter, cut into cubes
- 1/2 tsp fine sea salt
- 1 tbsp granulated sugar (optional for sweeter dough)
- 1 cup all-purpose flour, sifted
- 4 large eggs, at room temperature
Step-by-Step Technique (Precise Method)
1. Preheat the oven to 400°F (200°C). Prepare two baking sheets with parchment or silicone mats.
2. Combine water, butter, salt, and sugar in a medium saucepan over medium-high heat. Heat to a rolling boil while stirring so the butter fully melts and the mixture is homogeneous.
3. Remove the pan from heat and add all the sifted flour in one motion. Stir vigorously with a wooden spoon until a smooth ball forms and the dough pulls away from the pan sides, about 1–2 minutes.
4. Return pan to low heat for 1–2 minutes while stirring constantly to evaporate surface moisture. This drying step controls the final water available to generate steam.
5. Transfer the panade to a mixer bowl or large mixing bowl. Let cool 3–5 minutes. Cooling prevents premature cooking of eggs when they are added.
6. Add eggs one at a time, beating after each addition. The dough becomes glossy and ribbon-like when properly hydrated. Stop when the batter falls from a spoon in a thick ribbon.
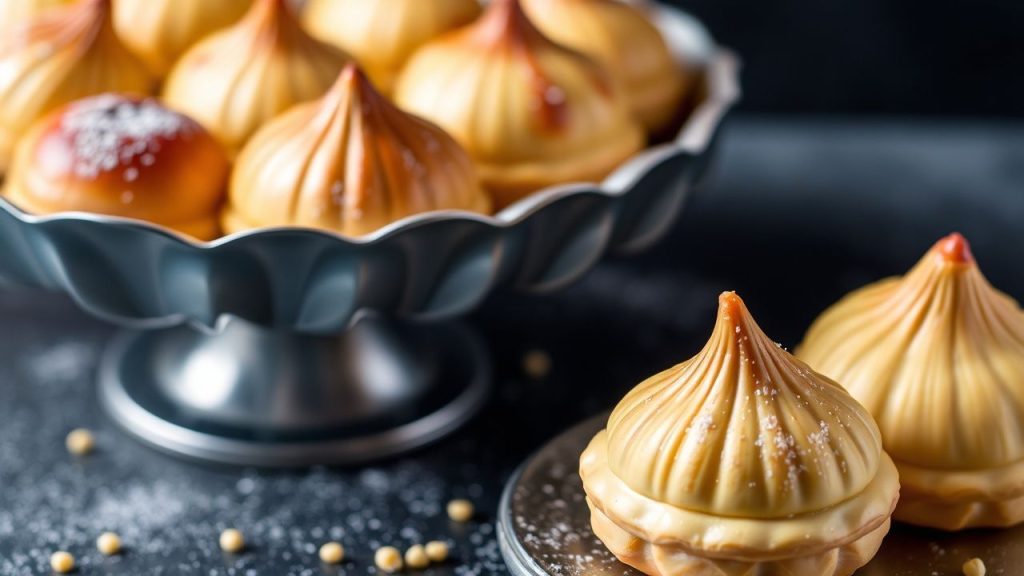
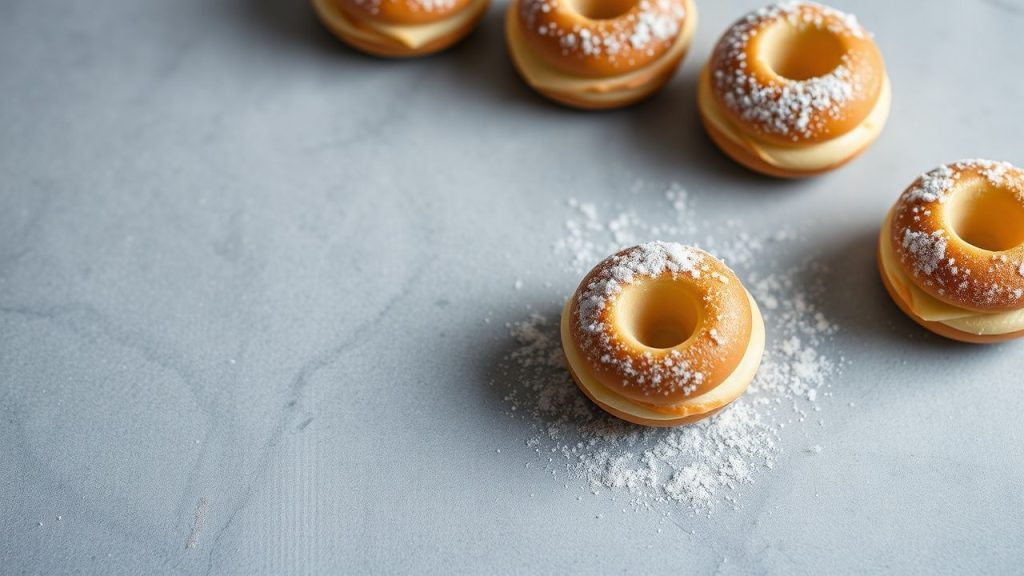
7. Fit a piping bag with a large round or star tip. Pipe 1.5-inch mounds spaced 2 inches apart. Smooth peaks if necessary with a wet fingertip to reduce cracking.
8. Mist the tops lightly with water or brush gently to remove dry flour. This small surface moisture reduces top splits and yields a smoother shell.
9. Bake at 400°F for 15 minutes, then lower to 350°F (175°C) and bake 20–25 minutes until shells are deeply golden and crisp. Do not open the oven early.
10. Cool on a wire rack. Cooling preserves the hollow interior and keeps shells crisp.
Common Problems and Troubleshooting
Flat or collapsed choux usually result from low initial oven temperature or undercooked panade. Ensure the panade reached a smooth ball and that you used the correct oven sequence.
Cracked tops occur when the dough surface dries before rising. Brushing or misting the tops and avoiding excess flour on the surface minimizes cracking.
Dense, heavy shells typically mean too little egg or overcooked panade. Remember: eggs add steam potential and elasticity; add them gradually until the ribbon stage.
Pro-Caution
Practice builds feel. Use a kitchen scale and keep notes on oven idiosyncrasies to refine timing and temperatures for your equipment.
Expert Insight
Spacing matters. Give shells room to expand so hot air circulates evenly and the steam can inflate the dough without crowding.
Tips for Success: Unlocking the Secrets to a Perfect Rise and Crispness
Temperature control: A high initial oven temperature creates rapid steam formation. The follow-up lower temperature dries the shell and sets structure.
Moisture balance: The stovetop drying step controls the water available for steam. Over-drying yields a stiff dough; under-drying produces greasy or heavy results.
Egg integration: Beat eggs in slowly and observe texture. The proper consistency falls in a thick ribbon; it should not be runny or rock-solid.
Piping precision: Consistent pressure and removing air from the bag produce uniform puffs and reduce misshapen shells.
Serving Suggestions and Internal Resources
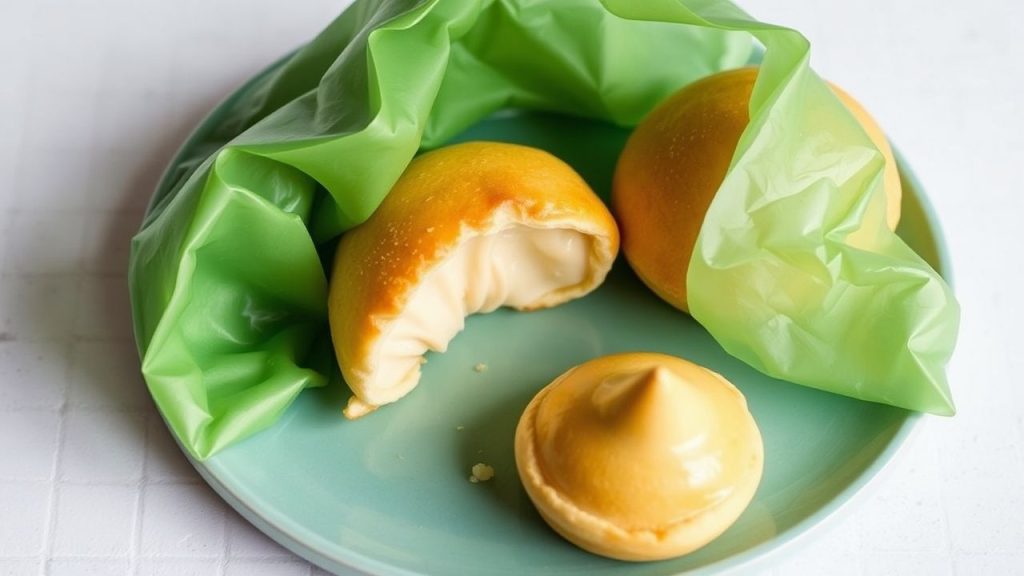
Choux shells work for both sweet and savory fillings. Classic options include vanilla pastry cream or flavored pastry creams and savory mousses with herbs or smoked fish.
For guidance on flour choices and how protein content affects texture, review our internal resource: Baking Flour Guide: Which Fits Your Pastry Best?. For ideas on fillings and plating, visit Choux Filling Ideas for curated recipes and pairing notes.
Garnish with powdered sugar, tempered ganache, or microgreens for savory versions. Pair with tea or a light sparkling beverage to contrast textures and flavors.
Nutritional Snapshot
One medium choux shell: approximately 95 kcal, 3 g protein, 12 g carbohydrates, and 3.5 g fat. Use this as a guideline; actual values vary with filling choice and portion size.
| Nutritional Value (per choux) | Calories | Protein | Carbs | Fat |
|---|---|---|---|---|
| One medium choux shell | 95 kcal | 3g | 12g | 3.5g |
FAQ
What makes choux pastry unique compared to other pastries?
Choux relies on steam for lift rather than chemical leaveners or laminated fat layers. The cooked dough traps moisture that vaporizes in the oven, inflating shells to produce a hollow center ideal for fillings.
Why is the stovetop cooking step essential?
Cooking flour with water and fat gelatinizes starches and removes excess surface moisture. This creates a cohesive panade that can trap air and steam during baking. Skipping this step prevents proper structure formation.
How do I know when eggs are fully incorporated?
The dough should look glossy and fall in a thick ribbon from the spoon or mixer paddle. If the batter sits in a mound that slowly levels, you have the correct consistency.
Why do my shells collapse after baking?
Collapsing indicates too little structure or a sudden steam loss. Common causes: insufficient panade cook, underbaked interior, or opening the oven during the critical set phase. Maintain oven temperatures and avoid early door opening.
Can I freeze choux shells?
Yes. Freeze fully cooled, unfilled shells in an airtight container. Re-crisp in a 300°F oven for 5–8 minutes before filling to restore texture.
Final Notes
Mastery comes from precise technique and observation. Track weights, oven behavior, and small timing changes to convert one-off successes into routine results.
Choux pastry rewards methodical practice. Follow the sequence here, respect moisture and temperature, and you will produce reliably hollow, crisp shells for both classic and creative fillings.
See also: Choux pastry
]]>
- Steam-driven rise: Choux puffs through trapped moisture, not chemical leaveners.
- Stove drying matters: Brief heat after adding flour sets structure before eggs arrive.
- Egg control: Add eggs slowly to reach a glossy, pipeable consistency.
Foundations: What Is Choux?
Choux, or pâte à choux, differs from laminated or enriched doughs. It relies on high internal moisture that converts to steam and inflates the dough during baking.
Unlike puff pastry, which uses layers of butter and folding, choux forms from a cooked paste of water, fat, and flour. That hot paste accepts eggs to create extensibility and structure for the steam to work against.
Prep and Cook Time
Preparation: 15 minutes. Cooking: 30 minutes. Total: 45 minutes.
These time blocks assume piped mounds baked on a preheated sheet and a single-batch workflow. Allow extra minutes for cooling and filling if you plan to assemble plated desserts.
Yield and Difficulty
Yield typically reaches about 20 medium-sized choux buns from the recipe below. Yield varies with piping size and moisture in the dough.
Difficulty rates as medium: execution requires attention to heat, dough texture, and oven behavior. Beginners succeed faster when they follow measured steps and practice a couple of times.
Ingredients and Why They Matter
Use precise measurements for water, butter, flour, salt, and eggs. Each ingredient performs a clear function: water provides steam, butter adds fat and flavor, flour builds structure, and eggs give moisture and elasticity.
Choose all-purpose flour for a balance between protein and tenderness. High-protein flours can tighten the crumb and inhibit expansion, while very low-protein flours undermine structure.
Recipe: Classic Choux Pastry
Ingredients:
- 1 cup water
- 8 tablespoons unsalted butter (1 stick), cut into cubes
- 1/2 teaspoon salt
- 1 cup all-purpose flour, sifted
- 4 large eggs, room temperature
- 1 tablespoon granulated sugar (optional)
This quantity delivers about 20 medium puffs. Scale proportionally for larger batches and weigh ingredients for repeatable results.
Step-by-Step Instructions
Preheat your oven to 400°F (200°C) and place the oven rack in the center for even heat. Line baking sheets with parchment and fit a piping bag with the tip of your choice.
Combine water, butter, salt, and sugar in a medium saucepan. Bring to a gentle boil, stirring until the butter melts and the mixture becomes uniform.
Remove from heat and add all sifted flour at once. Stir vigorously with a wooden spoon until a smooth paste forms and pulls away cleanly from the pan sides. This step gelatinizes starch and concentrates moisture.
Return the pan to low heat and stir the dough for 1–2 minutes to dry it slightly. Transfer to a mixing bowl and cool for 3–5 minutes until warm to the touch but not hot.
Add eggs one at a time, beating after each addition until the mixture becomes glossy and holds shape on a spoon. The final dough should be pipeable but thick enough to mound without collapsing.
Pipe mounds two inches apart on prepared sheets. Bake at 400°F for 10 minutes to trigger rapid steam expansion, then reduce to 350°F (175°C) and bake 20 more minutes until golden, puffed, and dry to the touch.
Switch off the oven, open the door slightly, and let choux rest inside for 10 minutes. This slow cooling completes the internal drying and reduces the risk of collapse.
Tips for Consistent Success
Flour choice: Use all-purpose flour for consistent gluten and structure. Weigh your flour to avoid dense results caused by scooping.
Egg temperature: Room-temperature eggs blend more uniformly and yield a smooth, glossy paste. Cold eggs can slow incorporation or curdle the mix.
Drying the dough on the stovetop makes the difference between hollow, stable shells and dense puffs. The brief reheating expels free water that would otherwise steam too aggressively.
Baking temperature control: Start hot to create rapid expansion, then lower to finish cooking without excessive coloration. Avoid opening the oven during that first rise window.
[p class=”callout”]
Expert InsightFor make-ahead convenience, bake shells fully, cool, and freeze on a tray before bagging. Reheat in a 350°F oven for 5–7 minutes before filling to refresh crispness.
Pro-CautionCreative Filling Ideas and Flavor Pairings
Classic fillings include vanilla pastry cream or chocolate ganache. For contrast, try citrus curds, salted caramel, or flavored whipped creams for seasonal variations.
Savory options transform choux into appetizers. Fill shells with herbed cheese mousses, smoked salmon rillettes, or warm mushroom duxelles paired with grated aged cheese.
Use garnish sparingly: a dusting of powdered sugar, a thin chocolate glaze, or micro-herbs can elevate presentation without masking texture.
Storing, Reheating, and Serving
Store unfilled choux in an airtight container at room temperature for up to 48 hours. Filled shells keep best refrigerated and should be consumed within 24 hours to preserve crispness.
To re-crisp frozen shells, warm briefly in a preheated oven rather than using a microwave. Pipe or spoon fillings just before serving to retain the contrast between crisp exterior and creamy interior.
Related Techniques and Further Reading
Choux knowledge pairs well with laminated and enriched dough skills. Explore complementary skills like puff pastry folding in our puff pastry techniques guide to broaden plated dessert options.
For foundational skill-building, review basics in heat control, egg handling, and mise en place at our baking basics resource. Reinforce theory with practice: precise timing and small test bakes speed mastery.
Science Behind the Rise
Steam powers the choux rise: water in the dough vaporizes and expands rapidly, creating internal pressure that inflates the shell. The gelatinized starch structure sets around the steam to hold shape.
For technical context, compare choux mechanics to simple steam expansion described on Steam. This physical process explains why controlling free moisture and oven temperature matters.
Visual Guide and Nutrition
Photographs of the baked shells help diagnose issues like underbaked centers or collapsed crowns. Visual checks remain a quick tool alongside thermometers and texture tests.
A typical medium choux contains about 95 calories with modest protein and fat levels, making it a light vessel for richer fillings. Balance portion size and filling richness for menu planning.
FAQ
What is the difference between choux and puff pastry?
Choux forms from a cooked paste and rises through steam rather than layered lift. Puff pastry relies on alternating layers of dough and butter that separate into flakes when baked.
Both produce light textures but through distinct mechanical and structural pathways. Choose choux for hollow shells and puff pastry for flaky layers.
Why did my choux collapse after baking?
Collapse usually results from excessive internal moisture or premature cooling. Ensure you dry the dough on the stovetop, finish cooking in the oven until dry, and allow gradual cooling with the door ajar.
Also verify oven accuracy; low temperature can prevent the structure from setting before steam dissipates.
Can I make choux gluten-free?
Gluten-free choux requires flours that mimic wheat starch behavior, usually a blend with tapioca, rice flour, and a binding agent. Expect different textures and adjust hydration and drying times experimentally.
Work in small test batches and document changes to egg volume or oven time to dial in a reliable method for alternative flours.
How do I store filled choux to preserve texture?
Fill choux just before serving whenever possible. If you must prefill, use a sealed container, refrigerate, and consume within 24 hours to keep the shell from softening excessively.
Re-crisp by draining excess moisture from fillings and reheating briefly in an oven rather than a microwave.
Where can I read more on classic choux recipes and history?
Read the pastry entry on Éclair and the profiterole overview at Profiterole for historical context and variations across cultures.
Combine these readings with hands-on practice, and consult technical baking texts when converting recipes by weight for consistent, professional results.
See also: Choux pastry
]]>