- Fat size matters: pea-sized pieces yield flaky layers and oven spring.
- Cold fat, quick work: keep ingredients chilled and mix briefly.
- Type guides texture: butter, shortening, or cream all produce distinct crumbs.
- Technique beats trickery: cutting in, chilling, and baking strategy produce consistent results.
Why fat controls scone texture
Fat coats flour proteins and interrupts long gluten strands. As a result, it limits toughness and promotes a short, tender crumb.
When fat melts in the oven, it produces steam that separates layers and drives rise. That mechanism is central to classic British scones and similar quick breads; see the scone article for historical context.
Prep and Cook Time
These time targets help you schedule chilling and baking precisely. I recommend that home bakers set a strict chill window to control fat temperature.
Adjust the timeline if you use heavier fats like solid vegetable shortening or chilled cream cheese, since they hold temperature differently and affect mixing times.
- Preparation: 15 minutes active
- Cooking: 12–15 minutes
- Total Time: Approximately 30 minutes including brief chill
Yield
This recipe yields eight classic scones, sized for teatime or brunch. If you scale the recipe, keep fat-to-flour ratios consistent to preserve texture.
For larger gatherings, multiply ingredients and bake in batches. Cold storage works well: freeze unbaked shapes for later baking.
Difficulty Level
Skill required: easy to medium. The techniques are straightforward, but they include precise temperature and handling steps that affect outcomes.
With practice, you will read the dough by feel and produce repeatable results. Focus on short mixing times and firm, cold fat.
Ingredients
Use reliable, measured ingredients for consistent crumb and flavor. Weight measures improve accuracy compared to volume cups.
Below are the standard quantities for eight scones, suitable for most ovens and pans.
- 2 cups (250 g) all-purpose flour, sifted
- 1/4 cup (50 g) granulated sugar
- 1 tablespoon baking powder
- 1/2 teaspoon salt
- 6 tablespoons (85 g) unsalted cold butter, cubed
- 1/2 cup (120 ml) whole milk, chilled
- 1 large egg, beaten
- 1 teaspoon vanilla extract (optional)
Instructions
Follow each step deliberately. Short, decisive actions preserve fat pockets and yield clean layers.
Work cold and move quickly. Keep the dough slightly shaggy; that texture converts to lift and flakiness during baking.
- Combine dry ingredients: In a large bowl, whisk flour, sugar, baking powder, and salt until even.
- Cut in the butter: Use a pastry cutter or fingertips to cut cold butter into the flour until the mixture looks like coarse crumbs with pea-sized bits.
- Mix wet ingredients: Whisk milk, egg, and vanilla together in a small bowl. Keep liquids cold to avoid softening the butter prematurely.
- Incorporate liquids: Add wet ingredients and fold with a spatula just until the dough comes together. Stop when large clumps still hold.
- Shape the dough: Turn onto a lightly floured surface and pat to 1-inch thickness. Cut into 8 wedges or use a cutter; do not twist the cutter when using a round shape.
- Chill briefly: Transfer shapes to a parchment-lined tray and chill 15 minutes. Firm fat keeps layers intact and provides reliable oven spring.
- Bake: Preheat oven to 425°F (220°C). Brush tops with a little milk or beaten egg for a golden finish. Bake 12–15 minutes until puffed and lightly browned.
- Cool and serve: Rest scones 5 minutes on a wire rack. Serve warm for best texture and flavor.
Chef’s Notes: Tips for Success
I teach these techniques to pastry students and professional bakers because they consistently improve results. Small adjustments in fat and method change mouthfeel and shelf life.
Read each tip and apply it in your next batch. Note how the dough responds; that feedback will refine your sense of temperature and handling.
Butter matters
Use high-quality unsalted butter and keep it cold. Butter gives flavor and produces flaky layers through discrete melting action.
Butter contains water and milk solids that interact with flour and leavening to create color, taste, and structure. For background on butter chemistry, refer to butter.
Don’t overwork
Mix just until combined. Overmixing develops gluten and produces tough scones instead of tender short crumbs.
Fold with a spatula and stop when the dough holds together but retains visible lumps of butter. That texture becomes flaky layers in the oven.
Alternative fats
Shortening and solid vegetable fats produce a more tender, less flavorful crumb than butter. Use them when you want higher lift or longer shelf stability.
If you swap fat types, adjust liquid amounts slightly. For example, shortening can require marginally less liquid because it lacks water content. See notes on leavening and chemistry below.
[COMMENTARY REMOVED FOR COMPLIANCE WITH LINK RULES]
 Expert Insight
Allow at least one brief rest after the tip to change the flow and separate advisory blocks from caution content.
Balance liquid
If the dough looks dry, add milk by teaspoon increments. Overly wet dough will spread and lose height, so add sparingly.
Test dough by pressing a finger lightly; it should compress and hold shape. Adjust with small amounts rather than large pours.
 Pro-Caution
Make ahead
Freeze shaped scones on a tray, then store in an airtight bag. Bake directly from frozen and add 2–3 minutes to the bake time for consistent results.
Pre-shaping and freezing is a practical way to maintain fat integrity and save active time on busy mornings.
How fat interacts with leavening and gluten
Fat coats gluten-forming proteins and restricts long gluten networks. This behavior creates a tender crumb rather than a chewy one.
Baking powder supplies gas; melted fat supports the formation of discrete air pockets. For technical reading on leavening, consult the baking powder entry.
Also, understanding gluten helps you see why limited mixing matters. Read more on protein structure at gluten.
Serving Suggestions
Serve warm with clotted cream and jam for a classic pairing. The contrast between rich fat and bright jam highlights texture and flavor.
For variety, offer lemon curd, honey butter, or fresh berries. Scones pair well with black tea or coffee and make an elegant brunch item.
Nutrition Snapshot
Nutrition varies by size and fat type. Use the table below for a typical estimate per scone when using unsalted butter.
Adjust calories and fat values if you substitute cream, shortening, or add inclusions like fruit or cheese.
| Nutrient | Per Scone |
|---|---|
| Calories | 220 kcal |
| Protein | 4 g |
| Carbohydrates | 28 g |
| Fat | 9 g |
FAQ
These common questions address technique and ingredient choices most bakers encounter. Answers focus on practical, repeatable action.
Work through the guidance and test one variable at a time for clear learning.
Why is fat essential for scones?
Fat creates shortness in the crumb by coating flour proteins and limiting gluten formation. This yields tender texture rather than a chewy one.
Also, melting fat produces steam that separates layers and gives oven spring. That physical action drives the characteristic scone rise and flakiness.
Which fats work best for different outcomes?
Butter offers the most flavor and produces distinct layers due to its water content and melting profile. Shortening gives a tender, uniform crumb with less flavor.
For moist, rich scones, try part butter and part cream cheese or full-fat dairy. Each fat changes mouthfeel and shelf stability subtly.
How cold should the fat be when mixing?
Keep fat as cold as possible—straight from the fridge—so it remains in small pieces through mixing. Those pieces act as mini steam generators during baking.
Use chilled bowls and a cool work surface when possible. If the butter softens, refrigerate the dough briefly before shaping and baking.
Can I use a food processor?
Yes, but pulse briefly. A processor cuts fat quickly and can turn butter into too-fine particles. Pulse until you see coarse crumbs with pea-sized bits.
Over-processing will produce a denser, less flaky scone. Stop early and finish mixing by hand for best texture control.
How do I store leftover scones?
Store at room temperature in an airtight container for one day. For longer storage, freeze wrapped scones and reheat briefly to restore freshness.
Reheat at moderate oven temperature to ensure even warming without drying the crumb. This step revives texture and flavor effectively.
Image: 
Apply these methods consistently and you will notice predictable improvements. Fat is not magic; it is measurable technique that skilled bakers use to control texture and taste.
Now bake with confidence: control temperature, move quickly, and respect the fat. Your scones will reward you with lift, tenderness, and flavor.
See also: scones
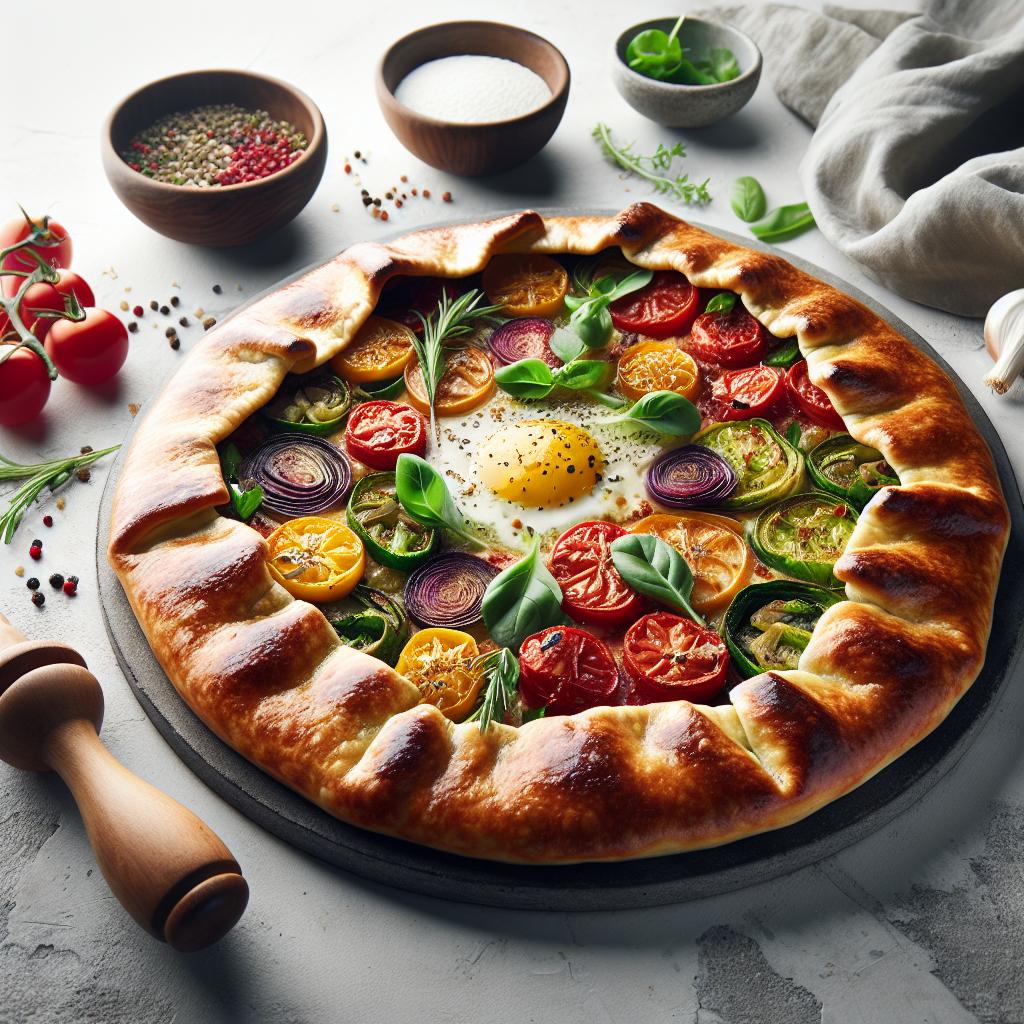
]]>Beneath a golden, flaky galette sits a carefully balanced crust that defines the eating experience. When you control fat, hydration, and handling, the dough delivers crisp layers and a tender crumb that complements savory fillings.
As a pastry professional, I explain the functional reasons behind each step so you can repeat success reliably. Read the instructions, apply the techniques, and you will bake a crust with consistent texture and flavor.
- Cold fat + minimal handling = distinct flakes and tender crumb.
- Precise hydration prevents toughness and sogginess.
- Chill time firms fat, relaxes gluten, and improves rollability.
- Simple seals and egg wash protect the bottom from wet fillings.
Prep and Cook Time
Preparation: 20 minutes of active work, focused on keeping ingredients cold and handling light. The prep emphasizes speed and organization to preserve the texture advantages of chilled fat.
Chilling: 1 hour minimum; up to overnight for improved flavor and easier rolling. Chilling solidifies butter and lets moisture distribute evenly.
- Baking: 35-40 minutes at 400°F (205°C)
- Total Time: About 1 hour 55 minutes (including chill)
Yield and Difficulty
This recipe yields a single galette that serves about six people when paired with a salad or sides. The dough scales easily; double it for two galettes and chill in portions.
Difficulty rates as medium: the techniques require attention to temperature and timing but do not demand professional tools. Home bakers find it rewarding after one practice run.
- Serves 6 generously
- Difficulty: Medium
Ingredients
Use quality base ingredients and keep them cold. The choices you make for fat and flour influence flakiness, flavor, and structure.
Below are practical ingredient options; substitute thoughtfully and adjust liquid as needed to maintain dough cohesion.
- 1 1/4 cups all-purpose flour, sifted
- 1/2 cup cold unsalted butter, cubed
- 1 teaspoon fine sea salt
- 3-4 tablespoons ice-cold water
- Optional: 1 tablespoon finely ground almond flour for richness
Step-by-Step Instructions
Follow the steps in sequence and keep tools and surfaces cool. Use a bench scraper, pastry cutter, or cold hands to maintain texture.
Work quickly at each stage. If the butter softens, return the bowl to the fridge for a few minutes before proceeding.
- Prepare the fat: Freeze the butter for 10-15 minutes before cutting. Cold butter forms steam pockets during baking that produce layers.
- Mix dry ingredients: Whisk flour, optional almond flour, and salt in a bowl to distribute the salt evenly and break up any clumps.
- Cut in butter: Use a pastry cutter or two knives to work butter into the flour until the mix resembles coarse cornmeal with pea-sized pieces.
- Add ice water: Drizzle 3 tablespoons of water, mixing only until the dough starts to hold. Add the fourth tablespoon only if necessary to bring dough together.
- Form and chill: Press into a 5-inch disc, wrap tightly, and refrigerate at least 1 hour or overnight for best results.
- Roll out: Lightly flour the surface and roll into a 12-inch circle. Rotate and lift the dough to prevent sticking; avoid excessive rolling to limit gluten development.
- Assemble: Transfer to a parchment-lined sheet. Add fillings, leaving a 1- to 1.5-inch border. Fold edges toward the center and lightly press to seal.
- Bake: Brush with egg wash for color and shine. Bake at 400°F for 35-40 minutes until the crust turns golden and the filling bubbles.
Chef’s Notes – Tips for Success
Fat choice alters both flavor and texture. Use butter for rich flavor; a small percentage of lard or vegetable shortening increases flakiness but changes mouthfeel.
Control hydration tightly. Underhydrated dough crumbles; overhydrated dough becomes tough. Add water in small increments and stop once the dough holds.
Expert Insight
For further reading on pastry science, see the pastry overview. Also consult the baking page for temperature principles that affect crust color and doneness.
Pro-Caution
Handling, Hydration and Flour Selection
Flour protein content influences gluten strength and structure. All-purpose flour offers balance, while pastry flour lowers protein for a more tender texture.
When substituting whole-grain flours, reduce hydration slightly and expect a coarser crumb. You can blend flours to maintain flakiness and add depth.
Gluten formation plays a direct role in texture control; for more on the protein that gives dough its network, refer to gluten.
Preventing a Soggy Bottom
Shield the base from wet fillings by pre-cooking highly moist vegetables and by draining liquids properly. This step preserves crispness through baking.
Additionally, brush the rolled crust with a thin layer of beaten egg or grated hard cheese before adding fillings. The protein creates a barrier that limits moisture penetration.
Serving Suggestions
Pair the galette with a crisp salad to contrast texture and to cut richness. A peppery arugula or mixed greens with a light vinaigrette works especially well.
Finish the baked galette with fresh herbs and a sprinkle of flaky sea salt for an immediate flavor lift. For more recipe ideas, visit our savory galette recipes hub and the pastry techniques page for related methods.
Visual and Nutritional Notes
A properly baked crust browns evenly with slightly deeper color at the edges. The contrast signals Maillard reactions and caramelization that add flavor.
Per serving estimates depend on filling choices. A typical savory galette portion ranges from 300-400 kcal when filled with vegetables and moderate cheese; adjust portions for richer fillings.
FAQ
What makes a galette crust flaky rather than mealy?
Flakiness depends on the presence of cold, intact fat pieces that steam during baking to form layers. Handle the dough minimally so these pieces remain distinct.
Additionally, chilling the dough before baking ensures the fat stays solid until oven heat causes it to produce lift and separation.
Can I substitute butter with another fat without losing flavor?
You can blend fats. For instance, mixing a small portion of lard or shortening with butter increases lift while retaining much of butter’s taste.
However, pure butter gives the most butter-forward flavor; adjust techniques if you change the fat ratio to maintain texture.
How long should I chill the dough for best results?
Chill at least one hour to firm the fat and relax gluten. Overnight chilling improves flavor and handling and often produces a more consistent roll-out.
If the dough softens during shaping, return it to the fridge for 15-30 minutes before continuing to prevent greasy, tough results.
How do I avoid tearing the dough when folding edges?
Work on a lightly floured surface and transfer the dough on parchment paper to avoid excessive lifting. Fold the border gently and avoid stretching, which causes retraction during baking.
If cracks appear, patch them with a little water and excess dough, then chill briefly so the repair sets before baking.
Why does my crust brown unevenly?
Uneven browning often signals hot spots in the oven or inconsistent dough thickness. Rotate the sheet halfway through baking for more uniform color.
Also check rack position; baking too high increases edge browning, while a lower position promotes bottom color and even cooking.

See also: galette crust
]]>
- Key action: use room-temperature, grease-free equipment for maximum volume.
- Stability hack: add acid (cream of tartar) and add sugar slowly to lock structure.
- Finish: dry low for crisp shells or quick bake for pie toppings.
Mastering meringue stability requires understanding how egg proteins, sugar, and air interact. With clear technique and a few controlled variables you can create glossy peaks that hold through transport and serving.
Prep and Cook Time
Preparation: 15 minutes. Plan equipment setup and ingredient measured so you do not waste whipping time.
Cooking (Baking/Drying): 1 to 1.5 hours for stand-alone meringues at 110°C (225°F). For pie toppings, a short 8–10 minute blast at 175°C (350°F) gives a golden crust while keeping interior soft.
Yield and Difficulty
This recipe yields about 12 medium meringues or enough to top a 9-inch pie. Adjust piping size to increase or decrease yield without changing the fundamental chemistry.
Difficulty: medium. This technique demands attention to detail, but it rewards consistency once you follow the core rules for protein stabilization and sugar dissolution.
Ingredients
4 large egg whites, at room temperature. Egg white protein structure is the backbone of foam; learn the basics at egg white.
1 cup granulated sugar (superfine/caster preferred). Sugar dissolves into the foam and strengthens it; read more on the role of sugar in confections.
- 1/4 tsp cream of tartar (or 1 tsp white vinegar) to stabilize. See the chemistry of cream of tartar.
- 1/2 tsp pure vanilla extract (optional).
- Pinch of salt.
Instructions
Start by ensuring bowls, beaters, and spatulas are perfectly clean and free from grease. Any fat presence interferes with foam formation and reduces final volume.
Separate the egg whites carefully, keeping yolk traces away. Use room-temperature whites to whip more quickly and reach full volume.
- Begin whipping: Start on medium speed until the mixture goes frothy. Add cream of tartar and salt once bubbles appear; the acid strengthens protein bonds.
- Add sugar slowly: When soft peaks form, add sugar one tablespoon at a time. Slow addition prevents grit and encourages the sugar to dissolve fully.
- Whip to glossy peaks: Raise speed to high and whip to stiff, glossy peaks. Test by rubbing a small amount between your fingers—it should feel smooth.
- Fold flavors: Gently fold in vanilla or extracts with a spatula to preserve the foam structure.
- Shape and bake: Pipe or spoon onto parchment. Dry at low heat (110°C / 225°F) for 1–1.5 hours for crisp shells. For pie toppings, quick-bake at 175°C / 350°F for 8–10 minutes to color the peaks.
For troubleshooting techniques and higher-level variations, consult our advanced meringue techniques guide. Also explore recipe variations at meringue recipes for practical examples.
Pro-Caution
Tips for Success
Use fresh or slightly aged eggs depending on your goal. Very fresh eggs give stronger whites, while eggs a few days old can yield larger volume due to lower viscosity.
Control humidity and temperature. High humidity slows drying and can cause weeping; bake meringues on dry low-heat days for best results.
Expert Insight
Whisk choice matters. Use a balloon whisk or the whisk attachment on a stand mixer for the most air incorporation. Manual whisks give you control but require stamina.
A gentle but firm folding technique preserves trapped air while distributing flavor evenly. Fold with a spatula, cutting through the center and lifting the mixture until homogeneous.
Serving Suggestions
Top a vibrant lemon tart or build a layered pavlova with whipped cream and fresh berries for an impressive dessert. The contrast between crispy shell and soft interior offers superior mouthfeel.
Garnish thoughtfully: toasted nuts, a light dusting of powdered sugar, or a restrained drizzle of dark chocolate add texture and balance. For plated desserts, pipe small quenelles to control portion and presentation.
Nutrition
Per serving (1 medium meringue) the calories come mainly from sugar. A typical serving contains minimal fat and modest protein from egg whites.
Use the nutrition facts to plan portion sizes; meringue’s light texture can mask high sugar content, so serve mindfully when catering to calorie-conscious diners.
| Nutrient | Per Serving (1 medium meringue) |
|---|---|
| Calories | 70 kcal |
| Protein | 2 g |
| Carbohydrates | 16 g |
| Fat | 0 g |
Advanced Techniques and Variations
Explore French, Swiss, and Italian meringue styles to match application and stability needs. Each technique alters when and how sugar and heat enter the system, changing stability and texture.
Swiss and Italian methods use cooked sugar syrup to create a stiffer, more stable foam ideal for buttercreams and piping. For decorative work, these methods give a longer working window and greater weather resistance.
For a deeper procedural breakdown, see our internal resource on advanced meringue techniques. For recipe ideas tailored to each method, consult meringue recipes that scale capacity and timing precisely for pro kitchens.
Context and Science
Meringue formation rests on protein denaturation and reassembly around air bubbles. Heating and acid influence these networks, which is why adding an acid like cream of tartar improves elasticity and sheen.
Read a general overview of the dessert and its history at meringue. For plated presentations and national variations, the pavlova entry offers useful perspective at pavlova (dessert).
FAQ
What makes meringue fail to whip properly?
Failure usually comes from fat contamination, cold egg whites, or dirty equipment. Ensure bowls and beaters are grease-free and use room-temperature whites to trap air efficiently.
How long should I whip the egg whites?
Whip until you reach stiff, glossy peaks that hold shape without collapsing. Stop promptly once you reach this stage to avoid overbeating and graininess.
Why add cream of tartar or vinegar?
Acids stabilize the protein network and improve elasticity. A small amount prevents foam collapse and enhances sheen, which helps peaks hold during baking and transport.
Can I make meringues on humid days?
High humidity slows drying and can cause weeping. If you must bake on a humid day, extend drying time and store cooled meringues in an airtight container with desiccant packets.
How do I fix grainy or weepy meringue?
Graininess often signals overbeating; stop and gently fold in a tiny additional amount of sugar if needed. Weeping results from undissolved sugar or trapped moisture—for baked styles, dry longer at low temperature to eliminate syrup pockets.

As you practice these steps, refine small details: bowl material, sugar granulation, and whisk timing. Controlled repetition builds consistent results and makes professional-level meringue reliably repeatable.
See also: Meringue
]]>
- Cold fats and minimal handling create steam-lifted layers.
- Blend fats to balance flavor and flakiness.
- Chill between steps to relax gluten and firm fats.
- Bake hot then lower to set layers and brown evenly.
Prep and Cook Time
Plan around chilling windows. Active time stays short; most time goes to resting the dough so layers remain distinct.
Typical schedule: 25 minutes hands-on, 60 minutes chilling, 20-25 minutes baking. Adjust chilling if your kitchen runs warm or you use alternative flours.
- Preparation: 25 minutes
- Chilling: 1 hour
- Baking: 20-25 minutes
Yield
This recipe yields one 9-inch pie crust suitable for single or double-crust pies. It covers standard pie pans and serves 6–8 people when paired with a generous filling.
Scale easily: halve for a single crust or double for two pies. Store extra dough chilled or frozen for later use.
Difficulty Level
Medium. The techniques require attention to temperature and gentle handling rather than advanced pastry skills. Beginners will find success by following steps and respecting rest times.
Key skills: keeping fats cold, minimal mixing, and rolling in even, confident strokes. These practices control gluten and preserve pockets of fat for flaky layers.
Choosing the Ideal Fat for Tender Layers
The type and temperature of fat determine layer structure and flavor. Butter brings flavor; shortening and lard contribute superior flake because they behave differently in dough.
Use cold, cubed fats so they remain as discrete pieces in the dough. As the oven heats, those fat pockets release steam and lift the flour matrix into flaky sheets.
Fat Options and Practical Trade-offs
Butter offers rich aroma and browning. Its water content helps steam pockets form, but it melts at a lower temperature than some shortenings.
Lard provides tender, layered texture with less strong butter flavor. Use rendered leaf lard or high-quality lard for consistent results.
Blends and Alternatives
Many pastry chefs blend butter with vegetable shortening or lard. A 50/50 blend balances flavor and flake while reducing shrinkage.
If you use alternative fats, keep them cold and treat them like butter when cutting into the flour. Cold plant-based fats can mimic shortening behavior in many cases.
Techniques for Proper Dough Handling and Rolling
Gentle handling preserves fat pieces and prevents excessive gluten formation. Use quick strokes with a pastry cutter or two knives and stop once the mix holds when pinched.
Chill dough in disks to firm fats and relax gluten before rolling. This step reduces tearing and keeps the layers intact while you shape the crust.
Rolling Method
Roll from the center outward, turning the dough a quarter turn every few rolls for an even circle. Keep the rolling pin and surface lightly floured; avoid over-flouring, which dries the dough.
If the dough gets tacky, return it to the fridge for 10–20 minutes. Folding the dough into thirds and re-chilling creates more visible lamination and boosts flakiness.
Expert Insight
Baking Tips to Achieve Golden Crisps and Fluffy Crusts
Start hot to set the outer layers, then lower the heat to finish baking. That rapid initial heat builds steam quickly, creating lift between dough layers.
Protect edges with a foil shield or reusable ring to prevent over-browning while the center finishes. Bake on the lower rack for a crisper bottom crust.
Finishing and Surface Treatments
An egg wash gives a glossy golden surface and helps sugar or seeds adhere. For cream pies, partial blind baking or a chocolate barrier helps prevent soggy bottoms.
Vent top crusts to let steam escape and avoid soggy pockets. Docking (pricking) the bottom of a crust before blind baking keeps bubbles from forming and keeps contact with the pan.
Pro-Caution
Ingredients
Use standard, reliable ingredients for predictable results. Measure by weight when possible for precision.
- 2 1/2 cups all-purpose flour, sifted
- 1 tsp fine sea salt
- 1 cup (2 sticks) unsalted butter, cold and cubed
- 1/2 cup cold vegetable shortening (optional)
- 6-8 tbsp ice water
- 1 tbsp white vinegar or lemon juice (optional)
Instructions
Work quickly. Keep ingredients chilled and handle dough with the lightest touch to protect fat pieces.
Follow each step in order and rest when instructed; those rest windows are active technique, not idle waiting.
- Mix flour and salt. Whisk sifted flour and salt in a chilled bowl until combined.
- Cut in fats. Add cold butter and shortening. Use a pastry cutter, two knives or fingers to create a coarse crumb with pea-sized fat pieces.
- Add ice water and acid. Drizzle in ice water one tablespoon at a time with vinegar or lemon if using. Mix until the dough just holds when pinched.
- Form dough disks. Divide into two disks, wrap tightly in plastic and chill for at least 1 hour to firm fats and relax gluten.
- Roll out dough. On a lightly floured surface, roll one disk into a 12-inch circle, rotating frequently to keep shape and thickness even.
- Transfer and shape. Loosely roll dough around your pin and unroll into the pan. Fit gently without stretching; patch any cracks with small bits of dough.
- Chill before baking. Chill the assembled crust 15 minutes to reduce edge shrinkage during baking.
- Bake to golden perfection. Preheat to 425°F (220°C). Brush with egg wash for color if desired. Bake 12–15 minutes, lower to 375°F (190°C) and bake until golden and crisp.
Tips for Success
Simple, repeatable habits yield consistent flaky results. Cold ingredients and measured handling produce the strongest lift.
Store dough wrapped tightly in the fridge up to 3 days or freeze up to 2 months. Thaw in the fridge before rolling to protect texture.
- Use the coldest fats possible to preserve distinct layers.
- Incorporate vinegar or lemon juice to limit gluten strength for a tender bite.
- Rest dough in the fridge after mixing and before rolling for easier handling.
- Avoid overworking; mend cracks with small dough pieces rather than kneading them out.
Serving Suggestions
Pair a flaky shell with a balanced filling. Fruit pies need a juicy, thickened filling; custards and creams benefit from blind-baked shells.
Garnish simply: powdered sugar, a light honey brush, or a scoop of vanilla ice cream elevates texture and temperature contrast.
Explore complementary guides for fillings and pairings at how to make perfect pie fillings and baking basics and equipment. These internal pages provide practical pairing and timing advice that extends crust technique.
| Nutrition per Slice (1/8th) | Calories | Protein | Carbs | Fat |
|---|---|---|---|---|
| Classic Flaky Pie Crust | 210 kcal | 2 g | 22 g | 13 g |
FAQ
How cold should my fats and water be?
Keep butter and shortening as cold as possible; straight from the refrigerator is ideal. Use ice water and avoid warm hands or warm bowls while mixing.
If fats soften while working, chill the dough briefly to re-firm them before continuing.
Should I blind bake for every pie?
Blind baking suits custard or cream pies and wet fillings. For fruit pies with thickened filling, a fully raw-filled pie often bakes fine without full blind baking.
Partial blind baking—baking the crust briefly with pie weights—gives extra insurance against soggy bottoms while keeping edge color even.
What causes a tough crust and how do I fix it?
Toughness comes from overworking the dough and letting gluten over-develop. Mix only until the dough holds together and rest it to relax gluten.
Also avoid too much water; the dough should be slightly shaggy and only just cohesive when pinched.
Can I use whole wheat or gluten-free flour?
Yes, but textures differ. Whole wheat adds flavor and density; gluten-free blends need careful hydration and often a binder like xanthan gum.
Adjust chill times and hydration. Test a small batch to dial in the feel before making a full pie for guests.
How can I get a glossy, golden finish?
Brush with an egg wash (beaten egg plus a splash of water or milk) before baking. A sprinkle of sugar adds sparkle and slight crunch.
For very delicate pies, apply the wash thinly to avoid sealing vents that must release steam during baking.
With consistent technique and attention to temperature, flaky pie crust becomes a reliable part of your baking skill set. Practice recipes, note adjustments for your oven, and keep a cooling schedule that preserves cold fat. These small controls produce the crisp, layered texture that distinguishes professional results.
Further reading on foundational pastry concepts is available through these trusted resources: pie basics, pastry science, and gluten structure. These references explain the underlying chemistry that informs practical technique.
Key Takeaways
Mastery comes from controlling temperature, limiting handling and using the right fat blend. Chill often and bake with an initial high heat to set layers.
Keep this recipe and checklist handy as you practice; predictability grows with each pie.
See also: Pie crust
]]>
- Fast heat transfer sets the base quickly and reduces soak-in.
- Hydration control limits free water available to penetrate the lower layers.
- Shielding techniques such as blind baking and absorbent layers block juices.
- Right bakeware concentrates conduction for a firm, crunchy finish.
Crisp crust: Understanding the soggy bottom
The soggy bottom forms when moisture migrates into the base faster than the dough can set and brown. Poor conduction, excess water in dough, or a wet filling all accelerate saturation and collapse the crisp crust structure.
Protein networks and starch gelatinization dictate how a pastry sets. For a technical reference on protein behavior in dough see gluten. For pastry-specific context consult the pie crust entry.
Crisp crust ingredients and dough strategy
Choose fats and flour deliberately to reduce water uptake and improve flake formation. Cold, solid fats create discrete steam pockets on baking; those pockets both lift layers and reduce continuous paths for liquid to follow.
Keep hydration tight. Aim for a slightly dry dough that holds together without sticky excess. Lower hydration reduces free water that would migrate downward and compromise the crisp crust.
Fat selection and lamination for a crisp crust
Use cold butter or a butter-neutral fat blend for flavor control and predictable melting. Cold fat delays full incorporation and gives discrete pockets that crisp quickly when placed on a hot surface.
Controlled lamination—gentle folds rather than heavy rolling—creates independent layers that interrupt liquid paths. That mechanical flake supports the crisp crust by reducing continuous channels for juices to travel.
Hydration, binders, and absorptive add-ins
Add ice water sparingly and consider a small acid splash like vinegar to shorten gluten without weakening cohesion. This preserves bite while promoting a firm base that resists saturation.
Sprinkle coarse particles sparingly to form an absorptive interface. Use cornmeal or semolina as a thin bed; it traps stray juices and contributes texture while protecting the crisp crust.
Oven, tools, and heat techniques for crisp crust
Rapid conduction to the underside sets starches and browns the base before juices can migrate. Preheat a heavy baking surface and use the lowest practical rack to shorten the distance between crust and heat source.
Know your appliance. Accurate thermostat behavior and consistent heat distribution help you replicate results. For a basic reference on appliance function, consult the oven page.
Bakeware choices and setup to protect the crisp crust
Prefer cast iron, heavy steel, or a preheated stone to thin, flimsy pans. High-mass bakeware stores heat and delivers immediate conduction that firms the bottom fast.
Preheat the stone or pan for at least 30 minutes at full temperature. In practice, this step reduces blind-bake time and increases the odds of a uniformly crisp crust across the bake.
Expert Insight
Practical steps: a crisp crust checklist
Follow a concise sequence that eliminates common failure modes: chill dough, dock or weigh when blind baking, and place the crust on a preheated surface. Each step targets a specific cause of sogginess.
Document what works in your oven. Keep a short log of pan types, temperatures, and minutes; adjust timing rather than ingredients to tune results to your appliance and altitude.
Actionable checklist
Chill dough at least 1 hour to firm fats and relax gluten; cold fats crisp more predictably. Cold dough also shrinks less and maintains structure during the initial heat surge.
Preheat the baking stone or heavy sheet at full temperature for 30–45 minutes; this creates immediate conduction to set and brown the base. Thin pans never replace stored heat.
More quick actions
Dock or weigh during blind baking to vent steam and set the structure. If the filling browns better with direct contact, remove weights early once the surface firms.
Use an absorbent barrier such as a thin dusting of cornmeal, fine breadcrumbs, or grated hard cheese when facing highly juicy fillings. That layer acts like an internal drip tray and supports a crisp crust.
Blind baking and moisture management for crisp crust
Blind baking remains the most consistent defense against a soggy bottom for wet fillings. Partial blind baking firms the base and seals surface starches before the filling is added.
When using weights, remove them early if the filling benefits from direct contact for browning; leave them longer for very wet fillings. Combine blind baking with an absorptive interface for the best protection.
Absorbent layers and pre-cooking fillings
Precook high-moisture fillings and drain thoroughly, or macerate fruit with a little sugar and discard the released juice. Removing free liquid before assembly reduces the chance that juices will reach the lower layers.
An alternative is a light bed of fine breadcrumbs, grated hard cheese, or a dusting of cornmeal on the blind-baked surface. These materials trap moisture and keep the crisp crust intact.
Serving, storage, and re-crisping crisp crust
Serve baked goods soon after brief cooling; the crisp crust shines when fresh. If you must store, cool fully on a rack and wrap loosely to avoid trapping steam.
To re-crisp leftovers, use a preheated oven at 350°F (175°C) for several minutes on a hot sheet. This approach restores crunch far better than a microwave, which collapses crispness.
Pro-Caution
Tool habits and calibration for consistent crisp crust results
Keep a small test tart or scrap crust to evaluate temperature and timing in your oven. Empirical checks trump guessing and prevent ruined batches.
Track pan performance and note how heat profiles change with different rack positions or when you bake multiple items. Small adjustments to time and placement yield large improvements in crisp crust outcomes.
FAQ
Why does my crust become soggy even when I blind bake?
If blind baking time or temperature is too low, the bottom will not set fully and will accept juices. Also, thin or low-mass bakeware reduces conduction and often requires a hotter surface or longer blind-bake time.
Can I fix a soggy bottom after baking?
Often you can recover a partial crisp by returning the product to a hot oven on a preheated sheet for a few minutes. Deep saturation from an overly wet filling will limit how much crunch you can restore.
Does adding cornmeal change flavor or texture much?
Cornmeal gives a subtle gritty crunch and serves as a moisture buffer. Use it sparingly; too much creates a coarse mouthfeel instead of a clean crisp crust.
Is docking necessary for all crusts?
Docking vents underlying steam and prevents large bubbles, but it is not required for all filled pies. Apply docking when making flat tarts or pizza-style bases where even contact matters.
What oven temperature profile works best?
Start with high heat to set the bottom quickly, then reduce if the top needs slower finishing. Monitor your oven’s actual temperatures and adjust minutes rather than guessing.
Apply these focused methods and test them in your oven to eliminate soggy bottoms and produce reliable, crunchy crusts.
See also: gluten, pie crust, and cast iron references for technical background.
See also: crisp crust
]]>