This roasted veggie quinoa salad combines nutty quinoa with caramelized vegetables for a balanced, satisfying bowl. It highlights texture contrast and bright dressing to deliver layered flavor in every bite.
- High-protein, plant-forward meal that stores well for meal prep.
- Roasting unlocks sweetness and builds savory depth without added salt.
- Easy swaps let you adapt the salad to seasonal produce or dietary needs.
This recipe uses straightforward techniques that yield consistent results even for cooks new to grains and roasting. Read on for precise timings, expert tips, and serving ideas to maximize flavor and texture.
Ingredients That Elevate the Salad
Use quality staples: well-rinsed quinoa and ripe, firm vegetables for best texture. Proper seasoning and a simple tahini-lemon dressing boost mouthfeel and balance the roasted notes.
Key ingredients: organic quinoa, bell pepper, zucchini, yellow squash, red onion, cherry tomatoes, Brussels sprouts, extra-virgin olive oil, smoked paprika, ground cumin, salt, pepper, fresh parsley, toasted pumpkin seeds, tahini, lemon, and a touch of honey or maple syrup.
For background on quinoa’s nutritional profile and cultivation, see quinoa. To understand the science behind browning and flavor development, refer to Maillard reaction.
Prep, Cook Time, and Yield
Preparation: 15 minutes. Roasting: 20–25 minutes. Quinoa cooking: 15 minutes. Total active time is under an hour when tasks run concurrently.
Yield: Serves 4–6 as a main or 6–8 as a side. Scale quinoa and vegetables proportionally for larger batches and store components separately for best texture retention.
Equipment and pantry notes
Use a medium saucepan with a tight-fitting lid for quinoa and a rimmed baking sheet for roasting. Parchment or a light film of oil prevents sticking and promotes even browning.
Keep toasted seeds and herbs separate until serving to preserve crunch and color. A microplane grater speeds dressing emulsification and releases more aromatic garlic flavor.
Step-by-Step Instructions
Follow the sequence below for reliable results: cook the quinoa first, then roast vegetables while the grain rests. Combining warm roasted veg with just-fluffed quinoa helps integrate flavors.
Work in batches if your sheet pan is small; overcrowding causes steaming rather than roasting. Remember to flip vegetables halfway for even caramelization.
1. Cook the quinoa
Rinse 1 cup quinoa thoroughly under cold water to remove saponins, which can taste bitter. Simmer in 2 cups vegetable broth or salted water for about 15 minutes, then let rest covered for 5 minutes before fluffing.
Fluff with a fork to separate the grains and retain a light, airy texture that will absorb dressing without turning mushy. For background on proper rinsing and processing, see quinoa.
2. Roast the vegetables
Preheat oven to 425°F (220°C). Toss bell pepper, yellow squash, zucchini, red onion, cherry tomatoes, and halved Brussels sprouts with 2 tablespoons olive oil, smoked paprika, cumin, salt, and pepper. Spread in a single layer on a baking sheet.
Roast 20–25 minutes, turning once, until edges brown and veggies yield to a fork. High heat encourages caramelization and concentrates natural sugars without added sweeteners.
3. Make the dressing
Whisk 3 tablespoons lemon juice with 2 tablespoons tahini, 1 tablespoon honey or maple syrup, and a minced garlic clove. Thin gradually with 1–2 tablespoons water until the dressing reaches a silky, pourable consistency.
Tahini brings creaminess and a toasted sesame note that complements roasted vegetables. For context on tahini and its culinary uses, consult tahini.
4. Combine and finish
Fold warm roasted vegetables gently into the fluffed quinoa. Pour the dressing in stages and toss lightly to ensure an even coat without breaking the vegetables.
Finish with chopped parsley and toasted pumpkin seeds for brightness and crunch. Adjust seasoning with salt and freshly ground pepper to taste.
Tips for Success
Temperature control: Use a hot oven for roasting; this maximizes browning and flavor concentration. Keep the quinoa covered during resting to ensure full hydration of the grains.
Texture management: Store dressing separately if you plan to refrigerate the salad to prevent sogginess. Add seeds and fresh herbs just before serving for peak texture and aroma.
 Expert Insight
Swap-ins are simple: roasted sweet potato, eggplant, or broccoli all work well. Match roasting times by size and density to ensure even doneness across the tray.
Pro-Cautions for Food Safety and Texture
Handle cooked quinoa and roasted vegetables promptly. Cool leftovers quickly and refrigerate within two hours to stay within safe food-handling windows.
 Pro-Caution
Serving Suggestions
Serve warm as a main or chilled as a side. Pair with warm flatbread, hummus, or a protein of choice for a complete plate. Add a lemon wedge at the table for extra brightness.
Garnish options include crumbled cheese for non-vegan diners, fresh herbs like parsley, cilantro, or basil, and a final drizzle of high-quality olive oil. For recipe ideas that complement this salad, explore our internal guides Hearty Grain Salad Ideas and Quinoa Salad Variations.
Nutritional Information (Per Serving)
This salad provides a balance of complex carbohydrates, plant protein, fiber, and healthy fats. Estimated nutrition per serving: ~320 kcal, 9 g protein, 45 g carbs, 10 g fat.
Quinoa supplies all nine essential amino acids in modest amounts, while vegetables contribute vitamins, minerals, and phytonutrients. For a high-level overview of roasting as a culinary method, see roasting.
Common Variations and Add-Ins
Add toasted nuts like almonds or walnuts for extra crunch and omega-3s. Swap tahini for plain yogurt in the dressing if you prefer a tangier, dairy-based option.
Introduce roasted chickpeas or grilled halloumi for added protein and textural interest. Seasonal herbs will change the flavor profile; basil elevates summer versions, while parsley and mint suit spring or fall preparations.
FAQ
Can I make this salad ahead of time?
Yes. Roast the vegetables and cook the quinoa up to 48 hours in advance and store each in airtight containers. Combine with dressing shortly before serving to preserve texture.
How do I keep quinoa fluffy and separate?
Rinse quinoa well, use a 2:1 liquid-to-quinoa ratio, bring to a simmer, then reduce heat and cover. After cooking, rest covered for 5 minutes and fluff with a fork to separate grains.
Which vegetables roast best for this recipe?
Firm, low-moisture vegetables like bell peppers, zucchini, squash, red onion, and Brussels sprouts roast evenly. Denser vegetables like sweet potato need slightly longer and may require larger pieces to match cook times.
Is this salad suitable for special diets?
Yes. The base recipe is naturally gluten-free and vegan when you choose maple syrup over honey. Adjust toppings like cheese or yogurt if you need a dairy-free or vegan version.
How should I store leftovers and how long do they keep?
Store salad components separately in airtight containers. Roasted vegetables and quinoa last 3–4 days refrigerated. Add fresh herbs and seeds just before serving to restore brightness and crunch.
For further reading on ingredient origins and nutritional context, consult the Wikipedia pages on bell pepper and tahini. These resources provide reliable background on key components used in this recipe.
Final Notes
This roasted veggie quinoa salad prioritizes technique: proper rinsing, high-heat roasting, and a balanced dressing deliver consistent, flavorful results. Use the recipe as a template for seasonal adaptations and flavor experiments.
Save variations and notes after your first batch to refine roasting times and dressing ratios based on your oven and produce. The method scales well and rewards simple adjustments with big flavor returns.
See also: quinoa salad
]]>
- Roast first: Caramelizing the florets concentrates sweetness and adds depth.
- Layer spices: Bloom ground spices briefly to unlock aroma and complexity.
- Finish bright: Lemon and fresh herbs lift the stew and balance its richness.
Overview
This stew showcases roasted cauliflower as the primary flavor and texture anchor. Roasting drives Maillard reactions that bring a nutty, golden profile to the vegetable (cauliflower).
The recipe uses standard pantry spices and a modest set of vegetables to form a stew body. The approach suits weeknight cooking and scaled entertaining alike.
Prep and Cook Time
Preparation: 25 minutes. This includes trimming and seasoning the florets and prepping aromatics.
Roasting: 30 minutes. Roast at high heat to ensure color and flavor development. Stew simmering: 45 minutes. Total: About 1 hour 40 minutes.
Yield and Difficulty
Yield: Serves 6 generous portions when paired with rice or bread. Portions can vary depending on sides and appetites.
Difficulty: Medium. This recipe requires attention to roasting technique and spice toasting, but it uses straightforward, repeatable steps.
Ingredients
Gather these components for a balanced, aromatic stew. Use fresh produce where possible for the best texture and flavor.
The ingredient quantities below make a stew with a medium-thick broth suitable for serving over rice or with crusty bread.
- 1 large head cauliflower, cut into florets
- 3 tbsp extra virgin olive oil, divided
- 1 large onion, finely diced
- 4 cloves garlic, minced
- 1 tbsp fresh ginger, grated
- 2 medium carrots, sliced into coins
- 1 red bell pepper, chopped
- 1 can (14 oz) diced tomatoes
- 4 cups vegetable broth (use a clear, well-seasoned stock such as a vegetable stock or stock)
- 1 tbsp tomato paste
- 1 tsp ground cumin
- 1 tsp smoked paprika
- 1 tsp ground coriander
- 1/2 tsp turmeric
- 1/2 tsp cinnamon
- 1 bay leaf (bay leaf)
- 1 bunch fresh cilantro, chopped (reserve some for garnish)
- Salt and freshly ground black pepper, to taste
- Juice of 1 lemon
Instructions
Step 1 — Preheat and season: Set the oven to 425°F (220°C). Toss the cauliflower florets with 2 tablespoons of olive oil, salt, and pepper until evenly coated.
Step 2 — Roast: Arrange florets in a single layer on a rimmed baking sheet and roast about 30 minutes, turning once. Aim for deep golden edges; that browning concentrates sugars and builds flavor via the Maillard reaction (roasting).
Step 3 — Sauté aromatics: While the cauliflower roasts, heat the remaining tablespoon of oil in a heavy-bottomed pot over medium heat. Add the diced onion and cook until softened and translucent, about 6 minutes.
Step 4 — Build spice base: Stir in garlic and grated ginger for 1-2 minutes until fragrant. Add the carrots and bell pepper and cook for 4–5 minutes to soften the vegetables without losing texture.
Step 5 — Bloom spices: Incorporate tomato paste, diced tomatoes, and the dry spices: cumin, smoked paprika, coriander, turmeric, and cinnamon. Toast for 30–60 seconds to bloom the flavors; this step deepens aroma and integrates heat.
Step 6 — Simmer: Pour in the vegetable broth and add the bay leaf. Bring to a gentle boil, then reduce heat and simmer uncovered for 20 minutes to allow flavors to meld and the carrots to become tender.
Step 7 — Combine roasted cauliflower: Fold the golden roasted cauliflower into the stew and simmer another 10–15 minutes. This allows the cauliflower to absorb stewy flavors while maintaining pleasant texture.
Remove the bay leaf, stir in chopped cilantro and lemon juice, and adjust seasoning with salt and pepper before serving.
Pro-Caution
Finish with a quick taste test and final seasoning adjustments. A last-minute squeeze of lemon and a scattering of fresh herbs make a marked difference in brightness and contrast.
Tips for Success
Choosing your cauliflower: Pick heads that feel heavy for size with tight, compact curds and no discoloration. Fresher heads yield firmer florets and better caramelization.
Roasting tips: Spread florets in one layer and resist overcrowding the pan. Overcrowding causes steaming rather than roasting, which reduces browning and texture contrast.
Expert Insight
Layer your cooking: Toast whole spices or briefly toast ground spices in the hot oil before adding liquids to magnify aroma. This technique is common in professional kitchens to extract essential oils.
Make-ahead and storage: The stew develops more depth after resting overnight. Refrigerate in an airtight container for up to 3 days or freeze portions for longer storage.
Variations and Add-ins
For added protein, fold in cooked chickpeas or white beans during the final simmer. Beans hold shape and add a complementary creamy texture.
To create a creamier consistency, stir in a spoonful of tahini or coconut yogurt just before serving. This adds richness without masking the roasted notes.
Herb and spice swaps
Swap cilantro for flat-leaf parsley if you prefer a brighter, less citrusy herb profile. Parsley pairs well with lemon and keeps the stew fresh.
Increase smoked paprika or add a pinch of chili flakes for more pronounced warmth. Adjust chili carefully to keep balance with the stew’s natural sweetness.
Serving Suggestions
Serve the stew in deep bowls garnished with chopped cilantro and toasted nuts like pine nuts or slivered almonds for crunch. The nuts add a contrasting texture and nutty flavor.
Pair with warm crusty bread, basmati rice, or couscous to soak up the broth. A wedge of lemon on the side invites guests to add extra brightness to their bowls.
Nutrition
This stew delivers a balanced macronutrient profile and is rich in fiber and vitamins from the vegetables. It works well in plant-forward meal plans that emphasize vegetable variety.
Below is a typical nutrient breakdown per serving to help with meal planning and calorie tracking.
| Nutrient | Amount per Serving |
|---|---|
| Calories | 210 kcal |
| Protein | 6 g |
| Carbohydrates | 25 g |
| Fat | 9 g |
Quality Notes and Sourcing
Ingredient quality affects final flavor. Use a good olive oil and a well-seasoned vegetable stock or homemade stock to create a robust base.
Buy seasonal cauliflower when possible for the best texture and cost. Seasonality often correlates with more intense flavor and lower price.
FAQ
Q: What makes roasted cauliflower ideal for a stew?
Roasted cauliflower develops caramelized edges and a deeper, slightly nutty flavor that becomes the stew’s backbone. This contrasts with the soft, saucy broth and improves mouthfeel.
Q: Can I make this stew vegan and gluten-free?
Yes. Use vegetable stock and ensure any optional toppings like yogurt are plant-based. The stew is naturally gluten-free if you avoid wheat-based sides.
Q: How do I reheat leftovers without losing texture?
Reheat gently over low heat on the stove, adding a splash of broth to restore looseness. Avoid high heat, which can break down texture and dull spices.
Q: Can I freeze the stew?
Freeze cooled portions in airtight containers for up to 3 months. Thaw overnight in the refrigerator and reheat slowly, stirring to reincorporate any separated liquids.
Q: Which spices can I adjust to suit personal taste?
Adjust smoked paprika for smokiness, turmeric for color and warmth, and cinnamon for subtle sweetness. Increase or reduce cumin and coriander to shift the stew toward earthier or brighter notes.
The Way Forward
Mastering this roasted cauliflower stew teaches a repeatable method: roast for depth, bloom spices for aroma, and finish with acid and herbs for balance. The technique transfers readily to other vegetable stews and braises.
Use this recipe as a template to experiment with legumes, seasonal vegetables, and different stocks. Each small change yields visible shifts in flavor and texture.

For additional reading on the vegetable and spice concepts used here, consult these reference entries: Cauliflower, Roasting, and Spices.
See also: Cauliflower stew
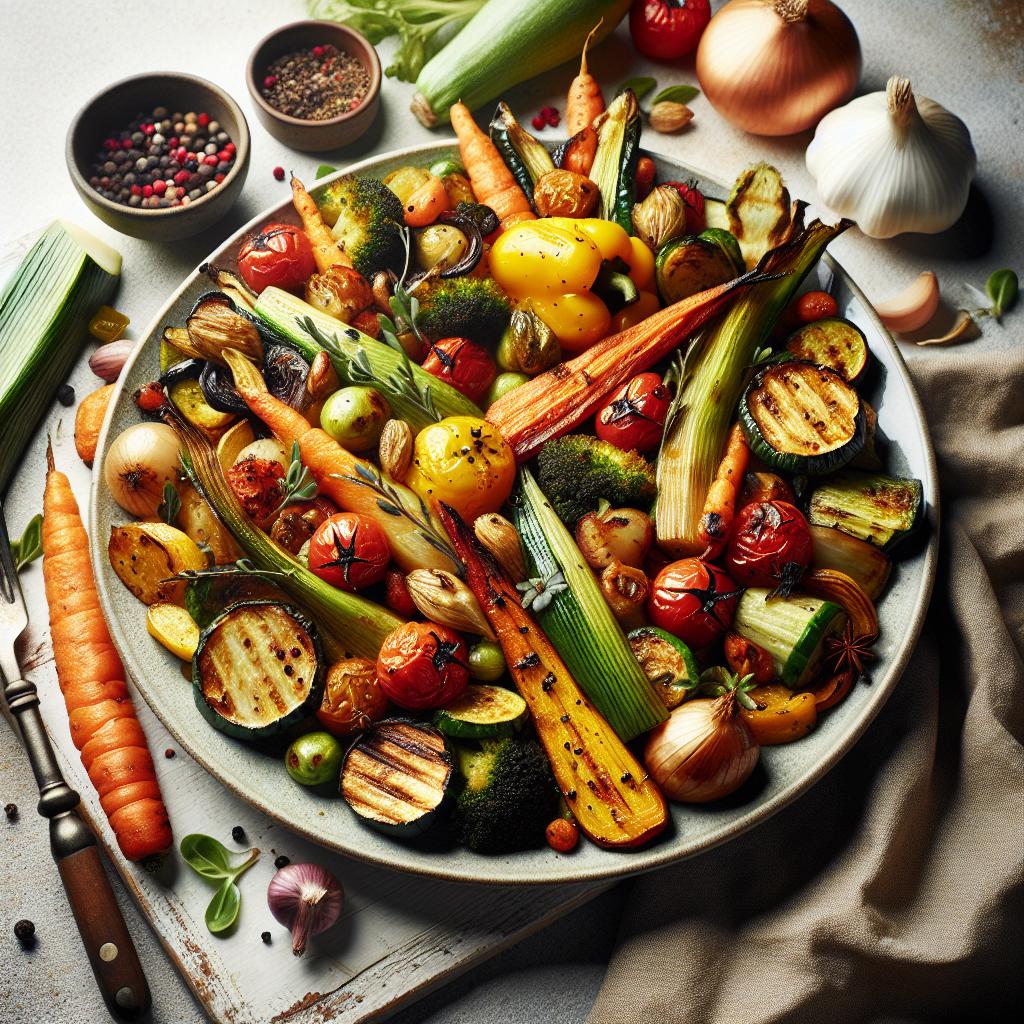
]]>Roasted vegetables transform raw produce into concentrated, caramelized bites that lift any meal. Roasting boosts sugars, develops savory browning, and creates texture contrast that works across cuisines.
- High heat produces crisp edges and rich Maillard notes.
- Uniform cuts yield predictable cooking times and even browning.
- Season twice—before and after roasting for layered flavor.
- Avoid overcrowding so vegetables roast, not steam.
Why Roasted Vegetables Work
Roasting relies on dry heat to concentrate flavor and build a complex surface crust. The browning stems from the Maillard reaction, which forms savory, roasted notes when amino acids meet heat.
At the same time, sugar breakdown through caramelization deepens color and sweetness on sugar-rich vegetables. Controlling time and temperature lets you maximize both reactions without overcooking interiors.
Prep and Cook Time for Roasted Vegetables
Preparation: 15 minutes. Trim, peel when necessary, and cut items to consistent size to equalize roast times. Use a sharp knife or mandoline for reliable pieces.
Cooking: 30–40 minutes at 425°F (220°C) for most mixed medleys. Stir or turn every 10–15 minutes to promote even surface browning and prevent scorching.
Yield and Difficulty for Roasted Vegetables
Serves 4 as a side. The recipe scales, but larger volumes need batch roasting or multiple sheets for consistent results.
Difficulty: Easy. This method uses standard kitchen tools and a stable oven temperature; consult internal guides for troubleshooting when ovens run hot or cool.
Ingredients
Balance textures: include quick-roast items like zucchini and bell pepper and dense roots like sweet potato and carrots. Match cut size to density so all pieces finish together.
Sample list: 2 cups baby carrots, 1½ cups Brussels sprouts (halved), 1 large sweet potato (cubed), 1 red bell pepper (sliced), 1 medium zucchini (half-moons), 1 red onion (wedges), 4 tbsp extra-virgin olive oil, 3 cloves garlic (minced), 1 tsp smoked paprika, 1 tsp dried thyme, 1 tsp kosher salt, ½ tsp black pepper, 1 tbsp balsamic vinegar (optional), fresh parsley to garnish.
Instructions
Preheat the oven to 425°F (220°C). A thoroughly preheated oven ensures quick surface browning and reliable texture.
In a large bowl, combine cut vegetables. Toss with olive oil, garlic, smoked paprika, thyme, salt, and pepper until every piece is lightly coated.
Sheet Setup and Roasting
Spread vegetables in a single layer on a large rimmed baking sheet; avoid overcrowding. If pieces touch extensively, they steam rather than roast, preventing crisp edges.
Roast for 30–40 minutes, turning once or twice. Look for golden-brown edges and fork-tender centers; adjust time for thicker pieces or denser roots.
Finishing Touches
Five minutes before the end, optionally drizzle with a tablespoon of balsamic for brightness and a glossy finish. The acid tames the roasted sugars and adds a lively counterpoint.
Finish with fresh herbs and a bright finishing salt to lift the plate. A light squeeze of lemon or a scattering of chopped parsley adds freshness to the warm medley.
Expert Insight
For extra texture and nutrition, add toasted seeds or roasted chickpeas once the vegetables finish. These provide crunch and a protein component when needed.
Seasoning Strategy
Season in two stages: a base seasoning before roasting and a finishing seasoning after. Base seasoning includes oil, salt, and aromatics to encourage browning and flavor penetration.
Finish with acid, fresh herbs, or crunchy toppings to reintroduce contrast and complexity. Use quality oil characteristics to match flavor; consider how different oils behave at heat and flavor points. See olive oil for tasting notes and typical varieties.
Pro-Caution
If you must cook large quantities, roast in batches or use multiple sheets and rotate them in the oven for uniform results. Rotating sheets midway balances heat zones and keeps edges crisp.
Creative Serving Ideas
Roasted vegetables work across many formats: pile them on grains, blend into soups, or use them in tarts and sandwiches. They form a versatile base for vegetarian mains and composed bowls.
For Mediterranean notes, finish with a balsamic glaze or sprinkle toasted nuts. Learn about balsamic vinegar styles to choose the right sweetness and acidity for finishing.
Nutritional Information
A typical serving of this roasted vegetable medley provides roughly 150 kcal with modest fat and carbohydrate from starchy vegetables. Roasting preserves nutrients better than prolonged boiling, particularly water-soluble vitamins, when cooking time is controlled.
Adjust oil quantity to lower calories, or add plant proteins like roasted chickpeas for a balanced plate. Simple swaps—less oil, added legumes—shift the macronutrient profile toward protein and fiber.
| Nutrient | Per Serving |
|---|---|
| Calories | 150 kcal |
| Protein | 3 g |
| Carbohydrates | 25 g |
| Fat | 6 g |
Common Variations
Swap vegetables seasonally: butternut squash, cauliflower, and beets all roast well when cut to similar size. Denser roots need longer at temperature than tender summer squash.
Add bold spices like smoked paprika or cumin for warmth, or toss with lemon, garlic, and herbs for a brighter profile. For protein-focused plates, roast chickpeas or tempeh with the vegetables so they crisp and take on the same seasoning.
Internal Resources
For planning seasonal menus and produce selection, see our Guide to Seasonal Vegetables. That resource helps you choose peak-flavor produce and plan batch roasts efficiently.
Refer to the Roasting Techniques page for oven setups, pan types, and troubleshooting specific to different ovens. Those guides help improve consistency across kitchens and household ovens.
FAQ
What oven temperature is best for roasting vegetables?
Use 425°F (220°C) for most mixed medleys. This temperature balances surface browning with interior tenderness for roasted vegetables.
How do I get crispy edges without drying vegetables?
Cut pieces uniformly and avoid overcrowding the sheet pan. Use enough oil to promote browning but not so much that pieces swim in fat, and remove when edges are golden and centers are fork-tender.
Can I roast frozen vegetables?
Frozen vegetables often release water and steam rather than brown. If using frozen, thaw thoroughly and pat dry before roasting to improve caramelization, or roast in well-spaced single layers at higher heat.
How do I season for different cuisines?
Match spice blends to the cuisine: smoked paprika and cumin for Spanish notes, za’atar for Levantine flavor, or soy and ginger for East Asian profiles. Start with salt and oil as a base, then layer distinct spices to ensure each piece picks up the intended profile.
How long will leftovers last?
Store roasted vegetables in an airtight container in the refrigerator for up to 4 days. Reheat briefly in a hot oven or skillet to restore some crispness, and repurpose leftovers in salads, bowls, or soups.
Takeaway: Apply these techniques—consistent cuts, high initial heat, staged seasoning—to produce repeatable, flavorful roasted vegetables every time. Practice and small adjustments by vegetable type deliver reliable results.
See also: Guide to Seasonal Vegetables
See also: roasted vegetables
]]>
- Balanced nutrition: plant protein from quinoa and beta-carotene from sweet potatoes.
- Fast prep: 45 minutes from start to finish; ideal for meal prep.
- Versatile: easy to customize for vegan, gluten-free, or higher-protein needs.
- Shelf-stable strategy: components keep well in the fridge for 3 days.
Benefits of Combining Sweet Potatoes and Quinoa for Optimal Nutrition
Roasted sweet potatoes pair with quinoa to form a nutrient-dense meal that supports satiety and steady energy. Sweet potatoes supply provitamin A in the form of beta-carotene, while quinoa provides a complete amino acid profile.
Additionally, both ingredients provide meaningful dietary fiber and antioxidants that support digestive balance and metabolic resilience. For background on the grain itself, see Quinoa for botanical and nutritional context.
Selecting the Best Ingredients for a Flavorful and Wholesome Meal
Choose firm, blemish-free sweet potatoes for the best texture after roasting; firmness predicts how well the cubes hold their shape. Opt for white, red, or tri-color quinoa and rinse thoroughly to remove surface saponins that cause bitterness.
Use high-quality extra virgin olive oil to carry flavor and facilitate caramelization when roasting; a modest amount enhances mouthfeel and browning. For a primer on the oil and its culinary uses, consult Olive oil.
Prep and Cook Time
Plan for about 15 minutes of hands-on prep and roughly 30 minutes of active cooking. This timeline works well if you roast sweet potatoes while toasting and simmering quinoa concurrently.
Work with a single sheet pan and one saucepan to minimize cleanup and keep workflow efficient. Multitasking during the roasting window yields a hot, balanced bowl in under an hour.
Yield
This recipe yields four generous portions when served as a main or four to six portions as a side. Portions scale predictably if you increase sweet potato and quinoa by the same ratio.
Store leftovers in an airtight container for up to 3 days in the refrigerator for quick lunches or meal-prep bowls. Reheat gently to preserve texture and avoid drying out the quinoa.
Difficulty Level
Difficulty: Easy. The technique set is accessible to home cooks of any level and uses basic tools: a sharp knife, baking sheet, and medium saucepan.
The recipe emphasizes timing rather than complex techniques, so precise seasoning and consistent cube sizing are the main factors that determine the final quality.
Ingredients
Gather whole-food ingredients to maximize flavor and nutrition. The ingredient list below reflects standard pantry items and minimal seasoning for clarity of flavor.
- 2 large sweet potatoes, peeled and cut into 1-inch cubes
- 1 cup quinoa, rinsed thoroughly
- 2 cups vegetable broth or water
- 3 tablespoons olive oil, divided
- 1 teaspoon smoked paprika
- 1 teaspoon ground cumin
- Salt and freshly ground black pepper, to taste
- 1/2 cup chopped fresh parsley or cilantro
- 1/4 cup toasted pumpkin seeds for garnish
- Juice of 1 lemon
Instructions
Preheat the oven to 425°F (220°C) and prepare a lined baking sheet for even roasting. Toss the sweet potato cubes with 2 tablespoons of olive oil, smoked paprika, cumin, salt, and pepper until coated evenly.
Spread the cubes in a single layer and roast for 25–30 minutes, flipping once, until edges caramelize. The high heat focuses on Maillard browning to intensify natural sweetness; see Roasting (cooking) for technique notes.
- While potatoes roast, rinse quinoa well under cold water and drain in a fine-mesh sieve.
- Heat 1 tablespoon olive oil in a medium saucepan over medium heat; add quinoa and toast lightly for about 2 minutes to deepen nuttiness.
- Add broth or water, bring to a boil, reduce heat to low, cover, and simmer 15 minutes until liquid absorbs.
- Remove from heat and let stand covered for 5 minutes; then fluff with a fork and stir in lemon juice and herbs.
- Fold roasted sweet potatoes into quinoa gently, taste, and adjust seasoning. Top with toasted pumpkin seeds before serving.
Serve warm or at room temperature depending on preference. This bowl works equally well as a hot dinner or a chilled component in a composed salad.
Pro-Caution
Tips for Success
Cube the sweet potatoes uniformly to ensure even roasting and consistent texture across pieces. Smaller cubes will caramelize faster; keep pieces around 1 inch for predictable timing.
Toast quinoa briefly in oil to enhance its nutty profile, then follow the liquid ratio precisely to achieve a light, separate grain texture. Fluffing and resting off-heat prevents gummy quinoa.
Expert Insight
Customize the bowl with roasted vegetables like red peppers or wilted greens for color and micronutrient variety. Fold in a spoonful of tahini or Greek yogurt for creaminess if desired.
Creative Serving Suggestions to Elevate Your Quinoa Delight
Present this dish in shallow bowls to highlight color contrast between orange sweet potato and the speckled quinoa. Garnish with a lemon wedge and extra herbs to enhance freshness at the table.
For Mediterranean notes, add sliced olives and crumbled feta. For additional plant protein, serve with grilled tofu or chickpeas spiced and roasted until crisp.
Nutrition
Per-serving estimates highlight this recipe as moderate-calorie, fiber-forward, and naturally gluten-free. The macronutrient balance favors carbohydrates with a meaningful plant-protein contribution from quinoa.
Sweet potatoes provide carotenoids while quinoa offers complete protein, making the pairing effective for vegetarian and active-living meal plans. See the table below for a concise breakdown.
| Nutrient | Per Serving |
|---|---|
| Calories | 320 kcal |
| Protein | 8 g |
| Carbohydrates | 55 g |
| Fat | 7 g |
| Fiber | 7 g |
For further reading on sweet potato cultivars and historical usage, consult the comprehensive entry on Sweet potato. This context helps explain varietal differences that affect sweetness and moisture.
Future Outlook
This recipe scales well for batch cooking and adapts to seasonal ingredients without losing its core nutritional benefits. You can rotate herbs, seeds, and additional vegetables to maintain variety across weekly menus.
As a template, the bowl supports strategies for higher-protein toppings or grain swaps such as farro or bulgur if you want different textures. Use proportion and cooking time adjustments to maintain balance.
FAQ
Is this dish gluten-free?
Yes. The standard recipe uses quinoa and sweet potato, both naturally gluten-free when prepared in a dedicated environment. Cross-contamination risk applies if grains are processed in shared facilities.
Can I make this ahead for meal prep?
Absolutely. Roast and cook components separately, then combine when serving. Store components in airtight containers for up to 3 days and reheat gently to preserve texture.
How can I increase the protein content?
Add roasted chickpeas, baked tofu, or a scoop of cooked lentils to each bowl. These options boost protein while keeping the meal plant-forward and balanced.
What is the best way to reheat leftovers?
Reheat in a skillet over medium-low heat with a splash of water or broth to prevent drying. Microwave in short intervals, stirring between cycles, to maintain even warmth.
Are there good grain substitutes for quinoa?
Yes. Use farro or bulgur for chewier textures, adjusting liquid and cook time per grain instructions. Note that farro contains gluten, so it is not a gluten-free substitute.
See also: sweet potato
]]>
- Even cuts produce uniform cooking and consistent browning.
- High heat (425°F/220°C) encourages caramelization while preserving moisture.
- Single-layer roasting prevents steaming and yields crispy edges.
- Finish bright with acid or fresh herbs to lift roasted richness.
Roasted Vegetables: Fundamentals and science
Roasting concentrates vegetable flavor by driving off surface moisture and enabling browning reactions. Proper heat and surface contact encourage both sugar-driven caramelization and amino-acid reactions that change aroma and taste.
Understanding the physical chemistry helps predict outcomes. For quick reference on the cooking method, see roasting for an overview you can trust.
Key techniques that change results
Start with dry produce; excess moisture inhibits browning and encourages steaming. Pat vegetables dry after washing and use a light coating of oil so each surface reaches searing temperature rapidly.
Use a rimmed metal baking sheet for direct conduction and steam escape. Avoid covered dishes, which trap moisture and slow crust formation.
Prep and Cook Time
Preparation: 15 minutes of focused work achieves uniform sizes and balanced seasoning for consistent results. Consistent piece size equals consistent doneness for your roasted vegetables.
Cooking: 30–40 minutes at 425°F (220°C) typically works for a mixed medley. Dense roots may need a 10–15 minute head start; monitor from 25 minutes to prevent burning.
- Total: 45–55 minutes
- Serves: 4–6 as a side
- Difficulty: Easy — repeatable across skill levels
Ingredients and smart swaps
Choose firm, seasonal produce for the best texture and flavor. A typical base includes broccoli florets, rainbow carrots, bell peppers, golden beets, and red onion for variety and color.
Begin with 3 tbsp extra virgin olive oil as a baseline, then add a balanced spice mix: smoked paprika, garlic powder, cumin, sea salt, and freshly ground black pepper. Read about oil types and stability at olive oil.
- 2 cups broccoli florets
- 2 cups rainbow carrots, peeled and cut
- 1 cup red bell pepper, 1-inch chunks
- 1 cup golden beets, peeled and cubed
- 1 medium red onion, thick wedges
- 3 tbsp extra virgin olive oil
- 1 tsp smoked paprika
- 1/2 tsp garlic powder
- 1/2 tsp ground cumin
- 1 tsp sea salt, adjust to taste
- Black pepper, freshly ground
- 2 tbsp chopped fresh parsley, optional
Instructions
Follow a clear sequence: preheat, size cuts uniformly, toss with oil and seasonings, spread in a single layer, then roast until edges caramelize. This workflow minimizes guesswork and maximizes browning for roasted vegetables.
Work on a rimmed sheet pan with parchment or a light oil coating for even heat. If vegetables crowd, use a second pan or roast in batches to preserve airflow and crisping.
Preheat and oven rationale
Set the oven to 425°F (220°C) to promote surface browning while keeping interiors tender. High, steady heat accelerates crust formation without long drying times.
For faster searing, place an empty sheet pan in the oven while it heats; add the oiled vegetables to the pre-heated pan to increase conduction on contact. See more on conduction and surface heat in standard cooking references.
Cutting, sizing, and staging
Chop vegetables into uniform pieces; similar mass equals similar cook time. For dense roots, make pieces slightly smaller or give them a head start so the mix finishes at the same moment.
Group vegetables by density when tossing. If using sweet potatoes or beets, consider a 10-minute head start before adding softer items like peppers and zucchini to the pan.
Tossing, spacing, and roasting
Mix oil and dry seasonings in a large bowl, then toss vegetables so every surface receives a light coat. Too much oil inhibits browning; too little leaves pieces dry and uneven.
Spread the vegetables into a single layer with space between pieces. Roast for 30–40 minutes, stirring once halfway through to ensure even color and texture for the roasted vegetables medley.
Resting and finishing
Remove the pan when pieces show golden, crispy edges and a tender center. Let the tray rest for 3–5 minutes to let flavors settle and juices redistribute.
Finish with a bright element: a squeeze of lemon or a splash of aged balsamic lifts roasted depth. Fresh herbs added after roasting retain vibrancy and avoid wilting.
Tips for success
Choose produce that is firm, dry, and colorful; ripeness impacts sugar content and browning. Overripe vegetables release extra moisture and can steam instead of roast.
Cut pieces into consistent shapes to achieve uniform doneness. Mixing crisp and soft textures creates contrast on the plate and improves appeal for diners.
Expert Insight
Spice variations: Try a Mediterranean mix with oregano and lemon zest, or a North African profile with cumin and coriander. Small changes shift the dish profile dramatically.
Toast crushed nuts or seeds and sprinkle them just before serving for crunch. For creaminess, add a dollop of labneh, yogurt, or hummus on the side to balance textures.
Expert Insight
Make-ahead strategy: roast, cool on a rack, refrigerate, then reheat in a hot oven for 8–10 minutes to restore crisp edges. This approach saves time while preserving texture.
Pro-Caution
Pro-Caution
Serving suggestions
Serve the medley over warm grains like quinoa or farro for a complete vegetarian main. The texture of roasted vegetables pairs well with chewy grains and a bright finishing acid.
For a composed plate, add toasted almonds, pumpkin seeds, or crumbled feta. A finishing drizzle of high-quality olive oil or a light acid brightens the entire dish.
Explore internal resources for recipe variations and pairing ideas: see our Roasted Vegetables recipes collection and the roasting techniques guide for step-by-step visuals.
Nutritional snapshot
Roasted vegetables deliver fiber, vitamins, and phytonutrients while remaining moderate in calories when prepared with controlled oil. The roasting method preserves many heat-stable nutrients while increasing palatability.
Per serving values vary by mix, but a typical side provides roughly 140 kcal, 4 g protein, and beneficial micronutrients. Include diverse colors to maximize nutrient variety; see general produce information at vegetable.
| Nutritional Info (per serving) | Amount |
|---|---|
| Calories | 140 |
| Protein | 4g |
| Carbohydrates | 18g |
| Fat | 7g |
Technique focus: caramelization and flavor chemistry
Caramelization of natural sugars yields sweet, toasty notes and color development on vegetable surfaces. The rate depends on sugar concentration and surface temperature for each vegetable type.
Combine sugar-driven caramelization with the Maillard reaction to produce complex savory flavors. For mechanism specifics, consult caramelization for temperature guidance.
Finishing touches and presentation
Serve the medley on a warm platter and scatter fresh herbs to inject aromatic freshness. Contrast of color and a final acid lift make dishes look composed and balanced to the eye and palate.
Use a shallow bowl or rustic board for family-style presentation. Garnish strategically to highlight texture and avoid overloading the plate with sauce that masks crisp edges.
FAQ
How do I prevent soggy roasted vegetables?
Use a single layer on a hot sheet pan and avoid overcrowding the pan. Lightly coat pieces with oil and ensure they are dry before roasting to promote browning rather than steaming.
Which vegetables should I roast together?
Group by density: roast root vegetables together and add tender vegetables later. Alternately, cut dense items smaller or give them a 10–15 minute head start in the oven for even finishing.
Can I roast frozen vegetables?
Frozen vegetables release extra moisture when thawed; pat them dry and increase oven temperature slightly. Roast on a hot, well-oiled pan and expect a shorter final cook time and slightly different texture.
What oils and seasonings work best?
Choose oils with a smoke point above your roasting temperature for stability. Olive oil is standard; experiment with spices like smoked paprika or herbs like rosemary to match your meal profile.
Are roasted vegetables healthy?
Yes. Roasting preserves many nutrients while enhancing flavor, which can increase vegetable intake. Use moderate oil amounts and pair with whole grains or legumes for balanced macronutrients.
Final notes
Roasting is a reliable technique to transform simple vegetables into a memorable dish. Small adjustments in cut size, heat, and seasoning deliver predictable, repeatable outcomes for roasted vegetables.
Practice with seasonal produce, experiment with spice blends, and apply the timing principles above. With these fundamentals, any cook can elevate roasted vegetables from a side to the meal’s highlight.

See also: Roasted Veggies
See also: roasted vegetables
]]>
- Roast first: Caramelize to prevent a watery bake.
- Layer with intent: Alternate sauce, vegetables, and cheese for balance.
- Rest before slicing: Let the strata set to preserve clean portions.
The finished dish becomes a study in contrasts: tender pasta, crisped edges, creamy ricotta, and concentrated vegetable flavor. These techniques adapt to seasonal produce and reward precise timing and seasoning.
Prep and Cook Time
Preparation: 35 minutes. This includes washing, slicing, and seasoning vegetables and preparing the sauce and cheese mixture.
Cooking: 50 minutes active oven time plus 10–15 minutes resting. Total project time varies with roast time and cooling.
- Total Time: 1 hour 25 minutes (approx.)
Yield
This recipe yields about 6 generous servings, suitable for family dinners or for portioned leftovers. It scales well; increase vegetables and sauce proportionally for larger pans.
If you prefer smaller portions, a 9×9-inch dish will serve 4; a full 9×13-inch pan serves six comfortably.
Difficulty Level
Rated Medium. The most demanding steps are consistent roasting and layered assembly. Home cooks gain the biggest returns by mastering those two stages.
Skills practiced here include heat control, seasoning in stages, and timing for texture contrast between pasta and vegetables.
Ingredients
Gather high-quality produce and dairy; each ingredient contributes to structure and flavor. Use firm vegetables that hold shape when roasted.
Essential staples include good olive oil and freshly grated cheese to improve melt and mouthfeel. Consider the link on olive oil for background on varieties and smoke points.
- 3 cups assorted vegetables (zucchini, eggplant, bell peppers, carrots), sliced into ½-inch pieces
- 2 tbsp extra virgin olive oil
- 1 tsp sea salt
- ½ tsp freshly ground black pepper
- 1 tbsp fresh rosemary, finely chopped
- 1 tbsp fresh thyme leaves
- 2 cups ricotta cheese
- 1 cup shredded mozzarella cheese
- ½ cup grated Parmesan cheese
- 1 cup basil-infused tomato sauce
- 9 sheets no-boil lasagna noodles
- 2 cloves garlic, minced
- 1 medium onion, diced
- 1 tbsp fresh basil, minced
- 1 tbsp fresh oregano, minced
- Salt and pepper, to taste
Instructions
1. Preheat and prep: Set the oven to 425°F (220°C). Toss sliced vegetables with oil, salt, pepper, rosemary, and thyme; spread in a single layer on parchment-lined sheet pans.
2. Roast: Roast 25–30 minutes, turning once, until caramelized and tender. Aim for browned edges without burning, which concentrates sweetness and reduces moisture.
3. Make the sauce: Heat 1 tablespoon oil over medium heat, sauté onion and garlic until translucent. Add tomato sauce, basil, oregano, salt, and pepper; simmer gently 20 minutes to harmonize flavors.
4. Mix the ricotta: Combine ricotta, half the Parmesan, a pinch of salt, pepper, and fresh basil. This mixture provides a cooling, creamy counterpoint to roasted vegetables.
5. Assemble: Spread a thin layer of sauce in a 9×13-inch baking dish. Cover with three lasagna sheets, a third of the roasted vegetables, dollops of ricotta mixture, a light sprinkle of mozzarella, and more sauce. Repeat twice, finishing with mozzarella and remaining Parmesan.
6. Bake and rest: Cover loosely with foil and bake at 375°F (190°C) for 30 minutes. Remove foil for the last 10 minutes to brown the top. Let rest 10–15 minutes before cutting to allow layers to set.
Pro-Caution
7. Finish: After resting, garnish with minced basil and a light drizzle of olive oil before serving. Clean slices hold their shape when the internal steam has dissipated.
Chef’s Notes
Vegetable swaps allow seasonal flexibility and texture contrast. For sturdier layers, use root vegetables or roasted mushrooms that release less water when reheated.
Consider adding a thin layer of béchamel for silkiness; nutmeg in béchamel adds warmth and rounds the cheese flavors.
Expert Insight
Fresh herbs always perform better in the final cheese and ricotta layers; dried herbs work well in the simmering sauce. Season in stages: taste sauce, then ricotta, then vegetables before final assembly.
Serving Suggestions
Serve slices with a simple, bright salad to cut richness. A lemon-based vinaigrette highlights the sweetness from the roasted vegetables.
Offer warm crusty bread or grilled polenta for an added texture contrast. Garnish each serving with a scattering of fresh basil and a light drizzle of good-quality olive oil.
Nutritional Information
This dish strikes a balanced profile of carbohydrates, protein, and fat, with fiber from vegetables. Nutritional values vary with cheese and pasta choices.
Per serving estimates reflect typical ingredients and preparation; adjust for dietary preferences like reduced-fat cheese or gluten-free noodles.
| Nutrient | Per Serving |
|---|---|
| Calories | 380 kcal |
| Protein | 18 g |
| Carbohydrates | 35 g |
| Fat | 15 g |
Technical Notes and Food Science
Roasting is a dry-heat method that uses high temperatures to trigger Maillard reactions and sugar caramelization, both of which amplify savory and sweet notes. For an overview of the method, see roasting (cooking).
Lasagna as a format layers structural starch, sauce, and fat to produce both melt and chew. For historical context on the dish, consult the entry for lasagne.
Practical Variations
To adapt for vegan diets, substitute ricotta with firm tofu blended with nutritional yeast and lemon for tang. Use vegan mozzarella to maintain stretch and topping color.
To intensify umami, add roasted mushrooms or a light splash of balsamic reduction to the vegetable mix before layering.
FAQ
What makes roasted vegetable lasagna different from traditional lasagna?
Roasted vegetable lasagna replaces meat with vegetables that are concentrated by roasting. The process adds sweet and smoky notes absent in meat-based versions, while cheese and sauce preserve the classic lasagna mouthfeel.
Should I roast vegetables before assembling lasagna?
Yes. Roasting removes excess moisture and develops flavor through caramelization. This reduces the risk of a watery final dish and strengthens the vegetable’s texture under bake conditions.
Can I use fresh lasagna sheets instead of no-boil noodles?
Fresh sheets work well but may require less sauce to avoid sogginess. If using traditional dried noodles, ensure adequate sauce to hydrate them without creating a slurry.
Which vegetables roast best for lasagna?
Opt for vegetables that hold shape and caramelize: eggplant, zucchini, bell peppers, mushrooms, and firm root vegetables such as carrots or sweet potato. For background on plant-based produce, see vegetable.
How far ahead can I assemble this lasagna?
You can assemble the lasagna a day ahead and refrigerate it unbaked. Baking from chilled adds 10–15 minutes to the oven time; resting after bake remains essential for clean slices.
These focused techniques ensure roasted vegetable lasagna delivers on flavor, texture, and presentation. Apply precise roasting, mindful seasoning, and intentional layering to build a lasagna that slices cleanly and tastes concentrated in every forkful.
See also: Vegetable Lasagna
]]>Roasted butternut squash and pasta form a seasonal main that balances sweet caramel notes with savory depth. The method hinges on high-heat roasting, tight seasoning, and a sauce that clings to broad shapes for maximum bite.
- Roast to concentrate flavor: dry heat caramelizes sugars and adds depth.
- Puree for body: a smooth squash purée yields a silky, clingy sauce with minimal dairy.
- Finish with acid and texture: bright lemon or toasted seeds lift richness.
Embracing the Vibrant Harmony of Roasted Butternut Squash Pasta Delight
Roasting transforms the flesh of the vegetable into a rich, savory-sweet base that works exceptionally with wide or ridged pasta shapes. The dry-heat Maillard reaction at the edges concentrates sugars and develops complexity that a simple simmer cannot match.
Choose a ripe specimen for the best sweetness and texture when pureeing. For reference on the crop and varieties, consult the butternut squash entry.
Prep and Cook Time
Preparation: 15 minutes. Cooking: 40 minutes. The bulk of the active time goes to roasting; plan to use that window efficiently.
Allow about 55 minutes total so the squash cools slightly before blending and the pasta finishes while the squash rests. Boil pasta toward the end of roasting to keep timing tight and maintain al dente texture.
Yield
This recipe yields 4 generous portions and scales linearly: double the squash and broth for 8 portions while retaining roast temperature and time. Scaling keeps oven conditions consistent and predictable.
When halving, use a smaller sheet to avoid over-browning caused by crowding. Increase pasta slightly for heartier servings or to feed larger appetites.
Difficulty Level
Rated Easy to Medium for home cooks. The key techniques are even roasting, careful blending, and adjusting sauce consistency with reserved pasta water.
If you can sauté aromatics and use a blender, this recipe fits a weeknight rotation. Taste as you go and adjust seasoning so the squash and herbs read clearly on the plate.
Ingredients
Ingredient quality affects the final plate markedly; choose a firm squash, fresh herbs, and a properly aged hard cheese to lift the sauce. Prefer pasta shapes with surface area or grooves so the purée adheres well.
For pantry planning, see related recipes and ingredient notes at our internal pages for Butternut squash and oven-roasted vegetables. Also review the basics of pasta shapes when selecting noodles.
- 1 medium butternut squash (about 2 pounds), peeled, seeded, and cubed
- 3 tablespoons olive oil, divided
- Salt and freshly ground black pepper, to taste
- 12 ounces pasta (fettuccine, pappardelle, or rigatoni work well)
- 2 cloves garlic, finely minced
- 1 small yellow onion, finely diced
- 1 cup vegetable broth
- 1/2 cup heavy cream or plant-based cream
- 1/4 cup grated Parmesan (or aged hard cheese)
- 1 tablespoon fresh sage, finely chopped
- 1 tablespoon fresh thyme, leaves only
- Toasted pumpkin seeds (pepitas) optional, for garnish
Instructions
Preheat the oven to 425°F (220°C) and use a rimmed baking sheet for even roast airflow. Toss squash cubes with 2 tablespoons oil, salt, and pepper and spread in a single layer to ensure browning instead of steaming.
Follow the sequence below and keep the pasta timing tight so both components finish simultaneously. Reserve 1/2 cup of starchy pasta water before draining; this liquid is crucial for binding and sheen.
- Roast the squash: Roast 30–35 minutes, turning once, until edges caramelize and flesh is tender.
- Cook the pasta: Boil in well-salted water until al dente. Reserve 1/2 cup pasta water and drain.
- Sauté aromatics: Warm remaining oil in a skillet over medium heat and cook onion until translucent, about 5 minutes. Add garlic and cook 30–60 seconds until fragrant.
- Simmer with broth: Add roasted squash and pour in vegetable broth. Simmer 3–5 minutes to loosen the mixture and marry flavors.
- Puree the sauce: Purée using an immersion blender or in batches in a countertop blender until smooth. Return to low heat.
- Finish the sauce: Stir in cream, Parmesan, sage, and thyme. Season and thin with reserved pasta water, a tablespoon at a time, until the sauce is glossy and clings to pasta.
- Toss with pasta: Combine pasta with the sauce off the heat so the dairy does not separate. Serve immediately with extra cheese and toasted seeds.
Maintain medium-low heat after adding dairy to prevent separation and curdling. If the sauce tightens too much, add more pasta water or a splash of broth until the texture restores to a glossy cling.
Pro-Caution
Tips for Success
Do not overcrowd the roasting pan; space between cubes allows edges to brown rather than steam. Use a high-heat oven and flip once halfway through to ensure even caramelization.
For texture control, pass the purée through a fine mesh for an ultra-smooth sauce or pulse gently for a rustic finish with small pumpkin flecks. Reserve pasta water to bind and control viscosity precisely.
Expert Insight
Serving Suggestions
Serve the pasta in shallow bowls so the golden sauce presents well and aromas lift from the plate. Finish with a drizzle of extra virgin olive oil, a squeeze of lemon if desired, and a sprig of fresh sage for visual contrast.
Toast pumpkin seeds in a dry skillet for 2–3 minutes and sprinkle just before serving for crunch. Pair with a crisp green salad dressed in lemon vinaigrette; see our green salad recipe for a bright match.
Nutrition Snapshot
Per serving, this plate balances carbohydrates, protein, and fat suitable for a main course. Values vary with swaps; heavy cream and cheese increase calories while cashew cream or light dairy reduces them.
| Nutrient | Per Serving |
|---|---|
| Calories | 460 kcal |
| Protein | 14 g |
| Carbohydrates | 60 g |
| Fat | 15 g |
To cut calories, swap heavy cream for blended cashews or a light dairy alternative. To raise protein, choose legume-based pasta or fold in white beans before blending for added texture and nutrition.
Practical Notes and Sources
Roasting is a dry-heat technique that drives reactions between amino acids and sugars for flavor development. For a concise overview of the method and science, consult the roasting (cooking) article.
When selecting cheese, seek out properly aged options that melt and add umami; Parmigiano-Reggiano is a classic match for winter squashes. For herb pairing notes, review the sage profile and adjust quantities to taste.
FAQ
How do I pick the best butternut squash?
Choose a squash that feels heavy for its size and has a firm, unblemished rind. A deeper tan color typically indicates maturity and a sweeter flesh, which reduces the need for added sweeteners.
Can I make this dish vegan without losing richness?
Yes. Replace cream with blended cashews or full-fat coconut milk and use nutritional yeast or a vegan Parmesan alternative for umami. Adjust salt and acid to taste to balance perceived richness.
Which pasta shapes trap this sauce best?
Wide ribbons like fettuccine and pappardelle or tubes like rigatoni catch and hold puréed sauce effectively. Textured surfaces and grooves improve the sauce-to-pasta ratio in every bite.
How should I store leftovers and reheat them?
Store cooled leftovers in an airtight container for up to 3 days. Reheat gently in a skillet with a splash of broth or water to restore creaminess and prevent drying.
What are good add-ins to elevate texture and flavor?
Toast walnuts, pepitas, or pine nuts for crunch; finish with lemon zest for brightness. For an aromatic garnish, sauté thin sage leaves in butter or oil until crisp and sprinkle over the plated dish.
Closing Remarks
This roasted butternut squash pasta relies on straightforward technique and careful timing to deliver high sensory payoff. With deliberate roasting, balanced seasoning, and targeted finishing touches, the dish performs well for weeknights and dinner parties alike.
Use the method and swaps provided to tailor the recipe to your pantry and dietary needs. Consistent roasting and thoughtful finishing will yield a creamy, balanced plate that highlights autumn produce.
See also: Butternut Squash
See also: Butternut pasta
]]>
- Roasting concentrates natural sugars and adds smoky depth.
- Layered spice technique unlocks aroma without masking vegetables.
- Make-ahead roasting improves texture and speeds weeknight assembly.
Heaping on Flavor with Roasted Veggies as the Star
Roasting transforms vegetables into concentrated, savory elements that anchor this vegetable chili. For example, caramelized sweet potatoes deliver body and natural sweetness that balance acid and heat.
Cut pieces uniformly and roast at high heat to promote Maillard browning. For a technical reference on the dry-heat method, consult roasting (cooking).
Colorful peppers add aroma and texture after a focused roast. When selecting varieties, choose firm bell types for reliable structure; see bell pepper for cultivar context.
Use even-sized cuts so sweet potato, pepper, and onion finish together. To explore sweet potato varieties and their cooking traits, see sweet potato.
Choosing the Perfect Spice Blend to Elevate Your Chili
Start with a core of smoked paprika and ground cumin to build warmth and an earthy base. For spice origin and flavor notes, refer to cumin.
Add supporting notes such as cayenne for heat and a small pinch of cinnamon for rounded depth. Balance is key: spices should amplify roasted vegetables rather than dominate them.
Whenever possible, toast whole spices and grind them before use. Toasting releases essential oils and increases aromatic intensity for a fresher spice bloom.
Bloom the spice blend in oil briefly when sautéing aromatics to extract oil-soluble flavor compounds. This step makes the spice profile lift across the entire pot.
Tips for Meal Prep and Serving Suggestions That Shine
Roast vegetables a day ahead to save time and to let flavors settle; chilled roasted vegetables integrate faster into simmering liquids. Store them airtight in the refrigerator to maintain texture.
When assembling the chili, sauté aromatics and bloom spices before adding beans and tomatoes to ensure even distribution of flavor. This sequence improves the overall balance of the finished vegetable chili.
Serve the chili with contrasting bases like brown rice or creamy polenta. For internal reference on pairing ideas, link to related recipes such as roasted vegetable chili recipe on the site.
Top bowls with fresh cilantro, toasted seeds, or a dollop of yogurt to add temperature and texture contrast. A wedge of lime brightens the smoky elements at service.
Expert Insight
For children or spice-sensitive guests, reduce cayenne gradually. Start with half the listed amount, taste, then increase in small increments while simmering.
Pro-Caution
Prep, Timing, Yield and Difficulty
Prep: 20 minutes. Roasting: 30 minutes. Simmering: 25 minutes. These estimates assume a single sheet tray and a standard oven.
Plan for about 20 minutes active time, then rely on oven and simmering time to do the work. This workflow keeps weeknight cooking realistic and efficient for the vegetable chili.
Yield: Serves 6 hearty portions. Leftovers often concentrate in flavor and taste better the next day after chilling and reheating gently.
Difficulty: Medium. The techniques focus on roasting and spice layering rather than advanced culinary skills. Home cooks with basic knife and sauté experience will succeed.
Ingredients & Instructions
Ingredients
- 2 cups sweet potatoes, peeled and cubed
- 2 cups bell peppers (red and yellow), chopped
- 1 cup zucchini, sliced
- 1 large red onion, sliced
- 3 cloves garlic, minced
- 1 15-oz can black beans, drained and rinsed
- 1 15-oz can kidney beans, drained and rinsed
- 1 28-oz can crushed tomatoes
- 2 tbsp olive oil
- 1 tbsp smoked paprika
- 2 tsp ground cumin
- 1/2 tsp cayenne pepper (adjust to taste)
- 1/2 tsp ground cinnamon
- 1 tsp dried oregano
- 1/2 tsp coriander powder
- Salt and black pepper, to taste
- Fresh cilantro, for garnish
- Optional: Greek yogurt or cashew cream, for serving
- Optional: Toasted pumpkin seeds or crushed tortilla chips, for garnish
- Optional: Lime wedges, for serving
Use canned beans for speed and consistent texture. Alternatively, cook dried beans in advance for better control over firmness and mouthfeel.
If you prefer other legumes, lentils or chickpeas work well; they change texture but integrate with roasted vegetables. For legume family context, see legume.
Instructions
- Preheat your oven to 425°F (220°C). Toss the sweet potatoes, bell peppers, zucchini, and red onion in olive oil, salt, and pepper on a large baking sheet.
- Roast the vegetables until tender and slightly charred, about 25–30 minutes, flipping halfway through to ensure even browning.
- While veggies roast, mix the spices: smoked paprika, cumin, cayenne, cinnamon, oregano, coriander, and a pinch of salt and pepper in a small bowl.
- In a large pot over medium heat, sauté the garlic in 1 tablespoon olive oil until fragrant, about 1 minute, stirring constantly to avoid burning.
- Stir in the spice blend and cook for 30 seconds to bloom the flavors.
- Add the roasted vegetables, beans, and crushed tomatoes to the pot; stir to combine everything thoroughly.
- Bring to a gentle simmer, reduce heat to low, and let the chili cook uncovered for 20–25 minutes, stirring occasionally.
- Adjust the seasoning with salt, pepper, or extra spices as desired.
- Serve hot with your favorite accompaniments and garnishes for a visually appealing and flavorful meal.
Mash a portion of the beans while simmering for a naturally thicker texture if desired. This technique avoids added thickeners and improves mouthfeel.
For internal guidance on roasting technique and follow-up recipes, visit the site guide at roasting techniques.
Tips for Success
- Variation: Swap butternut squash for sweet potatoes or add diced mushrooms for extra umami.
- Substitution: Use canned chickpeas instead of beans for a different texture.
- Make-ahead: Roast ahead and refrigerate to speed weeknight assembly and deepen flavor.
- Texture tip: Mash some beans for creaminess while preserving visible roasted pieces for texture contrast.
Small adjustments to cooking order and roasting intensity deliver consistent results across ovens. Taste and adjust salt near the end of simmering to account for concentration of flavors.
Double the roasted vegetables if you plan to repurpose leftovers into tacos or grain bowls later in the week. Leftovers reheat well and stay versatile.
Serving Suggestions
- Serve over steamed brown rice or creamy polenta for a satisfying base.
- Top with Greek yogurt or cashew cream to mellow heat and add creaminess.
- Garnish with fresh cilantro and toasted pumpkin seeds for color and crunch.
- Accompany with warm whole-grain bread or cornbread for added comfort.
- A squeeze of fresh lime brightens the dish right before eating.
Presentation improves appetite and dwell time. Use contrasting textures and bright garnishes to make each bowl inviting and camera-ready for readers.
Repurpose leftover vegetable chili in tacos, over baked potatoes, or as a warm topping for grain bowls. These options encourage meal planning and reduce waste.
| Nutrient | Per Serving |
|---|---|
| Calories | 320 kcal |
| Protein | 12 g |
| Carbohydrates | 52 g |
| Fat | 7 g |
Nutrition estimates assume standard canned beans and no added sugar. Adjust values when you swap ingredients or change serving sizes for the vegetable chili.
Pairing vegetables with legumes raises protein and satiety while keeping the dish plant-forward and nutrient-dense.
FAQ
What makes this roasted vegetable chili different from traditional chili?
This recipe emphasizes roasted vegetables as the primary flavor source rather than relying on meat browning. Roasted vegs concentrate sugars and add smoky notes that mimic slow-cooked depth.
The result is a hearty, plant-forward bowl that keeps fat and added salt lower while delivering satisfying mouthfeel and complexity.
Which vegetables roast best for this chili?
Root vegetables like sweet potatoes and firmer summer vegetables like bell peppers hold up well to high heat. Cut pieces to similar sizes so they cook evenly and finish together.
Eggplant and mushrooms also work when you want more umami; rotate vegetables seasonally to keep the dish economical and vibrant.
Can I make this chili vegan or gluten-free?
Yes. Use vegetable broth and check canned goods for additives. The core recipe is naturally gluten-free and can be fully vegan by using plant-based toppings.
For allergy concerns, verify labels and avoid cross-contact in shared cookware to ensure safety for sensitive diners.
How do I store and reheat leftovers?
Cool quickly and store in airtight containers in the refrigerator for up to four days. Freeze portions for up to three months for prep convenience.
Reheat gently on the stove with a splash of stock or water to restore silkiness, stirring occasionally to heat evenly.
How can I increase protein without changing the flavor profile?
Add cooked lentils or an extra can of black beans to boost plant protein while keeping the roasted notes dominant. Both options integrate with minimal texture change.
Serve over quinoa for a complete protein grain base; this small swap enhances nutrition while preserving the dish’s familiar flavors.
See also: Vegetable chili
See also: vegetable chili
]]>
- Key textures: Aim for caramelized edges and tender interiors for balanced mouthfeel.
- Timing matters: Stagger root and soft vegetables to ensure even doneness.
- Seasoning baseline: Olive oil, smoked paprika, and thyme create a dependable backbone.
Prep and Cook Time
Preparation: Allow 20 minutes to wash, trim, and cut vegetables to consistent sizes. Consistent pieces equal even roasting and predictable texture.
Roasting: Roast at 425°F (220°C) for 35–40 minutes, turning once. Higher heat drives caramelization through Maillard reactions and caramelization, improving flavor concentration.
Yield
This recipe serves six as a colorful side dish and scales well for larger batches. Multiply ingredients by 2x or 3x and roast on separate sheet pans to avoid crowding and steaming.
Leftovers retain value: they work in salads, bowls, and blended preparations. Reheated vegetables regain crispness when refreshed briefly under high heat.
Difficulty Level
Easy. The technique emphasizes simple, repeatable steps that deliver consistent results for cooks at any skill level. Focus on cut uniformity and high oven temperature to get professional outcomes.
Time management and mise en place reduce errors. When you prep ingredients before heating the oven, the roast proceeds without stress.
Ingredients
Gather fresh, firm produce and pantry staples for a balanced medley. Use high-quality extra virgin olive oil to coat pieces and promote even browning; learn more about oil selection at Olive oil.
Below are the ingredients for a six-serving batch; adjust ratios to taste and seasonality. Substitute similar-textured vegetables when needed to preserve cooking times.
- 2 cups baby carrots, trimmed
- 1 large red bell pepper, cut into 1-inch pieces
- 1 medium zucchini, sliced thickly
- 1 cup Brussels sprouts, halved
- 1 medium red onion, cut into wedges
- 1 medium sweet potato, peeled and cubed
- 4 cloves garlic, minced
- 3 tbsp extra virgin olive oil
- 1 tsp smoked paprika
- 1 tsp dried thyme
- ½ tsp ground cumin
- Salt and freshly cracked black pepper to taste
- Fresh parsley for garnish
Spice blend and swaps
Use smoked paprika and thyme as a neutral, autumnal base, then test variations like rosemary or za’atar. Small swaps maintain integrity while expanding flavor range.
For sharper aromatic notes, add a pinch of red chili flakes or smoked chili powder. If you prefer herb-forward profiles, finish with lemon zest and fresh herbs just before serving.
Instructions
Preheat your oven to 425°F (220°C) and prepare a rimmed sheet pan with parchment or a silicone mat. A rimmed pan prevents juices from pooling and encourages even contact between vegetables and hot metal.
Cut vegetables into similar-sized pieces to ensure uniform cooking. Uniformity prevents a mix of undercooked interiors and burnt edges.
Step-by-step roasting
- Combine carrots, bell pepper, zucchini, Brussels sprouts, onion, sweet potato, and garlic in a large bowl.
- Coat with olive oil and toss to ensure even coverage; oil conducts heat and promotes browning.
- Season with smoked paprika, thyme, cumin, salt, and pepper; toss to distribute spices evenly.
- Spread in a single layer on the prepared baking sheet—do not crowd the pan.
- Roast for 35–40 minutes, turning once halfway. Roast until tender with deep golden edges.
- Rest for 5 minutes off the heat before plating to let flavors settle.
If you include quick-cooking vegetables, add them halfway through roasting to avoid overcooking. Adjust roasting time for different ovens; convection ovens often reduce time by 10–15%.
Pro-Caution
Tips for Success
Choose firm, blemish-free vegetables for predictable texture and flavor outcomes. Seasonal produce offers the best sugar content for caramelization and concentrated taste.
Monitor the roast during the last 10 minutes to control the level of browning. Small adjustments at the tail end make the difference between slightly caramelized and deeply charred.
- Vegetable selection: Opt for fresh, firm produce free from blemishes; seasonality improves results.
- Cut size: Keep pieces consistent—this prevents burning or uneven cooking.
- Enhance sweetness: Add a light drizzle of maple syrup or honey in the final 5 minutes for extra glaze; the sugars will brown quickly.
- Make ahead: Roast in advance and reheat briefly at high heat for revived texture.
- Seasoning variations: Swap thyme for rosemary or add za’atar for a Middle Eastern twist.
Expert Insight
Creative Serving Suggestions
Serve the medley alongside whole grains like quinoa or farro to build a complete dish; see general grain profiles at Quinoa. Grains supply chewy contrast and additional protein.
Garnish with parsley, toasted seeds, or pine nuts for texture and flavor contrast. Pair the vegetables with a creamy hummus, tahini, or a lemon-yogurt drizzle for balance.
For an elevated presentation, mound the vegetables on a wide platter and sprinkle with toasted seeds and a scattering of fresh herbs. This technique suits holiday tables and buffets where visual appeal matters.
If you want further technique notes and seasonal selection ideas, consult our Ultimate Guide to Roasted Vegetables or the seasonal produce guide for pairing suggestions and shopping tips.
Nutritional Profile
Roasted vegetables provide fiber, vitamins, and moderate calories, depending on oil and portion size. A typical six-serving recipe yields about 160 calories per serving, with modest protein and healthy fats.
Roasting can concentrate flavors without large added fats, provided you limit oil to a thin coating. To learn how heat affects nutrients, review principles in food chemistry and cooking thermodynamics at Roasting (cooking).
| Nutrient | Per Serving |
|---|---|
| Calories | 160 |
| Protein | 3g |
| Carbohydrates | 24g |
| Fat | 7g |

FAQ
What is the best oven temperature for roasting vegetables?
Use 425°F (220°C) for reliable caramelization and tender interiors. Higher temperatures accelerate Maillard reactions and reduce overall cook time, but watch closely to prevent burning.
How do I ensure even roasting when mixing root and soft vegetables?
Cut root vegetables smaller or start them 10–15 minutes before adding softer vegetables. Alternatively, remove tender items early or add them later in the roast to synchronize doneness.
Can I roast vegetables ahead of time and reheat them?
Yes. Store cooled vegetables in an airtight container for up to four days. Reheat briefly at high heat or use a hot skillet to restore caramelized edges and minimize sogginess.
Which oils and fats work best for roasting?
Use oils with moderate to high smoke points; extra virgin olive oil provides flavor and works at the temperatures recommended here. For higher heat or different flavor profiles, choose refined olive oil or avocado oil.
How do I add color and crunch after roasting?
Finish with toasted nuts, seeds, or a quick squeeze of lemon to brighten flavors. Fresh herbs like parsley or chopped chives add color and aromatic lift.
For botanical context on specific vegetables such as Brussels sprouts, consult the detailed entry at Brussels sprout. For sugar transformations during cooking, the caramelization article provides clear chemical background.
Dive into the harvest and master this medley with controlled technique, thoughtful seasoning, and smart timing. Use the internal guides above for extra recipes and seasonal tips to keep your kitchen inspired.
See also: Roasted Vegetables
]]>This guide breaks the process into clear steps and actionable tips so you can replicate the result with consistent texture and flavor. Use the timings and techniques below to avoid watery layers and to get a golden, stable slice every time.
- Key result: Roasting vegetables reduces moisture and concentrates flavor.
- Cheese balance: A ricotta-based blend adds cream while aged cheese adds bite.
- Sauce strategy: Simmer low to deepen tomato richness without bitterness.
- Make-ahead: Assemble a day early for cleaner slices and stronger flavor.
Prep and Cook Time
Preparation: 30 minutes. Cooking: 45 minutes. These times assume standard oven performance and prepped vegetables.
Account for an additional 15 minutes of resting time after baking to let the layers set. Resting improves slice definition and serving presentation.
Yield and Difficulty
This recipe yields eight generous portions. It suits dinner parties, meal prep, and freezer-friendly planning.
Difficulty: Medium. The technical tasks involve consistent slicing, moisture control, and even layering. These are straightforward with the right sequence.
Ingredients
Gather organized, quality ingredients before you start. Good inputs—fresh vegetables, whole-milk ricotta, and ripe tomatoes—simplify technique and deliver predictable results.
Below are the core components and suggested quantities for a 9×13-inch pan. Adjust proportions while keeping the same layering logic to scale up or down.
- Lasagna noodles: 12 sheets (no-boil or pre-cooked)
- Vegetables: 1 medium zucchini (thinly sliced), 1 large eggplant (½-inch rounds), 2 cups fresh spinach, 1 red bell pepper (diced), 1 yellow onion (finely chopped), 3 cloves garlic (minced)
- Cheese blend: 1 cup whole-milk ricotta, 2 cups shredded mozzarella, ½ cup grated Parmesan, ½ cup crumbled feta
- Tomato sauce: 5 cups crushed tomatoes, 2 tbsp extra-virgin olive oil, 1 tsp dried oregano, 1 tsp dried basil, ½ tsp red pepper flakes, 1 small carrot (grated), 1 celery stalk (finely diced), salt and black pepper
- Olive oil: 2 tbsp for sautéing
- Fresh herbs: ¼ cup chopped basil, plus extra for garnish
- Salt and pepper: To taste
Cheese blend notes
Use whole-milk ricotta for a creamier mouthfeel and better structure when slicing. Combine it with a melting cheese like mozzarella and one aged cheese for savory depth.
If you prefer tang, replace feta with goat cheese or add a bit more Parmesan. These swaps change flavor but preserve the structural role of the blend.
Sauce components
Start with high-quality crushed tomatoes to build an unbroken flavor base. Adding grated carrot and diced celery mellows acidity and adds natural sweetness.
Simmer uncovered to concentrate flavor. Low, steady heat prevents acidity from turning bitter and creates a sauce with body rather than thin liquid.
Instructions
Follow the sequence: sauce, roast vegetables, wilt greens, mix cheeses, assemble, and bake. Keeping tasks parallel saves time and ensures components finish together.
Work with hot pans and oven-ready trays so you minimize waiting between steps. A clean mise en place prevents overcooking.
Prepare the tomato sauce
Heat 2 tbsp olive oil in a saucepan over medium heat. Add grated carrot, diced celery, and chopped onion; sauté until softened, about 6–8 minutes.
Add minced garlic for one minute, then stir in crushed tomatoes. Season with oregano, basil, red pepper flakes, salt, and pepper. Reduce to low and simmer uncovered for 30–40 minutes until thick.
Roast and prep the vegetables
Preheat the oven to 400°F (200°C). Lightly brush zucchini and eggplant slices with olive oil and roast for 12–15 minutes on a baking sheet until slightly caramelized. Flip once for even color.
Wilt spinach quickly in a hot skillet with a pinch of salt, then drain thoroughly in a sieve or kitchen towel. Roasted vegetables and drained greens prevent excess moisture in the final bake.
Optional: Reduce moisture further
After roasting, let eggplant and zucchini rest on paper towels to wick surface oil and water. This extra step yields cleaner layers and crisper edges when sliced.
Pressing roasted slices gently with a spatula removes pooled liquid. It costs little time and improves final presentation.
Mix the cheese and assemble
In a mixing bowl, combine ricotta, 1 cup mozzarella, Parmesan, feta, and 2 tbsp chopped basil. Season lightly with salt and black pepper; the cheese blend should taste balanced but not salty.
In a 9×13-inch baking dish, spread a thin coat of sauce on the base. Layer four noodles, one-third of the cheese blend, a layer of roasted vegetables, diced bell pepper, a handful of wilted spinach, and a spoonful of sauce. Repeat twice and finish with remaining noodles and sauce.
Bake and rest
Cover the dish tightly with aluminum foil and bake at 375°F (190°C) for 25 minutes. Remove foil and bake another 15–20 minutes until the edges bubble and the top browns slightly.
Allow the lasagna to rest at least 15 minutes before slicing. Resting firms the structure and produces clean, attractive portions.
Tips for Success
Consistency in slice thickness makes a big difference. Aim for uniform vegetable slices to ensure even roasting and layer texture.
Control moisture at three points: roast vegetables, drain greens, and simmer sauce until thick. That sequence prevents a runny bake.
- Uniform slicing: Use a mandoline for even rounds.
- Layer balance: Keep sauce thin on the base and generous between layers to avoid dryness.
- Cheese distribution: Mix cheeses well so every forkful gets cream and melt.
Expert Insight
Make-ahead assembly lets flavors meld and improves slice stability. Refrigerate overnight, then add 5–10 minutes to the covered baking time when cooking from chilled.
Serving Suggestions
Serve warm garnished with torn basil and a light drizzle of extra-virgin olive oil. A crisp green salad with a vinegar-based vinaigrette cuts richness and refreshes the palate.
Pair with light to medium-bodied wines or sparkling water with lemon to balance the dish. Offer crusty bread for those who want extra texture.
Pro-Caution
For vegetarian diners who follow gluten-free or vegan diets, consider gluten-free noodle sheets or thinly sliced vegetables as noodle substitutes. Use firm tofu ricotta or cashew cream to replace dairy without losing body.
Nutritional Information (per serving)
These estimates assume standard cheeses and no added meat. Values vary by brand and portion size. Use nutrition labels for precise tracking when needed.
Typical per-serving values: ~380 calories, 22 g protein, 32 g carbohydrates, 18 g fat. Adjust cheese and oil to alter fat and calorie totals.
| Calories | Protein | Carbs | Fat |
|---|---|---|---|
| 380 | 22g | 32g | 18g |
FAQ
This FAQ addresses common execution questions and substitutions. Read these answers before you begin to avoid common pitfalls.
Each response focuses on practical steps you can apply immediately at the stovetop or assembly table.
What makes a veggie lasagna “classic”?
A classic relies on balanced layers: pasta, a flavorful tomato base, a creamy cheese layer, and well-cooked vegetables. The aim is contrast between soft pasta and textured vegetables.
Traditional versions use ricotta and mozzarella; adding one aged cheese such as Parmesan gives savory lift and salt balance.
Which vegetables give the best texture and flavor?
Zucchini, eggplant, spinach, mushrooms, and bell peppers offer variety in bite and taste. Each adds a different texture, so combine firmer roasted vegetables with quick-wilted greens.
Roasting concentrates sugars and cuts water content; that step matters more than the specific vegetable chosen.
How do I avoid a watery lasagna?
Remove moisture at three control points: drain wilted greens, roast (don’t steam) vegetables, and simmer sauce until it reduces. Also use no-boil pasta only if it can absorb excess liquid.
Covering the lasagna while baking holds moisture, then removing the foil at the end encourages a golden top without drying the interior.
Can I make this ahead or freeze it?
Yes. Assemble the lasagna and refrigerate overnight for sharper slices and deeper flavor. Or freeze unbaked in an airtight pan for up to 3 months.
If baking from frozen, add 20–30 minutes to the covered baking time to ensure even heating through the center.
How can I adapt this for gluten-free or vegan diets?
Use certified gluten-free lasagna sheets or thinly sliced vegetables as noodle substitutes for a gluten-free version. For vegan, swap ricotta with tofu ricotta or cashew cream and use plant-based shredded cheese.
Maintain the same layering and moisture-control principles to preserve structure and flavor regardless of substitutions.
See also: veggie lasagna
]]>