Flavor science explains how chemistry and precise technique produce aroma, taste, and texture. When you apply flavor science to heat, time, and ingredient choices, you move from guesswork to predictable, repeatable results.
- Control browning to increase savory aroma and depth.
- Balance acid and fat for perceived brightness and richness.
- Respect time: resting and slow extraction change texture and release tastants.
- Test methodically and record outcomes to improve consistency.
Why Flavor Science matters
Applying flavor science turns culinary practice into a set of controlled experiments. You focus on variables—temperature, surface dryness, acidity—that consistently change outcomes.
That repeatability reduces waste, improves yield, and raises the quality of dishes in both home and professional kitchens. Use simple measurements and sensory checks to track improvements.
Foundational Flavor Science: key reactions and concepts
The Maillard reaction and caramelization create many volatile and nonvolatile compounds that we recognize as roasted, toasty, and sweet-browned notes. Control surface temperature and dryness to maximize positive compounds without burning.
Umami compounds concentrate through gelatin extraction and aging. Read about Umami to understand how glutamates and nucleotides layer into savory depth. Combine these concepts to design flavors rather than merely chase them.
Prep and Cook Time driven by Flavor Science
Preparation: 15 minutes | Cooking: 45 minutes | Total Time: 1 hour. These targets balance surface flavor development with internal doneness for bone-in chicken thighs.
Plan a short rest after cooking so juices redistribute and flavors equilibrate. Resting is a low-effort step with a high return in texture and perceived juiciness.
Yield and scaling with Flavor Science
Serves 4 as a main course. When scaling, maintain searing surface area and liquid ratios to preserve concentration of extracted compounds.
Measure critical ingredients by weight where precision matters. Weight-based measurement reduces variance that undermines reproducible flavor outcomes.
Difficulty Level: practical flavor science application
Medium — this recipe prioritizes heat control, browning management, and timed simmering. It rewards technique rather than specialized equipment.
Home cooks will succeed by following temperature cues and observing visual indicators such as a deep golden crust and reduced pan sauce viscosity.
Ingredients
These components combine protein, aromatics, and acid to build layered flavor. Choose bone-in cuts for gelatin, aromatics for volatile lift, and acid for brightness.
- 2 lbs bone-in chicken thighs, skin on
- 1 tbsp olive oil
- 1 tsp kosher salt
- ½ tsp freshly ground black pepper
- 1 medium yellow onion, finely chopped
- 3 cloves garlic, minced
- 1 tsp smoked paprika
- ½ tsp ground cumin
- 1 cup low-sodium chicken broth
- 1 tbsp tomato paste
- 1 tsp lemon zest
- 2 tbsp fresh parsley, chopped (for garnish)
- Juice of 1 lemon
Use fresh ingredients and measure by weight when practical. Precision supports consistent results when you apply flavor science principles.
Instructions — sequence guided by Flavor Science
Follow the sequence to maximize surface browning, bloom spices, and extract gelatin and collagen from bones and pan fond. Each step targets a defined chemical or physical change.
Work efficiently: prep mise en place, set heat levels before adding ingredients, and use visual cues like color, aroma, and pan fond to judge progress.
Searing and developing aroma
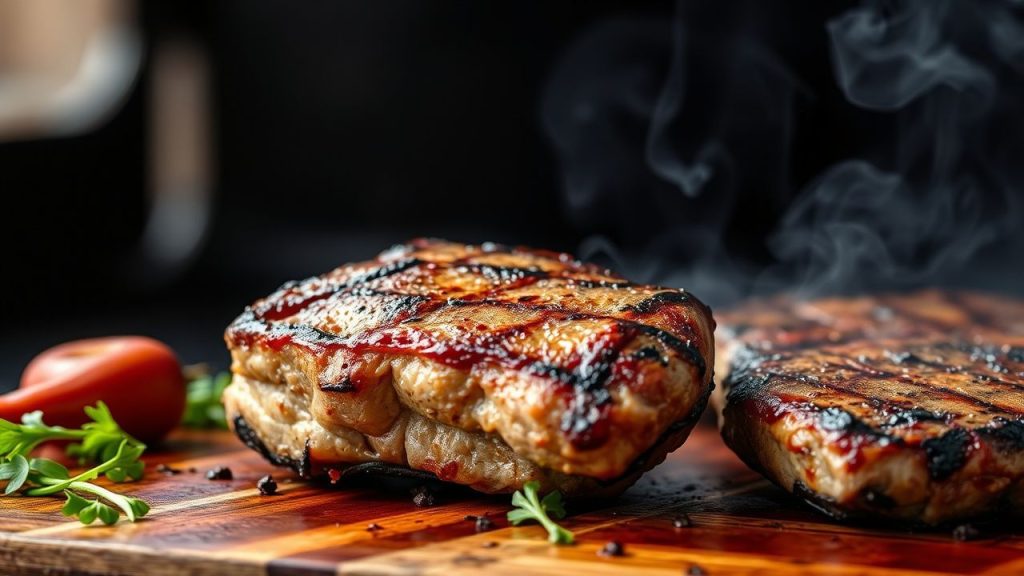
1. Prep the chicken: Pat thighs dry to remove surface moisture. Season both sides evenly with salt and pepper so the skin can reach the dryness needed for crust formation.
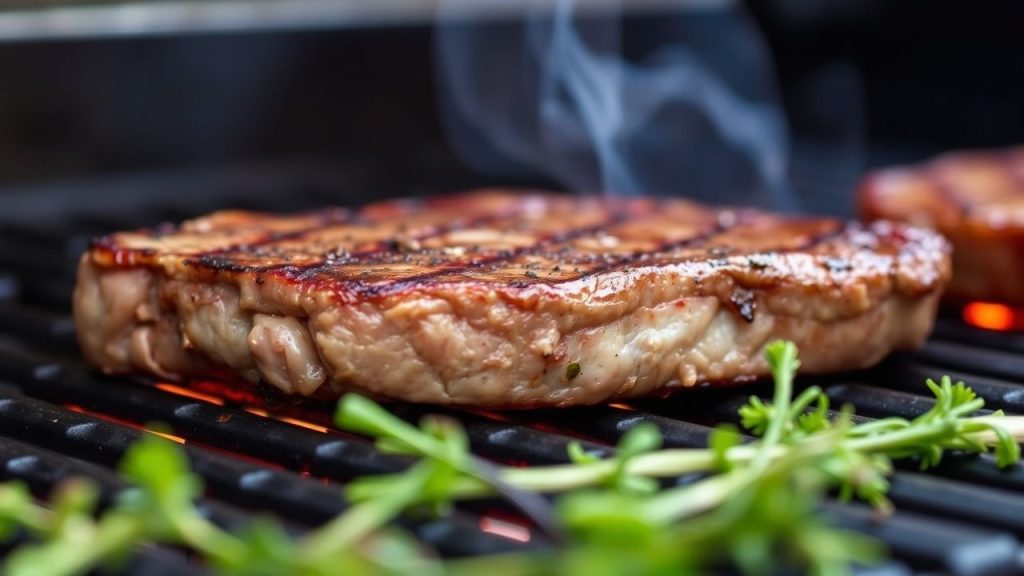
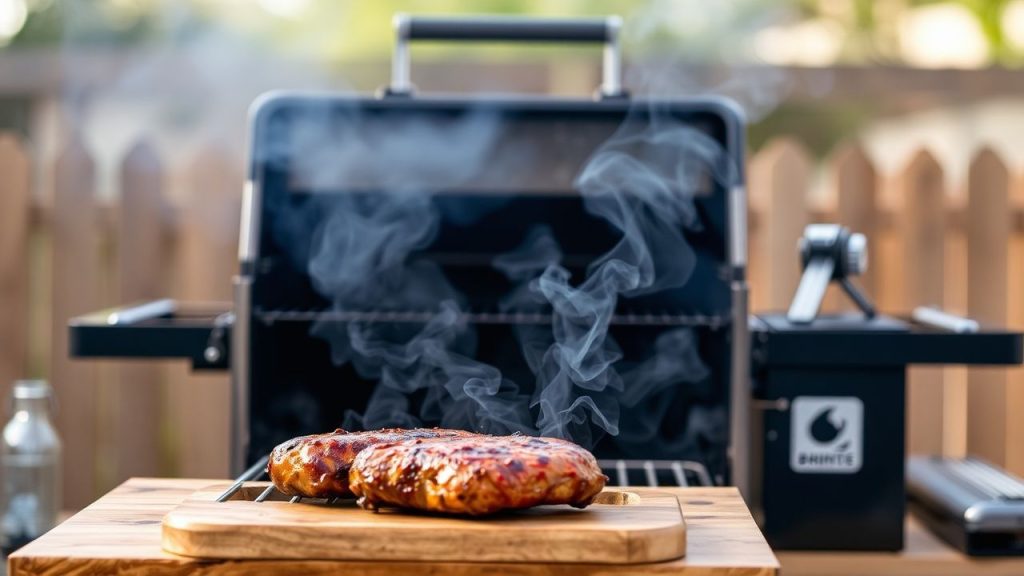
2. Sear: Heat oil in a heavy skillet until shimmering. Place chicken skin-side down and press to maintain contact. Sear until deep golden brown, about 6–8 minutes, then flip and sear 2–3 minutes more.
Sautéing aromatics and blooming spices
Remove chicken and set aside. Reduce heat, add onions, and cook until translucent and fragrant, about 4–6 minutes. Then stir in garlic, paprika, and cumin and cook 30–60 seconds to bloom spices and release their volatile oils.
Short, controlled cooking prevents bitter burnt notes while unlocking aroma. Blooming spices at moderate heat increases their solubility into the sauce.
Building and finishing the sauce
Stir in tomato paste and cook 1–2 minutes to deepen flavor. Add broth and scrape the pan fond; those browned bits concentrate Maillard compounds that enrich the sauce.
Return chicken skin-side up, add lemon zest, cover, and simmer gently for 30 minutes. Finish with lemon juice and a brief reduction to balance richness and concentrate savory notes.
Chef’s Notes: applied Flavor Science
Dry the skin: Surface moisture prevents reliable browning. Blot thoroughly before seasoning and searing to maximize Maillard-driven aroma.
Control heat: High heat builds aroma compounds quickly but can scorch spices. Lower heat after searing while you sauté aromatics to maintain clean flavors.
 Expert Insight
Use bones for depth: Bone-in cuts release gelatin and mineral cues under heat, which boost mouthfeel and perceived umami. That concentrated mouthfeel often reads to diners as deeper flavor.
Make ahead: This dish often improves after a few hours or overnight as flavors equilibrate. Reheat gently to preserve texture and avoid drying the meat.
Serving Suggestions guided by Flavor Science
Pair with basmati rice or creamy polenta to absorb sauce and balance textures. Both starches act as neutral carriers that highlight the chicken’s savory profile.
A crisp green salad with a citrus vinaigrette adds acidity and freshness to cut richness. Finish with chopped parsley and a lemon wedge for visual contrast and immediate brightness.
 Pro-Caution
Nutrition per serving
Approximate nutrition helps plan portions and dietary balance. Values assume typical ingredients and standard serving sizes.
Per serving: ~370 kcal, 32 g protein, 6 g carbohydrates, 24 g fat. Adjust ingredients to fit specific dietary needs.
Science links and resources for Flavor Science study
To extend technique into reliable practice, consult accessible scientific summaries. These sources provide frameworks for hypothesis-driven recipe tests and systematic adjustments.
Start with summaries in food chemistry and the mechanisms of taste perception. Use these concepts to design controlled tests at the stove.
FAQ
What is flavor science?
Flavor science studies how molecules, heat, and time interact to produce aroma, taste, and mouthfeel. It translates chemical reactions into culinary technique.
Practically, it means selecting methods that reliably produce the compounds you want—like Maillard-derived aroma—rather than hoping for them by chance.
How does the Maillard reaction improve flavor?
The Maillard reaction forms hundreds of compounds when amino acids react with reducing sugars under heat. These compounds produce roasted, savory, and toasty notes we associate with well-browned foods.
Control surface temperature and dryness to favor desirable Maillard products while avoiding bitter burnt byproducts. Visual and olfactory cues guide timing in real kitchens.
Can I use sous-vide techniques with this recipe?
Yes. Sous-vide gives precise temperature control to reach uniform doneness. Finish by searing to develop surface aroma through Maillard chemistry.
Dry the skin thoroughly before finishing with high heat to recreate the crust and volatile aroma compounds typical of pan-seared poultry.
What simple habits deliver the biggest flavor gains?
Start with three habits: salt ahead of time, control searing heat, and finish with acid. Those steps respectively improve seasoning penetration, build aroma, and balance richness.
Run small, controlled tests—change one variable at a time—and record sensory outcomes to identify the highest-impact adjustments.
How does texture influence perceived flavor?
Texture controls how flavors release and how saliva carries soluble tastants to receptors. Gelatin-rich sauces coat the palate and prolong taste, while crisp textures create contrast and perceived brightness.
Design textures deliberately by understanding starch gelatinization and protein coagulation to amplify the overall eating experience.
Key Takeaways
Flavor science gives you a toolbox: control browning, manage acidity, and respect time. These interventions target known chemical pathways that determine aroma, taste, and texture.
Apply small, testable changes and log results. This iterative, measurable approach delivers consistent, repeatable flavor improvements across recipes.

For hands-on practice, run a simple experiment: cook two thighs with different salting times or sear temperatures and note aroma, crust, and juiciness. Systematic comparison trains your senses to detect technique-driven differences quickly.
See also: Flavor Science and CookOrbit home
Recommended Reading:
]]>
- At a glance: Dry the fillet thoroughly, use a heavy pan, sear mostly skin-side down, finish with butter for flavor and gloss.
- Timing tip: For a 1-inch fillet, expect about 6–8 minutes skin-side down and 2–3 minutes on the flesh side.
- Pan care: Work in batches to avoid steam and maintain surface temperature for repeatable crisping.
Choosing Fish and Tools for Crispy Skin
Pick a fresh, skin-on fillet to maximize the chance of crisping. Fresh salmon has firm flesh and a taut skin that responds predictably to high-heat contact.
Use a heavy-bottomed skillet to hold steady heat and create an even crust. A cast-iron or thick stainless pan resists temperature drop; see the mechanics of good cookware on cast-iron cookware.
Prep and Timing for Crispy Skin
Effective prep focuses on removing surface moisture and tempering the fish. Pat fillets completely dry, salt just before cooking, and let the skin air-dry briefly on a rack to improve contact.
Time is variable by thickness, but the method is constant: long skin-side contact, short flesh-side finish. Visual cues—color change from the edge inward—give more reliable results than rigid timers.
Yield, Difficulty, and Batch Management for Crispy Skin
Plan yield by fillet size and pan capacity so you do not overcrowd the surface. Overcrowding lowers pan temperature and creates steam that defeats crisping.
Difficulty is moderate because the technique depends on temperature control and timing. With practice and consistent mise en place, the steps become routine and reproducible.
Ingredients That Build Crispy Skin
Keep the ingredient list short and functional: a neutral high smoke-point oil, a small finishing amount of butter, coarse salt, and pepper. The oil handles sear heat while butter adds gloss late in the cook.
Use oils suited to searing heat and flavor goals; compare options on the cooking oil overview. Choose avocado or grapeseed for neutral flavor and high smoke point.
Instructions to Achieve Crispy Skin
Follow a fixed sequence: dry, season, preheat pan, add oil, sear skin-side down, flip, baste, rest, and serve. Each step isolates a single variable—moisture, heat, contact, or finish—so you can troubleshoot precisely.
Heat the pan until it retains heat well and the oil shimmers but does not smoke. For a 1-inch fillet, press the skin briefly to ensure contact, sear skin-side down for 6–8 minutes, then flip and finish for 2–3 minutes.
Step-by-step details
Pat the skin until it feels tack-free and season immediately before cooking to avoid extracting excess moisture. If you must salt early, re-pat the fillet before it hits the pan.
Add oil and heat to a visible shimmer; this reduces sticking and encourages Maillard reaction for a golden crust. Avoid moving the fillet while the crust forms; the fish will release when the crust is ready.
After flipping, lower the heat and add a small amount of butter to baste for 30–60 seconds. Basting adds flavor without burning when used at the end of the cook.
Rest the cooked fillet briefly on a warm plate for 1–2 minutes to let carryover heat equalize the interior. Serve skin-side up to preserve and showcase the crisp texture.
Pro-Caution
When working multiple fillets, wipe the pan between batches and reheat the oil so each piece hits the optimal surface temperature. That reset preserves consistent results across servings.
Techniques and Physics Behind Crispy Skin
The goal is direct conduction of heat to the skin to drive Maillard browning while limiting steam formation. Surface dryness and firm contact remove insulating air pockets, enabling even browning.
Press the fillet at initial contact to flatten edges and eliminate air pockets. Maintain a stable pan temperature to sustain conduction; erratic heat produces uneven browning or burning.
Pan-frying mechanics
Pan-frying relies on sustained surface contact and the oil’s heat capacity to transfer energy into the skin. For deeper context on frying techniques, review frying.
Use a thin metal fish spatula for precise flipping. A careful flip preserves the crust and avoids tearing the skin.
Tips for Crispy Skin Success
Dryness matters: Even light surface moisture prevents crusting. Pat dry well and let fillets rest uncovered briefly if needed to remove residual dampness.
Temperature control: Start at medium-high for initial sear, then drop to medium-low after flipping to finish the flesh without burning the skin. This sequencing protects both texture and flavor.
Expert Insight
Use fats with high smoke points for the main sear and reserve butter as a finishing agent. Butter browns quickly and contributes desirable nutty notes when added late in the cook.
Work in single layers and avoid overcrowding so each fillet cooks in consistent, dry heat. If you must cook in batches, reheat the pan and oil to maintain a strong sear surface.
Serving Crispy Skin Salmon
Plate the fillet skin-side up to preserve the crunch and show off the color contrast between skin and flesh. A late squeeze of lemon and a sprinkle of flaky sea salt sharpen the perception of crispness.
Pair the salmon with something creamy, like mashed potatoes or a yogurt-based sauce, to amplify mouthfeel contrast. Bright sides, such as sautéed greens, cut richness and refresh the palate.
Common Problems and Troubleshooting for Crispy Skin
If the skin sticks, the pan or oil was not hot enough or the skin still held moisture. Reheat the pan and wait until the oil shimmers before trying again.
If the skin chars before the flesh cooks, reduce initial heat slightly and lengthen the finish on the flesh side at lower temperature. Use a thermometer to confirm internal temperature when precision is required.
FAQ
How does moisture affect crispy skin?
Moisture creates steam between skin and pan, preventing direct contact and browning. Dry thoroughly and, if needed, air-dry fillets briefly to eliminate surface dampness.
Salt draws moisture out of flesh; salt immediately before cooking or re-pat the fish if you salted earlier to maintain dryness for crisping.
Which oil is best for crispy skin pan-searing?
Choose a neutral oil with a high smoke point like avocado or grapeseed. These oils tolerate searing heat and preserve oil integrity during the sear phase.
Add a small knob of butter near the end for flavor and gloss, but avoid using butter as the primary searing fat because it browns and smokes quickly.
Why does the skin sometimes stick to the pan?
Sticking typically indicates the pan or oil wasn’t hot enough or the skin retained moisture. Heat the pan correctly and avoid moving the fish until the crust forms.
A properly formed crust releases naturally; forceful flipping risks tearing the skin and compromising crispness.
Can frozen salmon produce crispy skin?
Yes, but only if fully thawed and dried thoroughly. Frozen fillets often retain more water, so extend drying time and consider patting and air-drying before searing.
Fresh fillets give the most predictable results, but careful handling of thawed fish can still yield satisfying crispy skin.
How do I judge doneness without overcooking?
Look for an opaque band moving from the edge toward the center and a slightly translucent core for medium doneness. Use a gentle lift with a thin spatula to inspect doneness without piercing the flesh.
Remove the fillet while a slight translucence remains; carryover heat during the short rest will finish the center without drying out the fish.
See also: Technique references on searing and pan tools support repeatable results across kitchens. Practice and controlled technique produce consistent crispy skin every time.

For repeatable outcomes, focus on surface dryness, pan heat retention, and fat selection. Those three levers determine whether you get a crisp, golden skin or a soggy surface.
Adopt a checklist approach—dry, season, preheat, sear, finish—to reduce variation and increase success on the first try.
See also: crispy skin
]]>
- Choose the right cut for your cooking method to balance tenderness and flavor.
- Build seasoning around cumin and smoked paprika for authentic depth.
- Sear, then simmer to develop crust and retain juiciness.
- Layer textures with fresh toppings and a creamy element for balance.
Choosing the Perfect Cut: Understanding Beef Varieties for Tender Tacos
Beef selection drives flavor and mouthfeel. For classic ground tacos, an 80/20 ground chuck offers the marbling needed to stay juicy under heat.
For sliced or shredded tacos, consider cuts that suit their method: quick-sear steaks like flank steak or skirt steak, and braising cuts like chuck or brisket for shredding. Use the right cut and you will waste less time fixing texture issues.
Lean cuts dry out quickly; avoid extra-lean ground beef when you want succulence. When braising, collagen in tougher cuts breaks down and yields tender, shreddable meat with concentrated flavor.
Working knowledge of beef anatomy helps you predict results. For a broad overview of the protein you are working with, see beef, which explains common cuts and cooking properties.
Unlocking Authentic Flavors: Crafting the Ultimate Taco Seasoning Blend
Seasoning sets the tone: a few well-chosen spices deliver more impact than a long ingredient list. Start with ground cumin and smoked paprika as your backbone and add chili powder for warmth and mild heat.
A basic dry blend of cumin, smoked paprika, chili powder, garlic powder, onion powder, and dried oregano will cover most bases. Fresh components like minced garlic and diced jalapeño improve aroma and immediate flavor when added while cooking.
For reference on two key spices, review the history and uses of cumin and paprika. Both contribute earthy, slightly smoky notes essential to taco meat.
Pre-made mixes work, but crafting your own seasoning lets you calibrate salt and spice levels to suit your household. Freshly ground spices will always outperform aged jarred blends.
Step by Step to Taco Perfection: Preparing and Cooking Beef Like a Pro
Start with dry meat. Patting beef dry before it hits the pan reduces surface moisture and encourages the Maillard reaction that creates a savory crust.
Heat matters: use a heavy-bottomed pan or a hot frying surface to get even browning. A hot surface creates a crisp exterior while keeping interior juices locked in.
- Prep: Pat the meat dry and measure spices. Pre-chopped toppings save time and prevent overcooking while you assemble.
- Heat the skillet: Use medium-high heat and add a tablespoon of oil when pan is hot.
- Sear: Add beef without crowding; allow it to brown on one side for 3-4 minutes to form a crust.
- Season: Sprinkle your blend evenly, toss, and continue to cook until the meat is fully browned, about 6-8 minutes for ground beef.
- Simmer: Add 2-4 tablespoons of broth or water, reduce heat, and simmer for 3-5 minutes to marry flavors while keeping moisture.
- Rest: For sliced or shredded beef, rest briefly before slicing thin or shredding with forks to preserve juices.
Searing then simmering gives you both a flavorful crust and a moist interior. That sequence matters more than exotic ingredients for reliable results.
If you use a cast-iron or heavy skillet, it retains heat well and promotes even browning; read more about the tool in general cooking use at frying pan.
Elevate Your Tacos: Creative Toppings and Sides to Complement Every Bite
Topping choices change the profile of a taco instantly. Classic combinations—onion, cilantro, lime—brighten the meat and balance fat with acid and herbaceous notes.
Add creamy elements like Mexican crema, sour cream, or avocado to tame heat and add a velvety contrast to crisp garnishes such as radish or pickled jalapeños.
Try a selection of salsas: verde for tang, chipotle for smoke, and fruit-based salsas like mango for sweet contrast. Serving a small array encourages diners to customize and increases meal satisfaction.
Expert Insight
Pair tacos with sides that mirror central flavors. Roasted corn seasoned with chili and lime or a simple black bean salad complements beef without competing.
Use fresh lime juice at the end of assembly to brighten flavors; the acid lifts spices and adds perceived freshness to the entire taco.
Tips for Success and Practical Variations
Temperature control is a common failure point. Keep the pan hot enough for browning but not so hot that spices burn. Adjust heat after adding seasoning to maintain even cooking.
Make-ahead strategies improve weeknight performance: cook and cool seasoned beef, then refrigerate for up to three days or freeze for up to one month in airtight containers.
Small swaps broaden appeal. Choose ground turkey or plant-based crumbles and apply the same seasoning ratios for a similar flavor profile with less fat.
When converting recipes, preserve the ratio of cumin to chili powder and adjust salt after tasting. That conserves the intended flavor balance across proteins.
Pro-Caution
Prep and Cook Time
Preparation: 15 minutes. Gather and measure spices, chop toppings, and warm tortillas just before serving.
Cooking: 20 minutes. Browning and a short simmer deliver depth and juiciness without long braising times for ground beef.
Yield
This recipe yields about 12 tacos, serving four to six people depending on appetite and side dishes. Scale ingredients proportionally for larger groups.
For a family meal, double the batch and hold half refrigerated for a quick reheat and assembly later in the week.
Difficulty Level
Easy. The techniques here rely on timing and seasoning rather than advanced skills. Home cooks gain consistency by following a clear sear-simmer-rest routine.
Once you control heat and seasoning, you can customize toppings and proteins to suit taste confidently.
Ingredients
- 1 lb ground chuck beef (80/20 recommended)
- 1 tbsp olive oil
- 1 tsp ground cumin
- 1 tsp smoked paprika
- 1 tsp chili powder
- 1/2 tsp garlic powder
- 1/2 tsp onion powder
- 1/4 tsp cayenne pepper (optional)
- 1/2 tsp dried oregano
- Salt and freshly ground black pepper, to taste
- 1/4 cup beef broth or water
- 12 small tortillas
- Fresh cilantro, lime wedges, diced onion, and optional jalapeños
- Crema or sour cream, and avocado or guacamole
Instructions
- Heat oil in a large skillet over medium-high heat until shimmering.
- Add ground beef and let it sit undisturbed for 3 minutes to form a sear, then break it up and continue browning until no pink remains.
- Sprinkle the seasoning mix evenly and stir to combine, cooking another 1-2 minutes to bloom the spices.
- Pour in the broth, reduce heat to medium-low, and simmer for 3-5 minutes until the liquid reduces slightly and coats the beef.
- Warm tortillas on a hot skillet for 10-20 seconds per side, wrap them in a towel to keep warm and pliable.
- Assemble: spoon beef into tortillas, top with cilantro, onion, crema, and a squeeze of lime. Serve immediately.
Serving Suggestions and Nutrition
Present tacos on a warm board or platter and offer a small selection of salsas to increase engagement and dwell time at the table. A variety encourages guests to experiment with flavor combinations.
For a balanced plate, add a side salad or roasted vegetables and keep portions moderate to control calorie density without sacrificing satisfaction.
| Nutrient | Per Serving (2 tacos) |
|---|---|
| Calories | 320 kcal |
| Protein | 22 g |
| Carbohydrates | 18 g |
| Fat | 18 g |

FAQ
What makes a classic beef taco unforgettable?
Balance. Juicy, well-seasoned meat paired with acidic and crunchy toppings creates contrast. That interplay of textures and brightening acids like lime defines a memorable taco.
Which cut of beef is best for tacos?
Ground chuck (80/20) is the most straightforward choice for pan tacos. For sliced tacos, skirt or flank steaks provide beefy flavor and a good sear when sliced thin against the grain.
How can I prevent soggy tortillas?
Toast tortillas briefly on a hot, dry skillet and keep them wrapped in a towel to retain warmth and flexibility. Add very wet toppings sparingly and assemble just before serving.
Can I make the beef mixture ahead of time?
Yes. Store cooked, cooled beef in an airtight container for up to three days in the refrigerator or freeze for up to one month. Reheat gently with a splash of broth to restore moisture.
How do I adjust the spice level without losing flavor?
Reduce cayenne and jalapeños, then balance with more smoked paprika or a touch of sweet paprika for depth without heat. Add fresh lime juice or crema when serving to soften perceived heat.
Now you have a clear, practical path to consistent, flavorful beef tacos. Apply the sear-simmer-rest sequence, choose the right cut, and layer bright toppings to make each taco satisfying and memorable.
See also: beef tacos
]]>
- Control heat: steady temperature preserves interior meat moisture and prevents runaway evaporation.
- Sear smart: a dry surface forms a crust quickly while limiting deep interior moisture loss.
- Rest meat: hold before slicing so meat moisture redistributes and stays in the muscle.
- Pick marbling: intramuscular fat slows moisture loss and boosts perceived juiciness.
Mastering Temperature Control to Preserve Meat Moisture
Temperature is the single most effective tool for managing meat moisture during grilling. Proteins denature and fibers contract as internal temperature rises, and controlling that rise reduces how much water the muscle expels.
Use a quality thermometer and zone heat to manage the ramp. Establish a hot sear zone and a moderate indirect zone so you can sear then finish without blasting the interior; this two-zone method limits evaporation and protects meat moisture.
The Science: How Heat Forces Meat Moisture Out of Muscle
At a molecular level, heat changes protein structure and forces meat moisture outward. Protein networks shrink as they denature, squeezing intracellular water toward the surface where it either pools or evaporates.
Simultaneously, internal water becomes vapor as temperature climbs and creates pressure gradients. Those gradients push meat moisture outward until equilibrium or evaporation at the surface reduces the vapor pressure.
Maillard Reaction and Meat Moisture Management
The Maillard reaction produces the brown, savory crust we prize, but it needs a relatively dry surface to proceed. Surface moisture must evaporate before browning, so a short, dry sear intentionally trades surface water for flavor without sacrificing interior meat moisture when timed correctly.
Patting the surface dry and avoiding crowding lets moisture evaporate quickly during the sear window. That fast surface drying helps form a crust faster and reduces the length of time the interior experiences elevated steam pressure that drives meat moisture loss.
Why a Dry Surface Matters
Surface water creates steam that blocks browning and prolongs high internal temperatures. By contrast, a dry surface supports rapid Maillard reactions that lock in texture and minimize prolonged internal vapor pressure.
Work in short, controlled sear intervals. This preserves more meat moisture while still delivering the flavorful crust diners expect.
Practical Prep, Timing and Ingredients to Protect Meat Moisture
Good results begin before the meat hits the grates. Bring steaks to near room temperature and pat them dry to remove surface water that would otherwise steam away during searing.
Salt draws moisture briefly to the surface, but when you time it correctly salt helps proteins hold water and improves flavor without increasing final moisture loss. Use coarse kosher salt at least 30 minutes prior or just before cooking, based on cut thickness.
Prep and Cook Time Guidelines
Preparation Time: 15 minutes. Bring meat close to ambient and dry the surface thoroughly to reduce initial steam.
Marinating Time: Optional, 1–4 hours. Balanced marinades with oil and mild acid can aid tenderness without causing excessive moisture migration in thin cuts.
Equipment and Thermometry
A reliable instant-read thermometer removes guesswork and helps maintain meat moisture. Aim for internal targets rather than fixed cook times: 130–135°F for medium-rare suits most steaks.
Keep the sear surface around 450°F for rapid crusting, then move to indirect heat to finish. That prevents the interior from climbing too fast and expelling excessive meat moisture.
Ingredients, Yield and Cut Selection for Juiciness
Yield: Serves 4. Choose steaks about 1-inch thick for predictable cook times and consistent meat moisture retention.
Recommended cuts: Ribeye, striploin, and tenderloin use marbling to slow moisture loss and increase perceived juiciness.
Shopping List
- 4 beef ribeye steaks (1-inch thick, well-marbled)
- 2 tbsp olive oil
- 1 tbsp kosher salt
- 1 tsp black pepper
- 2 cloves garlic, minced
- Fresh rosemary
- Optional: 1 tbsp butter for finishing
Step-by-Step Instructions to Minimize Meat Moisture Loss
Follow consistent steps to control moisture migration and maximize flavor. Each action either shortens unnecessary evaporation or enhances final texture.
Use a two-zone approach: sear over high heat, then move to indirect heat to reach the target internal temperature without overshooting and forcing meat moisture out.
- Bring steaks to room temperature. Pat dry to remove surface moisture; a dry exterior sears faster and reduces steam formation.
- Rub olive oil evenly. Season with kosher salt and black pepper to taste.
- Preheat the grill to medium-high (≈450°F/230°C). Verify with a surface thermometer and set an indirect zone.
- Sear for 3–4 minutes per side without moving to develop a caramelized crust quickly.
- Finish over indirect heat until internal temperature reaches your desired doneness.
- Optional basting: In the final minute, baste with butter, garlic, and rosemary for aroma and added surface fat that slows moisture escape.
- Rest 5–7 minutes. Let juices redistribute; slicing too soon causes immediate drip loss and reduces retained meat moisture.
Expert Insight
Record sear duration, surface temp, and carryover rise each cook. This practice reduces variability and protects meat moisture batch to batch.
Pro-Caution
Thin cuts require a different approach: short sear and immediate rest, or a lower surface temperature to avoid explosive moisture migration.
Chef’s Notes: Techniques that Preserve Meat Moisture
Choose marbled cuts. Intramuscular fat both adds flavor and reduces rapid heat penetration, which helps the interior retain meat moisture longer during cooking.
Avoid piercing the meat. Use tongs to flip and a probe thermometer to check temperature. Each puncture creates a direct path for meat moisture to escape.
Marinades and Salt Use
Balanced marinades with oil create a thin surface barrier while salt helps proteins bind water when timed properly. Use oil-based or balanced blends rather than aggressive acidic baths on thin cuts.
Sous-vide pre-cook followed by a quick sear can yield predictable internal doneness and conserve meat moisture through gentle temperature control.
Serving, Pairings and Presentation to Highlight Juiciness
Slice against the grain to shorten muscle fibers and make each bite seem juicier. Garnish with flaky sea salt and herbs to accentuate perceived moisture and flavor.
Pair with bright chimichurri or charred vegetables to cut fat and highlight texture contrasts. A robust red wine or acid-forward sauce balances richness and emphasizes retained meat moisture.
Advanced Concepts: Pressure, Steam and Fiber Mechanics
As internal water vaporizes, pressure gradients form between the interior and surface. Those gradients drive meat moisture outward until the surface allows evaporation into the air.
You can limit this migration by slowing the interior temperature rise. Low-and-slow finishes or precise thermal baths reduce internal steam pressure and preserve more liquid in the muscle matrix.
Thermal Properties and Heat Capacity
Water has a high heat capacity and a large latent heat of vaporization. Once internal water turns to vapor, it removes significant heat and accelerates drying unless the temperature ramp is controlled.
Understanding these thermal properties helps you design cook curves that retain meat moisture while achieving safe, flavorful doneness.
Internal Resources and Further Reading
Want to refine your heat mapping? See our internal guide for zone charts and target temps for common cuts. Track both surface and internal readings to protect meat moisture across different grills.
For detailed guidance on resting and carryover cooking, consult our resting guide with carryover temperature tables and timing rules that help preserve meat moisture in larger roasts and steaks.
FAQ
Why does grilled meat sometimes come out dry?
High heat and long cook times push more internal water out of muscle fibers. If internal temperature rises too fast, proteins contract excessively and expel juices that then evaporate, reducing meat moisture.
Control the temperature ramp, use a two-zone grill, and monitor internal temps to limit aggressive evaporation and keep meat moisture where it belongs.
What happens to moisture inside meat during grilling?
Heat denatures proteins and creates vapor pressure inside cells. That pressure pushes water outward where it either collects on the surface or evaporates into the air, decreasing retained meat moisture.
Maintaining a moderate interior rise lowers vapor pressure and helps retain more meat moisture in the muscle matrix.
How does the Maillard reaction affect moisture loss?
The Maillard reaction requires a hot, relatively dry surface to produce flavor. Surface moisture must evaporate before browning begins, so the intended short sear window sacrifices a little surface water to gain crust while protecting interior meat moisture.
Time the sear for fast, hot contact on a dry surface to minimize interior moisture loss and maximize crust formation.
Can marinating help retain meat moisture?
Balanced marinades with oil, salt, and mild acid can slow moisture loss and improve tenderness. Oil creates a small protective barrier while salt helps proteins bind water when used correctly.
Avoid over-marinating thin cuts in acidic solutions longer than four hours; excessive breakdown can make texture mushy and alter moisture behavior.
Which grilling techniques best preserve juiciness?
Use a sear-then-finish method: sear quickly over high heat, then move to indirect heat to reach target internal temperature slowly. Rest the meat before slicing to allow juices to redistribute and maintain meat moisture.
Combine thermometry with zone cooking and choose cuts with good marbling for consistent, juicy results.
See also: protein denaturation, Maillard reaction, water, sous-vide, meat
See also: meat moisture
]]>
- Fat shields food: it limits air exposure and slows spoilage.
- Fat softens proteins: it infiltrates fibers and helps break down collagen.
- Fat amplifies flavor: it stores and releases aroma compounds efficiently.
- Use technique: rendering, basting, and emulsifying maximize fat’s benefits.
How fat preserves food
Fat creates a physical barrier that reduces exposure to oxygen and microbes. When you coat or confit food in fat, you slow oxidation and dehydration and extend shelf life.
Animal fats and vegetable oils differ in stability and flavor. For context on animal-derived fats, see animal fat and refer to rendering techniques in our rendering fat guide.
How fat tenderizes meat
Fat penetrates muscle and connective tissue during slow cooking. It lubricates fibers and helps heat break down collagen into gelatin, which yields a tender bite and a richer mouthfeel.
Heat and time govern this process: low-and-slow methods let fat migrate and collagen dissolve without toughening proteins. For theory on fats and cell structure, see lipid basics.
Practical recipe and timing
This section pairs the science with a tested roast recipe that demonstrates preservation and tenderizing in practice. Follow technique closely: sear, slow-cook, and finish with a fat-based sauce.
Prep and cook times suit a medium-complexity home project. The method stresses fat management—render, retain, and integrate fats to gain both shelf stability and texture.
Prep and Cook Time
Prep Time: 20 minutes. Cook Time: 40 minutes. Use active heat control during searing to avoid burning the fat.
Total Time: 1 hour. Resting time counts toward final tenderness; do not skip rest.
Yield
Serves 4 generously. Portioning influences reheating and preserving outcomes; slice and store with a thin fat layer to extend freshness.
Leftovers keep better when covered with sauce or fat and chilled promptly.
Difficulty Level
Medium. This recipe requires basic searing and an understanding of low-heat braising. Maintain steady, low oven or stovetop temperature to let fat do its work.
Recommended for cooks ready to refine technique. See our companion notes on choosing fats in best fats for cooking.
Ingredients
Use well-marbled cuts and quality fats to maximize preservation and tenderness. Quality of fat affects flavor, melting behavior, and stability during cooking.
- 1.5 lbs (680 g) beef chuck roast, well-marbled
- 2 tbsp unsalted butter, softened
- 2 tbsp olive oil
- 3 garlic cloves, minced
- 1 tbsp fresh rosemary, chopped
- 1 tsp smoked paprika
- Salt and freshly ground black pepper, to taste
- 1 cup beef broth, low sodium
- 2 medium onions, sliced thin
- 1/2 cup heavy cream
Note: if you avoid dairy, substitute suitable plant fats with stable behavior under heat. See the notes below for alternatives.
Instructions
Sequence matters. Dry the meat, season it, sear to develop crust, then slow-cook with retained fat to allow penetration and collagen breakdown.
Finish by enriching pan juices with cream or additional butter for mouthfeel. Strain and cool properly if you plan to store the dish under a protective fat layer.
- Prepare the beef: Pat the roast dry and season with salt, pepper, smoked paprika, and half the rosemary to ensure even seasoning.
- Heat the fat base: Warm olive oil and 1 tbsp butter in a heavy skillet until shimmering. A fat blend helps flavor and browning performance.
- Sear the beef: Sear on all sides until a deep golden-brown crust forms, about 3–4 minutes per side. Browning concentrates flavor via the Maillard reaction.
- Sauté aromatics: Reduce heat to medium and cook garlic and onions until soft and caramelized, about 6–8 minutes. The fat carries aromatic compounds into the sauce.
- Deglaze with broth: Add beef broth to lift fond and dissolve concentrated flavors. Stir and scrape the pan bottom to incorporate browned particles.
- Slow cook and infuse: Return beef with rendered fat. Cover and simmer gently or use a 300°F (150°C) oven for 30–40 minutes until fork-tender. Slow heat allows fat to penetrate fibers and collagen to convert to gelatin.
- Finish the sauce: Remove the beef to rest. Stir cream and remaining butter into pan juices and reduce until slightly thickened for a silky finish.
- Serve: Slice against the grain and spoon sauce over the meat. Garnish with the remaining rosemary for a fresh contrast.
Chef’s Notes
Choose fats based on desired flavor and melting point. Butter adds sweetness and gloss; olive oil contributes a fruity note and stability.
Animal fats like lard and tallow perform well for sealing and preservation. For more on emulsions and fat behavior, consult the emulsifier reference.
- For dairy-free cooking, use coconut milk and refined coconut oil for richness and mouthfeel.
- Always rest meat after cooking to let juices and fat redistribute; this step increases tenderness and juiciness.
- Use well-marbled cuts for maximum natural fat; for lean cuts, consider adding rendered pork fat or frequent basting.
Expert Insight
When storing, cool food quickly and keep below 5°C to limit bacterial growth. Fat reduces oxidation but does not replace proper refrigeration.
Pro-Caution
Serving suggestions
Serve slices over buttered mashed potatoes or roasted roots to complement richness. Fresh herbs or a dressed bitter green cuts through fat and refreshes the palate.
Light vinaigrettes, pickled vegetables, or acid-based condiments balance the dish and reduce the perception of heaviness while highlighting tender texture.
Nutritional snapshot
This recipe yields a high-protein, moderate-carbohydrate plate with substantial fat content. Tailor portions and fat choices to fit dietary goals.
| Nutrient | Amount per Serving |
|---|---|
| Calories | 530 kcal |
| Protein | 45 g |
| Carbohydrates | 8 g |
| Fat | 35 g |
Explore related technique articles such as our rendering fat guide and a primer on choosing cooking fats for further skill-building.
FAQ
Why does fat improve flavor?
Fat dissolves and carries flavor compounds, releasing them as you eat. This transport of volatile aromas makes herbs, spices, and browned surfaces more intense.
Fats also coat the tongue, prolonging flavor release and enhancing perceived richness.
How does fat slow spoilage?
When food is submerged in or coated with fat, the surface sees less oxygen and moisture loss. This reduces oxidative rancidity and surface dehydration.
Combine fat coverage with refrigeration for safe, extended storage; fat alone is not a sterilization method.
Which fats are best for slow cooking?
Choose fats with stable melting behavior and a flavor that complements the dish. Tallow, lard, butter, and medium-stability vegetable oils all work, depending on taste goals.
For neutral preservation use rendered animal fats; for aromatic results, select olive oil or butter according to the recipe.
Can I get tenderness without high fat content?
Yes. Acids, enzymes, mechanical tenderizing, and proper low-and-slow heat also break down connective tissue. Fat accelerates lubrication and mouthfeel but is not the sole route to tenderness.
Combine modest fat with acids or slow braise to turn lean cuts into tender dishes.
Where can I learn more about fat chemistry?
Authoritative resources include texts on lipid chemistry and culinary science. For quick reference on rendering methods and emulsification, see the linked Wikipedia pages for rendering and emulsification.
Apply tested technique frequently to refine your sense of fat behavior across recipes.
Fat remains a tool. Use it with intention: select the right type, control temperature, and apply storage best practices to preserve and tenderize reliably.
See also: Fat
]]>
- Choose material for heat retention and corrosion resistance.
- Heat management delivers even cook and reliable sears.
- Routine care extends service life and preserves flavor.
- Design matters — reversible and modular grates add versatility.
Choosing the Perfect Grill Grate Material for Flavor and Longevity
Selecting grate material determines heat behavior and maintenance needs. Cast iron, stainless steel, and porcelain-coated steel each offer distinct trade-offs for sear quality and upkeep.
Cast iron holds heat aggressively, which helps form caramelized crusts quickly. For background on cast-iron cooking properties see cast iron cookware.
Material breakdown and practical uses
Cast iron: Thick bars store thermal energy and release it evenly. That yields strong sear marks and stable temperatures for steaks and chops.
Stainless steel: Resists corrosion and requires less upkeep. It heats faster but does not retain heat as long as cast iron; consult stainless steel for material behavior.
Porcelain-coated steel: Offers a slick surface that reduces sticking and simplifies cleaning. The coating fuses to steel; if it chips, the underlying metal becomes exposed.
Mastering Heat Distribution for Even Cooking
Even heat distribution prevents hot spots and uneven charring. Grates that conduct and store heat deliver steady contact temperatures and reduce the need for constant adjustments.
Use two-zone setups to control flare-ups: direct for searing and indirect for finishing. This method creates a predictable thermal environment for different cuts and thicknesses.
How searing and chemistry interact
Searing concentrates heat on the surface, which accelerates the Maillard reaction and builds complex flavors. High, consistent contact temperature improves crust formation without overcooking interiors.
Thicker bars or denser metals smooth out spikes in temperature. As a result, a properly chosen grate reduces the need to constantly flip or reposition food during a cook.
Essential Cleaning and Maintenance to Prolong Grill Grate Life
Cleaning is not optional; it affects flavor, safety, and longevity. Remove carbonized residue after each cook to prevent bitter off-notes and uneven heat transfer.
Use a sturdy brush and heat cycles: heat the grate, then scrape. For cast iron, avoid detergent and water-soaking; instead, wipe and reseason to rebuild the protective layer.
Expert Insight
For stainless and coated grates, use mild soap and non-abrasive pads when cool. Periodic polishing keeps surfaces reflective and less likely to trap food particles.
Seasoning, Safety, and When to Replace
Seasoning cast iron prevents rust and builds a polymerized cooking surface. Apply a thin coat of high-smoke point oil and heat until the oil bonds to metal.
Watch for chips in porcelain coatings and deep pitting in cast iron. Those defects change heat flow and can harbor bacteria; replace grates when damage compromises cooking performance.
Pro-Caution
Innovative Grill Grate Designs That Elevate Your BBQ
Manufacturers now offer reversible, wave-shaped, and modular grates to expand function. These designs let you change surface contact and airflow without buying multiple complete grates.
Removable inserts—flat griddles, pizza stones, or smoker boxes—adapt a single cook chamber for multiple tasks. Invest in modularity if you cook varied menus often.
Practical benefits of modern designs
Wave or rounded bars trap juices and help feed flame for smoky flavor. Wider spacing can encourage smoke flow under larger cuts, while tighter spacing prevents small items from falling through.
Adjustable height and pivoting grates give control over radiant heat exposure. These features shorten the learning curve when transitioning from smoking to high-temperature searing.
Prep and Cook Time
Preparation focuses on cleaning, seasoning, and preheating; these steps take about 10 to 20 minutes for most grates. Preheating time depends on grate mass and grill power.
Cooking duration varies by food: thin steaks sear in minutes; roasts and brisket require low-and-slow schedules. Plan your timeline around both grate readiness and meat thickness.
Yield
One well-selected grate optimizes results from single steaks to family-sized roasts. The same grate can support diverse recipes if you manage heat zones correctly.
For commercial contexts, choose grates that combine rapid recovery with durable coatings to meet frequent use demands.
Difficulty Level
Working with grates rates as medium difficulty: it requires equipment knowledge plus practice to master heat control. A few simple routines speed competence.
If you handle cast iron, expect an initial learning curve for seasoning and rust prevention. Stainless steel lets you focus more on technique than maintenance.
Ingredients for a Perfect Grill Setup
Assemble quality components: the right grate, a heat-stable oil, a robust brush, and protective gloves. These basics reduce risk and improve outcomes.
- 1 quality grate (cast iron, stainless steel, or porcelain-coated)
- High-smoke point oil (grapeseed, avocado, or refined canola)
- Sturdy grill brush with intact bristles or a scraper
- Mild soap and non-abrasive pads for stainless/porcelain care
- Protective gloves for handling hot components
Instructions: Ultimate Grill Grate Preparation and Maintenance
Follow these steps to prepare and maintain grates for reliable performance. Each step focuses on safety and long-term value.
- Inspect the grate: Remove loose debris with a cool-grate brush and check for defects.
- Season cast iron: Apply a thin oil coat, then heat to 450°F for 30 minutes to polymerize the oil.
- Clean stainless/porcelain: Wash with mild soap, rinse, and dry; avoid steel wool on porcelain surfaces.
- Preheat: Heat grates on high for 10–15 minutes to burn off residue before cooking.
- Final brush: Scrape while hot to dislodge particles, then oil lightly if using cast iron.
- During cooking: Manage zones to control flare-ups; move food away from active flames as needed.
- Post-cook care: Scrub while warm, wipe clean, and store grates dry or under cover.
Chef’s Notes: Tips for Success
Small habits compound. Regular, short maintenance sessions beat infrequent, intensive overhauls.
Match grate choice to cooking style: choose cast iron for steakhouse sears and stainless for low-maintenance, high-volume grilling.
Serving Suggestions
Showcase food on a clean grate for best visual appeal; sear marks signal mastery and add texture. Finish with compound butter or a light glaze to carry smoky notes to the palate.
Pair grilled proteins with charred vegetables and acid-forward salsas to balance richness. Serve immediately to preserve crust integrity and internal juiciness.
| Nutritional Element | Per Serving |
|---|---|
| Calories | 0 (Grate itself is non-caloric; oils and food add calories) |
| Durability | Cast Iron: 10+ years with care |
| Heat Retention | Cast Iron: High; Stainless Steel: Moderate |
| Maintenance Level | Cast Iron: Moderate; Stainless Steel: Low |
Discover more techniques on-site via additional barbecue guides and check system care tips at grill maintenance for step-by-step routines.
Further Reading
For detailed context on grilling equipment and technique, consult the broader topic of grill (cooking). These references explain core technology and historical uses.
For coating science and material choices, see porcelain enamel, which clarifies how surface treatments interact with heat and food.
FAQ
Why do grill grates make such a difference?
Grates control contact temperature and airflow, which affect crust formation and smoke exposure. Better heat conduction produces consistent sears and complete bakes without constant repositioning.
Which material gives the best sear?
Cast iron gives the most intense and even sear because it stores heat well. However, you must manage seasoning to prevent rust and sticking.
How often should I clean my grates?
Scrape after every cook while warm, and perform a deeper clean and inspection monthly or after heavy use. Frequent light maintenance keeps flavor consistent and prevents buildup.
Can I use oil to prevent sticking on any grate?
Yes, apply a thin layer of high-smoke point oil immediately before cooking. For cast iron, regular seasoning between cooks builds a more durable non-stick finish.
When is it time to replace my grate?
Replace grates when coatings chip, bars warp, or rust penetrates deeply. These issues change heat distribution and risk uneven cooking or food contamination.
See also: grill grates
]]>
- Heat retention: heavy iron holds and evens temperature for consistent results.
- Durability: properly maintained pans can last generations.
- Natural nonstick: a seasoned surface releases food without synthetic coatings.
- Versatility: stove-to-oven performance simplifies recipes.
Intro: Why Cast Iron Still Matters
Professional chefs and serious home cooks use cast iron because it solves real cooking problems. The pan’s thermal mass and rough surface influence browning and crust development in ways that thin pans cannot match.
Cast iron’s history and function are inseparable: a heavy skillet stores heat and releases it steadily. That behavior means fewer temperature swings and more control when searing or roasting.
Learn more about the material itself on the Cast iron page for background on composition and manufacturing.
Prep and Cook Time
Prep Time: 10 minutes | Cook Time: 25 minutes | Total: 35 minutes.
These times assume a preheated skillet and a standard oven set to 425°F (220°C). Allow extra time if your pan starts cold; cast iron benefits from gradual heating to avoid thermal shock.
Yield
This roast yields about four portions and scales well with larger pans or two smaller pans. Use a thermometer to confirm an internal temperature of 165°F (74°C) for poultry.
Leftovers reheat reliably in the same skillet because the pan keeps food warm without drying it out. Store shredded meat in an airtight container and reheat gently to preserve texture.
Difficulty Level
Medium. Cast iron removes much of the guesswork for high-heat cooking, but it requires attention to care and seasoning. Expect a short learning curve with big returns in flavor and crust.
Basic cooking competence plus attention to temperature and timing produces excellent results. The pan rewards consistent technique rather than complex tricks.
Ingredients
These ingredients are listed for a classic pan-roast chicken. Adjust herbs and aromatics according to taste; cast iron amplifies those flavors during browning.
- 1 tablespoon vegetable oil or melted lard (for seasoning)
- 1 whole chicken (about 3-4 pounds), patted dry
- 2 teaspoons kosher salt
- 1 teaspoon freshly ground black pepper
- 4 cloves garlic, smashed
- 2 sprigs fresh rosemary or thyme
- 1 lemon, halved
- 1 large yellow onion, quartered
- 1 cup chicken broth (optional, for pan deglazing)
Seasoning oils and aromatics interact with the pan’s surface to build flavor. Use a high-smoke-point fat when searing to protect the seasoning layer.
Instructions
Prepare the pan and chicken as separate steps to ensure even browning. Preheat the skillet gently on medium before moving to higher heat for a sear.
Preheat & Sear
Preheat your oven to 425°F (220°C). Place the seasoned cast iron pan on the stovetop and warm over medium heat for 3-5 minutes to stabilize surface temperature.
Rub the chicken with vegetable oil or melted lard and season liberally with kosher salt and pepper. Dry skin promotes crisping; pat the bird thoroughly before oiling.
Oven Roast & Finish
Fill the cavity with smashed garlic, fresh herbs, and lemon halves to infuse aroma during cooking. Arrange the quartered onion evenly in the pan to create a shallow rack and a reservoir for pan juices.
Place the chicken breast-side up on the bed of onions and transfer the pan to the preheated oven. Roast for 20-25 minutes or until the thickest part reaches 165°F (74°C), basting once halfway for moistness.
Deglazing & Sauce
When the roast is done, remove the chicken and return the pan to medium heat on the stove. Pour in chicken broth to deglaze, scraping browned bits into a quick pan sauce and simmer for 2-3 minutes.
Strain if desired, then spoon the sauce over the carved bird. Deglazing both dissolves flavor and helps maintain a clean surface on the pan.
Chef’s Notes
For crisp skin, ensure the chicken is completely dry before oiling and seasoning. A hot pan at the point of searing seals protein surfaces and directs juices inward.
If the pan shows signs of rust or uneven seasoning, scrub gently with coarse salt and a soft cloth before re-seasoning. Repeat a light oiling and heating cycle to rebuild the patina.
Expert Insight
Get detailed conditioning steps in our Cast Iron Seasoning Guide. Regular maintenance prevents rust and improves release over time.
Serving Suggestions
Serve the roasted chicken straight from the skillet for a rustic presentation. Garnish with fresh rosemary or a light squeeze of lemon to brighten the rich juices.
Pair with creamy mashed potatoes or a crisp green salad to balance texture. The caramelized onions from the pan make an ideal topping for both meat and vegetables.
Care & Performance: What the Science Says
Cast iron behaves like a thermal reservoir: it absorbs heat slowly and releases it steadily. This property reduces temperature variance and produces consistent results during searing and roasting.
For technical background, review principles of heat conduction and thermal mass. Knowing how heat flows clarifies why heavy pans outperform thin sheets for certain techniques.
Seasoning chemistry converts oils into a polymerized layer that resists sticking and corrosion. For more about surface technologies, see the Non-stick cookware overview, which contrasts synthetic coatings with traditional seasoning.
Nutritional Snapshot
Per serving, the roast averages about 340 kcal, with protein around 38 g and fat near 18 g. Values vary by cut and added fats.
Use a light hand with added oil and trim excess fat to lower calories. Cast iron does not significantly add iron to food under normal cooking conditions, though minute leaching can occur with very acidic preparations.
Q&A
What makes cast iron pans so popular?
Cast iron pairs high heat capacity with a rough surface that encourages browning. The result is deeper crusts and better caramelization than many lightweight pans.
Durability and repairability play a role too: a pitted or rusty pan can be restored, which supports long-term ownership. Learn how to restore and maintain your pan in the seasoning guide.
How does cast iron distribute heat compared with stainless steel?
Cast iron heats slowly but evenly and holds temperature well. Stainless steel heats faster but can show hot spots on thin constructions, which makes it less forgiving for long sears.
For techniques that require rapid temperature shifts, lighter metals may excel. For steady high-heat work, cast iron is preferable because of its thermal mass.
What is seasoning and how long does it take?
Seasoning is the polymerized oil layer that forms with repeated heating and oiling. Initial build-up takes a few cycles, but a robust patina develops after many uses.
Use frequent, light seasoning rather than infrequent heavy coats. Each cooking session contributes microscopic layers that enhance release and protect the metal.
Can I cook acidic foods in cast iron?
Occasional acidic dishes are fine for a well-seasoned pan, but long braises with tomatoes or vinegar can degrade the seasoning. Protect the surface by limiting contact time and re-oiling after cleaning.
If you plan frequent acidic cooking, consider enameled cast iron or a dedicated stainless vessel. For typical home use, rotating recipes preserves seasoning.
How eco-friendly is cast iron compared to single-use nonstick pans?
Cast iron lasts decades and is fully recyclable, which reduces lifetime environmental cost. By contrast, coated nonstick pans often need earlier replacement and may involve synthetic materials with greater disposal concerns.
Longevity, reparability, and recyclability make cast iron a practical, lower-impact choice when cared for properly. For basic roasting techniques using cast iron, see the Roasting (cooking) entry.
Pro-Caution
After cleaning, always dry the pan immediately and apply a thin oil film before storage. These small steps prevent rust and preserve the seasoning built over time.
Closing Remarks
Mastering cast iron is a combination of technique and routine care. Heat control and regular seasoning produce reliable results and long service life.
Whether searing steaks, roasting chicken, or baking cornbread, the pan’s properties reward consistent practice. Use the included guides and our internal recipes to build skills and safeguard performance.
Related: see our Roast Chicken Recipe for a step-by-step roast adapted to cast iron performance.
For hands-on maintenance steps and restoration techniques, consult the Cast Iron Seasoning Guide. Regular care extends function and flavor over decades.
See also: Cast Iron
]]>
- At a glance: control heat zones, balance marinades, and choose fuel deliberately for consistent BBQ results.
- Key focus: measure temperature, rest meat, and change one variable at a time to learn faster.
- Tools that pay off: a digital instant-read thermometer and a charcoal chimney speed learning and reduce guesswork.
- Flavor primer: sear over direct heat, finish over indirect heat, and match wood intensity to protein.
BBQ Prep and Cook Time
Preparation: allow about 30 minutes of active prep and plan marinades from 20 minutes to 2 hours depending on cut and acid level. For thin cuts use short marinades; for dense cuts extend time, but avoid overexposure to acid.
Cooking: expect 20–40 minutes on the grill for steaks or thighs depending on thickness and method. Sear first on direct heat, then move to indirect heat to control interior doneness while preserving a crust.
BBQ Yield
This plan serves 4–6 people when you allocate 6–8 ounces of cooked protein per guest. Sides change appetite, so increase protein if you expect heavy eaters or fewer sides.
Account for trimming loss and bone weight when you buy raw. Buy slightly more raw weight than you need to meet guest expectations and avoid shortages.
BBQ Difficulty Level
Rated Medium: the technique matters more than exotic ingredients. Precise temperature control and timing deliver reliable results across proteins.
Intermediate grillers benefit most: you will practice searing, zone setup, wood selection, and thermometer use to refine outcomes. Each skill is teachable and repeatable with consistent feedback.
BBQ Ingredients
Keep a clean mise en place and measure oils, acids, and salt so the marinade chemistry stays consistent across cooks. Consistency of inputs leads to consistent cook results.
Use fresh herbs and quality lump charcoal or wood for predictable flavor transfer. Match wood and seasoning intensity to the protein to avoid overpowering delicate cuts.
- 2 pounds boneless beef ribeye or chicken thighs (bone-in optional)
- 1/4 cup extra virgin olive oil
- 1/4 cup soy sauce
- 3 tablespoons fresh lemon juice
- 2 tablespoons honey or maple syrup
- 4 cloves garlic, minced
- 1 tablespoon smoked paprika
- 1 teaspoon ground black pepper
- 2 teaspoons kosher salt
- Fresh herbs: 2 sprigs rosemary & 3 sprigs thyme
- Wood chunks: apple or hickory for grilling
- Charcoal: lump charcoal for clean, intense heat
BBQ Instructions
Follow a clear sequence: prepare the marinade, marinate, build two heat zones, preheat, sear, finish on indirect heat, then rest. Every step affects the next, so respect the order for reliable results.
Use an instant-read thermometer to confirm internal temperature rather than relying on time alone. Visual cues help, but temperature proves doneness and keeps food safe.
- Prepare your marinade: Whisk olive oil, soy sauce, lemon juice, honey, garlic, smoked paprika, black pepper, and kosher salt. A balanced mix of acid and oil adds surface flavor while limiting protein break-down.
- Marinate the meat: Submerge protein, cover, and refrigerate 20 minutes to 2 hours. Too long in acid can soften delicate cuts excessively; monitor exposure time.
- Set up the grill: Bank lump charcoal to create a high direct zone and leave the other side for indirect heat. Hardwood chunks add aroma as they smolder and provide controlled smoke.
- Preheat the grill: Wait until coals reach a white-gray ash for steady searing heat. That ash signals even radiant heat across the coal bed.
- Sear the meat: Place meat on direct heat for 3–4 minutes per side to form a crust driven by the Maillard reaction. Resist over-flipping to allow surface browning.
- Move to indirect heat: Finish on the cooler side until the internal target is reached: about 130°F for medium-rare beef and 165°F for chicken. Use a probe thermometer for accuracy.
- Rest the meat: Tent the cooked protein loosely with foil and rest 5–10 minutes. Resting lets juices redistribute and improves slice presentation.
- Serve: Slice against the grain for beef and garnish with chopped rosemary and thyme. Drizzle reserved resting juices for added moisture and sheen.
BBQ Tips for Success
Small habits yield big returns. Log temperatures, wood selection, and timing so you can reproduce wins and learn from misses.
Invest in two basic tools: a digital instant-read thermometer and a reliable charcoal chimney. They remove guesswork and speed workflow while improving safety and repeatability.
- Marinade chemistry: Acid breaks proteins while oil carries fat-soluble flavors; salt improves water retention. Balance avoids toughening muscle fibers.
- Heat zones mastery: Use direct heat to sear and indirect heat to finish without burning the exterior. That two-zone method minimizes flare-ups.
- Wood and charcoal selection: Fruitwoods add subtle sweetness; hickory gives stronger, bacon-like notes. Choose woods that match the protein and desired intensity.
- Thermometer use: Check temperature at the thickest point and avoid touching bone. Aim for target temperatures to ensure safety and preferred doneness.
Expert Insight
Keep one routine element constant so you can evaluate changes objectively. Consistent fuel and thermometer technique speed learning and stabilize results.
Pro-Caution
BBQ Smoke and Fuel Choices
Fuel and smoke determine the aromatic backbone of BBQ. Choose fuels with known burn profiles to match the protein and the desired flavor intensity.
Charcoal provides high, focused heat and a neutral base that lets wood chips supply aroma. Use lump charcoal for cleaner combustion and better temperature control; learn more about charcoal chemistry Charcoal.
How smoke changes flavor
When wood smolders, it releases aromatic compounds that bond with surface fats and proteins to create perceived smoke in each bite. Controlled smoke layers complexity instead of masking meat flavor.
Learn the limits: too much smoke yields bitter notes. Aim for a steady, thin smoke rather than a heavy white cloud to avoid off-flavors, and review smoking techniques at Smoking (cooking).
BBQ Serving Suggestions
Pair grilled proteins with simple sides that echo the grill flavors: charred peppers, grilled zucchini, or a citrus salad cut through smoke and fat. Keep sauces restrained to highlight the sear and underlying protein.
Finish with a light sprinkle of coarse sea salt and fresh herbs. A small final salt touch brightens flavors and elevates texture contrast without masking the grill notes.
| Nutrient | Per Serving |
|---|---|
| Calories | 450 kcal |
| Protein | 38 g |
| Carbohydrates | 8 g |
| Fat | 28 g |
For technique context on high-heat surface reactions, read about the Maillard reaction. For method context on direct vs. indirect grilling, consult Grilling.

BBQ Final Thoughts
Mastering BBQ combines reproducible technique with measured experimentation. Track variables, refine methods, and prioritize consistent inputs to build a dependable backyard system.
Grilling rewards attention to heat, timing, and aroma. Measure outcomes and iterate; your backyard will become a dependable lab for flavor when you apply disciplined practice.
FAQ
What internal temperatures should I target for safety and texture?
Use an instant-read thermometer and aim for 130°F for medium-rare beef and 165°F for poultry. These targets balance safety and preferred texture when combined with proper resting.
How long should I marinate my steak or chicken?
Thin cuts need 20–60 minutes; thicker steaks or bone-in thighs can handle up to 2 hours. Avoid extended acid exposure on delicate cuts to prevent textural breakdown.
Does wood type really change flavor that much?
Yes. Fruitwoods add sweet, mild notes while hardwoods like hickory provide stronger, savory smoke. Match wood intensity to protein to complement rather than overwhelm.
Is searing necessary for flavor?
Searing creates the Maillard crust that enhances taste and texture. Use a hot direct zone to sear, then finish over indirect heat to preserve juiciness.
How should I rest grilled meat?
Rest tented loosely for 5–10 minutes depending on cut size. Resting lets juices redistribute and provides cleaner slices and better mouthfeel.
See also: Tag: Grilling
See also: BBQ
]]>
- Choose refined searing oils with smoke points above 400°F to prevent off-flavors.
- Neutral oils preserve the ingredient’s taste; nutty oils add subtle aroma.
- Prep and pan technique—dry proteins, preheat pans, and avoid overcrowding—matter as much as the oil.
- Finish smartly with butter or a delicate finishing oil after the sear for gloss and flavor.
Prep and Cook Time for Searing Oils
Preparation: 5 minutes. Cooking: 10–15 minutes. Use searing oils to reach and hold high surface temperatures for fast caramelization.
Total Time: 20 minutes. Plan mise en place so you add proteins to a fully preheated pan and keep tools ready for immediate basting and resting.
Yield and Protein Notes
This searing method serves 4 people when using four chicken thighs or equivalent proteins. Scale oil volume proportionally for larger batches.
Apply the same oil strategy to steaks, fish fillets, or tofu; adjust sear time to thickness and target internal temperature while using the same heat-stable searing oils.
Difficulty Level
Difficulty: Medium. You must manage pan temperature and timing precisely, but the method is repeatable with practice and the right searing oils.
Practice develops feel for crust formation. Choosing proper searing oils reduces variability and improves predictability across pans and stoves.
Ingredients
Below are recommended searing oils and a basic protein list. Use refined versions for searing and reserve delicate oils for finishing touches.
- 2 tablespoons refined avocado oil (high smoke point, neutral)
- 1 tablespoon grapeseed oil (light, clean flavor)
- 4 boneless skin-on chicken thighs or equivalent protein
- Salt and freshly ground black pepper, to taste
- 4 sprigs fresh thyme (optional)
- 1 clove garlic, smashed (optional)
- 1 tablespoon unsalted butter (for finishing)
Store refined searing oils in cool, dark places to slow oxidation and preserve their smoke-point reliability.
Instructions
Follow these steps to build a crisp, caramelized crust. Timing and minimal disturbance determine success when using searing oils.
- Preheat the skillet: heat a heavy-bottom pan over medium-high until it shimmers. Cast iron or stainless steel maintain steady heat for even browning.
- Dry the protein: pat pieces thoroughly. Surface moisture creates steam and prevents proper Maillard browning.
- Season: salt and pepper each side immediately before cooking to avoid drawing moisture out prematurely.
- Add oil: pour a thin layer of refined avocado or grapeseed oil and swirl to coat; avoid pooling so the oil makes direct contact for fast crust formation.
- Sear skin-side down: place protein away from you and resist moving it for 5–6 minutes to let stable contact produce a uniform crust.
- Flip and finish: turn pieces, add butter, thyme, and garlic if using, and baste for 3–5 minutes until the interior reaches safe temperatures.
- Rest: transfer to a warm plate and rest 5 minutes so juices redistribute before slicing and serving.
Why Searing Oils Matter
Choosing the right searing oils lets you reach target surface temperatures without the oil breaking down and creating acrid flavors. High smoke points help protect both taste and pan seasoning.
Moreover, searing oils influence heat transfer and the chemistry of browning. The Maillard reaction progresses cleanly when oils remain stable at searing temperatures.
Top Searing Oils for High Heat
Below are nine practical searing oils ranked for smoke point, flavor neutrality, and cost-effectiveness. Match oil choice to the protein and desired flavor lift.
Use refined variants for searing; keep delicate, unrefined oils for finishing to retain their aromatic profiles.
Refined Avocado Oil (Recommended)
Refined avocado oil offers one of the highest smoke points and a neutral, slightly buttery profile that suits long sears and pan roasting.
It performs predictably in a hot pan and pairs with robust proteins. For background on production, see avocado oil.
Grapeseed Oil
Grapeseed oil provides a light mouthfeel and respectable smoke point. Chefs favor it for quick, high-heat contact browning when a neutral taste is required.
Its clean flavor keeps pan sauces bright and avoids masking subtle ingredients during finishing.
Refined Peanut and Safflower Oils
Refined peanut oil adds a restrained nutty character while still tolerating intense heat, making it a solid option for pan-frying and wok work.
Refined safflower oil remains neutral and cost-effective for high-volume searing. Choose refined forms; unrefined variants smoke at lower temperatures.
Refined Canola and Sunflower Oils
High-oleic canola and refined sunflower oils resist heat and cost less for frequent use. They offer neutral flavors and steady heat transfer for consistent crusts.
When purchasing, look for labels indicating refined or high-oleic formulations to ensure higher smoke points during searing.
Olive Oil Notes for Seared Dishes
Extra virgin olive oil has a lower smoke point and a pronounced flavor, so reserve it for finishing or medium-heat cooking rather than high-temperature searing.
Light or refined olive oil tolerates higher heat and can work for searing. See more on olive oil varieties and processing.
How to Sear with Searing Oils
Three fundamentals control a perfect sear: heat, dryness, and spacing. Master these and the searing oils will complement the technique instead of compensating for errors.
Use a thermometer to confirm surface and internal temperatures. Consistency comes from measured heat management and deliberate oil choice.
Heat: Get the Pan Ready
Start with a hot pan and add oil only once the surface reaches temperature. A properly heated pan requires less oil and minimizes sticking.
Test with a few drops of water; they should dance. If oil smokes immediately, reduce the heat to protect the searing oil’s integrity.
Dry: Remove Surface Moisture
Pat proteins dry; a dry surface browns faster and reduces the period oil spends overheating while moisture evaporates.
Season immediately before searing to avoid drawing moisture out during resting and keep crust formation efficient.
Space: Avoid Overcrowding
Leave room between pieces so the pan temperature recovers after each addition. Overcrowding causes steaming and prevents caramelization.
Work in batches and keep finished items warm in a low oven while completing the rest to preserve texture and crispness.
Tips and Cautions
Smoke point practice: choose searing oils with smoke points above your working temperature, typically above 400°F for aggressive searing.
Refined searing oils resist breakdown better than unrefined oils. Store all oils away from heat and light to slow oxidation and preserve performance.
Expert Insight
Use a thin film of oil so the food, not the oil, contacts the pan directly. Excess oil pools and reduces the speed at which the crust forms.
Pro-Caution
Always keep a lid or splatter screen on hand and never leave an overheated pan unattended. A thermometer reduces guesswork and improves safety during prolonged searing tasks.
Serving Suggestions
Pair seared proteins with bright vegetables and acid to cut through richness. The caramelized crust benefits from contrasts such as lemon, pickled shallots, or herb chimichurri.
Finish with a small pat of butter or a drizzle of delicate finishing oil to add gloss and flavor without dulling the crust formed by your searing oils.
| Nutrient | Per Serving |
|---|---|
| Calories | 320 |
| Protein | 28g |
| Carbohydrates | 0g |
| Fat | 22g |
Further Reading and Resources
Understand how oils behave and why refined searing oils perform better by reviewing technical resources on cooking fats and heat reactions. For general background, see cooking oil.
For technique references and professional tips, consult trusted guides on searing and pan care. For additional study, review the fundamentals of frying processes at frying.
See also: searing oils and searing technique.
FAQ
Why does oil choice matter when searing?
Oil selection affects heat tolerance and flavor transfer. Using proper searing oils lets you reach high surface temperatures without creating burnt flavors or degrading fats.
Stable oils maintain heat transfer efficiency and help form an even crust across the protein surface.
What exactly is a smoke point and why is it crucial?
The smoke point denotes when an oil visibly smokes and begins chemical breakdown. Past that point, oils produce off-flavors and potentially undesirable compounds.
For searing, select oils whose smoke point exceeds the temperature you plan to use, typically above 400°F for robust searing work.
Can blending oils improve high-heat performance?
Blending a high-smoke-point refined oil with a small amount of a flavorful lower-smoke oil can balance heat tolerance and aroma. Add the lower-smoke oil after the main sear to keep its flavor intact.
Keep blends minimal to avoid dropping the effective smoke point of the mix and monitor for early signs of breakdown.
Is extra virgin olive oil suitable for searing?
Extra virgin olive oil generally has a lower smoke point and strong flavor; it suits medium heat and finishing. For high-heat searing, prefer refined or light olive oils if you want olive character without rapid smoking.
Consider flavor impact: robust extra virgin olive oil can mask delicate proteins when used at intense searing temperatures.
How do I tell if an oil is breaking down during cooking?
Watch for continuous smoke, acrid or sour odors, or sticky residues. Those signs indicate oxidation and breakdown; lower the heat or replace the oil immediately.
Using a thermometer and staying present while searing prevents ruined flavor and reduces safety risks when working at high temperatures.
See also: searing oils
]]>
- Clear pans speed heat transfer and stabilize crust formation.
- Drying and proper oil use prevent steam and sticking.
- Quick refreshes between batches keep surfaces sear-ready.
- Use the right tools for stainless steel or cast iron care.
Why food debris sabotages the sear
Food debris creates microscopic barriers between protein and the hot metal. Those remnants absorb and scatter heat so the surface under the meat never reaches the temperature required for the Maillard reaction, which forms the desirable brown crust.
Debris also burns unpredictably and leaves bitter compounds that mask natural flavors. Even a thin layer of sticky residue causes food to steam instead of sear, producing grey, uneven crusts rather than the golden crust you want.
Essential prep and timing
Prep and timing control whether the first contact with the pan produces sear or steam. You must bring both pan and food to the right condition: hot pan, dry protein, and measured oil.
Timing matters more than temperature alone. Give the pan time to stabilize at medium-high heat; shortchanging this step lets debris cool or trap moisture under the protein, costing the crust.
Prep and Cook Time
Prep: 10 minutes. Use drying and seasoning steps that take minimal time but yield big results. Dry skin and pat meat to remove surface moisture that competes with browning.
Cook: 15 minutes. Heat the pan thoroughly and sear without overcrowding; then finish to temperature. Total: 25 minutes, including quick in-between-pan refreshes to clear debris.
Ingredients and tools
Choose a high-smoke point oil and tools that match your cookware. Oils with higher smoke points keep the pan stable at searing temperatures and reduce burnt residues.
Match your tools to the surface: use non-abrasive brushes for stainless steel and firm scrapers for well-seasoned cast iron. A dedicated pan scraper avoids surface gouges and removes stubborn bits quickly.
- 2 tbsp high-smoke point oil (grapeseed, avocado, or refined olive oil)
- 4 boneless skin-on chicken thighs, patted dry
- 1 tsp kosher salt
- ½ tsp freshly ground black pepper
- 1 tbsp unsalted butter
- 2 cloves garlic, smashed
- Fresh thyme sprigs for garnish
Step-by-step instructions
Heat the skillet until the surface is uniformly hot but not smoking. A properly heated pan releases stuck debris more readily and gives predictable sear development.
Work in batches and refresh the surface between each one. That quick refresh removes residual bits, restoring a clean metal surface for the next piece of protein.
- Heat your skillet over medium-high heat for 3–4 minutes until it glows evenly. This temperature window mobilizes old residues and primes the pan for proper heat transfer.
- Dry each chicken thigh thoroughly with paper towels to remove surface moisture that fights browning and creates steam.
- Season each piece with salt and pepper so flavors penetrate without drawing extra moisture out during searing.
- Add oil and form a thin film. The oil protects metal-to-food contact and stabilizes the hot surface, reducing sticking and errant charring.
- Place thighs skin-side down without crowding. Give each piece 5–7 minutes; moving prematurely tears the developing crust.
- Flip once when the crust releases easily. Add butter, garlic, and thyme and baste briefly to finish color and flavor.
- Finish to temperature until the interior reaches a safe temperature and juices run clear. Let the meat rest off heat for 5 minutes to reabsorb juices.
- Refresh the pan while it is still warm: wipe with a paper towel or scrape lightly, then add a small splash of liquid and boil off to lift any clinging particles.
Heat management and pan care
Use heat deliberately: aggressive initial heat creates the crust, then finish on moderate heat to avoid burning. Cast iron and stainless steel behave differently; learn each surface’s thermal response.
Stainless steel holds heat but traps bits more readily, while a cast-iron skillet gives even heat once seasoned. Invest time to learn how your pans behave so you adjust timing and cleaning accordingly.
Expert Insight
After a cook, deglaze intentionally rather than letting bits remain to become sticky over time. Save the fond for sauces, but clear the cooking surface before the next sear to maintain consistent heat transfer.
Common mistakes and how to avoid them
Overcrowding is the most frequent error: too many pieces lower the surface temperature and trap steam. Always leave breathing room around each piece so the pan keeps its heat and the surface contact remains direct.
Neglecting quick cleans between batches compounds residue. A single neglected crumb compounds into a streak of burnt particles; remove it before it multiplies into a major problem.
Pro-Caution
Serving suggestions and storage
Serve seared items immediately for best texture: a rest lets juices settle but prolonged holding softens crust. Pair with bright vegetables or a light jus to balance richness.
Store leftovers properly: cool quickly, refrigerate in a shallow container, and reheat with a quick sear to revive the crust. Re-crisping on a hot pan often restores much of the original texture.
Pan maintenance checklist
Maintain a weekly routine: deep-clean stainless pans to remove polymerized oil layers and re-season cast iron when necessary. Regular maintenance prevents stubborn debris buildup and preserves heat transfer.
Use silicone or wooden tools to avoid gouging, and keep a small scraper and brush handy. Refer to our internal pan-care resource for step-by-step maintenance routines and troubleshooting.
Pan care guide and Mastering heat techniques for searing provide hands-on routines and visual checks to keep cookware performing at its best.
FAQ
What is food debris in cooking?
Food debris refers to tiny browned or burnt particles that cling to the pan after cooking. These fragments interfere with direct contact and absorb surface heat, undermining even browning.
Left unchecked, debris can polymerize into sticky films that attract more residue and make future searing unpredictable.
How often should I clean the pan during a multi-batch sear?
Clean between every batch of protein with a quick wipe or scrape while the pan is still hot. That brief maintenance removes obstructive bits without allowing the pan to cool too much.
For heavier residue, add a small splash of liquid to loosen particles, then wipe and re-oil before the next batch.
Can those brown bits ever be useful?
Yes. The fond—the browned bits left after searing—adds concentrated flavor for pan sauces and gravies. Extract it after searing, once the surface is clean for the next sear.
Use reserved fond deliberately: deglaze with stock or wine, scrape, and reduce to balance and complement the sear without leaving debris on the cooking surface.
Which pans are most forgiving for searing?
Cast iron and heavy-gauge stainless steel offer the most consistent results due to superior heat retention. A well-seasoned cast-iron skillet can also release food cleanly when properly heated.
Learn each pan’s quirks: stainless steel requires attention to heat and wiping, while cast iron needs proper seasoning and occasional reconditioning to avoid residue buildup. See stainless steel and cast-iron skillet references for material properties.
How do I stop oil from burning and leaving residue?
Choose oils with a high smoke point and monitor heat so oil glows but does not smoke aggressively. Smoke signals that oils are degrading and leaving polymerized films that become debris.
Reset the oil between batches if you notice dark particles forming, and wipe the surface clean before adding fresh oil for the next sear.
For further reading on the chemistry of browning reactions, consult the detailed overview of the Maillard reaction. For technique-focused guidance, our internal resources provide stepwise practice routines and checks.
Nutritional Information:
| Calories | Protein | Carbs | Fat |
|---|---|---|---|
| 320 kcal | 28 g | 0 g | 22 g |
If you want a technical breakdown of why residues change heat transfer, review the culinary science around fond and surface reactions at the fond (cooking) entry. These tradecraft details let you convert leftover bits into deliberate flavor, not accidental sabotage.
See also: Food Debris
]]>