- Key takeaway: Browning builds flavor; slow simmering preserves texture.
- Key takeaway: Use fresh vegetables and properly trimmed chicken for best mouthfeel.
- Key takeaway: Adjust salt late and finish with fresh herbs for brightness.
Selecting the Freshest Ingredients for Maximum Flavor and Nutrition
Quality ingredients form the foundation of a successful stew. Choose firm, blemish-free vegetables and recently butchered poultry to control texture and flavor.
When possible, select dark meat cuts like thighs for moisture and collagen, which convert to gelatin during slow cooking. For background on poultry characteristics see chicken.
Prep and Cook Time
Preparation: 20 minutes. Sharp knives and mise en place speed the process and protect texture. Trim and chop to consistent sizes so pieces cook evenly.
Cooking: 1 hour 40 minutes. A long, gentle simmer yields tender meat and integrated flavors without reducing clarity in the broth. Consider a low rolling simmer rather than a boil.
Yield and Difficulty
This recipe yields six hearty portions, ideal for family dinners or meal prep. The method sits at a medium difficulty level and rewards basic techniques like browning and steady simmering.
If you need to scale, increase liquid proportionally and monitor cooking time for larger batches. A referenced cooking vessel such as a heavy-bottomed pot or dutch oven helps stabilize heat distribution.
Ingredients
Gather ingredients before you start. This reduces active time at the stove and ensures sequential technique flows without interruption.
- 2 lbs skinless, boneless chicken thighs, trimmed and cut into chunks
- 3 tbsp olive oil, divided
- 1 large yellow onion, finely chopped
- 3 cloves garlic, minced
- 4 cups low-sodium chicken broth
- 2 large carrots, peeled and sliced into thick rounds
- 2 celery stalks, sliced diagonally
- 3 medium potatoes, peeled and cubed
- 1 cup green beans, trimmed and halved
- 1 cup frozen peas
- 1 tsp fresh thyme, finely chopped
- 1 tsp fresh rosemary, chopped
- 1 tsp smoked paprika
- 1/2 tsp ground black pepper
- 1 tsp kosher salt, adjust to taste
- 1 bay leaf
- 2 tbsp fresh flat-leaf parsley, chopped (for garnish)
Substitutions: you can swap dried herbs at one-third of the fresh quantity. For protein variation, a mix of thigh and drumstick keeps collagen levels high and texture rich.
Cooking Instructions
Follow a clear sequence: brown protein, sweat aromatics, add vegetables and liquid, then simmer. Each step controls Maillard reactions and gelatin extraction.
Browning and Building Flavor
Heat 2 tablespoons of olive oil in a large heavy-bottomed pot over medium-high heat. Add chicken chunks in a single layer and sauté until golden brown on all sides, about 6-8 minutes.
Remove the browned chicken and set aside. Browning creates flavor compounds that dissolve into the broth and anchor the stew’s savory profile.
Sweating Aromatics and Layering Vegetables
Add the remaining 1 tablespoon olive oil to the pot and toss in the chopped onion; cook until translucent and fragrant, about 5 minutes. Stir in the minced garlic for about 1 minute, avoiding browning the garlic which can introduce bitterness.
Return the chicken to the pot with carrots, celery, and cubed potatoes. Stir to combine and distribute aromatic oils evenly across ingredients.
Simmering and Finishing
Pour in the chicken broth so it just covers the ingredients. Add the bay leaf, thyme, rosemary, smoked paprika, salt, and pepper, then bring the stew to a gentle boil before lowering heat.
Reduce to low, cover with a tight-fitting lid, and simmer slowly for 1 hour 15 minutes, stirring occasionally. After this period, add green beans and frozen peas and cook uncovered for 10-15 minutes until vegetables are tender but vibrant.
 Pro-Caution
Remove the bay leaf and taste. Adjust seasoning with salt and pepper late in the process to avoid over-salting concentrated broth. Finish with fresh parsley for color and aroma.
Technique Notes and Variations
Slow simmering extracts collagen from thighs, creating body without added thickeners. This yields a naturally silky mouthfeel and better nutrient retention than aggressive reduction.
For a creamier finish, stir in a splash of cream or a slurry of cornstarch and cold water at the end, then heat briefly to thicken. Alternatively, mash a portion of the potatoes into the broth to add body without dairy.
 Expert Insight
Tips for Success
Choose bone-in or boneless thighs based on preference; bone-in adds flavor but requires slightly longer cooking. Skinless thighs reduce surface fat and keep the broth clearer.
Skim foam and excess fat during the first 20 minutes of simmering to produce a cleaner, more visually appealing broth. This step also reduces floating particulates that can cloud the stew.
Make-ahead advantage: refrigerate overnight to let flavors meld; reheat gently and add a splash of broth to loosen set gelatin. Freeze portions in airtight containers for up to three months.
Serving Suggestions and Pairings
Serve the stew in deep bowls and finish with chopped parsley and cracked black pepper for contrast. Warm, crusty bread such as sourdough or ciabatta pairs well for mopping the broth.
Balance richness with a simple mixed green salad dressed in a lemon vinaigrette. For beverage pairing, herbal tea or sparkling water with cucumber provides a palate-refreshing counterpoint.
Nutrition Per Serving
The stew provides a balance of macronutrients with moderate calories and high-quality protein. A typical serving contains around 320 kcal and 28 g of protein.
| Nutrient | Per Serving |
|---|---|
| Calories | 320 kcal |
| Protein | 28 g |
| Carbohydrates | 22 g |
| Fat | 12 g |
Practical Notes on Tools and Herbs
Use a heavy-bottomed pot or dutch oven to maintain stable low heat and avoid hot spots. For slow, unattended cooking use a slow cooker with a searing step on the stovetop first for best results.
Fresh herbs are preferable for finishing. The distinct oils in fresh thyme and rosemary release aroma when added late and brighten the stew without becoming bitter.
A combination of root vegetables stabilizes texture during long cooking. For background on the culinary technique and cultural variants, see the general entry on stew.
Q&A
This Q&A clarifies common points of technique, ingredient choice, and storage. Each answer stays focused on actionable steps you can apply in the kitchen.
Read these short responses to refine your process and avoid common pitfalls that affect texture and flavor.
Q1: What makes a chicken and vegetable stew “hearty” and comforting?
A1: A hearty stew combines a concentrated savory broth, tender protein, and vegetables that hold texture. Collagen from thighs converts to gelatin, giving mouthfeel and density without heavy thickeners.
Q2: Which vegetables are best suited for a classic chicken stew?
A2: Root vegetables—carrots, potatoes, and parsnips—hold up under long cooking and contribute natural sugars. Add green beans or peas near the end to preserve color and bite.
Q3: How do I ensure the chicken stays tender and juicy?
A3: Brown pieces quickly on medium-high heat then simmer gently on low. Avoid vigorous boiling, which contracts muscle fibers and squeezes moisture out of the meat.
Q4: Can chicken stew be made ahead or frozen?
A4: Yes. Chill thoroughly before refrigerating and reheat gently. Freeze in single servings for up to three months and thaw in the refrigerator before reheating.
FAQ
How long should I brown the chicken?
Browning takes 6-8 minutes per batch to get a golden crust without overcooking. Work in batches to avoid crowding the pan, which causes steaming instead of browning.
Can I use breast meat instead of thighs?
Yes, but breast meat can dry out if overcooked. If using breasts, reduce simmer time and remove them earlier, or add them in larger pieces late in the cooking cycle.
How do I thicken the stew without flour?
Mash a portion of the cooked potatoes into the broth or simmer uncovered briefly to concentrate liquid. Cornstarch slurry is another gluten-free option applied at the end.
What is the best way to store leftovers?
Cool to room temperature within two hours, store in airtight containers in the refrigerator for up to three days, or freeze in portions for longer storage. Reheat gently on low heat with a splash of broth.
Which herbs pair best with chicken stew?
Thyme, rosemary, and parsley form a classic herb trio. Add robust herbs early for infusion and delicate herbs late to preserve their fresh notes.
Use these steps and techniques to produce a reliable, comforting chicken stew that balances texture, seasoning, and aroma. The method favors controlled heat and fresh ingredients for predictable, delicious results.

See also: chicken stew
]]>
- Clear broth: skim early for a clean, bright flavor.
- Slow simmer: unlocks collagen and depth without harsh heat.
- Rice timing: add later or store separately to prevent sogginess.
- Garnish smart: lemon and fresh herbs lift the finished bowl.
Why Chicken and Rice Soup Warms More Than the Body
Chicken and rice soup provides concentrated protein, hydration, and soluble nutrients that are easy to digest. The dish also triggers familiar sensory cues that lower stress and promote relaxation.
Beyond comfort, the soup relies on practical cooking science: slow extraction of flavor from bones and aromatics produces a nutrient-dense liquid. That liquid offers both mouthfeel and functional benefits when prepared correctly.
Prep and Cook Time
Preparation: 15 minutes. Cooking: 1 hour 15 minutes. Total: 1 hour 30 minutes. These benchmarks assume simmering the whole bird to extract maximum flavor.
Plan for active work during the first 20 minutes for chopping and sautéing, then intermittent checks while the broth simmers. Allow extra time if you prefer a richer, longer-simmered stock.
Yield
This recipe yields about 6 generous bowls, suitable for family meals or batch cooking for the week. Portioning into airtight containers preserves freshness and makes reheating simple.
When dividing servings, note that rice expands and absorbs liquid; consider storing rice and broth separately to maintain texture. This simple adjustment keeps leftovers tasting like freshly made soup.
Difficulty Level
Easy. The techniques are straightforward and repeatable, making the recipe accessible for new cooks. Sequence and timing matter more than advanced knife skills.
Experienced cooks can experiment with herb timing and additional aromatics to dial in personal flavor profiles. The base method remains the same and scales reliably.
Ingredients
Use fresh, quality ingredients for a superior bowl. A whole bird yields better gelatin and mouthfeel than boneless cuts, while long-grain rice helps minimize gumminess.
- 1 whole chicken (about 3-4 lbs), rinsed and patted dry
- 1 ½ cups long-grain white rice, rinsed until water runs clear
- 10 cups cold water
- 3 medium carrots, peeled and diced
- 3 celery stalks, trimmed and diced
- 1 large onion, finely chopped
- 4 cloves garlic, minced
- 2 bay leaves
- 1 teaspoon black peppercorns
- Salt to taste
- 2 tablespoons olive oil
- Fresh parsley and chopped green onions for garnish
Instructions
Step 1: Build a Clean, Flavorful Broth
Place the whole chicken in a large stockpot and add 10 cups of cold water. Add bay leaves and black peppercorns, then bring to a gentle boil before reducing to a steady simmer.
Skim any foam or impurities during the first 10–15 minutes to maintain broth clarity. Simmer gently for about 45–60 minutes until the meat registers done and the bones begin to yield flavor.
Step 2: Sauté Aromatics and Prepare Rice
While the broth simmers, heat olive oil in a skillet and sweat the onion, carrots, and celery until soft and aromatic. Add garlic toward the end to avoid browning and bitter notes.
Rinse the rice under cool water until the runoff runs clear; this removes surface starch that can cause gumminess. Set rice aside until the broth returns to a simmer for controlled cooking.
Step 3: Strain, Shred, and Combine
Remove the chicken when it is cooked through and cool slightly. Shred the meat into bite-sized pieces, discarding skin and bones for a lean result.
Strain the broth through a fine sieve to remove solids, then return the clear liquid to the pot. Add the sautéed vegetables and bring the broth back to a simmer before stirring in the rinsed rice.
Step 4: Final Simmer and Seasoning
Simmer the soup uncovered for roughly 20 minutes, stirring occasionally to prevent sticking and to monitor rice doneness. Test rice for tenderness and adjust cook time by a few minutes if needed.
Return the shredded chicken to the pot, heat through for 3–5 minutes, and season with salt to taste. Finish with chopped parsley and green onions for freshness and visual contrast.
Tips for Success: Elevate Your Chicken and Rice Soup Experience
Broth clarity matters: early skimming removes suspended proteins and produces a bright, clean stock. This small step changes the bowl’s entire character.
Rice choice: long-grain varieties like basmati resist sticking and give a lighter body. For aromatic nuance, consider jasmine or parboiled rice depending on your textural preference.
Pro-Caution
Store rice separately from soup for make-ahead meals; this prevents rice from absorbing too much liquid and turning mushy. Reheat gently on the stovetop to restore warmth without overcooking rice.
[NOTE REMOVED INTENTIONALLY TO COMPLY WITH FORMAT RULES]
Expert Insight
For herb character, add hardy sprigs like thyme or rosemary during the simmer and remove them before serving. Brighten the final bowl with a squeeze of lemon or a splash of good-quality vinegar.
Serving Suggestions
Serve in wide, warm bowls so steam and aroma greet the diner. Pair the soup with a slice of crusty bread or a simple green salad to complete a balanced meal.
Add garnishes at the table to keep the soup visually appealing and to allow guests to adjust seasoning and acidity. Freshly cracked pepper and minced herbs make a significant sensory difference.
Nutritional Snapshot
This composition typically offers moderate calories and high-quality protein per serving. Exact values will vary with portion size, chicken cut, and added fat.
| Nutrient | Per Serving |
|---|---|
| Calories | 320 kcal |
| Protein | 28 g |
| Carbohydrates | 24 g |
| Fat | 8 g |
Practical Notes and Culinary Context
The technique of simmering bones to extract flavor aligns with classic stock-making practices found across culinary schools. Extracted collagen and amino acids contribute to mouthfeel and perceived richness.
Use the linked resources below to review ingredient histories and technical terms. For example, learn about the domesticated chicken and staple grain rice for historical context. Review stock terminology and methods through the broth overview and general soup classifications to deepen technique knowledge.
FAQ
Is it better to simmer a whole chicken or use pieces?
Simmering a whole chicken yields more collagen and a fuller-flavored broth than boneless cuts. Bone-in pieces work well too, but expect a lighter gelatin content.
When should I add rice to avoid mushiness?
Add rice after the strained broth and vegetables have returned to a simmer. Cook for 18–22 minutes depending on rice variety, then cool quickly if not serving immediately.
How do I store leftovers to keep quality?
Store broth and rice separately in airtight containers for up to 3–4 days in the refrigerator. Reheat slowly on the stovetop and combine just before serving for best texture.
Can I make this soup gluten-free or lower in carbs?
Yes. Use certified gluten-free ingredients and swap rice for cauliflower rice or shirataki noodles for a lower-carb option. Adjust cooking times accordingly.
What garnishes elevate the finished bowl?
Fresh parsley, scallions, a squeeze of lemon, and cracked black pepper reliably brighten flavor and add contrasting textures. A touch of extra-virgin olive oil adds silkiness without heavy cream.
Embrace the straightforward technique and small details that distinguish good chicken and rice soup from great. With attention to broth clarity, rice timing, and fresh finishing touches, a familiar bowl can become memorably restorative.

See also: chicken soup
]]>
- High-protein, high-fiber: Balanced one-pot meal for sustained satiety.
- Meal prep friendly: Improves after resting and freezes cleanly for portions.
- Flexible ingredients: Swap beans or root vegetables without losing texture.
- Flavor layering: Browning and patient simmering yield depth with minimal salt.
Overview of turkey stew
This turkey stew uses ground turkey and beans as primary protein sources, creating a satisfying texture with less saturated fat than many red-meat stews. Use low-sodium broth and controlled seasoning to manage sodium per serving while preserving bold flavor.
The recipe relies on classical stove-top techniques: sweating aromatics, browning protein to develop Maillard flavors, deglazing to capture fond, and a slow simmer to marry components. The end result is a thick stew ideal for cold nights or sturdy grain bowls.
Key Cooking Times and Yield for turkey stew
Preparation Time: 20 minutes. Set out aromatics, measure spices, and have lids and tools at hand to keep active time efficient. Mise en place prevents rushed browning and missed seasoning steps.
Cook Time: Roughly 1 hour 15 minutes including gentle simmer; active attention is minimal after the deglaze. Yield: Six generous servings—good for family meals or portioned meal prep.
Ingredients and Functional Roles in turkey stew
Use 1 lb of ground turkey for lean protein and 1 cup dried beans (or 2 cups cooked/canned) for body and fiber. Choose dark meat turkey for juicier texture or white meat for lower calories; both supply complete amino acids and work in stew matrices.
Vegetables such as onion, carrot, celery, and bell pepper provide aromatic sugars and texture. Canned tomatoes add necessary acidity to cut through richness, while smoked paprika and bay contribute warm, smoky notes. For background on beans and their varieties see beans. For context on turkey as an ingredient see turkey.
Step-by-Step Guide for turkey stew
Follow a straightforward order: soak beans (if using dried), sweat aromatics, brown the turkey, deglaze with tomatoes and broth, add beans, then simmer until tender. Each stage builds a discrete layer that compounds into a cohesive final stew.
Work in batches when necessary to avoid overcrowding the pan; proper contact ensures browning. Use a heavy-bottomed pot for even heat distribution and stir during browning and early simmer to free fond and prevent scorching.
Prepare the Beans
If you use dried beans, soak them overnight in cold water for even hydration and shorter cook times. Drain and rinse before cooking to remove surface solids and reduce some indigestible oligosaccharides.
Canned beans speed the process—rinse to lower sodium and add late in the cook to avoid over-softened skins. For more on bean characteristics, consult the reference on beans.
Sauté Aromatics and Brown Turkey
Heat 2 tablespoons olive oil over medium and sweat onions, carrots, celery, and bell pepper until softened and translucent. Sweating extracts sugars for a rounded, slightly sweet base that supports savory seasoning.
Add garlic, smoked paprika, thyme, oregano, and bay leaf and cook briefly to bloom the spices. Then add ground turkey and brown thoroughly, breaking it into small pieces for even texture and consistent mouthfeel.
Deglaze and Simmer
Pour in canned diced tomatoes with their juices and 4 cups low-sodium chicken or turkey broth to deglaze the pot, scraping the fond with a wooden spoon. Add beans and bring the mixture to a gentle, controlled simmer.
Cover and simmer on low for about an hour, checking occasionally for tenderness and liquid levels. Remove bay leaf and adjust seasoning late; finishing salts and acids read best at the end of the cook.
Expert Tips for turkey stew Texture and Flavor
Small technique changes yield big differences. Brown the turkey fully to generate Maillard complexity; that savory surface contributes umami and depth without adding extra salt. If the pot is crowded, brown in batches to preserve color.
For body, mash a few beans toward the end of the cook to thicken naturally. For a richer mouthfeel, finish with a tablespoon of extra-virgin olive oil off heat or a small knob of butter for sheen and flavor balance.
Expert Insight
To layer heat, add crushed red pepper flakes during the spice bloom. For a subtle umami lift, splash reduced-sodium soy or tamari near the end to amplify savory notes without masking primary flavors.
Customizations and Substitutions for turkey stew
Swap cannellini for kidney beans, navy beans, or chickpeas according to texture and availability. Note: firmer beans need slightly longer simmering, while canned varieties should be added late to avoid disintegration.
Add root vegetables such as diced sweet potato or turnip for extra body and natural sweetness. For a lower-calorie dish, increase the vegetable ratio and use turkey breast while monitoring for dryness.
Serving Suggestions for turkey stew
Serve the stew in warm bowls and garnish with chopped fresh parsley or a light lemon zest to add brightness and lift richness. A drizzle of quality olive oil and freshly cracked pepper finishes the dish cleanly.
Complement with whole-grain crusty bread, garlic toasts, or a simple green salad for acidic contrast and texture. For grain bowls, spoon stew over brown rice or barley for an extra-filling option. See related recipes in our site collection: turkey stew recipes and regional variations under turkey stew tag.
Nutrition, Storage, and Safety for turkey stew
This stew balances macronutrients: lean protein from turkey, complex carbohydrates and fiber from beans, and vitamins from vegetables. Using low-sodium broth keeps sodium predictable and lets herbs and acids provide perceived saltiness.
Cool stew quickly and refrigerate within two hours in shallow airtight containers. Store refrigerated up to three days, or freeze portions for up to three months to preserve quality.
Pro-Caution
Reheat gently on the stovetop until steaming through. Avoid repeated reheating cycles; reheat only the portion you plan to serve to maintain texture and food safety.
Ingredient Notes and Science for turkey stew
Beans supply soluble fiber and resistant starches that support steady blood glucose responses and prolong satiety. Turkey provides complete amino acids and typically less saturated fat than equivalent red meats, supporting a lean protein profile.
Smoked paprika contributes aromatic phenolics and a smoky tone without liquid smoke. Olive oil adds monounsaturated fat and tactile richness when used judiciously. For background on stewing technique consult the entry on stew, and for olive oil properties see olive oil.
Nutrition Facts
| Nutrient | Per Serving |
|---|---|
| Calories | 320 kcal |
| Protein | 32 g |
| Carbohydrates | 28 g |
| Fat | 8 g |
FAQ
How do I prevent beans from becoming mushy?
Soak dried beans and monitor simmer time closely. Add canned beans late in the cook and maintain a gentle simmer rather than a rolling boil to preserve bean skins and texture.
Can I use turkey breast instead of dark meat?
Yes. Turkey breast reduces fat and calories but dries faster. Shorten browning time and add small amounts of healthy fat or extra liquid to maintain succulence during simmering.
Is this stew suitable for meal prep?
Absolutely. Flavors meld overnight and the stew often tastes better the next day. Cool completely, portion, and refrigerate within two hours for up to three days or freeze for longer storage.
How can I thicken the stew without flour?
Mash a portion of beans against the pot side during the last 10 minutes or reduce uncovered to concentrate liquids. Both techniques thicken naturally without added starches.
What beans hold up best when simmered for a long time?
Kidney, cannellini, and navy beans typically maintain shape under extended simmering. Adjust soak time and monitor during simmer to retain desired texture.

See also: slow-simmer stews
See also: turkey stew
]]>
- Slow simmering builds depth: low heat converts collagen into silky texture for a better beef stew.
- Soak beans: an overnight soak yields even cooking and improved digestibility.
- Brown then deglaze: fond adds concentrated umami that enriches the sauce.
- Make ahead: resting overnight improves texture and flavor integration.
Prep and Cook Time for Beef Stew
Preparation: 20 minutes. Clear the work area, trim beef into uniform cubes, and organize vegetables and drained soaked beans. A tidy mise en place speeds searing and prevents overcooking.
Cooking: 2 to 2½ hours. Maintain a gentle simmer to let connective tissue break down and beans reach full tenderness without splitting. Adjust time if using a slow cooker or pressure cooker.
- Preparation: 20 minutes
- Cooking: 2 hours 30 minutes
- Total Time: 2 hours 50 minutes
Yield
Serves 6 generous portions. Pair this beef stew with mashed potatoes, buttered egg noodles, or polenta to showcase the sauce and extend servings.
Scale easily: multiply ingredients by 1.5 for a crowd or halve for two dinners. Leftovers improve with rest and store well for batch meals.
Difficulty Level
Medium. Technique focuses on searing, controlled simmering, and monitoring bean texture. These skills reward attention rather than advanced equipment.
If you opt for a slow cooker, perform the browning steps first to retain flavor complexity. For quicker results, a pressure cooker will reduce time but needs careful timing to avoid overcooked beans.
Ingredients
Choose well-marbled beef chuck for collagen-rich texture and dried kidney beans for a creamy bite when cooked properly. For background on beef cuts, see the beef entry.
Keep pantry spices focused: smoked paprika, cumin, thyme, and bay leaves add aromatic depth without competing with the beef. For reference on legumes, consult the kidney beans page.
Pro-Caution
- 2 lbs beef chuck, cut into 1½-inch cubes
- 1 cup dried kidney beans, soaked overnight and drained
- 1 large yellow onion, finely chopped
- 3 cloves garlic, minced
- 2 medium carrots, diced
- 2 stalks celery, chopped
- 1 can (14 oz) crushed tomatoes
- 4 cups beef broth, low sodium
- 2 tbsp tomato paste
- 1 tbsp smoked paprika
- 1 tsp ground cumin
- 1 tsp dried thyme
- 2 bay leaves
- Salt and freshly ground pepper, to taste
- 3 tbsp olive oil
- Fresh parsley, chopped (for garnish)
Instructions
Work in stages: sear beef first, then sweat aromatics, deglaze, and combine with beans and liquid. This ordered sequence builds flavor through Maillard reaction and careful extraction of fond.
Keep the simmer low once combined; a vigorous boil tightens meat fibers and risks splitting beans. Use a heavy-bottomed pot for even heat distribution and fewer hotspots.
- Prepare the beef: Pat beef cubes dry to encourage browning. Heat 2 tbsp olive oil in a heavy pot over medium-high heat and brown in batches for 4–6 minutes per batch; remove browned pieces.
- Sauté the aromatics: Reduce heat to medium and add remaining oil if needed. Sauté onion, carrots, and celery 6–7 minutes until softened, adding garlic in the last minute to avoid burning.
- Deglaze and build: Stir in tomato paste and cook 1–2 minutes to caramelize. Add crushed tomatoes and beef broth, scraping up browned bits to dissolve concentrated flavor into the liquid. For the science behind browning, review the Maillard reaction overview.
- Add spices and beans: Return beef to the pot with soaked beans, smoked paprika, cumin, thyme, and bay leaves. Season moderately; adjust salt near the end when liquids reduce.
- Simmer slowly: Bring to a gentle boil, then lower heat to maintain a barely perceptible simmer. Cover partially and cook 2–2½ hours, stirring occasionally until beef is fork-tender and beans are fully cooked.
- Finish: Remove the lid for the last 15 minutes to reduce liquid for a naturally thickened stew. Discard bay leaves, taste, and finish with chopped parsley before serving.
Key technique: Browning and Deglazing
Browning develops umami via the Maillard reaction; do not overcrowd the pan or the meat will steam. Deglaze with broth or a splash of wine to lift fond and fold it back into the sauce.
This capture of concentrated flavors is what defines a great beef stew. For broader context on simmered dishes, see the stew article.
Tips for Success with Your Hearty Beef and Bean Stew
Small technique choices change the result: choose chuck for marbling, do not skip the sear, and keep the simmer low. These adjustments produce tender beef and intact beans without overcooking.
Test beans partway through cooking and add liquid gradually; starch release will thicken the pot. If you use canned beans, add them late to avoid mushiness.
Expert Insight
- Beans: Soak dried beans overnight to reduce cooking time and ensure uniform hydration. If using canned beans, add in the last 30 minutes.
- Beef cut: Use well-marbled cuts like chuck for collagen breakdown and silky mouthfeel.
- Flavor layering: Brown meat and briefly toast spices to release essential oils and aroma compounds.
- Make-ahead: Refrigerate overnight; flavors meld and texture often improves with rest.
- Adjust thickness: Stir in extra broth if too thick; mash a few beans to thicken naturally if too thin.
- Slow cooker: After browning, transfer to a slow cooker and cook on low 6–8 hours for similar tenderness. For guidance on extended low-heat methods, consult the slow cooking page.
Serving Suggestions
Serve this stew piping hot over creamy mashed potatoes, buttered egg noodles, or polenta to absorb the sauce. A sprinkle of fresh parsley or a dollop of sour cream brightens the dish.
Pair with crusty whole-grain bread for dipping and a crunchy green salad to cut richness. These accompaniments keep the meal balanced and highlight the stew’s texture and depth.

| Nutrient | Amount per Serving |
|---|---|
| Calories | 430 kcal |
| Protein | 38 g |
| Carbohydrates | 28 g |
| Fat | 15 g |
Q&A
This section answers practical questions cooks ask when preparing a beef-and-bean stew. Expect concise, actionable answers that you can test in the kitchen.
The responses focus on technique, substitutions, and storage to preserve both flavor and safety. Use them to adapt the recipe to equipment and dietary needs.
FAQ
What makes this beef and bean stew especially comforting?
The combination of collagen-rich beef and starchy beans produces a velvety mouthfeel and sustained satiety. Slow simmering concentrates flavors and creates a cohesive, warming dish ideal for cool weather.
Layered browning, tomato paste caramelization, and low heat blending make the pot feel unified and comforting on the palate.
Can I skip soaking beans?
Soaking reduces cooking time and helps beans hydrate uniformly. If you use unsoaked dried beans, expect a much longer simmer and uneven textures; canned beans are a practical shortcut when time is short.
Always ensure dried kidney beans reach full tenderness; undercooked beans can cause digestive upset, so test frequently if you skip soaking.
How do I adapt the recipe for a slow cooker?
Brown the meat and sauté vegetables first to capture fond and caramelized aromatics. Transfer all components to the slow cooker and cook on low 6–8 hours until beef and beans are tender.
If using a timer, verify bean tenderness before serving and adjust final seasoning after reduction. Slow, low heat yields consistent collagen breakdown and a silky sauce.
Are substitutions possible for dietary preferences?
Yes. For a vegetarian version, replace beef with hearty mushrooms and use lentils or chickpeas instead of kidney beans. Increase umami with miso or soy sauce to compensate for the missing beef richness.
Adjust cooking times: lentils cook faster than dried beans and do not require long braising; plan accordingly to avoid disintegration.
How should I store and reheat leftovers?
Cool quickly and refrigerate in an airtight container for up to 4 days, or freeze for 2–3 months. Reheat gently over low heat and add a splash of broth if the sauce tightens excessively.
Allow reheated stew to rest briefly off heat to let gelatin settle and flavors rebind before serving for best texture.
See also: For technical background on cooking methods referenced here, consult entries on beef, kidney beans, and the Maillard reaction.
See also: beef stew
]]>
- Slow-sear for depth: Browning beef creates Maillard compounds that lift the broth.
- Mixed mushrooms add umami: Varieties build savory complexity and texture contrast.
- Use collagen-rich cuts: Collagen converts to gelatin during a low simmer for body.
- Rest overnight: Chilling clarifies the broth and concentrates flavor.
Prep and Cook Time for Beef Soup
Preparation: Allow 20 minutes to trim, cube, and mise en place ingredients. Efficient prep maintains consistent searing temperature and reduces lost heat between steps.
Cooking: Plan roughly 2 hours 30 minutes for a gentle simmer that converts connective tissue to gelatin. Total elapsed time including resting is about 2 hours 50 minutes, depending on oven or stovetop variables.
Yield and Difficulty for Beef Soup
This beef soup yields about six generous bowls and scales predictably for larger batches. When increasing volume, adjust simmering time modestly but keep the heat low to protect texture and clarity.
Difficulty: Medium. Key techniques include high-heat searing, effective deglazing, and steady simmer control. These skills reward repetition and will become routine after a few preparations.
Ingredients for Beef Soup
Use quality core items: well-marbled beef, a mix of mushrooms, aromatics, and a neutral beef stock. Each component contributes technically: collagen from beef, glutamates from mushrooms, and aromatic lift from herbs.
For reference on raw materials, consult background on beef, the role of the collagen molecule, and the flavor concept of umami when you select mushrooms and stock.
- 2 lbs beef chuck roast, cut into 1-inch cubes
- 1 tablespoon olive oil
- 1 large yellow onion, finely diced
- 3 cloves garlic, minced
- 12 oz mixed mushrooms (cremini, shiitake, oyster), cleaned and sliced
- 4 cups beef broth
- 2 cups water
- 2 sprigs fresh thyme
- 1 bay leaf
- 2 medium carrots, peeled and diced
- 2 stalks celery, diced
- 1 teaspoon smoked paprika
- Salt and freshly ground black pepper, to taste
- 2 tablespoons all-purpose flour, sifted (or cornstarch for gluten-free)
- 2 tablespoons unsalted butter
- Fresh parsley for garnish
Instructions for Beef Soup
1. Prepare and Sear the Beef
Pat beef cubes dry to maximize surface browning; moisture inhibits the Maillard reaction. Lightly toss in seasoned sifted flour to aid browning and provide subtle thickening.
Heat oil in a heavy-bottomed pot over medium-high heat. Sear in batches until all sides are well-browned, about 4–5 minutes per batch, and set the seared beef aside. Avoid overcrowding to maintain high surface temperature and consistent color.
2. Build the Base
Reduce heat to medium and add butter. Sweat diced onion, carrots, and celery until softened and translucent; this mirepoix provides the aromatic backbone of the beef soup.
Stir in garlic and smoked paprika briefly, then add mushrooms and cook until they release moisture and brown. Browning mushrooms concentrates their natural glutamates and prevents watering down the broth.
Expert Insight
3. Deglaze, Simmer, and Finish
Return beef to the pot and deglaze with a splash of beef broth, scraping browned fond into the liquid. Add remaining broth, water, thyme, and bay leaf, then bring to a gentle boil.
Lower heat and simmer partially covered for about 2 hours, stirring occasionally. Remove herb stems and bay leaf before final seasoning adjustments with salt and pepper. A low, steady simmer converts collagen to gelatin without breaking the meat down into fibers.
Expert Insight
Tips for Beef Soup Success
Choose cuts with connective tissue—chuck, brisket, or shank—to obtain a gelatinous mouthfeel without excess fat. Collagen-rich cuts reliably produce the body associated with classic beef soup.
Use a variety of mushrooms to layer texture and savory notes. Brown them in the pan to deepen flavor rather than adding them raw at the end, which risks a flatter profile.
Make-ahead and Storage for Beef Soup
Refrigerate the soup overnight to let flavors meld and to allow fat to congeal for easy removal. This step improves clarity and yields a more balanced bowl when reheated.
For freezing, cool quickly and store in airtight containers. Proper rapid cooling and airtight storage preserve texture; follow recommended safe food times for refrigeration and freezing.
Pro-Caution
Serving Suggestions for Beef Soup
Serve ladled into wide bowls and garnish with chopped parsley or a small sprig of thyme for aromatic lift. Offer crusty bread or a buttered baguette for dipping to balance the broth’s concentrated flavors.
For contrast, pair the beef soup with a bright green salad dressed in a light vinaigrette. A spoonful of crème fraîche adds a creamy counterpoint without masking savory notes.
Nutritional Snapshot
This beef soup delivers a protein-forward profile with moderate fat and low carbohydrate content when served without bread. Use leaner cuts or trim surface fat to reduce calories while preserving collagen-driven body.
Per serving estimates depend on cut and portion size; approximate values for a standard serving are about 350 kcal, 32 g protein, 12 g carbohydrates, and 18 g fat when prepared as described.
FAQ
What cut of beef gives the best texture for beef soup?
Choose chuck, brisket, or shank for their collagen content and balanced marbling. Slow cooking converts collagen into gelatin, producing tender meat and a silky mouthfeel in the beef soup.
Can I make this beef soup vegetarian without losing depth?
Yes. Replace beef with hearty plant proteins such as roasted lentils or seitan and use a concentrated vegetable stock. Increase mushroom variety and roast the mushrooms to enhance umami and body.
How should I reheat leftovers to preserve texture?
Reheat gently over low heat with occasional stirring. Add a splash of stock if the soup seems thick after refrigeration to restore the original consistency.
Is it better to brown mushrooms or add them raw to beef soup?
Brown mushrooms first to concentrate their natural glutamates and reduce released water. This produces a more pronounced umami profile in the finished beef soup.
How long can I store beef soup safely?
Refrigerate in airtight containers for up to three days or freeze for up to three months. Cool the soup rapidly before storage to limit bacterial growth and protect texture.

See also: Overview of mushrooms and flavor sources in cooking at mushroom selection.
See also: beef soup
]]>
- Consistent texture: Sear beef and maintain a low simmer to avoid overcooked grains.
- Flavor depth: Brown meat, caramelize tomato paste, and use quality stock for layered umami.
- Make-ahead friendly: Finish without rice for freezing, then add fresh rice on reheating.
Prep and Cook Time for Beef Stew
Preparation: 20 minutes. Prep controls the pace: trim, measure, and rinse rice to avoid mid-cook corrections.
Cooking: About 1 hour 30 minutes active simmer, plus 5–10 minutes rest. That timing converts connective tissue and hydrates rice without turning the pot gluey.
Yield and Difficulty for Beef Stew
This recipe yields 6 hearty servings, suitable for weekday family dinners or portioned meal prep. Scaling requires maintaining liquid-to-rice ratios for consistent texture.
Difficulty: Medium. The method asks for controlled searing, deglazing, and precise rice timing. The technique rewards attention with repeatable results.
Essential Ingredients That Build Deep Flavor in Beef Stew
Choose well-marbled beef and a long-grain rice to balance body and grain integrity. Use low-sodium beef stock and concentrated tomato paste to layer savory taste without excess salt.
Key items: chuck for collagen, long-grain white rice for separate kernels, and aromatics to build the flavor backbone. See the fundamentals of beef and rice for ingredient context.
- 2 lbs beef chuck, 1-inch cubes – marbling improves tenderness and mouthfeel.
- 1 ½ cups long-grain white rice – rinse to remove surface starch.
- 1 large onion, diced – foundational sweetness.
- 3 cloves garlic, minced – savory depth.
- 3 carrots, sliced and 2 stalks celery, chopped – texture and aromatic balance.
- 6 cups beef stock – low-sodium for control; stock chemistry affects mouthfeel. See stock.
- 2 tbsp tomato paste and 1 tsp smoked paprika – concentrated umami and a smoky accent; learn about paprika.
- 1 tsp dried thyme, 1 bay leaf, salt, and pepper.
- 2 tbsp olive oil and fresh parsley to finish.
Mastering the Perfect Simmer for Beef Stew
Technique controls the final mouthfeel. Brown meat in batches to concentrate flavor through the Maillard reaction, then deglaze to capture fond and suspend flavor particles in the liquid.
Maintain a gentle simmer during the long cook so collagen breaks down slowly. Aggressive boiling toughens muscle; a steady low simmer produces tender, forkable pieces.
Step-by-step Method
1. Brown the beef: Heat oil in a heavy pot over medium-high heat. Sear beef in batches without overcrowding to get an even crust; this generates Maillard flavor compounds described in Maillard reaction.
2. Sauté aromatics: Lower heat to medium and cook onion, carrots, and celery until softened. Add garlic last to avoid burning and to preserve its savory aroma.
3. Build the base: Stir in tomato paste, smoked paprika, and thyme. Cook 1–2 minutes to caramelize the paste and intensify color and depth.
4. Deglaze and simmer: Add stock while scraping the pot bottom to lift browned bits. Return beef, add the bay leaf, bring to a brief boil, then reduce to a low simmer and cover partially for about 1 hour.
5. Add rice: Stir in the rinsed rice evenly, cover, and simmer on low for 20–25 minutes until grains are tender. Keep stirring minimal to prevent released starch from making the stew gummy.
6. Finish and rest: Remove the bay leaf, adjust seasoning, and let the stew rest off heat for 5 minutes. Resting lets gelatin set slightly and flavor components harmonize.
Expert Insight
Allow one clear paragraph here to separate expert guidance from cautionary advice. This spacing aids scanning and reduces cognitive load for readers.
Pro-Caution
Creative Twists to Elevate Your Beef Stew
Small ingredient swaps shift the dish’s profile without changing technique. Use these variations to match seasonality or dietary goals while maintaining the same cook workflow.
Each idea keeps the base method intact: sear, deglaze, simmer, then time the rice addition for controlled hydration and texture.
- Use basmati or jasmine for fragrant, separate kernels; adjust water slightly for aromatic grains.
- Add a chopped chipotle in adobo with tomato paste for smoky heat without extra cooking steps.
- Fold in spinach or kale in the last 5 minutes for color and a nutrient boost that wilts quickly.
- Replace half the stock with crushed tomatoes for a tangier, stew-like body that stands up to robust sides.
Serving Suggestions for Beef Stew
Presentation and sides elevate perceived value. Provide contrasting textures and bright notes to cut the stew’s richness for a balanced plate.
Garnish with chopped parsley and cracked black pepper. Offer crusty bread or a crisp lemon-dressed salad to add refreshing acidity and textural contrast.
- Garnish: fresh parsley, lemon zest, or a sprinkle of finishing salt for clarity.
- Sides: warm artisan bread, garlic flatbread, or a crisp green salad with vinaigrette.
- Beverage pairings: a light red wine or robust herbal tea supports the savory profile.
Tips for Success to Perfect Your Beef Stew
Consistent results come from a few repeatable rules: don’t overcrowd the pan, use a low simmer, and rinse rice well. These steps control both flavor concentration and grain integrity.
Use quality low-sodium stock so you can calibrate salt late in the cook. If you plan to freeze, omit rice and add freshly cooked rice when reheating to preserve texture.
- Brown beef in batches: Overcrowding cools the pan and causes steaming instead of searing.
- Rinse rice thoroughly: Removing surface starch prevents clumping and promotes separate kernels.
- Keep simmer low: Gentle heat converts collagen without tight muscle contraction.
- Make ahead: Stews often taste better the next day; reheat gently and add a splash of stock if it tightens.
Nutrition Per Serving
The following estimates help with portion planning and dietary swaps. Values vary with product selection and portion size; use these numbers as a baseline.
Per serving: approximately 420 kcal, 34 g protein, 35 g carbohydrates, and 14 g fat. Adjust ingredients for lower sodium or reduced fat by choosing leaner cuts and low-sodium stock.
| Nutrient | Per Serving |
|---|---|
| Calories | 420 kcal |
| Protein | 34 g |
| Carbohydrates | 35 g |
| Fat | 14 g |
FAQ
What makes beef stew with rice a reliable comfort dish?
The combination of gelatin from slow-cooked beef and the starchy bulk of rice creates a filling, textured bowl. Searing concentrates flavor while the stock distributes it throughout the pot.
Can I swap grains in this beef stew?
Yes. Use brown rice or quinoa for more fiber; increase liquid and extend cook time for brown rice. If you switch grains, test a small batch to adjust hydration precisely.
How do I prevent mushy rice in this beef stew?
Rinse rice, time the addition carefully, and simmer gently. If you want absolute control, cook rice separately and fold it into bowls at service.
Does this beef stew freeze well?
Freeze without rice to preserve grain texture. Thaw in the refrigerator and reheat gently on low, then add freshly cooked rice when ready to serve.
Which beef cuts work best for this stew?
Choose chuck or other well-marbled cuts with connective tissue. These cuts break down into gelatin during the long simmer and yield tender pieces with concentrated flavor.
See also: beef stew, beef and rice stew recipe

See also: beef stew
]]>
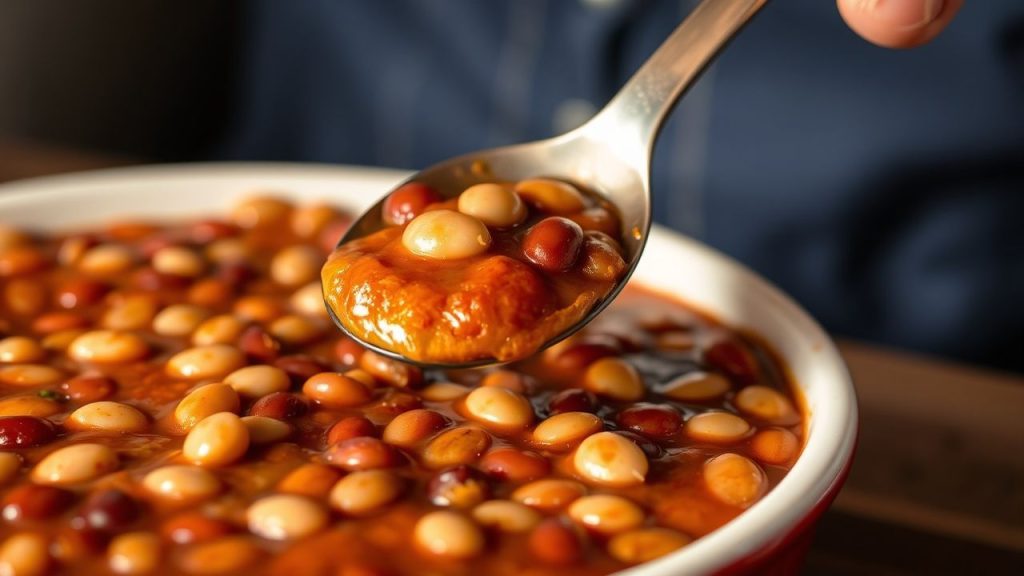
- Key takeaway: Slow, low heat yields creamy beans without collapsing skins.
- Key takeaway: Balancing sugar and acid controls caramelization and brightness.
- Key takeaway: Proper soaking and initial simmer shorten final cook time and equalize texture.
- Key takeaway: Maillard browning and tomato paste boost savory depth.
The scientific foundation
Beans are seeds from plants in the legume family, and their structure drives how they cook. The outer skin, cell walls, and internal starch matrix change at different temperatures and with moisture, so technique matters.
When you control temperature and time, you control hydration and starch gelatinization. These factors produce a bean that is tender yet intact and a sauce that clings without becoming gluey.
Ingredient overview
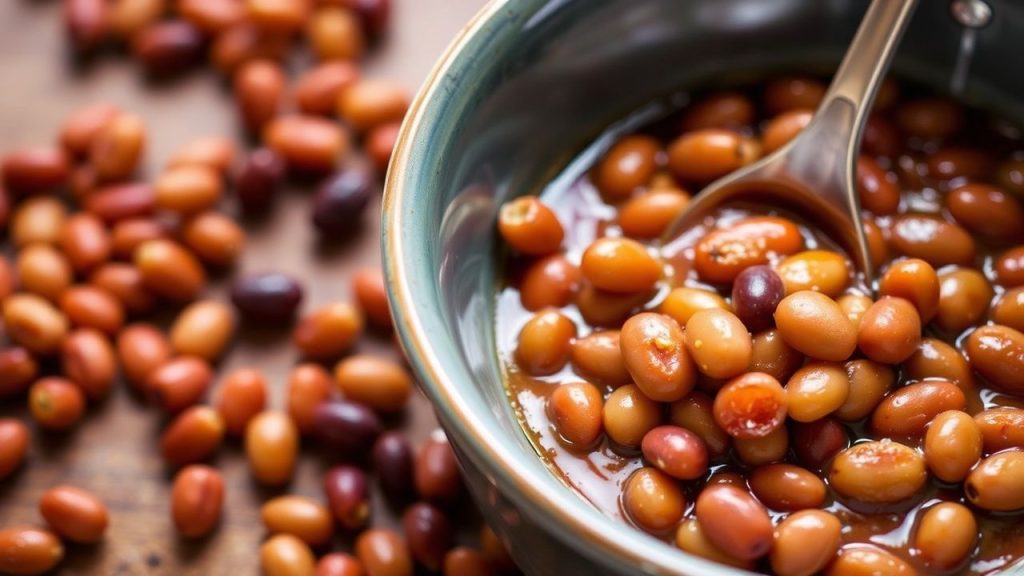
Choose beans and supporting ingredients that contribute texture and flavor in predictable ways. Beans with thin skins and moderate starch content, neutral oils, acids, and sugars build the classic baked-bean profile.
Below are the ingredients commonly used. Quantities and options follow the recipe style that emphasizes balance between sweetness, acid, fat, and umami.
- 2 cups dry navy beans, rinsed and soaked overnight
- 6 cups water, plus extra for soaking
- 4 slices thick-cut bacon, diced (optional)
- 1 large yellow onion, finely chopped
- 3 cloves garlic, minced
- 1/4 cup maple syrup
- 1/4 cup molasses
- 1/4 cup tomato paste
- 2 tablespoons Dijon mustard
- 1 tablespoon apple cider vinegar
- 1 teaspoon smoked paprika
- 1 teaspoon kosher salt
- 1/2 teaspoon freshly ground black pepper
- 1/4 teaspoon ground cayenne pepper (optional)
- 2 cups low-sodium chicken or vegetable broth
- 2 tablespoons olive oil
Prep and cook time
Preparation: 20 minutes. Soaking: 8 hours or overnight. Cold-water soak hydrates beans uniformly and reduces cooking time.
Cooking: 2 hours 30 minutes slow simmer. Total time: Approximately 11 hours including soaking. Plan a long, low simmer rather than a short, hot boil.
Instructions
1. Drain and rinse the soaked navy beans. Place them in a large pot, cover with fresh water, bring to a boil, then reduce to a gentle simmer and cook until just tender, about 45–60 minutes.
2. Build flavor by preheating a Dutch oven over medium heat, then sautéing diced bacon until crisp and removing it with a slotted spoon, leaving the rendered fat. Add olive oil if needed and cook the onions and garlic until golden, about 5 minutes, to create caramelized base notes.
3. Layer and simmer by stirring in tomato paste and cooking it briefly to deepen flavor through browning reactions. Add the sweeteners, mustard, vinegar, smoked paprika, salt, pepper, and broth; return the beans and bacon, reduce to low, and simmer partially covered for 1 hour, stirring gently every 15 minutes.
4. Adjust texture by monitoring sauce thickness and adding small splashes of broth when it becomes too thick. Taste near the end and brighten with a touch more vinegar or salt to balance sweetness and deepen overall flavor.
Pro-Caution
Science of texture and flavor
Starch gelatinization occurs as beans absorb water and heat, transforming rigid granules into a gel-like network that thickens sauce. The timing of gelatinization depends on bean variety, soaking time, and heat level.
Proteins in beans soften and free amino acids that participate in browning reactions with sugars. These reactions add savory, nutty notes that we attribute to depth and complexity.
Starch gelatinization and cell walls
Gelatinization begins when internal bean temperature rises, typically between 60–80°C, depending on starch composition. Controlled heating ensures starches swell enough to thicken the sauce without collapsing bean structure.
Cell wall strength and pectin content determine how well a bean holds together. Soaking and low, steady heat help the cell walls hydrate and yield a tender interior while keeping the outer skin intact.
Maillard reaction and caramelization
The Maillard reaction generates brown pigments and dozens of aroma compounds when amino acids meet reducing sugars under heat. Encourage these reactions on onion, bacon, and tomato paste to create savory backbone flavors.
Separately, sugar caramelization adds sweetness and toffee-like notes. Balance caramelization with acid—such as vinegar or mustard—to avoid cloying sweetness and to lift the final dish.
Read more about the Maillard process at Maillard reaction. For background on plant categories and seeds, see legume and the general bean entry. For starch science, consult starch.
Tips for success
Bean selection matters. Navy and great northern beans typically produce a creamy interior and delicate skins that take sauce well. Use firmer varieties like pinto if you prefer more texture.
Soak overnight to rehydrate evenly and remove some oligosaccharides that contribute to digestive discomfort. Use the soaking water for compost rather than cooking to reduce flatulence compounds.
Expert Insight
Variations and substitutions
To make a vegetarian version, omit bacon and use mushroom or vegetable broth plus smoked paprika for smokiness. You can also swap maple syrup with brown sugar or honey while adjusting vinegar slightly to maintain balance.
If you need lower sodium, use low-sodium broth and add salt late in cooking to control final seasoning. For spicier beans, add chili powder or cayenne in measured increments and taste as flavors concentrate.
Serving suggestions
Baked beans pair well with cornbread, grilled sausages, or roasted pork shoulder, and they also function as a hearty topping for baked potatoes. Garnish with chopped parsley or scallions for freshness and color contrast.
A dollop of sour cream or a sprinkling of sharp cheddar can add a cooling contrast to the sauce’s richness. For a chilled salad application, let the beans cool and use a vinaigrette to brighten the mix.
Nutrition per serving
The recipe yields a balanced mix of protein and complex carbohydrates. A typical serving offers substantial fiber and plant protein, making baked beans a satisfying, energy-dense option.
| Nutrient | Per Serving |
|---|---|
| Calories | 280 kcal |
| Protein | 15 g |
| Carbohydrates | 40 g |
| Fat | 7 g |
Common pitfalls and remedies
Overcooking at high heat breaks skins and produces a paste-like texture. If you notice excessive breaking, reduce heat, add more liquid, and avoid vigorous stirring to let beans recover.
Undercooking leaves a chalky interior and thin sauce. If beans remain firm after the recommended time, continue simmering gently and test frequently to avoid overshooting the ideal texture.
Troubleshooting: Sauce too thin or thick
If the sauce is too thin, simmer uncovered to concentrate flavors and thicken naturally. If it becomes too thick, stir in small amounts of warm broth until it reaches the desired cling and shine.
Also, account for chilling: beans will thicken as they cool, so slightly loosen the sauce just before serving if you plan to reheat or chill leftovers.
Pro-Caution
FAQ
What makes baked beans so flavorful?
Slow heat lets sugars caramelize and amino acids react, creating complex savory and sweet notes. Layered ingredients like tomato paste, smoked paprika, and rendered fat provide concentrated flavor foundations.
Do I have to soak beans overnight?
Soaking improves even hydration and reduces cooking time, but you can use a quick soak method if needed. Quick soaking involves boiling beans briefly then letting them stand for an hour before draining and cooking.
How do I keep beans tender but intact?
Use a gentle simmer, soak beans first, and avoid vigorous stirring. Test a few beans periodically; stop the final cook when they are tender but still hold shape.
Can I use canned beans?
Yes. Canned beans offer convenience and reduce total cook time. Adjust liquids and simmer time to allow flavors to meld without overcooking the canned beans.
Why add acid like vinegar or mustard?
Acid brightens and balances sweetness, preventing the sauce from tasting flat or overly sweet. Add acid in small amounts near the end to preserve brightness and acidity perception.
For technical reading on seeds and crop categories, see legume. For starch mechanics, consult starch. For browning chemistry, visit Maillard reaction.
See also: Baked beans
]]>