- Slow, low heat promotes even starch gelatinization and prevents a gummy interior.
- Fat coats starch to create a velvety mouthfeel and inhibit toughness.
- Layering maximizes surface contact for uniform cooking and flavor infusion.
- Finishing heat creates Maillard browning for an aromatic crust.
Core Chemistry Overview
Potato structure and dairy interaction determine the final texture. The native granules inside potato cells absorb liquid and swell; controlled gelatinization gives the gratin its creamy body.
For background on the tuber, review the potato physiology and uses on Potato on Wikipedia. Those basics explain why variety choice matters.
Prep and Cook Time
- Preparation: 20 minutes
- Cooking: 90 minutes (slow bake for optimum texture)
- Total Time: 1 hour 50 minutes
Slow baking at 300°F (150°C) provides gentle, even heat and gives starch granules time to gelatinize without overcooking the exterior. That slow schedule also concentrates flavors while limiting moisture loss too quickly.
Allowing a final uncovered phase of higher surface heat encourages Maillard reactions. Read about the Maillard process at Maillard reaction on Wikipedia to understand crust development.
Yield
Serves 6 generously when paired with simple sides. The recipe scales linearly; increase liquid proportionally for larger dishes to maintain the same creamy set.
Resting time after baking is part of the yield strategy: it reduces runniness and improves sliceability, so each portion holds together for plating.
Difficulty Level
Medium — this recipe rewards careful attention to technique rather than advanced tools. Precise slicing, even layering, and controlled temperature are the key skills.
Use a mandoline or a sharp knife and steady hands to ensure uniform 1/8-inch slices. Consistent thickness yields consistent gelatinization and texture across the dish.
Ingredients
2 pounds Yukon Gold potatoes, peeled and sliced 1/8-inch thick
2 cups whole milk; 1 cup heavy cream; 2 cloves garlic, minced; 4 tbsp unsalted butter, melted; 1 ½ tsp kosher salt; ½ tsp black pepper; ¼ tsp nutmeg; 1 cup Gruyère, grated; 2 tbsp Parmesan, finely grated; thyme to finish.
Choose a medium-starch potato like Yukon Gold for balance between structure and creaminess. Higher-starch varieties thicken more, while waxy ones hold shape longer.
For dairy context, review cream properties at Cream (food) on Wikipedia. The fat fraction and protein behavior determine emulsification and mouthfeel.
Instructions
Custard Preparation
Preheat oven to 300°F (150°C). Butter a 9×13-inch baking dish thoroughly for even browning and to prevent sticking.
Combine whole milk, heavy cream, minced garlic, salt, pepper, and nutmeg in a mixing bowl. Whisk gently to homogenize the liquid without over-aerating; a calm custard reduces bubble formation during bake.
Layering and Baking
Arrange a single overlapping layer of potato slices across the dish to maximize surface contact and uniform heat transfer. Sprinkle a light layer of Gruyère and drizzle a tablespoon of melted butter to ensure even fat distribution.
Repeat layers until nearly full, reserving some cheese for the finish. Pour the custard over the potatoes so the liquid settles between slices and replace evaporating moisture during the slow bake.
Bake and Finish
Cover tightly with foil and bake 75 minutes to allow starch gelatinization and protein setting. The covered phase traps steam, which aids gentle heat penetration and uniform texture development.
Remove foil, top with Parmesan and remaining Gruyère, then bake uncovered 15 minutes to encourage Maillard browning. Rest 10 minutes before serving so the custard tightens for clean slices.
Resting and Serving
Resting lets residual heat finish the gel matrix without excess moisture. Serve warm so the fat remains soft but the slices hold shape.
For plating, garnish with thyme for aromatic lift and pair with crisp salads or roasted proteins to balance richness.
[having_space_to_isolate_tip_warning]
 Expert Insight
After salting and drying, build your layers promptly to keep the slices from oxidizing. Oxidation affects color more than texture, so trim any discolored edges if needed.
 Pro-Caution
Use the recommended slow-bake schedule. If you need a crisper top, only raise heat for the final uncovered phase for short bursts to control interior doneness.
Tips for Success
Slice uniformly: consistent thickness leads to consistent gelatinization. A mandoline yields the most repeatable slices for predictable results.
Balance fat and liquid: fat coats starch granules, producing silkiness, while liquid supports swelling. Small adjustments to cream and milk change firmness and richness.
Control evaporation: cover during most of the bake to retain moisture for starch swelling, then uncover to form a browned crust. The timing of this switch defines texture contrast.
Cheese choice matters: melting, flavorful cheeses with moderate fat complement texture without making the sauce greasy. Reserve some cheese for browning to layer flavors.
Serving Suggestions
Present the gratin as a centerpiece for seasonal dinners or as a side to roasted meats. Fresh herbs brighten the dish and cut the palate weight of dairy.
Pair with green salads, pickled vegetables, or lean proteins to offset richness. A small drizzle of browned butter on each portion adds aroma and a toasty finish.
| Nutrient | Per Serving |
|---|---|
| Calories | 360 |
| Protein | 12 g |
| Carbohydrates | 29 g |
| Fat | 22 g |

Science Details: Starch and Emulsions
Starch governs thickening and mouthfeel. As granules absorb water and heat, they swell and leach amylose, which increases viscosity and sets the custard structure.
Explore starch fundamentals at Starch on Wikipedia to understand how potato type changes behavior during baking.
Fat works as an emulsifier in combination with dairy proteins; it coats granules and smooths texture. Proteins denature with heat and help the mixture gel while preventing separation when proportioned correctly.
Temperature control matters: slow, steady heat optimizes gelatinization and minimizes syneresis (liquid weeping). Good technique ensures the fats and proteins create a cohesive, stable matrix around swollen starch.
Expand practical skills with related content in our site guides: Classic French Casseroles and Kitchen Technique Guides. These internal pages provide complementary recipes and method primers.
FAQ
How does slow baking improve gratin texture?
Slow baking lets heat penetrate gradually, allowing starch granules to swell uniformly. That slow process avoids overcooking the surface while the interior sets, producing a consistently creamy texture.
Which potato variety works best?
Choose medium-starch potatoes like Yukon Gold for a balance of creaminess and structural integrity. Higher-starch Russets will thicken more but can break down if sliced too thinly or cooked too long.
Can I reduce the fat without losing texture?
Yes. Substitute part of the cream with whole milk and slightly reduce butter, but expect a lighter mouthfeel. Maintain enough fat to coat starch granules so the custard remains smooth.
Why does my gratin become watery sometimes?
Watery gratins usually result from excess surface moisture or under-gelatinized starch. Lightly salting and resting potato slices, or patting them dry before layering, reduces surface water and prevents runniness.
How do I get a crisp, browned top without drying the interior?
Finish uncovered for 10–15 minutes at a slightly higher temperature to trigger Maillard reactions on the surface. This step creates a crust while the covered bake has already set the interior texture.
By understanding how starch, fat, and heat interact, you gain predictable control over the gratin outcome. Apply these chemical principles to adapt the dish, whether you seek extra creaminess, firmer slices, or a more pronounced crust. Practical technique plus informed ingredient choices yield repeatable, exceptional gratins every time.
See also: potato gratin
]]>Microwave oatmeal delivers a fast, nourishing breakfast when you understand the underlying science. Small adjustments to water ratio, power, and stirring produce a reliably creamy bowl.
- Short bursts + stirring prevent uneven cooking and gumminess.
- Use 1.5–2x liquid for rolled oats to balance creaminess and body.
- Rest 60 seconds to finish starch gelatinization and improve texture.
The goal of this guide is practical, science-based steps you can repeat in any kitchen. Expect clear ratios, power adjustments, and topping strategies that preserve texture and nutrition.
Prep and Cook Time
Preparation: 2 minutes. Gather a microwave-safe, wide bowl and your chosen liquid for accurate measuring.
Cooking: 3–5 minutes total in short bursts depending on wattage. Resting adds another minute for carryover cooking.
Yield and Difficulty
Serves 1 hearty portion. This method suits beginners and experienced cooks who want consistent results quickly.
Difficulty: Easy. The technique relies on timing and attention rather than complex ingredients or tools.
Ingredients
Use measured, simple ingredients for repeatable texture: rolled oats, water or milk, salt, and optional flavorings. Keep toppings separate until after cooking.
Typical base: ½ cup rolled oats and ¾–1 cup water or milk. Adjust by oat type; steel-cut oats need more time and liquid.
Instructions
Combine oats, liquid, and a pinch of salt in a large, microwave-safe bowl. A wider bowl reduces the chance of boil-over as the mixture expands under heat.
Microwave at medium-high (about 70–80% power) for 90–120 seconds. Pause, stir thoroughly, then microwave for another 30–90 seconds until most liquid is absorbed.
Stir vigorously after cooking for 20–30 seconds to promote a cohesive, creamy texture. Let the bowl rest uncovered for 60 seconds—residual heat completes starch gelatinization.
Finish with sweeteners and toppings. Add yogurt, nuts, or fruit after cooking to preserve texture and nutritional integrity.
Scientific Principles Behind Texture
Oatmeal texture depends on starch gelatinization and water absorption. As starch granules heat, they swell and leach amylose and amylopectin, thickening the matrix of the cooked oats.
These mechanisms are well studied in food science; for background on how starch behaves with heat and water, see starch gelatinization. Understanding this helps you control creaminess.
Microwave energy heats water molecules unevenly, which is why stirring and staged heating matter. For technical context on how microwaves interact with food, consult the microwave oven entry.
The base grain also influences outcomes. Learn more about oats and their variations at the oatmeal page and the Avena sativa entry for the botanical perspective.
Practical Tips for Success
Control power and time: Lower power with longer intervals prevents hotspots and boil-over. High-power bursts can overcook outer areas while leaving centers underdone.
Stir and rest: Stir midway and after cooking. Resting for one minute equalizes temperature and completes gelatinization.
Adjusting for Microwave Power
Know your oven’s wattage. A 1,000W microwave needs less time than a 700W unit. If your oven is high-wattage, cut times by 20–30% and use medium-high power settings to avoid spillage.
Test with small increments. Start with 90 seconds at medium-high, stir, then add 30-second bursts. Record successful timings for future reference.
Liquid Ratios and Ingredient Effects
Use 1.5–2.0 times the volume of liquid for rolled oats to reach a creamy consistency. Milk yields a richer mouthfeel than water; yogurt added after cooking increases perceived creaminess without overcooking.
Ingredients that absorb liquid—chia seeds, protein powders, or nut flours—require extra liquid or shorter cook times to avoid drying the bowl out.
Expert Insight
Flavor additions like cinnamon, vanilla, or a pinch of salt enhance perceived sweetness, allowing you to use less sugar overall. Add delicate toppings after cooking to maintain texture.
Pro-Caution
Serving Suggestions
Serve oatmeal hot in a wide bowl to show off texture and make stirring easy. Layer toppings—fresh fruit, toasted nuts, or a spoonful of yogurt—after cooking to preserve contrast.
For visual and textural interest, add crunchy elements last. A drizzle of nut butter or seeded granola provides fat and satiety while keeping the cooked oats silky.
Nutrition and Portion Notes
A standard serving (½ cup dry rolled oats) provides complex carbohydrates, fiber, and plant-based protein. A typical prepared bowl with milk and toppings ranges from 250–350 kcal depending on additions.
To increase protein, fold in Greek yogurt or a scoop of protein powder after cooking. For heart-healthy fats, top with walnuts or ground flaxseed just before serving.
Further Reading and Internal Guides
For deeper technique and ratios, consult our internal guide on water ratios: Perfect Microwave Oatmeal Ratio Guide. That page offers tested charts for common microwave wattages.
Explore recipe variations and make-ahead options in our collection: Oatmeal Recipes and Mixes. These combine texture strategies with flavor templates for weekday breakfasts.
FAQ
Why does my oatmeal become gummy?
Gumminess results from rapid gelatinization where outer starches overcook and inner granules remain underdone. This creates uneven viscosity and chew.
Prevent it by lowering power, stirring midway, and using staged cooking bursts with a final rest to finish gelatinization evenly.
Should I use water or milk?
Use water for a lighter bowl, milk for richness. Milk increases fat and protein, which changes heat transfer slightly and yields a silkier mouthfeel.
Adjust liquid volume slightly downward with full-fat milk because it adds bulk and viscosity compared with water.
Can I cook steel-cut oats in the microwave?
Steel-cut oats require longer time and more liquid due to their intact kernel structure. Microwaving steel-cut oats works but needs extended low-power cooking and careful stirring.
For convenience, favor rolled oats or quick oats for microwave preparation. Reserve steel-cut oats for stovetop or slow-cooker methods if you prefer them.
How long should I let oatmeal sit after microwaving?
A 60-second rest lets residual heat finish gelatinization and improves texture without significant cooling. This simple pause often turns a so-so bowl into a creamy one.
If you add cold toppings like yogurt, you may rest slightly less to keep the bowl warm while still allowing internal equilibration.
Where can I learn more about the science behind oats?
Reliable, general overviews are available on reputable resources like Wikipedia. Start with the oatmeal article and the starch gelatinization page for technical background.
For microwave-specific details, the microwave oven entry outlines energy-transfer principles that explain common cooking phenomena.
The techniques above let you convert food science into predictable, repeatable microwave results. With measured ratios, staged heating, and a brief rest, you can make creamy, non-gummy oatmeal every time.
See also: Microwave oatmeal
]]>
- Steam is the leavening agent: water content and oven heat control rise.
- Starch gelatinization builds structure: the panade step matters.
- Eggs tune texture: protein and moisture determine pipeability and hold.
- Consistent technique yields repeatable results.
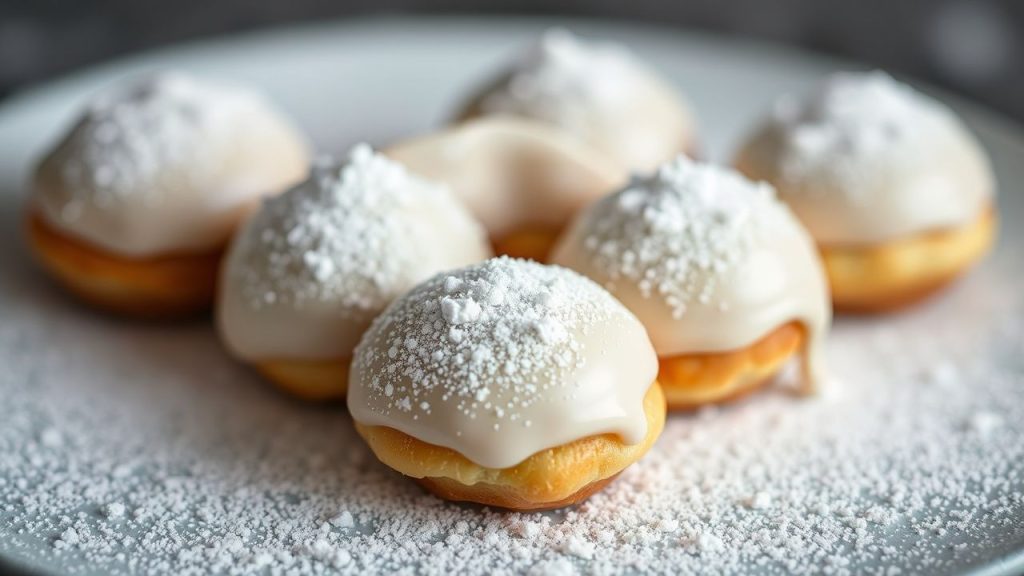
Understanding the Chemistry of Choux Dough for Flawless Texture
The classic pâte à choux creates its lift with steam rather than chemical leaveners. A cooked dough called a panade traps moisture; when heated in the oven, that moisture flashes to steam and expands the matrix, forming a hollow interior.
Starch gelatinization during the stovetop cook step sets the structure so the dough expands without collapsing. Read more about starch gelatinization on Wikipedia: Starch gelatinization.
Gluten plays a controlled role. We do not develop a strong gluten web as with bread; instead, limited protein alignment gives elasticity for puffing while remaining tender. For background see Wikipedia: Gluten.
Eggs supply liquid, fat, and protein that both strengthen and plasticize the dough. The balance between liquid and egg proteins dictates whether the dough is pipeable and whether it holds shape in the oven. See Wikipedia: Egg (food).
Ingredients, Yield and Equipment
Use precise measures. A kitchen scale beats volume cups for repeatability. Standard proportions are about equal parts water and flour by weight once accounting for butter and eggs.
Yield: approximately 24 medium choux buns. Equipment: saucepan, wooden spoon, piping bag with large tip, baking sheets, and a wire rack. For pastry technique context, review Wikipedia: Pâte à choux.
Prep and Cook Time
Preparation: 20 minutes. Use room-temperature eggs for easier incorporation.
Cooking (stovetop + baking): 40 minutes. Bake on middle rack for consistent heat exposure.
Yield
Approximately 24 medium-sized choux buns. Adjust piping size to vary counts.
Difficulty Level
Intermediate. Basic pastry experience helps, but methodical technique yields excellent results for precise bakers.
Ingredients
- 1 cup water, preferably filtered
- 8 tbsp (113g) unsalted butter, cut into cubes
- 1/2 tsp fine sea salt
- 1 tbsp granulated sugar (optional for sweeter dough)
- 1 cup all-purpose flour, sifted
- 4 large eggs, at room temperature
Step-by-Step Technique (Precise Method)
1. Preheat the oven to 400°F (200°C). Prepare two baking sheets with parchment or silicone mats.
2. Combine water, butter, salt, and sugar in a medium saucepan over medium-high heat. Heat to a rolling boil while stirring so the butter fully melts and the mixture is homogeneous.
3. Remove the pan from heat and add all the sifted flour in one motion. Stir vigorously with a wooden spoon until a smooth ball forms and the dough pulls away from the pan sides, about 1–2 minutes.
4. Return pan to low heat for 1–2 minutes while stirring constantly to evaporate surface moisture. This drying step controls the final water available to generate steam.
5. Transfer the panade to a mixer bowl or large mixing bowl. Let cool 3–5 minutes. Cooling prevents premature cooking of eggs when they are added.
6. Add eggs one at a time, beating after each addition. The dough becomes glossy and ribbon-like when properly hydrated. Stop when the batter falls from a spoon in a thick ribbon.
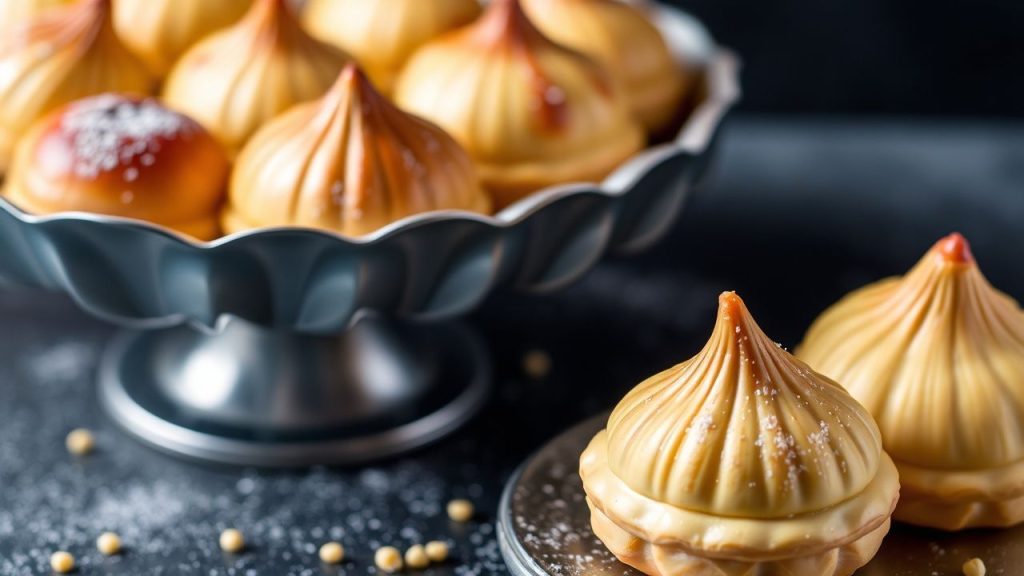
7. Fit a piping bag with a large round or star tip. Pipe 1.5-inch mounds spaced 2 inches apart. Smooth peaks if necessary with a wet fingertip to reduce cracking.
8. Mist the tops lightly with water or brush gently to remove dry flour. This small surface moisture reduces top splits and yields a smoother shell.
9. Bake at 400°F for 15 minutes, then lower to 350°F (175°C) and bake 20–25 minutes until shells are deeply golden and crisp. Do not open the oven early.
10. Cool on a wire rack. Cooling preserves the hollow interior and keeps shells crisp.
Common Problems and Troubleshooting
Flat or collapsed choux usually result from low initial oven temperature or undercooked panade. Ensure the panade reached a smooth ball and that you used the correct oven sequence.
Cracked tops occur when the dough surface dries before rising. Brushing or misting the tops and avoiding excess flour on the surface minimizes cracking.
Dense, heavy shells typically mean too little egg or overcooked panade. Remember: eggs add steam potential and elasticity; add them gradually until the ribbon stage.
Pro-Caution
Practice builds feel. Use a kitchen scale and keep notes on oven idiosyncrasies to refine timing and temperatures for your equipment.
Expert Insight
Spacing matters. Give shells room to expand so hot air circulates evenly and the steam can inflate the dough without crowding.
Tips for Success: Unlocking the Secrets to a Perfect Rise and Crispness
Temperature control: A high initial oven temperature creates rapid steam formation. The follow-up lower temperature dries the shell and sets structure.
Moisture balance: The stovetop drying step controls the water available for steam. Over-drying yields a stiff dough; under-drying produces greasy or heavy results.
Egg integration: Beat eggs in slowly and observe texture. The proper consistency falls in a thick ribbon; it should not be runny or rock-solid.
Piping precision: Consistent pressure and removing air from the bag produce uniform puffs and reduce misshapen shells.
Serving Suggestions and Internal Resources
Choux shells work for both sweet and savory fillings. Classic options include vanilla pastry cream or flavored pastry creams and savory mousses with herbs or smoked fish.
For guidance on flour choices and how protein content affects texture, review our internal resource: Baking Flour Guide: Which Fits Your Pastry Best?. For ideas on fillings and plating, visit Choux Filling Ideas for curated recipes and pairing notes.
Garnish with powdered sugar, tempered ganache, or microgreens for savory versions. Pair with tea or a light sparkling beverage to contrast textures and flavors.
Nutritional Snapshot
One medium choux shell: approximately 95 kcal, 3 g protein, 12 g carbohydrates, and 3.5 g fat. Use this as a guideline; actual values vary with filling choice and portion size.
| Nutritional Value (per choux) | Calories | Protein | Carbs | Fat |
|---|---|---|---|---|
| One medium choux shell | 95 kcal | 3g | 12g | 3.5g |
FAQ
What makes choux pastry unique compared to other pastries?
Choux relies on steam for lift rather than chemical leaveners or laminated fat layers. The cooked dough traps moisture that vaporizes in the oven, inflating shells to produce a hollow center ideal for fillings.
Why is the stovetop cooking step essential?
Cooking flour with water and fat gelatinizes starches and removes excess surface moisture. This creates a cohesive panade that can trap air and steam during baking. Skipping this step prevents proper structure formation.
How do I know when eggs are fully incorporated?
The dough should look glossy and fall in a thick ribbon from the spoon or mixer paddle. If the batter sits in a mound that slowly levels, you have the correct consistency.
Why do my shells collapse after baking?
Collapsing indicates too little structure or a sudden steam loss. Common causes: insufficient panade cook, underbaked interior, or opening the oven during the critical set phase. Maintain oven temperatures and avoid early door opening.
Can I freeze choux shells?
Yes. Freeze fully cooled, unfilled shells in an airtight container. Re-crisp in a 300°F oven for 5–8 minutes before filling to restore texture.
Final Notes
Mastery comes from precise technique and observation. Track weights, oven behavior, and small timing changes to convert one-off successes into routine results.
Choux pastry rewards methodical practice. Follow the sequence here, respect moisture and temperature, and you will produce reliably hollow, crisp shells for both classic and creative fillings.
See also: Choux pastry
]]>
- Key takeaway: Lumps result from starch granules swelling unevenly.
- Key takeaway: Temperature control and gradual liquid addition prevent most clumps.
- Key takeaway: Simple rescues — strain, blend, or whisk — restore silkiness quickly.
- Key takeaway: Use technique over shortcuts for superior flavor and texture.
Understanding why gravy becomes lumpy
Gravy thickens because starch granules absorb liquid and swell, forming a network that traps water. When those granules meet heat and moisture unevenly, they clump instead of dispersing, producing lumps.
Two technical points explain most failures: insufficient mechanical dispersion and thermal shock. Mechanical dispersion means whisking the starch into fat or liquid so granules separate; thermal shock happens when very cold liquid hits hot roux and causes sudden clumping.
For the science behind thickening agents, see starch structure and gelatinization. For classic technique background, consult the culinary concept of a roux.
Common culprits that turn your gravy grainy
One frequent error is adding dry flour directly to hot fat without proper whisking; dry pockets caramelize or remain raw, then clump when liquid arrives. Another is pouring cold stock too quickly, which shocks the starch and yields gluey clumps instead of a smooth dispersion.
High heat also ruins texture. A violent boil can break starch granules and force water from the network, leaving a separated, grainy sauce. Use a gentle simmer to let the starch hydrate and align into a cohesive matrix.
When choosing thickeners, note that cornstarch behaves differently from wheat flour. For details about corn-based thickeners, review cornstarch. If you want technique drills, review our internal guide on perfect gravy techniques for step-by-step practice drills.
Mastering stir and heat control
Start by cooking the fat-and-flour mixture (the roux) on medium heat and stir constantly until it smells nutty and looks pale gold. That color signals that the starch has lost its raw edge and will thicken evenly without tasting floury.
Next, bring your stock up to warm, not cold. Add it in a steady stream while whisking vigorously. This mechanical action prevents pockets of concentrated starch from forming, and the warmed liquid reduces thermal shock to the roux.
Think of the whisk as an alignment tool: it breaks clusters, introduces consistent motion, and helps distribute heat. For practical technique cues and pan selection, see our internal note on roux basics and pan choice.
Rescue tactics: how to fix lumpy gravy fast
If lumps appear, don’t panic. Remove the pan from direct heat and whisk over low flame; often the reduced temperature lets trapped granules rehydrate and loosen. For concentrated clumps, push gravy through a fine-mesh sieve while pressing with the back of a spoon.
When you need a rapid fix before serving, an immersion blender will emulsify and smooth the sauce in seconds. Alternatively, whisk a small amount of cold liquid into a measured scoop of gravy to form a temporary slurry, then reincorporate slowly to break stubborn clumps.
Expert Insight
Straining and blending change texture slightly but restore a pleasing mouthfeel faster than starting over. For a long-term fix, reheating gently with whisking, then finishing with a knob of butter, will rebuild sheen and body.
Prevention checklist: practical steps to avoid lumps
Use a measured roux: equal parts fat and flour by weight produces predictable thickening. Sift flour before adding to fat and whisk immediately to create a uniform paste. This prevents dry islands that later become lumps.
Temper liquids: warm stock slightly and add in a slow, continuous stream while whisking. Keep heat at a bare simmer so gelatinization proceeds gradually and evenly. Additionally, consider a slurry for cornstarch—mix cornstarch with cold water first, then whisk into hot liquid to avoid clumping.
Recipe: Basic smooth gravy (4 servings)
This recipe emphasizes method over magic. Follow the sequence exactly for a reliable, lump-free result every time.
Prep and cook times remain short: five minutes prep and about 15 minutes cook time. Yield is approximately four servings and difficulty is moderate due to technique demands.
Ingredients
3 tbsp unsalted butter
3 tbsp all-purpose flour, sifted
2 cups warm chicken or beef stock
½ tsp salt, ¼ tsp black pepper, 1 tsp Worcestershire (optional)
1 tsp fresh thyme (optional)
Instructions
1. Melt the butter in a medium saucepan over medium heat until it foams but does not brown. Immediately whisk in the sifted flour to form a smooth paste.
2. Cook, stirring constantly, 3–5 minutes until the roux turns light golden. This removes any raw flour flavor and stabilizes thickening performance.
3. Warm your stock separately. Add it slowly in a thin stream while whisking vigorously to integrate the liquid and eliminate pockets of dry flour.
4. Simmer gently while whisking until the gravy thickens, about 5–7 minutes. Adjust seasoning and thin with warm stock if necessary.
5. Finish off heat and stir in a small knob of butter for gloss. Serve immediately and keep leftovers loosely covered in the refrigerator.
Chef’s notes and substitutions
For a gluten-free option, replace flour with cornstarch but prepare it as a slurry mixed into cold liquid first. Cornstarch thickens more quickly and yields a glossier finish than wheat flour.
To rescue overly thick gravy, whisk in warm stock incrementally until you reach the desired consistency. Avoid water if possible; stock adds flavor and keeps texture cohesive.
Pro-Caution
Make-ahead tip: prepare the roux up to a day in advance and refrigerate. Warm gently before finishing with hot stock to avoid introducing cold liquid into the hot fat.
Common mistakes and how to correct them
Skipping constant stirring and using high heat are the two most consistent errors I see in kitchens. Both produce hot spots and uneven gelatinization that create lumps and grainy textures.
Another misstep is mismeasuring. Fat and starch ratios determine thickening power, so measure by volume or weight for predictable outcomes. If you need a thinner result, add warm stock slowly and test texture incrementally.
FAQ
Why does my gravy clump when I add cold stock?
Cold stock cools the roux locally and causes starch granules to constrict and clump. Always warm stale or refrigerated stock before adding to a hot roux and add it gradually while whisking.
Can I fix gravy that already has lumps?
Yes. Remove the pan from high heat and whisk over low. Strain through a fine sieve for larger clumps or use an immersion blender for rapid smoothing. Re-season after adjusting consistency.
Is cornstarch better than flour for gravy?
Cornstarch gives a clearer, glossier finish and thickens at a lower temperature. However, it requires a cold-water slurry before adding to hot liquid. Flour roux provides more flavor and a classic mouthfeel.
Will overheating a gravy break it?
Excessive boiling can break down the starch network and cause separation or a grainy texture. Maintain a gentle simmer and remove from direct heat once the desired thickness appears.
What tools prevent lumps most effectively?
A balloon whisk provides the best mechanical action for dispersion. For final texture control, an immersion blender or fine-mesh sieve will rescue any remaining imperfections quickly.
For technique reinforcement, review our step-by-step pages on perfect gravy techniques and roux basics. For authoritative background on sauces, consult classic sauce theory.
See also: Gravy lumps
]]>
- Key control points: water temperature, soak time, and seasoning order.
- Texture drivers: starch gelatinization and residual frying structure.
- Flavor strategy: preserve volatile aromatics by layering powders and liquids.
- Practical gains: small technique changes deliver large sensory improvements.
Prep and Cook Time
Preparation: 5 minutes. Cooking: 4 minutes. Keep tools ready: kettle, thermometer, and a heatproof cup or bowl.
Short prep keeps the process controlled. Having a timer and quick-access toppings improves consistency across cooks.
Yield and Difficulty
Serves 1 generous portion. Difficulty: easy, but precision matters for repeatable results.
This method suits busy cooks who want predictable texture and optimized flavor with minimal effort. Use it to test variables like water volume or add-ins.
Ingredients
Use measured ingredients to keep chemistry consistent. Small changes to water mass or oil content alter the final bite.
Below is a standard ingredient list you can vary for texture or nutrition:
- 1 cup boiling water (monitor temperature for starch gelatinization)
- 1 pack instant noodles
- 1 sachet dry seasoning powder
- 1 tsp soy sauce
- 1 tsp toasted sesame oil
- 1 green onion, thinly sliced
- Optional: boiled egg, steamed greens, or mushrooms
Instructions
Follow a controlled sequence: heat, hydrate, season, and finish. Each step influences molecular interactions in the noodles and broth.
Measure time and temperature on the first try, then adjust for package differences and personal texture preference.
- Heat water: Bring water to a rolling boil (about 100°C/212°F). Use a thermometer when precision matters.
- Set noodles: Place noodles in a heatproof cup or bowl. Pour water to just cover the block for concentrated flavor or more to create a soup.
- Cover and time: Close the lid or cover and soak for 3–4 minutes. Stir gently halfway to separate strands without overworking the gluten network.
- Layer seasonings: Add dry powder first, then oil-based sachets. Mix gently to release aroma without dissipating volatile compounds.
- Finish: Drain a portion of water for firmer noodles or keep broth for a softer bite. Garnish and serve immediately.
Timing and Temperature Details
Starch gelatinizes across a narrow temperature window. Keeping the water close to boiling ensures uniform swelling of starch granules.
Shorter soaking favors chew and spring; longer soaking yields softer structure. Record soak times to refine texture for each brand.
Seasoning Strategy
Powders contain many volatile flavor compounds that evaporate quickly. Add them while the container is covered to trap aroma.
Liquid flavor sachets often carry oils and concentrated umami agents. Add these last to preserve their aroma and mouthfeel.
Science of Texture
The primary texture change comes from starch gelatinization. Heat and water break down crystalline regions in starch granules and allow them to swell and bind water.
For a technical primer, see the starch gelatinization entry. Manufacturers pre-process noodles to a specific moisture and frying profile to control final bite.
Instant noodles often undergo frying or steaming followed by drying. This pre-treatment creates a porous structure that rehydrates rapidly and yields the characteristic springy chew.
Refer to the instant noodles overview for historical and manufacturing context. Different flours, protein levels, and drying methods change rehydration kinetics.
Flavor Chemistry
Umami compounds such as free glutamates and nucleotides drive savory depth. Salt and acids modulate perceived intensity and balance.
Learn more about the taste category at umami on Wikipedia. Powder blends use a mix of amino acids, salts, and hydrolyzed proteins to create a lasting savory profile.
The Maillard reaction products from frying add roasted, caramelized notes that dissolve into the broth. Those compounds enhance aroma and perceived richness.
For chemistry background, see Maillard reaction. Retaining oil-based aromatics during preparation keeps the soup fragrant and full-bodied.
Packaging and Heat Retention
Cup materials and lids alter heat loss and steam retention. Insulating cups trap heat and water vapor, creating a microclimate that favors uniform rehydration.
Careful lid placement reduces aroma loss and preserves volatile flavor compounds. Some designs intentionally channel steam to soften noodles evenly.
Tips for Success
Small procedural changes yield measurable differences. Consistency in water temperature, amount, and timing delivers predictable texture and flavor.
Store noodles and seasoning sachets in a cool, dry place to preserve volatile aromatics and prevent oil rancidity.
Expert Insight
When adding vegetables or proteins, pre-blanch or preheat them to avoid cooling the broth and altering starch set. Hot additions integrate faster and protect texture.
Pro-Caution
Serving Suggestions
Garnish with sliced green onion, a soft-boiled egg, or quick-blanched greens for visual contrast and balanced nutrition. Small additions elevate perceived quality.
A drizzle of sesame oil or chili oil at the end adds an aromatic top note without disturbing the starch matrix. Add them after mixing to preserve aroma and mouthfeel.
Nutrition and Practical Notes
A typical instant noodle cup contains moderate calories and a mix of macronutrients. Manufacturers vary widely in sodium and fat content.
If you track macros, add lean protein or extra vegetables to improve nutrient density while keeping the cooking sequence intact.
| Nutrient | Amount per Serving |
|---|---|
| Calories | 350 kcal |
| Protein | 10 g |
| Carbohydrates | 55 g |
| Fat | 8 g |
For test routines and advanced variations, consult our internal resources to refine technique. See our comprehensive noodle recipe guide for step-by-step experiments.
For texture calibration across brands, track soak times and water mass in a notebook or digital log. Our noodle texture guide provides templates for A/B testing.
FAQ
Why do instant noodles cook so quickly?
Manufacturers pre-cook noodles by frying or steaming, which reduces internal crystalline structure and moisture. That pre-processing accelerates water uptake and shortens rehydration time.
How does water temperature affect texture?
Higher water temperatures speed starch gelatinization and protein relaxation, producing a softer bite in the same time. Lower temperatures undercook the starch and yield a chalky or brittle texture.
Should I add all seasonings at once?
No. Add dry powders first to dissolve, then liquid oils or concentrated pastes. Layering preserves volatile aromatics and enhances perceived aroma after opening the lid.
Can I reduce sodium without losing flavor?
Yes. Substitute part of the seasoning with mushroom powder or low-sodium stock concentrates. Umami-rich ingredients restore savory depth while lowering explicit salt levels.
Is there a best container to cook in?
Use a heatproof ceramic or steel bowl for highest safety and even heat distribution. Many commercial cups work, but check for deformation or odor when hot water is poured.
Technical mastery rests on controlling variables. Measure ingredients, time precisely, and adjust one factor at a time to improve your instant noodle cup systematically.
See also: Instant Noodles
]]>Imagine biting into a piece of tempura: a delicate, crackling shell gives way to a tender interior. The texture comes from controlled chemistry—cold batter, starch behavior, and precise frying create that airy crisp.
- Key textures come from limiting gluten and promoting starch gelatinization.
- Temperature control prevents oil uptake and burns.
- Cold, bubbly batter yields the lightest, most brittle crust.
- Drain and rest on a rack to preserve crunch.
Origins and the scientific frame
Tempura traces to 16th-century Japanese cookery and Iberian frying influence; the technique evolved into its current delicate form. For historical context, see tempura history.
Scientifically, tempura relies on rapid water evaporation, starch gelatinization, and minimal gluten formation. These mechanisms act together during rapid deep-frying to produce a fragile, brittle crust.
Prep and Cook Time
Preparation and timing matter because the batter’s temperature and the oil’s heat determine texture. Work in small, controlled batches so oil temperature recovers quickly between fries.
The following times reflect a standard home setup and moderate pieces. Commercial kitchens can often halve the cook time with larger oil baths and consistent throughput.
- Preparation: 15 minutes
- Cooking: 10 minutes
- Total Time: 25 minutes
Yield and Difficulty
This recipe yields a reliable small-plate portion for four diners as an appetizer or side. The technique rates medium: the ingredients stay simple, but the process requires temperature discipline.
Practice improves timing and batter feel. Use a thermometer and a wire rack to reproduce results consistently.
Ingredients
Choose ingredients that favor low gluten and quick gelatinization. Typical swaps—cake flour, rice flour, or cornstarch—change protein and starch behavior.
For starch behavior reference, consult cornstarch properties and compare with wheat-based flours to understand gelatinization speed.
- 3/4 cup cake flour, sifted (low-protein option)
- 1/4 cup cornstarch (adds crispness)
- 1 large egg, lightly beaten
- 1 cup ice-cold sparkling water (keeps batter cold and bubbly)
- Vegetables and seafood of choice: sweet potato, shrimp, mushrooms
- Vegetable oil with a high smoke point (canola, sunflower, or rice bran)
- Salt for finishing
Why flour choice matters
Flour protein governs gluten formation. Lower protein flours reduce network formation and keep coatings tender rather than elastic. For background, read about gluten.
Starch additions—cornstarch or rice flour—gelatinize quickly, forming a brittle matrix that resists oil absorption. Combine flour and starch for an optimal balance of structure and lightness.
Instructions
Follow a disciplined sequence: dry ingredients, cold liquid, limited mixing, and fast frying. Each step preserves the microstructure that yields crispness.
Work methodically and keep batter chilled until the moment you dunk the items into oil. Use a thermometer to maintain a steady frying temperature.
- Prepare the pieces: Pat produce and seafood dry. Excess surface moisture converts to steam and can break the crust.
- Combine dry ingredients: Sift cake flour and cornstarch into a chilled bowl.
- Add egg and cold water: Add beaten egg, then pour in ice-cold sparkling water. Stir briefly; a few lumps are fine. Avoid overmixing to prevent gluten development.
- Heat oil: Bring oil to a steady 350°F (175°C). Use a wide pot for stable temperatures; hot oil must recover between batches to prevent greasiness.
- Coat and fry: Dredge items lightly into batter, let excess drip, then lower carefully into oil in small batches. Fry 2–3 minutes until pale gold.
- Drain and rest: Transfer to a wire rack to drain; resting briefly allows steam to exit, locking in crispness.
For related techniques and troubleshooting, see our internal guides on Ultimate Guide to Frying and specific deep-fry techniques.
Tips for Success
Small adjustments produce large improvements. Keep the batter cold, limit mixing, and maintain oil temperature between 170–180°C for optimal puffing and minimal oil uptake.
Use a wire rack instead of paper towels to avoid trapped steam and softened crust. Always fry in small batches to keep the oil temperature consistent.
- Use sparkling water: Bubbles create micro-voids that make the crust lighter.
- Mix briefly: Lumps in batter reduce surface area for gluten to form.
- Control oil temperature: Rapid evaporation creates a crisp shell without overcooking inside.
[LET’S LEAVE A SEPARATION PARAGRAPH HERE BEFORE THE EXPERT TIP]
Season immediately after frying with flaky salt to accent the fragile crust. Serve the pieces while they still crackle; crispness drops as they cool fully.
[NOTE: The next block is the mandatory expert tip; it is not adjacent to the WARNING block.]
Expert Insight
Apply the tip across two or three practice runs to feel how batter viscosity and temperature change outcomes. Small shifts in water temperature or oil heat show up immediately in the crust.
Heat and Safety
Frying involves hazards: hot oil can cause severe burns and fires. Use a reliable thermometer and never leave hot oil unattended.
Keep a lid nearby to smother a grease fire, and use a deep, heavy pot to reduce splashing. If oil smokes, discard and start fresh to avoid off-flavors and health risks.
Pro-Caution
After frying, cool oil completely before straining and storing. Discard oil that smells off or shows excessive foaming during reuse.
Serving Suggestions
Serve tempura with a classic tentsuyu dip made from dashi, soy sauce, and mirin for balanced umami and acidity. For background on dashi, refer to dashi.
Garnish with grated daikon and a lemon wedge for freshness. Pair tempura with steamed rice or a light salad to balance the fried textures.
Nutritional Snapshot
Portion control matters. A standard serving of tempura ranges 200–300 kcal depending on oil retention and fillings.
Use lean fillings and drain well to reduce per-serving fat. Frequent practice yields crisper results with less oil uptake.
| Nutrient | Per Serving |
|---|---|
| Calories | 220 kcal |
| Protein | 8 g |
| Carbohydrates | 18 g |
| Fat | 12 g |
Further Reading
For scientific background on frying and heat transfer, consult technical overviews of deep frying. These sources explain oil behavior and heat flow in batter-covered foods.
Practice, measurement, and curiosity produce consistent results. Combine methodical technique with the pointers above to convert theory into repeatable, restaurant-quality tempura.
FAQ
How does batter temperature affect crispness?
Cold batter delays gluten formation and increases steam generation on contact with hot oil. The rapid phase change creates pockets that keep the crust airy and brittle.
Can I replace wheat flour entirely?
Yes. Rice flour or a rice flour blend produces a very light crust. However, blends with some wheat or cornstarch balance texture and adhesion for larger items.
What is the ideal oil temperature range?
Maintain 170–180°C (340–355°F) for most tempura tasks. This range vaporizes water quickly without overbrowning the thin coating.
Why does my tempura become soggy after a few minutes?
Soggy tempura usually stems from trapped steam when pieces rest on paper towels or from oil temperature collapse. Use a wire rack and fry in small batches.
How can I reduce oil absorption?
Keep batter thin, keep oil hot, and avoid overcrowding. Starch-rich batters also resist oil uptake once properly gelatinized.
Mastering tempura requires precision, disciplined mixing, and consistent heat. Apply these steps and measurements to produce crisp, airy tempura with predictable results.
See also: Tempura
]]>Starch drives texture in bread, rice, potatoes, and many sauces. Understanding how starch hydrates and gels gives you predictable outcomes in the kitchen.
- Gelatinization: Heat plus water makes starch thicken.
- Resting: Hydration before cooking improves texture.
- Heat control: Balance browning and full gelatinization.
What is starch and where it lives
Starch is a plant polysaccharide used by plants to store energy. You encounter it daily in potatoes, rice, wheat, and corn.
For a technical overview, see starch on Wikipedia. That page details structure, sources, and industrial uses.
Prep and Cook Time
These timings are typical for the batter-based recipe below: Prep: 15 minutes; Cook: 30 minutes; Total: 45 minutes.
Timing matters because starch gelatinization occurs over a temperature and time window. Short rests and correct heat keep crumb tender and sauces stable.
Yield
This recipe yields servings for four as a satisfying side or breakfast plate. Use it to practice starch control in a small batch.
Scale ingredients proportionally. When you change batch size, keep liquid-to-starch ratios consistent to preserve texture.
Difficulty Level
Medium. The techniques require attention to hydration and temperature but reward you with repeatable results.
Focus on two skills: measuring liquids accurately and managing pan temperature. Those habits influence gelatinization and browning most.
Ingredients
Ingredients include common pantry starches and liquids. Each item plays a specific role in structure, moisture, or browning.
Below is the ingredient list for the example batter. Use a kitchen scale for best consistency.
- 1 cup all-purpose flour, sifted
- 2 tablespoons cornstarch (for starch gelation clarity)
- 1/2 teaspoon baking soda
- 1 teaspoon fine sea salt
- 1 cup whole milk, warmed
- 2 large eggs, at room temperature
- 3 tablespoons unsalted butter, melted
- 1 tablespoon brown sugar (enhances Maillard browning)
- 1 teaspoon vanilla extract
Instructions
Follow these steps in order. Each step protects starch structure to deliver a tender crumb and reliable browning.
Measure and mix with intent. Overworking or rushing heat changes starch behavior and the final texture.
- Combine dry ingredients: In a large bowl, whisk flour, cornstarch, baking soda, and salt until even. Uniform dry mix prevents local overdosing of starch.
- Mix wet ingredients: Beat eggs, then whisk in warm milk, melted butter, brown sugar, and vanilla. Warm milk helps starch granules hydrate more uniformly.
- Combine gently: Fold wet into dry just until moistened. Overmixing strengthens gluten and can make the crumb tough.
- Rest the batter: Let batter sit for 10 minutes at room temperature. This short rest lets starch granules fully absorb water before heat.
- Preheat and grease the pan: Warm a non-stick skillet over medium heat and grease lightly. Proper pan temperature supports even Maillard browning without burning.
- Cook carefully: Pour 1/4 cup of batter per pancake. Cook until bubbles form and edges set, about 2–3 minutes; flip and cook another 2 minutes until golden.
- Repeat and serve: Continue cooking and keep finished pieces on a rack to preserve texture. Stacking traps steam and softens crusts.
Resting and hydration details
Resting hydrates starch granules so they swell evenly when heated. That swelling creates a stable gel instead of isolated gummy patches.
When you hydrate starch in cold or warm liquid, the kinetics differ. For reference on the physical process, consult gelatinization on Wikipedia.
Tips for Success: Mastering Gelatinization and Flavor
Know which starch you use. Cornstarch and potato starch behave differently from wheat flour because of amylose/amylopectin ratios.
Control temperature. Medium heat balances caramelization and full starch gelatinization without burning sugars.
- Know your starches: Cornstarch gelatinizes at a lower temperature than all-purpose flour, giving a smoother finish.
- Temperature matters: Too-hot cooking can brown sugars before starch fully gels, leading to a drier interior.
- Resting is key: Rest batters or doughs to hydrate granules and reduce toughness.
- Use acids sparingly: High acidity can weaken starch gels; add acidic components after thickening when possible.
Expert Insight
If sauces turn gummy, reduce cooking time or use a lower-gelatinization starch. For grainy textures, ensure thorough pre-hydration and even mixing.
Pro-Caution
Serving Suggestions: Elevate the Experience
Plate pancakes freshly cooked to preserve crust contrast. A simple syrup or fruit keeps textures complementary rather than competing.
For savory applications, use a starch-manipulated base such as crispy shredded potatoes for a contrasting crunch. Consider texture contrasts with soft proteins and acidic condiments.
Nutritional Breakdown
The values below are estimates per serving for the example recipe. Adjust values when you scale the recipe or substitute ingredients.
| Nutrient | Per Serving |
|---|---|
| Calories | 210 kcal |
| Protein | 6 g |
| Carbohydrates | 30 g |
| Fat | 7 g |
Practical Troubleshooting
If your batter is gummy, first check hydration. Excess liquid or too-long cooking often causes a pasty result.
If items brown too fast and remain raw inside, lower your heat and allow more time for starch gelatinization. Adjust pan temperature and try again.
Further Reading and Science Links
To explore browning chemistry, see the Maillard reaction entry for mechanisms and flavor outcomes: Maillard reaction on Wikipedia.
For specifics on a common thickener used in these recipes, see the cornstarch article: cornstarch on Wikipedia. These resources provide concise, sourced technical details.
FAQ
What is the best starch for thickening sauces?
Cornstarch gives a clear, glossy result and sets quickly. Use half as much cornstarch by volume compared with flour for the same thickening power.
For high-acid sauces or long-simmered dishes, use stable starches or add them late in the process to preserve gel strength.
Can I substitute potato starch for cornstarch?
Yes. Potato starch often thickens at slightly lower temperatures and yields a silkier mouthfeel. Adjust quantity by feel and desired finish.
Be aware that potato starch can break down under prolonged, vigorous boiling, so add it near the end of cooking when possible.
Why did my sauce separate after cooling?
Separation usually means the gel network weakened. Excess acid, overcooking, or mechanical shear can break the gel and release water.
To rescue a separated sauce, reheat gently and whisk in a small slurry of starch off heat, then warm slowly to re-establish a network.
How does resting affect baked goods?
Resting lets starch absorb moisture uniformly and relaxes gluten slightly. This yields a more tender crumb and consistent structure after baking.
Short rests (10–30 minutes) work well for batter-based items. Longer autolyse periods help yeast breads develop flavor and hydration.
Where can I read more technical background on starch structure?
Consult authoritative references such as the general starch article and the gelatinization entry for polymer behavior under heat: starch on Wikipedia and gelatinization on Wikipedia.
These pages summarize the molecular basis that explains practical kitchen outcomes and point to academic sources for deeper study.
Key Takeaways
Controlling starch hydration, heat, and resting yields predictable textures from sauces to breads. Small technique changes produce large sensory differences.
Practice with simple recipes, measure carefully, and note how starch type and temperature shift outcomes. That disciplined approach gives repeatable, high-quality results.
See also: starch
]]>