There’s something undeniably magical about a perfectly seared meal: the crisp, caramelized crust that locks in juices, the aroma that signals depth of flavor, and the steady sizzle that promises texture. A grill press is a simple tool that reliably delivers those results by increasing surface contact and stabilizing heat across the protein or sandwich.
- Even contact and heat speed Maillard browning for deeper flavor.
- Controlled pressure produces consistent crusts without over-drying.
- Simple maintenance extends cast-iron life and protects finish.
- Versatility spans steaks, burgers, paninis, vegetables, and tofu.
How a Grill Press Works
A grill press amplifies surface contact between food and the cooking surface. That contact concentrates heat energy where the Maillard reaction forms, yielding a brown, flavorful crust.
Heat conduction and pressure together change cooking kinetics: the press conducts heat into the food while reducing insulating air gaps. For the science behind browning, see the Maillard reaction explanation on Wikipedia and how heat affects transformations in proteins and sugars.
Prep and Cooking: Timings, Yield, and Difficulty
Plan 10 minutes for prep and 8–12 minutes for cook time on a 1-inch steak, depending on doneness. Timing will vary with thickness and the starting temperature of the protein.
Serves 2–4 in a typical home kitchen setting and rates as Easy to Medium in skill. The technique scales to burgers and paninis with small adjustments to weight and time.
Prep Time and Cook Time
Prep: 10 minutes to bring steaks to room temperature and season. Dry the surface; moisture prevents proper browning.
Cook: 8–12 minutes overall, pressing 4–6 minutes per side for many cuts. Use a reliable instant-read thermometer to judge doneness.
Yield and Difficulty
Yield: One pound of ribeye yields 2 hearty portions or 3 moderate servings once sliced. For sandwiches, 4 slices of bread make two paninis.
Difficulty: The method is accessible. Mastering pressure and timing takes practice; start conservative with pressing duration.
Ingredients and Step-by-Step Instructions
Use quality protein and minimal seasoning to highlight the seared crust. For a ribeye, a light brush of oil and coarse salt are often all you need to get a bold exterior.
Keep ingredients and steps simple: oil, salt, pepper, optional aromatics, and your press. Below is a practical ingredients list followed by clear steps for consistent results.
Ingredients
- 1 lb ribeye steak, about 1-inch thick, room temperature
- 1 tbsp neutral oil (or olive oil for flavor)
- 2 cloves garlic, smashed (optional)
- Salt and freshly ground black pepper, to taste
- 4 slices sourdough bread (if making sandwiches)
- Butter for spreading on bread
- Optional: sliced cheddar, fresh herbs (thyme or rosemary)
Instructions
Preheat your grill press and pan on medium-high for at least five minutes so heat is consistent. A cold press will slow browning and give uneven results.
Season the steak and lightly oil the cooking surface. Place the steak in a hot cast-iron skillet or grill pan and let one side develop color before applying the press.
- Preheat the press until it holds heat consistently.
- Season the steak with salt and pepper and add a thin coat of oil.
- Place the steak in the pan and wait 1–2 minutes to start a crust.
- Press gently with even force for 4–6 minutes on the first side.
- Flip and press again for 4–6 minutes or to target internal temperature.
- Rest the steak 4–5 minutes before slicing against the grain.
For sandwiches, butter the outside of each bread slice, assemble fillings, and press until bread is crisp and cheese melts. Timing for paninis is typically shorter—monitor closely.
 Pro-Caution
Use an instant-read thermometer to check doneness. Aim for 125–130°F for medium-rare steaks when removing from heat; carryover will raise it slightly as the steak rests.
Tools, Materials, and Care
Select a press material to match your cooking style. Cast iron holds heat and adds weight for a firm press; stainless steel heats faster and resists corrosion.
Size should match your skillet; a press too large or small reduces efficiency. A wooden or heat-resistant handle keeps handling safer when reheating or moving the press.
 Expert Insight
To protect cookware and the press, avoid abrasive cleaners on seasoned surfaces. Rinse gently, dry immediately, and reapply a light oil if you store cast iron for long periods.
For stainless steel, use hot water and a mild scrub. Avoid thermal shock by letting the press cool before washing to reduce warping risk.
Why Material and Heat Matter
Material choice influences heat transfer and weight distribution. Cast iron’s thermal mass keeps surface temperatures stable, aiding uniform browning.
Stainless steel transfers heat faster but has less thermal inertia. Review general heat transfer principles on the Heat transfer page for context on conduction and surface contact.
Serving Suggestions and Pairings
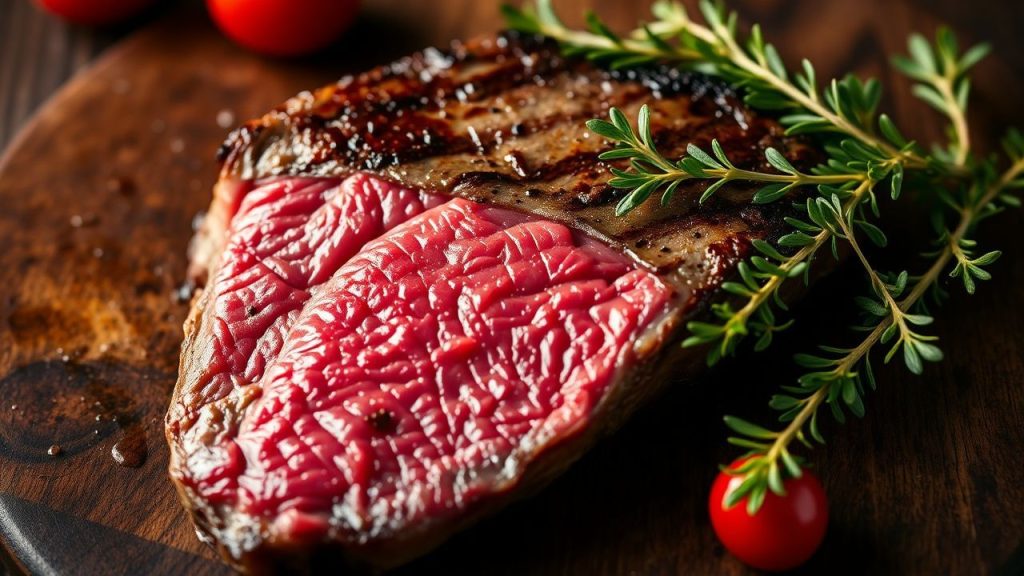
Slice steak against the grain and garnish with a small pat of herb butter for gloss and richness. Fresh herbs like thyme or rosemary add aromatic lift without overpowering the sear.
Pair with grilled seasonal vegetables or a peppery arugula salad dressed with lemon vinaigrette. For paninis, serve with a crisp pickle or light coleslaw to cut the richness.
Practical Resources and Internal Guides
For basic technique refreshers and tool checks, visit the internal guide on grill press basics for additional photos and setup tips. That page covers size selection and initial seasoning routines.
For maintenance routines and troubleshooting—from rust removal to re-seasoning—see care and maintenance. Those steps extend tool life and protect your cookware finish.
Nutrition Snapshot
Use the table below to estimate per-serving nutrition for a ribeye-based meal. Values vary by cut and added fats.
| Nutrient | Per Serving |
|---|---|
| Calories | 450 |
| Protein | 38g |
| Carbohydrates | 15g |
| Fat | 28g |
FAQ
The following answers cover common practical questions about use, care, and technique when cooking with a grill press.
What is the best material for a grill press?
Cast iron is preferred for its thermal mass and weight, which create even contact and steady heat. Stainless steel works well if you want easier cleaning and faster heat-up times.
Can a grill press be used on any cooktop?
Yes. You can use a press on gas, electric, or induction-compatible cookware as long as the cookware itself suits the cooktop. Avoid using a heavy press on delicate non-stick pans to preserve the surface finish.
Will pressing make my steak dry?
Not if you wait to apply pressure until a crust begins to form and avoid excessive force. Gentle, even pressure speeds surface browning while conserving internal juices.
How do I maintain a cast-iron press?
Dry immediately after washing, lightly oil the surface, and store in a dry place. Periodically re-season the press by applying a thin oil layer and heating it to bond the oil to the surface.
Are grill presses only for meat?
No. Use the press for paninis, vegetables, burgers, and firm tofu. The press creates crisp edges and even caramelization on any food that benefits from direct contact and steady heat.
Resources and Further Reading
For background on the chemistry of browning, review the Maillard reaction. For material properties, read about cast iron and stainless steel.
For a quick reference on pressed sandwiches, see the Wikipedia entry on Panini. These sources reinforce practical choices for tools and technique.
Final Notes
A grill press is a compact, durable tool that raises the consistency of searing across proteins and sandwiches. With proper heat, measured pressure, and basic maintenance, it returns professional-style results at home.
Practice with timing and weight to match your preferred crust and internal doneness. Use internal resources like grill press basics and care and maintenance to deepen skill and extend the life of your tools.
See also: grill press
]]>
- Salt early: dry-brine for flavor and improved muscle relaxation.
- Sear hot: create a Maillard crust to lock flavor and texture.
- Control temp: use an instant-read thermometer and rest before slicing.
- Aging or enzymes: break down collagen for sustained tenderness.
Prep and Cook Time
Preparation: 10 minutes. Bring steaks to room temperature for even cooking and predictable carryover.
Cook Time: 12–15 minutes depending on thickness. Use direct high heat for a short sear, then lower the heat to finish to target temperature.
Yield and Difficulty
Yield: Serves 2 hearty portions. Adjust times when cooking thicker cuts or multiple pieces in one pan.
Difficulty: Medium. The techniques require timing, temperature tracking, and attention to surface moisture for a reliable result.
Ingredients
Gather quality ingredients and simple tools: two 10–12 oz ribeye steaks, kosher salt, freshly ground black pepper, a high smoke-point oil, unsalted butter, fresh thyme, and garlic.
Use a heavy skillet (cast iron preferred) and an instant-read thermometer. Choosing the right cut matters; ribeye offers marbling that improves tenderness and mouthfeel.
- 2 (10-12 oz) ribeye steaks, at room temperature
- 1 tablespoon kosher salt
- 1 teaspoon freshly ground black pepper
- 2 tablespoons high smoke-point oil (canola or avocado)
- 2 tablespoons unsalted butter
- 3 sprigs fresh thyme
- 3 cloves garlic, lightly crushed
Instructions
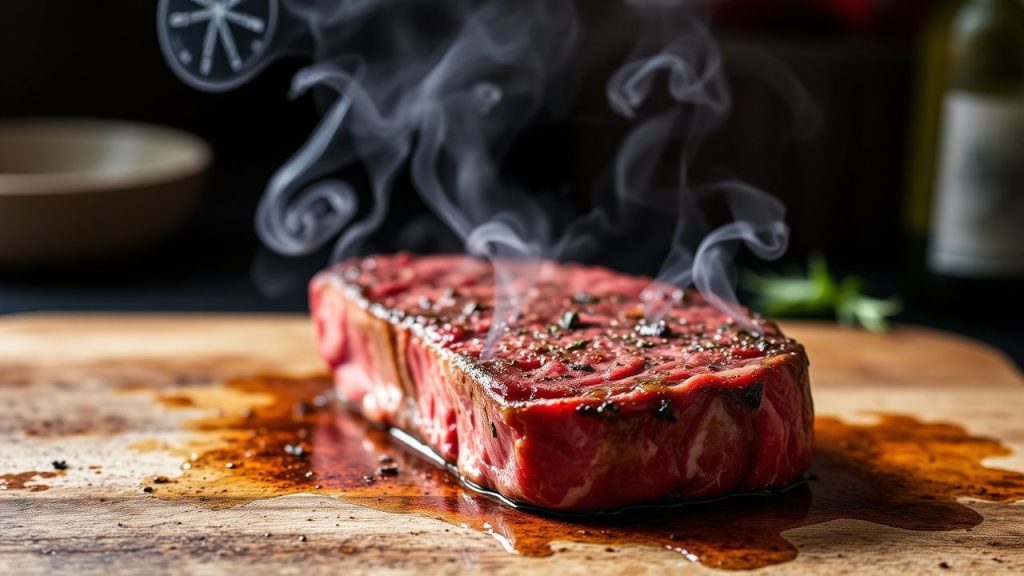
Step 1 — Dry the surface: Pat steaks thoroughly with paper towels. A dry surface ensures a rapid Maillard reaction and prevents steaming.
Step 2 — Season and rest: Salt both sides generously. Let seasoned steaks sit for 30–120 minutes uncovered in the fridge for a basic dry-brine effect or rest 30 minutes at room temperature if cooking immediately.
- Preheat skillet: Heat a heavy pan over high heat until smoking hot. Add oil and swirl to coat the surface.
- Sear both sides: Place steak away from you to avoid splatter. Sear undisturbed 3–4 minutes per side to build a dark crust, then reduce heat.
- Finish and baste: Lower heat to medium-low, add butter, thyme, and garlic, and spoon melted butter over the steaks to enrich flavor.
- Check doneness: Use an instant-read thermometer: 130°F for medium-rare, 140°F for medium; remember carryover heat raises temperature after removal.
- Rest and slice: Tent loosely with foil and rest 5–10 minutes. Slice against the grain to shorten fibers and maximize tenderness.
Pro-Caution
Science of Tenderness
Meat tenderness depends on three physical elements: muscle fiber structure, connective tissue, and intramuscular fat. Each element responds differently to salt, heat, and time.
Connective tissue like collagen toughens with heat but converts to gelatin under long, low temperatures. Learn more about connective tissue on connective tissue.
Maillard Reaction and Flavor
The Maillard reaction produces the brown crust and dozens of flavor compounds. It requires a dry surface and high heat to proceed efficiently.
Control moisture and maximize surface temperature to favor Maillard products while avoiding burning. For a technical reference, see Maillard reaction.
Enzymes, Aging, and Tenderizing
Aging concentrates flavor and allows endogenous proteolytic enzymes to cleave proteins. Both wet and dry aging promote measurable tenderization.
For background on controlled breakdown processes used in the trade, consult aging of meat.
Chef’s Notes
Cut selection: Choose cuts with appropriate marbling for your cooking method. Ribeye offers intramuscular fat that melts during cooking and improves tenderness.
Temperature control: Use an instant-read thermometer for accuracy. Remove steaks slightly below target temp to account for carryover cooking.
Expert Insight
Variations and Advanced Techniques
For tougher cuts, employ low-and-slow braises to hydrolyze collagen into gelatin. Alternatively, consider sous-vide cooking to hold temperature precisely while enzymes work.
Enzymatic marinades (pineapple, papaya) contain proteases that act on surface proteins. Use them briefly to avoid a mushy surface and to preserve internal texture; read about proteases protease.
Serving Suggestions
Serve sliced steaks with a simple pan jus or herb butter to complement but not mask beef flavor. Sides such as roasted potatoes or a bright arugula salad balance richness.
Finish with flaky sea salt and fresh herbs. A small garnish adds visual contrast and a final aromatic note without overwhelming texture.

Nutrition
Estimate per serving: approximately 680 kcal, 55 g protein, 52 g fat, 0 g carbohydrates. Values vary by cut and trimming.
Trim visible fat to control saturated fat content, or choose leaner cuts when desired. Balance portions with vegetable sides for a complete plate.
FAQ
Why does a properly rested steak taste juicier?
Resting allows muscle fibers to relax and reabsorb some exuded juices. Cutting immediately forces those juices onto the plate, reducing perceived juiciness.
Rest time depends on thickness; 5–10 minutes is common for typical steaks to equalize temperature and retain moisture.
Does salt actually tenderize meat?
Salt initially draws moisture out, then reabsorbs it with dissolved salt molecules that season and slightly alter protein structure. This process, known as dry brining, improves water-holding capacity and texture.
Timing matters: brief salting seasons the surface, while longer salting (30–120 minutes) yields more pronounced tenderizing effects.
How should I use a thermometer for best results?
Insert an instant-read thermometer into the steak’s center, avoiding bone or fat pockets. Aim for 5°F below your target and allow carryover heat to finish cooking during rest.
Verify multiple pieces when cooking several steaks to ensure uniform doneness across the batch.
Are marinades necessary for tenderness?
Marinades add flavor and can alter surface texture. Acidic or enzymatic marinades tenderize mainly at the surface and are less effective on thick cuts without extended time.
For deep tenderization, use aging, mechanical tenderizing, or long, low-temperature cooking methods instead of relying solely on marinades.
What cut should I pick for consistent tenderness?
Select cuts from low-activity muscles for natural tenderness. Filet mignon and ribeye top the list because they have less connective tissue and good marbling.
For leaner preferences, sirloin or strip steak can perform well with careful temperature control and proper slicing against the grain.
Master these steps and you will consistently produce steaks that are tender, flavorful, and texturally satisfying. Science gives you the rules; precise technique delivers the result.
See also: tender steak
]]>
- Even doneness: Short, frequent flips reduce the exterior-to-center temperature gradient.
- Consistent crust: Repeated returns to searing temperature sustain the Maillard reaction while avoiding burned edges.
- Faster, controlled cooking: Cadenced flipping shortens total cook time for many 1–1.5 inch steaks.
- Practical for home cooks: The method requires attention, not special equipment, and suits common kitchen pans.
Prep and Cook Time
Preparation: Allow steaks to sit at room temperature for 30–45 minutes to stabilize core temperature. That improves predictability when you perform the steak flip cadence.
Cooking: Expect about 8–12 minutes on the stovetop for a 1–1.5 inch ribeye using frequent flips, depending on target doneness and pan conductance. Use a probe thermometer to remove guesswork and track carryover heat.
Yield and Difficulty
Yield: The recipe yields two hearty servings from two ribeyes of the specified thickness. Portion size and trimming affect plate yield and nutrition estimates.
Difficulty: Medium. The technique depends on timing, heat management, and observing visual cues; it rewards an attentive cook more than a passive one.
Ingredients
Keep seasoning simple to highlight beef flavor. Salt, oil, aromatic butter, and fresh herbs support crust formation during repeated steak flip intervals without masking the meat.
Ingredients (serves 2):
- 2 ribeye steaks, 1–1.5 inches thick, trimmed to preference
- 2 tbsp neutral oil with a high smoke point (canola or grapeseed)
- 2 tsp coarse salt, adjusted to taste
- 1 tsp black pepper, freshly ground
- 2 cloves garlic, lightly crushed
- 2 sprigs thyme or rosemary
- 2 tbsp unsalted butter
Equipment and Rationale
Choose a heavy, heat-retaining pan for predictable surface temperature during repeated steak flip cycles. A cast iron skillet performs well because it resists rapid temperature drop when the meat is introduced.
For more on the pan type and why it matters, consult cast-iron skillet. Pair the pan with a reliable instant-read thermometer for consistent pulls and to measure carryover heat.
Instructions
Follow precise steps but stay observant: the steak flip cadence interacts with pan temperature and steak thickness. Adjust intervals slightly based on visible browning and the thermometer readout.
Preheat the skillet over medium-high until it radiates heat across the surface. Add oil and lay steaks away from you to avoid splatter. Begin with a short initial sear to establish a base crust before the cadence.
- Preheat the pan: Heat the skillet over medium-high until it is very hot and stable.
- Season the steaks: Pat dry, salt both sides generously, and apply pepper just before searing to limit moisture draw.
- Initial sear: Add oil; sear each side approximately 90–120 seconds to begin crust formation without overcooking the center.
- Apply the cadence: After the initial sear, flip every 30–60 seconds depending on pan temperature and thickness. This is the core of the steak flip method to even internal heat distribution.
- Baste with aromatics: On a later flip, add butter, garlic, and thyme. Tilt the pan and spoon butter continuously to layer flavor without dropping surface temperature too far.
- Probe for doneness: Insert the thermometer laterally into the center for accurate readings: medium-rare ~130°F, medium ~140°F, then account for 5–8°F carryover.
- Rest: Tent loosely with foil and rest 5–7 minutes to allow juices to re-distribute and the center to equilibrate.
Timing checklist
Start with a 90–120 second initial sear. Then switch to the cadence that matches your observation of browning and thermometer movement. Keep notes and calibrate times to your stovetop.
If the pan smokes excessively, lower the heat briefly and allow the oil to recover. Overheating negates the benefit of frequent steak flip cycles by forcing long recovery times between flips.
Expert Insight
Why multiple flips work (the science)
Frequent steak flip intervals reduce the temperature gradient between exterior and center by delivering heat in stepped increments. That moderates edge overcooking while the core approaches the target temperature.
The Maillard reaction still proceeds because the surface periodically returns to searing temperatures with each flip. For more on the chemical process that creates browning and flavor, see Maillard reaction. Repeated short exposures drive these reactions in bursts while avoiding excessive charring.
Chef’s Notes: Practical Tips for Success
Cut selection matters: Well-marbled steaks such as ribeye and strip respond predictably to the steak flip method. Their intramuscular fat supports even cooking and flavor development.
Avoid crowding: Give each steak space so steam escapes and surface temperature stays high. Crowding forces steaming and prevents a reliable crust.
- Thermometer placement: Insert the probe from the side, parallel to any bone, into the thickest part for accurate internal readings.
- Carryover heat: Expect a 5–8°F rise while resting. Plan to remove the steak a few degrees below target to account for this.
- Oven finish: For steaks thicker than 1.5 inches, sear on the stove then finish to temperature in a 400°F oven for 3–8 minutes as needed.
Pro-Caution
If heavy smoking or burnt bits appear, reduce heat and scrape the pan to remove carbonized residue between batches. Maintain consistent oil choice to keep smoke behavior predictable.
Serving Suggestions
Always slice against the grain to shorten muscle fibers and maximize tenderness. Serve immediately after the rest period so juices remain inside the meat rather than on the plate.
Pair the steak with bright sides that cut through fat, such as herb chimichurri or a lemony salsa verde. Classic roasted potatoes or grilled seasonal vegetables match the intensity of a well-seared ribeye.
Nutrition
Nutrition estimates depend on trim and portioning. Use the following rough numbers for a ribeye-based serving as a reference for meal planning.
Per serving (approximate):
| Nutrient | Per Serving |
|---|---|
| Calories | 650 kcal |
| Protein | 48 g |
| Carbohydrates | 2 g |
| Fat | 48 g |
Key Practical Comparisons
Single-flip advocates point to uninterrupted contact for an unbroken crust. That argument can hold for very thick cuts where a single extended sear is part of a reverse-sear sequence.
However, for a wide range of medium-thickness steaks, the steak flip approach balances crust and interior control. Match technique to thickness, bone presence, and fat distribution rather than applying a one-size-fits-all rule.
For background on beef as an ingredient and consumer considerations, see meat and for context on steaks specifically, consult steak.
FAQ
What exactly is the “steak flip” myth?
The myth says flipping once guarantees the best crust and juiciness. In practice, flip frequency is a tool: you can achieve both a strong crust and even doneness by controlling heat and timing with the steak flip cadence.
How often should I flip a 1-inch ribeye?
Aim to flip every 30–60 seconds after the initial sear for a 1–1.5 inch ribeye. Adjust based on visual browning and the thermometer reading; the cadence is a guideline, not a rigid rule.
Will flipping more often stop the crust from forming?
No. If the pan remains in the searing temperature window, repeated short exposures still promote the Maillard reaction and crust formation. Avoid long cooldowns between flips.
Are there cuts that still prefer a single flip?
Very thin steaks or very thick bone-in cuts can benefit from fewer flips or hybrid methods like reverse sear. Match your approach to the cut and your target doneness for predictable results.
What tools make the steak flip method more reliable?
A heavy skillet with good heat retention, an instant-read thermometer, and tongs for confident handling improve consistency. Internal monitoring and note-taking help you replicate success across cooks.
See also: steak flip and ribeye steaks
See also: steak flip
]]>
- Even doneness edge-to-edge: gentle heat prevents a thick gray band around the steak.
- Better crust with less moisture loss: sear after reaching target temperature to lock juices in place.
- Tools matter: probe thermometers and heavy pans improve repeatability.
At a Glance: Key Takeaways
Reverse searing uses a low-temperature oven or indirect grill to bring steaks to near-final temperature, followed by a short, hot sear. The technique emphasizes control and timing to produce consistent results.
Use a probe thermometer, choose thick cuts, and let steaks rest after searing. Mastering these elements yields a reliable medium-rare every time.
Prep and Cook Time
Preparation: 15 minutes of active prep plus 30 minutes to bring meat closer to room temperature. This step shortens the slow-cook time and promotes even heat transfer.
Cooking: 30–45 minutes low-and-slow plus 3–4 minutes of high-heat searing and 10 minutes resting. Total time normally ranges from 1 hour to 1 hour 15 minutes depending on thickness and oven efficiency.
Yield
This recipe yields 2 generous portions or 3 modest servings, depending on appetite and side dishes. Thick steaks slice into satisfying portions that hold heat well during plating.
Serving size will vary with cut and trimming; factor bone-in cuts as heavier per portion when planning quantities.
Difficulty Level
Medium: technique requires temperature control but follows repeatable rules that scale from home kitchens to professional settings. Experience improves timing but novice cooks can achieve reliable results with a thermometer.
Precision tools reduce guesswork. A digital probe or instant-read thermometer and a heavy searing pan make the difference between inconsistent and repeatable outcomes.
Ingredients
2 beef ribeye steaks, 1.5 to 2 inches thick, trimmed but with fat cap intact. Thick cuts retain moisture and develop a better crust than thin steaks.
Seasoning & finishing: kosher salt, freshly ground black pepper, garlic powder, neutral high smoke point oil, unsalted butter, fresh thyme, and smashed garlic. Keep seasoning simple to let the beef flavor shine.
Essential Tools and Reference Links
Use a reliable probe or instant-read thermometer for internal temperature feedback. A heavy cast-iron pan or other thick-bottomed skillet provides steady surface heat required for a fast Maillard reaction.
Further reading on the underlying science is useful: the Maillard reaction explains crust chemistry, and sous-vide is the precision cousin of reverse searing. See Maillard reaction, Steak, and Sous-vide for background.
Instructions
The workflow splits into two clear phases: a controlled low-temperature phase and a brief, intense sear. Consistency comes from repeating the same temperatures and timings until they suit your equipment and cut.
Follow the numbered steps below to reproduce reliable results every time. Keep sentences short and monitor temperature rather than time exclusively.
Low-and-Slow Phase (Oven or Indirect Heat)
Remove steaks from the refrigerator 30 minutes before cooking to reduce thermal shock and to let the center climb toward room temperature. Pat dry and season evenly with salt, pepper, and garlic powder to promote surface drying and even browning during the sear.
Preheat the oven to 225°F (107°C). Place steaks on a wire rack set over a baking sheet to allow air circulation. Insert a probe into the thickest part and roast until internal temperature reaches about 110–115°F for medium-rare carryover.
High-Heat Sear
Preheat a heavy skillet over high heat for several minutes until it is evenly smoking hot. Add a splash of high-smoke-point oil to coat the surface; this reduces sticking and supports fast crust formation.
Sear steaks for 1.5–2 minutes per side without moving them to develop an even, deeply browned crust. Add butter, thyme, and garlic in the last 30–60 seconds and baste continuously to finish flavor and surface sheen.
Step-by-Step Checklist
1) Room temp steak, dry surface, generous salt. 2) Slow roast to target minus 10–15°F. 3) Hot pan sear, butter baste, rest 10 minutes. These checkpoints minimize error.
Keep a log of times and temperatures for your oven and skillet; small variations change the final cook by minutes. Repeatable technique produces predictable results.
[having a separated practical tips block below]
Expert Insight
Many cooks forget that temperature rise during resting is normal; plan removal accordingly. Use warm plates and avoid over-tenting, which can trap steam and soften the crust.
Tips for Success
Use a digital probe thermometer and track internal temperature rather than rely solely on time. Oven and pan performance vary, so temperature is the universal measure of doneness.
Choose thick steaks—ribeye, strip, or filet—from trusted suppliers. If you dry-age at home or buy dry-aged cuts, the flavor intensifies, and surface moisture reduces, improving searing performance. See our guide on dry-aging techniques for more on aging.
Trim fat wisely: a modest fat cap improves flavor and mouthfeel, but excessive hard fat can flare when searing. Render fat slowly by searing the edge against the pan for 20–30 seconds before searing faces.
Maintain a clean, very hot pan and minimal movement during the sear. A thin crust develops fastest when the meat is left undisturbed long enough for the Maillard reaction to progress.
Pro-Caution
When finishing with butter and aromatics, remove pan from direct heat briefly if butter smokes excessively; burnt butter will impart bitter notes. Time the butter baste to the last 60 seconds of searing.
Serving Suggestions
Straight from the cutting board, slice against the grain and serve while warm. Simple accompaniments—roasted garlic mashed potatoes, sautéed broccolini, or a red wine jus—pair well without masking beef flavor.
Finish with a sprinkle of flaky salt and a small pat of compound butter if desired. Keep sides warm so the steak remains the focal point of the plate.
Nutrition
Estimated nutrition for a typical ribeye reverse-seared portion: approx. 650 kcal, 55 g protein, 48 g fat, and minimal carbohydrates. Values vary by cut, trimming, and portion size.
For menu planning, calculate per-serving values with your exact steak weight and any finishing sauces or butters added at service time.
Related Reading
Deepen technique with targeted gear articles and method guides on our site. See our resources on choosing the right thermometer and sharpening searing technique for home cooks.
Quick references: Best steak thermometers and Choosing and seasoning cast-iron pans help you pick tools that raise consistency and results.
FAQ
What is reverse searing and how does it differ from traditional methods?
Reverse searing starts with slow, gentle cooking to raise internal temperature evenly, then applies a brief, intense sear to create the crust. Traditional sear-first methods can produce a larger gradient of doneness from edge to center.
The two-phase approach of reverse searing reduces the risk of overcooking the exterior while you wait for the center to reach the proper temperature.
Which internal temperatures should I target for different doneness levels?
Aim for probe temperatures slightly below your final target because steaks rise during rest. Typical finish targets: 120–125°F rare, 130–135°F medium-rare, 140–145°F medium, 150–155°F medium-well.
Remove steaks 5–10°F below these final numbers and rest 8–10 minutes to allow carryover cooking to complete the process.
Can I use sous-vide or smokers in a reverse sear workflow?
Yes. Sous-vide is effectively a precision low-and-slow that produces exact internal doneness before a quick sear. Smokers add a flavor layer during the slow phase and still require a hot sear to form a proper crust.
For technique comparisons, review the sous-vide overview and consider smoke intensity relative to the final crust you want.
Why does the Maillard reaction matter for reverse searing?
The Maillard reaction creates the complex flavor and brown crust that define a great sear. High surface temperature for a short time encourages that chemistry without dragging moisture from the interior.
Learn more about the reaction and its role in flavor formation at the Maillard reaction page.
What tools improve consistency for reverse searing?
Reliable equipment includes a digital probe thermometer, a heavy cast-iron or thick-bottomed skillet, and an oven or grill with predictable low-temperature performance. Heavy pans maintain heat during the sear, enabling fast crust development.
See background on cookware materials such as cast iron for heat retention properties: Cast iron.
For a practical pairing guide and aging tips, read our in-depth post on Dry Aging Steak for Maximum Flavor.

Insights and Conclusions
Mastery of reverse searing comes from disciplined temperature control and consistent technique. The method reduces guesswork and yields repeatable, restaurant-quality results.
Practice with the same cuts and tools until you understand how your oven and pan behave. When you control heat precisely, the science behind the cook converts into better flavor and texture every service.
See also: Reverse sear
]]>
- Temperatures matter: target ranges control protein denaturation and collagen melting.
- Marbling feeds flavor: intramuscular fat melts and bastes the meat internally.
- Sear plus rest: a rapid crust and a proper rest preserve juices and texture.
Prep and Cook Time for a Juicy Steak
Preparation time: 15 minutes. Give the steak time to approach room temperature for even cooking and predictable internal rise.
Cooking time: 10–15 minutes, depending on thickness and doneness target. Use a thermometer rather than the clock to aim for a consistent, juicy steak every time.
- Preparation time: 15 minutes
- Cooking time: 10–15 minutes (depending on desired doneness)
- Resting time: 10 minutes
Fat content and cut thickness influence the exact cook time. Track internal temperature to avoid overcooking and to preserve the best juicy steak texture.
Yield and Portions for a Juicy Steak
Serves: 2 hearty portions. Two 1½-inch ribeye steaks or an equivalent cut will feed two adults with generous portions.
Scale ingredients without changing the technique. The method works for single steaks or a batch; thickness and carryover heat remain the critical variables for a juicy steak outcome.
Skill Level for a Juicy Steak
Skill: Medium. The method focuses on temperature control and timing rather than exotic steps, so consistent results come from repetition and good tools.
With an instant-read thermometer and a heavy skillet, most home cooks can achieve a repeatable juicy steak by following the steps and verifying temperature rather than relying on feel alone.
Ingredients for a Juicy Steak
Keep ingredients simple to highlight meat quality. Use coarse salt, freshly ground pepper, a high-smoke-point oil, butter, and aromatics to support the natural flavor.
Choose steaks about 1½ inches thick for best sear-to-center balance. Pat dry before seasoning to encourage a strong crust and a reliably juicy steak interior.
- 2 ribeye steaks, about 1½ inches thick, room temperature
- 1 tablespoon kosher salt
- 1 teaspoon freshly ground black pepper
- 1 tablespoon high-smoke-point oil (avocado or grapeseed)
- 2 tablespoons unsalted butter
- 3 garlic cloves, lightly crushed
- 2 sprigs fresh rosemary
- Optional: finishing sea salt for serving
Instructions for a Juicy Steak
Follow a clear workflow: season, sear, baste, monitor temperature, then rest. Each step influences internal texture and the overall juiciness of the steak.
Work with a heavy skillet on high heat to develop the crust quickly, then lower heat for basting and finish. Use a calibrated instant-read thermometer for precision and consistent results.
- Prep the steaks: Pat the steaks dry with paper towels. Season both sides generously with kosher salt and black pepper to penetrate and flavor the meat.
- Preheat the pan: Heat a heavy cast-iron skillet over high heat until very hot. A properly hot pan creates the Maillard crust that locks flavor without overcooking the center.
- Sear the steaks: Add the oil and sear without moving for about 3–4 minutes per side to form a deep brown crust. Flip once for an even sear and avoid repeated turning.
- Add aromatics and butter: Reduce heat to medium-low. Add butter, garlic, and rosemary, then tilt the pan and spoon melted butter over the steaks to baste and finish the exterior.
- Monitor internal temperature: Use a thermometer to check doneness: 125°F for rare, 135°F for medium-rare, 145°F for medium. Rely on temperature rather than time alone to protect the juicy steak interior.
- Rest the steaks: Transfer to a warm plate and tent loosely with foil. Rest for 8–12 minutes to allow juices to redistribute via carryover heat.
- Slice and serve: Slice against the grain just before serving to preserve tenderness and reveal the juicy interior.
Keep the pan hot enough to sear but not so hot that butter smokes or burns. Adjust the heat while basting to maintain a controlled finish and a consistent juicy steak center.
Pro-Caution
Science of Juiciness
This section links culinary practice to muscle biology and heat-driven changes that determine a juicy steak. The explanations use industry terminology and measurable thresholds.
Understanding those mechanisms helps you choose temperature targets and timing to protect moisture and tenderness. The science explains why the method works.
Maillard Reaction and Crust Formation
The brown crust forms through the Maillard reaction, a set of chemical reactions between amino acids and reducing sugars. These reactions produce browned color and complex flavor compounds quickly at high heat.
A strong sear improves flavor and texture without requiring prolonged high internal temperatures. Searing creates surface flavor while the interior stays at the target doneness for a juicy steak.
Connective Tissue, Collagen, and Gelatin
Collagen toughens raw muscle but softens to gelatin with heat and time. The conversion follows predictable thermal thresholds, so moderate heat plus brief resting preserves tenderness and moisture.
For quick-cook cuts like ribeye, you rely on partial collagen softening plus fat to deliver tenderness. For tougher cuts, longer low-temperature cooking converts more collagen to gelatin for a different kind of juicy steak experience. See collagen for structural detail.
Muscle Fibers and Temperature Control
Skeletal muscle structure determines how proteins denature as temperature climbs. The arrangement and type of fibers set how the steak reacts to heat and how much moisture it releases.
Controlling internal temperature prevents excessive contraction of proteins and limits moisture loss. For background on muscle anatomy consult skeletal muscle.
Marbling and Melted Fat
Intramuscular fat melts during cooking and redistributes flavor and lubrication inside the meat. That internal basting is central to what consumers perceive as a rich, juicy steak.
Fat chemistry influences mouthfeel and perceived tenderness. For a technical overview of lipids in food see fat. Properly rendered fat helps protect the juicy steak interior while adding flavor.
Tips for Success with a Juicy Steak
Choose marbled cuts: Ribeye and strip deliver predictable juiciness due to intramuscular fat. Tenderloin remains tender but contains less fat and will taste leaner.
Use precise tools: A calibrated instant-read thermometer and a heavy skillet reduce variability and build repeatable habits that produce a consistently juicy steak.
- Consistent thickness: Trim or butterfly irregular steaks to get even cooking and an even juicy interior.
- Dry surface: Pat steaks dry to promote better crust formation and faster searing.
- Reverse sear option: For very even doneness, cook low then finish with a hot sear to protect the center while building a deep crust.
Practice the technique with the same cut and thickness to refine timing for your equipment. Track internal temperatures and record results to build a repeatable track record for a juicy steak.
Expert Insight
For more practical guides on searing and finishing, see the hands-on how-to on our site about searing techniques. Use the reverse sear guide to compare outcomes and choose your personal preference for a juicy steak finish.
Related internal resources: Steak science and a practical how-to sear steak guide provide recipe variations and troubleshooting tips tailored to home kitchens.
Serving Suggestions
Serve steaks on a warm plate and finish with a sprinkle of finishing salt to highlight texture. Allow slices to rest slightly before arranging on the plate so the juices settle evenly.
Classic sides include garlic mashed potatoes, grilled vegetables, or a bright salad to cut richness. Pair with a robust red wine or a dark ale if desired to match the meat’s intensity and support the juicy steak flavor.
| Nutrient | Per Serving |
|---|---|
| Calories | 620 kcal |
| Protein | 58 g |
| Carbohydrates | 1 g |
| Fat | 45 g |
For a technical reference on meat structure and cooking techniques consult trusted culinary science texts and professional resources. Use measured temperature targets and verified methods to reproduce a reliably juicy steak.
FAQ
What happens inside a steak as it cooks to make it tender and juicy?
Heat denatures muscle proteins and changes texture while collagen softens toward gelatin and intramuscular fat melts. Those concurrent processes add moisture and tenderness.
Controlling the rates and endpoints of those processes yields a tender, juicy steak interior rather than a dry, overcooked center.
How does temperature affect steak tenderness?
Temperature determines protein contraction and collagen transformation. Lower internal targets reduce moisture loss and preserve the soft texture associated with a juicy steak.
Use thermometer readings—125°F rare, 135°F medium-rare, 145°F medium—and allow for a few degrees of carryover during resting for accurate results.
Why is resting essential after cooking?
Resting lets internal temperature equalize and juices redistribute. If you cut too early, juices run onto the plate instead of staying in the meat.
A rest of 8–12 minutes on a warm plate is typically sufficient for common steak sizes and preserves both moisture and texture for a juicy steak serving.
Does marbling change the cooking method?
Marbled cuts need the same fundamental methods but offer more margin for error. Rendered intramuscular fat bastes the meat internally and protects against dryness.
Lean cuts require closer temperature control and sometimes a finishing compound butter or sauce to enhance perceived juiciness.
Which tools and techniques give the most reliable results?
A heavy skillet, an instant-read thermometer, and a timer deliver the best consistency. Aim to sear quickly and finish at a controlled lower heat when needed.
Practice with the same cut and thickness to refine your timing and develop a repeatable approach for a reliably juicy steak outcome.
See also: Steak science
Recommended Reading:
]]>
- Controlled high heat triggers the Maillard reaction to create a savory crust.
- Dry surface and room temperature speed consistent browning and even cooking.
- Appropriate fat and pan mass prevent sticking and preserve surface temperature.
- Resting redistributes juices and finishes texture without overcooking.
Science of Searing
Searing converts amino acids and reducing sugars on the meat surface into hundreds of flavorful compounds in a process known as the Maillard reaction. That reaction requires temperatures well above simple warming, which is why intense pan heat matters.
Heat also drives rapid evaporation of surface moisture; this prevents steaming and lets browning proceed. Understanding these two mechanisms—chemical transformation and moisture control—lets you manipulate flavor predictably.
Prep and Cook Time
Plan the workflow: seasoning, resting at room temperature, searing, and resting after cooking. Each stage contributes to even heat penetration and flavor development.
Preparation: 15 minutes
Cooking: 10–12 minutes
Total Time: 25–27 minutes
Yield and Difficulty
This method yields four well-seared portions with a medium-rare target. It suits cooks with basic pan technique and timing control.
Serves: 4
Difficulty: Medium — requires attention to pan temperature and timing.
Ingredients
Ingredient choice focuses on meat quality, salt for surface seasoning, and a neutral oil with a high smoke point. These elements create a favorable surface chemistry for browning.
Use firm cuts with some marbling for both crust and juiciness; trim only large silver skin or excess fat that might cause uneven splatter.
- 4 ribeye steaks, about 1-inch thick, brought to room temperature
- 2 tsp kosher salt
- 1 tsp freshly ground black pepper
- 2 tbsp high-smoke-point oil (e.g., grapeseed or avocado)
- 2 tbsp unsalted butter
- 3 cloves garlic, gently crushed
- 2 sprigs fresh thyme or rosemary
Equipment and Heat
Choose heavy cookware that stores and transfers heat evenly. A massy pan holds temperature when meat hits the surface, which preserves the conditions needed for browning.
A classic choice is a cast-iron skillet or a heavy stainless steel pan. For more pan comparisons, see our internal guide on best pans for searing.
Step-by-Step Instructions
Follow a consistent sequence: dry, season, preheat, oil, sear, finish, and rest. This order controls moisture and surface temperature so the Maillard reaction proceeds efficiently.
Execute deliberate timing rather than guessing: measure pan temperature visually (thin wisps of smoke) or use an infrared thermometer for repeatability.
- Pat dry and season: Use paper towels to remove visible surface moisture. Salt both sides evenly and wait 10–15 minutes at room temperature to let the salt begin surface penetration.
- Preheat the pan: Heat the heavy pan over medium-high until it becomes visibly hot and starts to smoke lightly. The goal is roughly 400–500°F surface temperature to trigger rapid browning.
- Oil the pan: Add 2 tablespoons of high-smoke-point oil and swirl to coat. The oil provides a conduction layer and prevents sticking while tolerating high heat.
- Sear without crowding: Lay steaks in the pan with space between pieces. Do not move them during the first 3–4 minutes to allow an intact crust to form. Flip and repeat on the second side.
- Finish with butter and aromatics: Lower heat to medium, add butter, crushed garlic, and herbs. Tilt the pan and spoon melted butter over the surface to promote even browning and add flavor compounds.
- Check doneness: Use an instant-read thermometer. Aim for 125°F (52°C) for medium-rare after carryover. Adjust time for thicker cuts or different target temperatures.
- Rest the meat: Transfer to a warm plate, tent loosely with foil, and rest 5–7 minutes. Juices redistribute rather than pouring out when sliced.
After resting, slice against the grain and serve with pan juices. Proper slicing keeps fibers short and improves perceived tenderness.
Pro-Caution
Tips for Success
Small adjustments make large differences. Control surface moisture, maintain pan temperature, and measure doneness rather than relying on timing alone.
Practice with one cut and note exact times and temperatures; replicate those settings for similar thicknesses and pan types next time.
- Room temperature meat sears more evenly than straight-from-fridge cuts.
- Patting dry is essential; water must evaporate before the Maillard reaction can occur efficiently.
- Do not overcrowd—crowding drops pan temperature and causes steaming rather than searing.
- Use an instant-read thermometer for reliable doneness, especially with thick cuts.
Expert Insight
Serving Suggestions
Pair seared steaks with simple sides that contrast texture and acidity. Acidic condiments cut the richness while starchy sides add comfort and balance.
Try roasted seasonal vegetables, a bright chimichurri, or creamy mashed potatoes. Finish with flaky sea salt and microgreens for visual and textural lift.
Nutritional Information
Estimating nutrition requires portion size and added fats. The table below reflects a typical serving prepared with butter and oil.
Adjust calories and macronutrients by trimming fat or altering added fats during finishing.
| Nutrient | Per Serving |
|---|---|
| Calories | 450 kcal |
| Protein | 38 g |
| Carbohydrates | 1 g |
| Fat | 36 g |
For more technique variety and extended meat-handling protocols, consult our internal guide to meat cooking techniques which expands on searing, braising, and roasting methods.
FAQ
What exactly happens when meat hits a hot pan?
Surface proteins and sugars react at high heat to form new flavor molecules through the Maillard reaction. Simultaneously, moisture evaporates rapidly, which prevents steaming and allows browning.
These combined effects create the crust and concentrated flavors associated with expertly seared meat.
Does searing lock in juices?
Searing does not physically seal juices like an impermeable barrier. Instead, it forms a flavorful crust that changes mouthfeel and flavor perception.
Juiciness depends on internal temperature control and resting; carryover cooking and redistribution of juices determine final moisture levels.
How hot should my pan be for a proper sear?
Surface temperatures between roughly 400°F and 500°F (204–260°C) initiate fast browning and efficient evaporation of surface moisture. Use visual cues and thermometers for accuracy.
Heavy pans such as a cast-iron skillet hold heat better and recover temperature quickly after contact with meat.
Can searing improve cheaper cuts?
Searing adds concentrated flavor to any cut, which makes economical cuts more palatable. However, searing alone does not tenderize dense connective tissue.
Pair searing with braising or slow-cooking when working with very tough cuts to combine flavor development and tenderness.
How long should I rest steak after searing?
Rest steaks 5–7 minutes for typical 1-inch cuts. This pause lets internal juices redistribute and reduces moisture loss during slicing.
Longer rests suit thicker roasts; shorter rests are acceptable for thin cuts if carryover cooking considerations are small.
To Wrap It Up
Searing succeeds when you control surface moisture, maintain pan temperature, and apply measured finishing techniques. Those actions let chemistry and heat produce a deep, savory crust.
Approach searing as a repeatable technique: track times, use a thermometer, and refine sauce and garnish choices to complement the crust. Practice yields consistent, flavorful results every time.

See also: Searing
]]>
- Maillard reaction is responsible for browning and complex flavor development.
- High, dry heat and good surface contact drive the best sear.
- Drying, seasoning, and resting are practical controls every cook can use.
- Small adjustments in pH, fat, and time change flavor outcomes dramatically.
What is the Maillard reaction?
The Maillard reaction is a non-enzymatic chemical reaction between amino acids and reducing sugars that takes place when food reaches elevated temperatures. For a technical overview, see the Maillard reaction on Wikipedia.
This reaction creates hundreds of volatile and non-volatile compounds that build the savory, roasted, and caramel-like notes we recognize. The basic players are proteins (amino acids) and sugars; read more on amino acids to understand why meat develops such varied flavors.
How searing triggers Maillard chemistry
Searing supplies the surface with sufficient heat to dry and activate the reaction pathways that produce browned crusts. Surface temperatures above the boiling point of water allow the Maillard pathways to outcompete steaming, so the pan must be hot and the surface dry.
Contact, heat flux, and time determine how deep and complex the crust becomes. Cast iron and other heavy pans deliver high, even heat; see the construction and use of a cast-iron skillet for practical guidance.
Prep and Cook Time
Allow focused time for preparation and searing to control each variable that affects browning. Good timing reduces guesswork and produces repeatable results.
Preparation: 10 minutes. Cooking: 8–12 minutes depending on thickness. Total: ~20 minutes for typical ribeyes.
Yield
Recipe quantities below serve four people with generous portions. The yield depends on steak weight and side pairing choices.
Scale ingredients linearly for more servings, but keep pan space and heat consistent to avoid steaming instead of searing.
Difficulty Level
Intermediate: the method is straightforward but requires attention to heat, seasoning, and timing. These factors change results more than exotic equipment does.
With practice you will gain reliable control over crust color and internal doneness. Use a thermometer for precision and consistent outcomes.
Ingredients
Choose quality cuts and keep ingredients simple to highlight Maillard flavors. Marbling and surface dryness are more important than exotic rubs.
Keep the following on hand and measured before you start to prevent rushed adjustments at the pan.
- 4 boneless ribeye steaks (1–1½ inches thick, ~8 oz each)
- 2 tbsp high-smoke point oil (grapeseed or refined avocado oil)
- 1 tbsp unsalted butter
- 4 cloves garlic, smashed
- 3 sprigs fresh thyme
- Salt and freshly ground black pepper, to taste
- Optional: fine dusting of baking soda (¼ tsp per steak) to raise pH and speed browning
Instructions
Follow these steps to control surface moisture, contact, and heat—three primary variables that govern the Maillard reaction. Small, deliberate actions produce a deep, even crust without burning.
Do not rush the preheat and do not overcrowd the pan; both common mistakes reduce browning and create uneven results.
- Bring steaks to room temperature (about 30 minutes). Even starting temperature shortens cook time variability and supports consistent searing.
- Pat steaks dry with paper towels to remove surface moisture; moisture inhibits browning by forcing the surface to stay near boiling point.
- Season generously with salt and pepper. If using baking soda, apply sparingly to avoid a soapy note; baking soda raises pH and accelerates Maillard pathways.
- Preheat a heavy skillet over medium-high heat until very hot. Heavy pans maintain temperature under load and deliver steady contact; learn more about maintenance of cast iron on the linked guide above.
- Add oil and heat until it shimmers. The oil facilitates even heat transfer and prevents sticking while tolerating high surface temperatures.
- Place steaks in the pan without overcrowding. Leave space so each steak receives full, uninterrupted contact with the hot surface.
- Sear undisturbed 3–4 minutes until a dark golden crust forms. Resist flipping too soon; crust formation requires uninterrupted contact time.
- Flip and add butter, garlic, and thyme. The butter and aromatics add depth; baste for 3–5 minutes to build layers while monitoring internal temperature.
- Thermometer check: 130°F (54°C) for medium-rare. Remove a few degrees early to account for carryover cooking while resting.
- Rest loosely tented 5–10 minutes to allow juices to redistribute and the crust to stabilize. Cutting too early causes moisture loss and a less juicy finish.
For technique expansion, consult our internal guide to perfect pan sear techniques which covers heat management and utensil selection. That page includes additional steps for reverse sears and thick-cut steaks.
Tips for Success
Small procedural choices affect flavor far more than complex ingredient lists. Focus on surface dryness, steady heat, and a brief rest for best results.
Use the following practical tips during prep and cooking to increase the likelihood of professional results at home.
- Pick cuts with good marbling—fat carries and amplifies Maillard-derived flavors.
- Do not overcrowd the pan; moisture from crowded meat quickly halts browning.
- Control heat rather than chase color—if edges blacken before a deep brown crust forms, lower the heat.
- Use a thermometer to remove subjectivity from doneness; color is unreliable for thick cuts.
Expert Insight
Apply butter and aromatics late in the process so their flavors infuse without burning. A quick baste with melted butter improves crust gloss and aroma.
Pro-Caution
Serving Suggestions
Slice across the grain and plate warm to preserve texture and mouthfeel. Pairings should complement the concentrated, savory crust without overpowering it.
Try a bright chimichurri or a silky mushroom pan sauce. For internal resources on carrying and resting meat techniques, visit our resting meat guide.
Nutrition
Per-serving nutrition varies by cut and trim level; the figures below apply to ribeye portions with minimal trimming. Consider side dishes when calculating meal totals.
| Nutrient | Per Serving |
|---|---|
| Calories | 520 kcal |
| Protein | 48 g |
| Carbohydrates | 1 g |
| Fat | 36 g |
Q&A
The following questions address common technical points about browning, heat control, and texture. These concise answers are grounded in culinary science and practical experience.
They will help you apply the Maillard concepts directly during home searing sessions.
What exactly is the Maillard reaction?
The Maillard reaction is a series of chemical processes between amino acids and reducing sugars that produce brown pigments and flavor compounds. These changes occur when surface temperatures exceed the boiling point of water and continue as heat increases.
Read a technical overview at Maillard reaction for mechanistic details and compound pathways.
How does surface moisture impact browning?
Moisture keeps the surface at or near 100°C (212°F) until it evaporates, which delays the Maillard pathways that require higher temperatures. Thorough patting and short resting periods eliminate this obstacle.
Dry surfaces achieve higher contact temperatures quickly, enabling efficient crust development without prolonged heat exposure that can overcook interiors.
Can I speed up browning without burning the meat?
Yes—raising pH slightly with a minimal dusting of baking soda accelerates browning, as does ensuring a very hot pan and proper fat contact. However, the margin for error narrows as you increase reactivity.
Shorter, hotter sears with immediate resting produce a deep crust while preserving internal juiciness; practice and a thermometer help find the ideal window for each cut.
Does searing seal in juices?
Searing does not physically “seal” juices, but it creates a flavorful crust and changes surface texture that improves perceived juiciness. True moisture retention depends on total cook time and internal temperature control.
Resting post-sear reduces immediate juice loss by allowing muscle fibers to relax and reabsorb some expelled liquids, improving final tenderness.
Can vegetarian foods experience Maillard browning?
Absolutely. Any protein- or sugar-containing food—mushrooms, tofu, bread, and many vegetables—can undergo Maillard reactions when exposed to sufficient dry heat. The result is richer, more complex flavors in plant-based ingredients.
Experiment with higher heat and dry surfaces for vegetables and protein substitutes to develop the same roasted notes commonly associated with meat.
Understanding and controlling the Maillard reaction turns searing into a precise, repeatable technique. Apply these principles consistently to improve crust, aroma, and overall flavor in every cook.
For background on culinary browning processes, consult the general overview of browning (cooking) and ensure your pan selection matches the task.
See also: Maillard reaction
]]>Steak flipping is a deliberate technique that controls crust development, heat transfer, and final juiciness. Use measured turns to shape the Maillard crust while moving the internal temperature toward your target doneness.
- Controlled flips promote even cooking and reduce carryover surprises.
- Initial sear secures the Maillard layer; subsequent flips build thin crusts.
- Tools and timing determine how many flips a steak tolerates without losing moisture.
- Resting finalizes texture and redistributes juices for clean slices.
Why steak flipping frequency matters
Flip frequency changes how heat moves through the meat and how the surface browns. Each flip equalizes surface temperature and limits prolonged exposure on one side.
When you plan flips, you influence the Maillard reaction and the temperature gradient from crust to center. For further reading on browning chemistry, see Maillard reaction.
Prep and cook time for steak flipping
Bring steaks to room temperature and pat dry; that reduces thermal lag and yields more predictable carry to doneness. A 30-minute rest on the counter works for most cuts up to 2 inches thick.
Typical pan times vary by thickness and heat. For a 1½-inch ribeye expect 8–12 minutes total on the stove, plus a 5-minute rest to hit medium-rare reliably.
Yield, difficulty, and expected results with steak flipping
This method yields two hearty portions from two 1½-inch steaks and suits cooks who want repeatable results. It requires attention and a thermometer rather than specialized gear.
Difficulty sits at intermediate: you must read sear color and monitor internal temp. Aim for about 125–128°F before resting to carry to 130°F for medium-rare.
Ingredients and equipment for effective steak flipping
Use quality cuts and minimal seasoning: salt, black pepper, high-smoke oil, and finishing butter with aromatics work best. Fat content affects tolerance for frequent turns.
Choose a heavy skillet or a hot grill for rapid crust formation. For guidance on cookware choices, reference cast-iron skillets and how they retain heat.
Instructions: Practical steak flipping patterns
Start with a high-heat sear to establish an initial crust, then switch to brief, timed flips to even out cooking. Sear for 90–120 seconds without disturbance, then begin controlled turns.
After the final turn, remove the steak, tent it loosely with foil, and rest five minutes. Resting lets internal juices redistribute and stabilizes the final temperature.
- Bring steaks to room temperature for 30 minutes; pat dry and season immediately before cooking.
- Heat pan or grill to medium-high until shimmering; add oil to coat the surface and prevent sticking.
- Sear first side undisturbed for 90–120 seconds to lock a Maillard crust in place.
- Begin controlled flips every 20–45 seconds after the initial sear to equalize surface temperature and speed up interior cooking. Use tongs; avoid piercing the meat.
- Add butter and aromatics after the second side sears; baste while flipping to layer flavor without overcooking.
- Target internal temp: remove at 125–128°F if you want medium-rare after resting. Use a calibrated thermometer for accuracy; read more about food thermometers at food thermometers.
Chef’s notes: technique details for steak flipping
Flip with intent: lift, rotate, and set. Avoid frantic agitation that cools the surface and prolongs cook time.
Adjust frequency by thickness and heat. Thicker cuts benefit from more frequent turns to avoid overcooked edges and underdone centers.
Choosing the right cut for steak flipping
Marbled cuts such as ribeye and strip tolerate repeated turns because intramuscular fat keeps the meat moist. The fat also supports crust development under frequent flips.
Lean, thin cuts cook quickly and usually require fewer flips. Match your flip pattern to the cut for the best texture and doneness.
Mastering temperature control when steak flipping
Keep heat steady. Too hot and butter will brown too fast; too cool and you won’t build a reliable crust. Medium-high often balances searing with internal warming.
Consider finishing in a moderate oven if the crust forms faster than the interior cooks. The oven changes how flips affect final doneness.
Tools and technique for clean steak flipping
Use sturdy tongs and a thin spatula to flip without piercing. A fork will drain juices and reduce final succulence.
Read edge color and bead juices as cues. When the edge shows consistent golden color, flip confidently for the next interval.
Expert Insight
Practice builds visual and tactile memory. Use a thermometer alongside sight and touch until timing becomes reliable.
Pro-Caution
Serving suggestions after steak flipping
Rested steaks slice cleanly and present glossy, not wet. Finish with flaky sea salt and a turn of cracked pepper for texture and lift.
Pair with roasted vegetables, mashed potatoes, or a bright chimichurri. For classic service, use warm plates to keep temperature stable while plating.
Practical context: grill vs. pan vs. oven for steak flipping
Different environments change flip strategy. Open-flame grilling often needs fewer turns because of radiant heat, while pan-searing allows finer control and more frequent flipping.
For more on outdoor methods, consult material about grilling and how it alters surface and interior heat transfer.
Further reading and reference links
For authoritative background on steak as a culinary item, see the general entry on steak. These resources clarify terms and underpin technique choices.
Use these references to deepen your technical approach and adapt flips by cut, thickness, and heat source. The linked pages explain the science and cookware considerations that inform best practices.
FAQ
How many times should I flip a steak for best results?
There is no fixed number; count flips by window rather than a set total. After a solid initial sear, flip every 20–60 seconds depending on thickness and heat until you reach your target internal temperature.
Does flipping more often make the steak juicier?
Moderate frequent flipping helps even heat penetration and can reduce overcooked edges by avoiding long exposure on a single surface. Excessive flips cool the pan and can extend cook time, so balance frequency with pan temperature.
Will flipping stop the Maillard crust from forming?
No, provided you allow an initial uninterrupted sear. The first 90–120 seconds create a Maillard layer; controlled subsequent flips build additional thin crust layers rather than removing them.
What internal temperature should I aim for?
Pull steaks around 125–128°F if you want medium-rare after resting; they will rise to about 130°F during carryover. Always use an instant-read or probe thermometer for repeatable results.
Can I use this flip method on a grill?
Yes. High-heat grills often require fewer flips, but the same principles apply: an initial sear followed by controlled turns based on color and temperature. Adapt the interval to grill intensity and flare-up behavior.
Final takeaway
Steak flipping is a practical technique that balances crust formation with interior evenness. Use a clear sear, timed flips, and a thermometer to get consistent, restaurant-quality results.
Practice with different cuts and heat sources, apply expert flip windows, and you will improve consistency, texture, and juiciness every time.
See also: steak flipping
]]>