- At a glance: Choose direct heat for quick sears and indirect heat for gentle, even cooking.
- Use a calibrated probe thermometer to reach 165°F / 74°C without overcooking.
- Rest cooked chicken to let juices redistribute for better texture.
- Combine zones: sear on direct heat, finish on indirect for best results.
Overview and Practical Uses of Direct Heat and Indirect Heat
Direct heat delivers high, focused energy to the chicken surface and produces crisp skin and char. This approach suits wings, thighs, and small cuts that benefit from intense surface browning.
Indirect heat cooks by surrounding the chicken with warm air or radiant heat and prevents the exterior from burning while the interior comes up in temperature. Use it for whole birds, bone-in breasts, and large pieces that need time to reach a safe internal temperature.
Grilling and roasting share technical fundamentals but differ in airflow, fuel, and scale. Refer to authoritative context on grilling and roasting for technique differences and equipment choices.
Prep and Cook Time for Direct Heat and Indirect Heat
Preparation: 15 minutes is typical when you include patting dry and seasoning. Properly dried skin with a light oil coat allows direct heat to crisp quickly and predictably.
Cooking: Total cook time varies by cut and method. Direct sear times per side are short; indirect finishes take 20–40 minutes depending on size and whether you use a two-zone grill or an oven.
- Preparation: 15 minutes
- Cooking: 30-45 minutes (varies by heat method and cut)
- Total Time: 45-60 minutes
Yield
This guidance serves about four people when using four bone-in thighs or a similar weight of boneless cuts. Adjust quantities if you scale to larger gatherings or smaller appetites.
Yield depends on side dishes and portion sizes. Apply the same timing principles when cooking multiple racks on a grill or in batches in the oven.
- Serves 4 generously
Difficulty Level
Difficulty rates as medium because you must manage heat zones and use a thermometer to confirm doneness. Learning to control direct heat and indirect zones rewards careful attention more than advanced chef skills.
Home cooks can learn two-zone grilling and oven finishing quickly. Practice sequencing sear and finish stages and you will improve consistency across all poultry cuts.
Ingredients
Use four bone-in, skin-on thighs or four breasts depending on texture preference. Season simply with oil, smoked paprika, garlic powder, onion powder, dried thyme, salt, and black pepper.
Fresh herbs and lemon added after resting brighten the dish and enhance perceived juiciness. Keep seasonings balanced so the heat method expresses the chicken’s natural flavor.
- 4 bone-in, skin-on chicken thighs (or 4 chicken breasts)
- 2 tbsp olive oil
- 1 tbsp smoked paprika
- 1 tsp garlic powder
- 1 tsp onion powder
- 1 tsp dried thyme
- Salt and freshly ground black pepper, to taste
- Fresh herbs and 1 lemon for garnish and finishing
Instructions
Start by preheating and create clear hot and cool zones: for direct heat use high heat (~450°F / 230°C); for indirect heat leave one side cooler or use a 375°F (190°C) oven. Building zones gives you control over sear and finish stages.
Pat chicken dry, rub with oil, and season evenly. Let the rub adhere briefly but avoid brining or over-salting without testing first on a small piece.
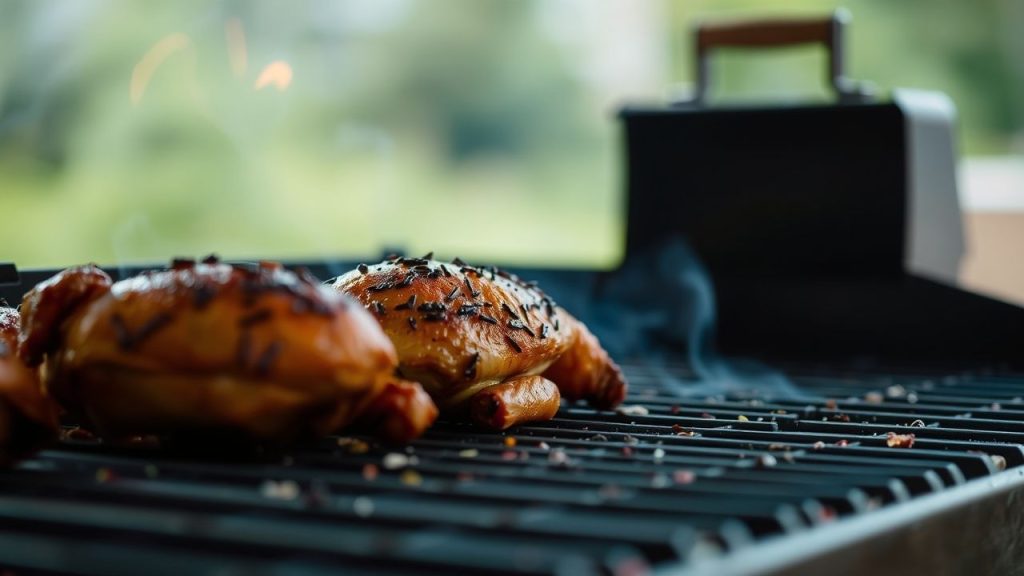
Direct Heat Grilling
Place pieces skin side down over high heat and sear until the skin crisps and char marks form, about 5–7 minutes. Flip once and finish for another 4–6 minutes while watching for flare-ups from dripping fat.
Use tongs and move pieces off the hottest area if flames spike. A quick sear on direct heat locks surface flavor while you reserve interior cooking for the finish stage.
Indirect Heat Grilling or Oven Finish
Move seared pieces to the cooler zone or close the oven to let them cook gently for 25–35 minutes. Insert a probe thermometer into the thickest part to confirm 165°F (74°C) for safety.
Maintain a covered environment to encourage even heat circulation and consistent carryover cooking. Let carryover raise the final temperature slightly while resting under tented foil.
 Pro-Caution
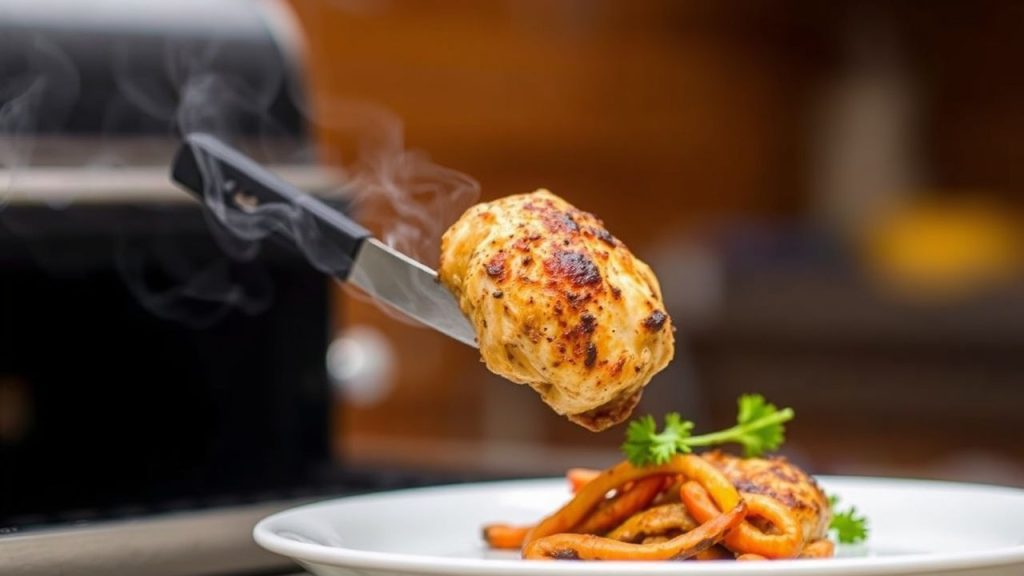
After removing from heat, tent the chicken loosely and rest for 5–10 minutes to allow juices to redistribute. Cutting immediately forces juices out and dries the meat.
Finish with lemon and herbs for brightness. Serving at the right temperature and texture improves perceived flavor without adding extra fat.
Tips for Success with Direct Heat and Indirect Heat
Choose heat by cut: Use direct heat for thin or skin-on cuts and indirect for thick or whole birds. This approach balances exterior texture and interior moisture.
Manage flare-ups by trimming excess fat and keeping a spray bottle of water or a cooler zone to move pieces into when flames spike. Predictable heat reduces burnt spots and bitterness.
- Direct heat: Quick sear, crisp skin, best for thighs and wings.
- Indirect heat: Slow cook, even internal temp, best for whole birds and large breasts.
- Hybrid method: Sear on direct heat then finish indirectly for the best balance of texture and juiciness.
Experiment with wood chips during indirect grilling to introduce mild smoke without burning the skin. Keep spice blends simple so the method remains the primary flavor driver.
 Expert Insight
Serving Suggestions
Pair grilled chicken with seasonal vegetables that can share the grill or be roasted at similar temperatures. Vegetables like asparagus and bell peppers complement smoky, direct heat flavors and add textural contrast.
Light sauces such as garlic aioli or chimichurri brighten both direct and indirect preparations without overwhelming the meat. A lemon wedge and fresh parsley add a final acidic lift to the plate.
For authoritative guidance on handling and temperatures, consult food-safety references such as food safety. Follow recommended temperatures and hygiene for best results.
Nutritional Information (per serving)
| Nutritional Information (per serving) | Calories | Protein | Carbs | Fat |
|---|---|---|---|---|
| Bone-in, skin-on thigh (150g) | 280 | 26g | 0g | 18g |
| Olive Oil (1/2 tbsp) | 60 | 0g | 0g | 7g |
| Spices & herbs | 5 | 0g | 1g | 0g |
Technical Notes and Equipment
A reliable instant-read or probe thermometer is essential for precision; it removes the guesswork from timing. For details on thermometer types and calibration, review the thermometer overview.
Set up a two-zone grill when using charcoal or gas to create a hot sear zone and a cooler finish zone. This setup mimics an oven’s ambient heat while preserving the option to sear on direct heat.
Use heavy pans or a cast-iron skillet when finishing in the oven to preserve heat and encourage even cooking. Consistent contact and radiant heat reduce hot spots and speed finishing without drying the meat.
Final Notes
Mastering direct heat and indirect heat is a practical skill set that improves reliability and flavor for all poultry cooks. Consistent use of temperature checks, resting, and appropriate heat selection elevates everyday chicken to restaurant-quality results.
Adopt the routines described here and practice across cuts until the timing and behavior of your equipment feel intuitive. With repeated application you will deliver juicy, safe, and well-textured chicken every time.
See also: chicken heat | grill basics
FAQ
What is the core difference between direct and indirect heat?
Direct heat places the chicken directly above the heat source for immediate browning and crisping. Indirect heat surrounds the chicken with warm air and radiates heat gently to avoid burning the exterior.
When should I use direct heat over indirect?
Use direct heat for small, skin-on, or thin cuts that need quick browning and a crispy crust. Switch to indirect when pieces are thick, bone-in, or require time to reach safe internal temperatures without charring.
Can I combine both methods in one cook?
Yes. A common method is to sear over direct heat, then move the chicken to indirect heat to finish cooking. That combination produces both crisp skin and a moist interior.
How do I prevent flare-ups on the grill?
Trim excessive fat, keep a cooler zone to move pieces into, and use tongs to reposition items during flare-ups. A short spray from a water bottle helps control flames without dousing coals.
What internal temperature is safe for chicken?
The safe internal temperature target for chicken is 165°F (74°C) measured at the thickest point. Use a calibrated probe to confirm, then allow brief resting time for carryover stabilization.
Recommended Reading:
]]>
- Inject flavor inside proteins to achieve consistent seasoning throughout.
- Use small volumes to protect texture while boosting taste.
- Choose food-grade syringes and clean them immediately after use.
- Experiment with warm and chilled infusions to vary viscosity and mouthfeel.
Why chefs rely on culinary syringes
Culinary syringes let cooks bypass surface-only seasoning and place concentrated flavors deep inside food. This is valuable when thick cuts of meat or layered desserts need uniform taste from edge to center.
Professional kitchens often borrow methods from modernist cuisine, where precise dosing and targeted delivery shape texture and aroma. Syringes fit naturally into that toolkit because they control both volume and location.
Tools: choosing the right syringe and accessory care
Select syringes made from food-grade materials and rated for culinary use, not medical disposables. Look for stainless-steel needles, clear barrels for visual control, and sizes that match intended volumes.
Disassemble and wash components immediately after use. Many syringes are dishwasher-safe, but hand-cleaning ensures small channels and needle hubs clear fully and prevents residue buildup that affects flavor and hygiene.
Capacity, needle gauge, and materials
A 10 ml syringe suits light infusions; larger syringes handle bulk brining or thick gels. Needle gauge controls flow: finer gauges deliver precision; wider gauges move viscous liquids faster.
Choose stainless steel needles for durability and silicone or PTFE seals for chemical resistance. Replace O-rings and seals when wear appears to maintain an airtight plunging action and prevent leaks.
Core techniques and practical applications
Injection technique matters more than equipment alone. Insert the needle to the desired depth, slowly depress the plunger while withdrawing the needle to create dispersed pockets of flavor, and repeat at measured intervals.
Different preparations work best with specific carriers. Use oils and buttery emulsions for fat-soluble aromatics, light syrups or reduced sauces for sweetness and acid, and gelatinous gels for textural surprises.
Meat and poultry injections
For roasts and breasts, disperse 5–15 ml per injection point depending on cut size. Inject along muscle fibers to avoid tearing and to promote even distribution as the meat rests and cooks.
Traditional marinades work well when paired with syringe delivery because they combine seasoning and tenderizing elements. Read about marinades and their roles on Marinade for background on acidity and enzymatic action.
Dessert, pastry, and plating uses
Syringes add concentrated fruit reductions, flavored gels, or liqueur to the center of choux buns, cakes, and custards without leaking. This keeps textures intact and avoids sogginess that surface soaking can cause.
Use syringes as plating tools to draw fine lines, dots, and micro-patterns that guide the diner’s experience. Controlled placement maintains balance between elements and supports cleaner, more intentional plating.
Expert Insight
Recipe: Infused chicken using a culinary syringe
Preparation: 15 minutes. Cooking/Infusion: 10–15 minutes. Total Time: 30 minutes.
Yield: 4 servings. Difficulty: Medium — requires a steady hand and measured injections.
Ingredients
- 1/2 cup rosemary-infused olive oil, strained and cooled
- 1/4 cup reduced balsamic glaze, chilled to thicken
- 2 tbsp lemon-honey syrup
- 4 boneless chicken breasts, trimmed and pounded lightly
- Salt and freshly ground black pepper, to taste
- Microgreens and edible flowers, for garnish
- 1 culinary syringe (10 ml), sterilized before use
Instructions
- Season the chicken with salt and pepper; let it rest while you prepare infusions.
- Load the syringe with rosemary oil, tap gently, and expel air bubbles before inserting.
- Insert and inject into the thickest section; withdraw slowly as you dispense a small, measured amount.
- Alternate flavors by repeating injections with lemon-honey syrup and balsamic glaze at different sites to layer taste.
- Chill the infused chicken in the refrigerator for 10–15 minutes to allow flavors to settle.
- Sear over medium heat about 5 minutes per side until the internal temperature reaches 165°F (75°C).
- Rest briefly, slice, and finish with remaining glaze and garnishes.
For a broader set of infusion recipes and modern techniques, consult our internal guide on modernist cooking techniques and the kitchen equipment guide for syringe care and selection.
Sanitation, safety, and handling
Use syringes only for food-grade applications and label dedicated sets for sweet and savory work to avoid cross-flavor contamination. Replace needles if bent or nicked to maintain clean tissue entry and consistent dosing.
Handle hot infusions with care: heated syringes increase pressure and can spray unexpectedly. Allow warm carriers to cool slightly to a safe dispensing temperature before filling the barrel.
Pro-Caution
Presentation and finishing techniques
Syringes support visual storytelling on the plate. Use contrasting colors and textures and draw controlled dots or streaks that echo the infused flavor profile.
Finish proteins with a light sprinkle of flaky salt or a micro-herb scatter to amplify aroma at the moment of tasting. These small details signal care and precision to diners.

| Nutrition (per serving) | Amount |
|---|---|
| Calories | 320 kcal |
| Protein | 38 g |
| Carbohydrates | 4 g |
| Fat | 15 g |
To understand the equipment lineage and basic syringe design, see the Syringe article. For background on animal proteins and muscle structure when injecting, consult the Meat entry.
FAQ
What is a culinary syringe and how does it differ from medical syringes?
A culinary syringe is built for food: it uses food-grade plastics or stainless steel and has broader gauges and larger capacities tailored to sauces and gels. Medical syringes prioritize sterility and single use, while culinary syringes are designed for repeated cleaning and varied viscosities.
Which liquids should I avoid injecting?
Avoid raw-plant pulps with large particulates and highly alcoholic liquids that can denature proteins unpredictably. Thick solids that clog needles also reduce control; prefer thinned gels or emulsions for syringe work.
How much liquid should I inject into a single site?
Start with 5–15 ml per injection point for medium cuts, adjusting by size and texture. Small, repeated injections produce more even flavor than a single large deposit.
Can syringes tenderize meat?
They can assist by delivering acidic or enzymatic marinades directly into muscle tissue, increasing contact and accelerating tenderization. However, syringes complement—not replace—traditional brining or low-and-slow cooking methods.
Where can I learn more about technique progressions?
Practice with neutral carriers, then progress to flavored emulsions and gels. Explore technique articles on our site, such as modernist cooking techniques, and pair reading with hands-on repetition for best results.
Apply these methods to produce consistent, layered flavors. With measured injections and careful hygiene, culinary syringes become an efficient, creative extension of your technique set.
See also: Culinary syringes
]]>