

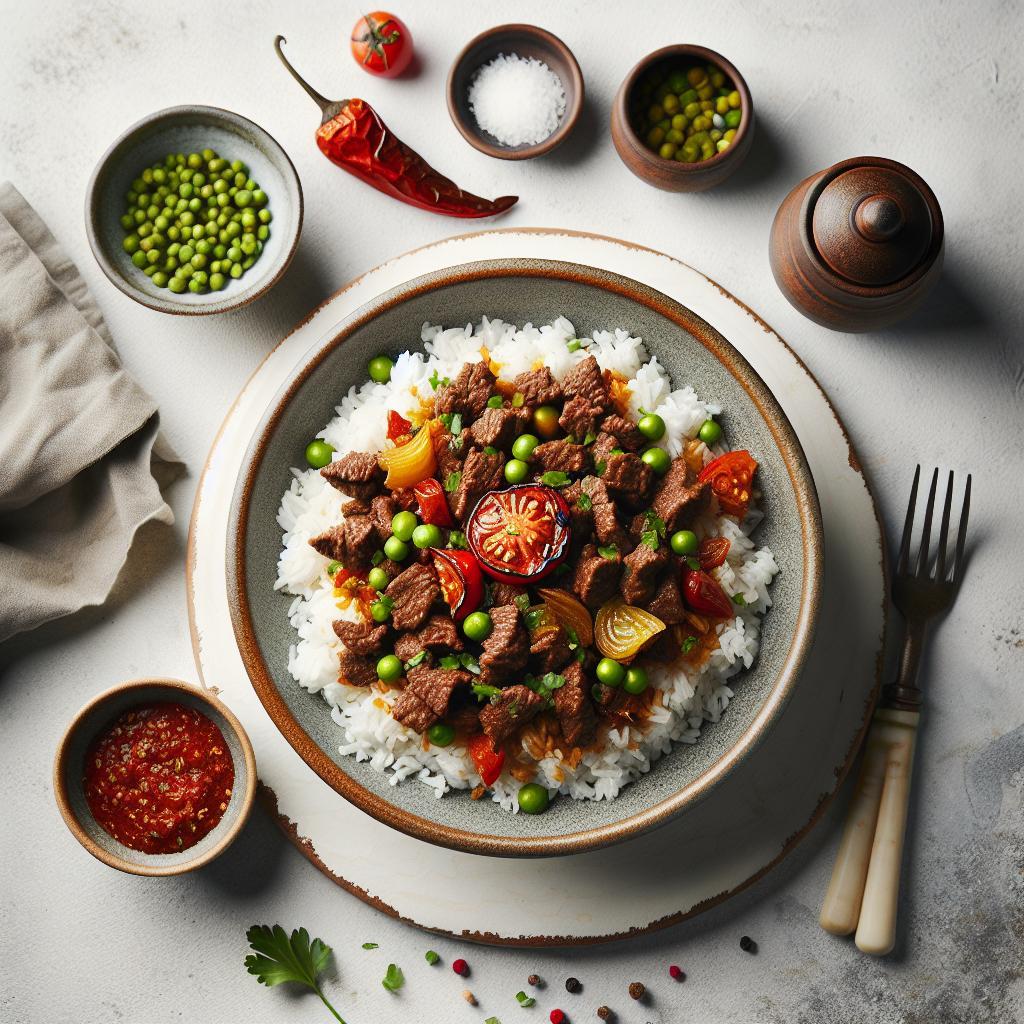
There is a deep, satisfying comfort in a well-made beef keema served alongside steaming, separate grains of rice. This version balances layered spices, controlled moisture, and simple technique to deliver consistent results.
- Introduction to Beef Keema and Flavor Principles
- Prep and Cook Time
- Yield and Difficulty
- Ingredients (what to assemble)
- Essential Equipment and Mise en Place
- Cooking Instructions
- Tips for Success: Balancing spices for the perfect flavor profile
- Choosing the ideal rice pairing for a complete meal
- Serving Suggestions and Plating
- Storage, Reheating, and Make-Ahead Notes
- Nutrition Snapshot
- Common Variations and Customizations
- FAQ
- Key takeaways: Use fresh whole spices and slow-caramelized onions for depth.
- Timing: Prep 20 minutes; cook 35–40 minutes for a total of about 60 minutes.
- Pairing: Fluffy basmati rice complements the keema’s sauce without becoming soggy.
- Storage: Keeps 3 days refrigerated; freezes well in portions.
Introduction to Beef Keema and Flavor Principles
Beef keema is a versatile mince-based preparation that relies on spice layering and moisture control to sing. It combines aromatics, powdered spices, and finishing acids for a balanced plate.
The technique emphasizes rendered fat and slow onion browning to develop umami. For background on minced-protein traditions, consult the discussion on minced meat and its culinary uses.
Prep and Cook Time
Preparation: 20 minutes. This covers chopping, measuring spices, and soaking rice where applicable.
Cooking: 35 minutes active time with 10 minutes resting. Expect a total elapsed time near 55–60 minutes depending on equipment.
Yield and Difficulty
This recipe yields about 4 hearty portions, ideal for a family meal or small dinner gathering. It scales well if you multiply quantities by two and adjust cooking vessel size accordingly.
Difficulty rates as medium due to spice balancing and timing of rice and keema finishing. Home cooks will find the method reliable once they follow the sequence and salt levels precisely.
Ingredients (what to assemble)
For precision, use weight measurements where possible: 500 g lean ground beef, 1 1/2 cups rinsed basmati rice, and 3 cups water for the rice. Use fresh aromatics: ginger, garlic, and a large onion to form the base.
Spice list includes whole cumin seeds, ground coriander, turmeric, red chili powder, and a finishing measure of garam masala. Optional peas and a splash of lemon add brightness and texture contrast.
Essential Equipment and Mise en Place
Use a heavy-bottomed skillet or sauté pan for even heat and a medium saucepan with a tight-fitting lid for rice. A fine-mesh sieve helps drain soaked rice and prevent starchy clouding in the pot.
Prepare mise en place by measuring spices into a small bowl and chopping all produce before heating any oil. This reduces overcooking risk and keeps timing tight between rice and keema in the final stages.
Cooking Instructions
Begin by cooking the rice so it finishes roughly when the keema is ready. Toast whole spices in ghee, add rice, bring to a boil, then simmer covered until the water absorbs and grains separate.
For the keema, heat oil and crackle cumin seeds before adding the onion. Sauté the onion slowly until deep golden; this step builds the recipe’s backbone and cannot be rushed.
- Prepare the rice: Heat ghee in a saucepan and add bay leaves, cloves, and cardamom. Sauté briefly, stir in drained rice, add 3 cups water and a pinch of salt, bring to a boil, then cover and simmer on low for 15 minutes; rest 5 minutes off heat.
- Begin the keema base: Heat oil in a skillet, add cumin seeds and wait for them to sizzle. Add finely chopped onion and cook slowly until a rich brown develops, about 7 minutes.
- Add aromatics and spices: Stir in minced garlic and grated ginger for 2 minutes, then add ground coriander, turmeric, and red chili powder and cook 1 minute to bloom the spices.
- Tomatoes and meat: Add chopped tomatoes and cook until oil separates, about 5 minutes. Crumble in the ground beef, raise heat to brown the meat, and break it into small pieces as it cooks for 8–10 minutes.
- Simmer and finish: Add peas if using, reduce heat, cover partially, and simmer 8–10 minutes to thicken. Finish with garam masala, lemon juice, and chopped cilantro off the heat.
- Plate and serve: Fluff rice with a fork and serve beside or under the keema. Offer extra lemon wedges and cilantro for guests to adjust acidity and herbiness.
Tips for Success: Balancing spices for the perfect flavor profile
Always taste and adjust salt before the final finish, as salt modulates spice perception and texture. If the mixture tastes flat, a splash of lemon brightens flavors more effectively than adding extra spices.
Control moisture by cooking the keema uncovered at the end to reduce excess liquid. For a silkier mouthfeel, stir in a tablespoon of ghee or a splash of coconut milk just before serving.
Sourcing fresh ground beef at 15–20% fat gives flavor and prevents dryness during rapid browning. If using very lean beef, add a teaspoon of oil when frying the meat to maintain succulence.
Choosing the ideal rice pairing for a complete meal
Fluffy basmati rice works best because its elongated grains separate and absorb keema juices. Rinse and soak basmati briefly to remove surface starch and promote separate grains.
For a fragrant twist, infuse your cooking water with a light pinch of saffron or a roasted cumin note. For texture contrast, consider a cumin (jeera) rice or a simple pilaf that uses toasted nuts sparingly.
Serving Suggestions and Plating
Serve the keema on a shallow platter with rice alongside, garnished generously with cilantro and thinly sliced onions tossed in lemon. Provide raita, pickles, or a crisp green salad to add cooling and acidic counterpoints.
Offer warm flatbread for a hands-on option that changes the eating experience. Small bowls of toasted fried onions or roasted cashews add crunch and elevate the mouthfeel.
Storage, Reheating, and Make-Ahead Notes
Store cooked keema in an airtight container in the refrigerator for up to three days. Reheat gently on the stovetop with a splash of water to loosen the sauce and avoid drying out the meat.
Keema freezes well in portioned containers for up to one month; defrost overnight in the refrigerator for best texture. For best results, cook rice fresh and reheat only the keema when serving from frozen portions.
Nutrition Snapshot
This combined plate provides a balanced macronutrient profile: protein from beef, carbohydrates from rice, and fat from cooking oil or ghee. Typical per-serving estimates are roughly 420 kcal, 28 g protein, 45 g carbs, and 12 g fat.
Adjust portion sizes and ingredient choices to meet dietary needs: swap in leaner meat or increase vegetable content to reduce overall calories. Use measured servings to track nutrient intake precisely when required.
Common Variations and Customizations
Swap beef for ground lamb for a richer flavor profile, or use textured vegetable protein to create a vegetarian keema with similar texture. Add potatoes or diced bell peppers for extra body and comfort.
Play with spice accents such as smoked paprika for a smoky note or a pinch of ground cinnamon for subtle warmth. Garnish variations—mint, green chilies, or fried shallots—shift the final character markedly.
FAQ
What cut of beef is best for keema?
Choose freshly ground beef with some fat for flavor, typically 15–20% fat content. That fat helps carry the spices and prevents the mince from drying during the sear.
Can I make this recipe gluten-free?
Yes—this recipe is naturally gluten-free when you use plain spices and check any packaged spices for cross-contamination. Serve with plain rice or gluten-free flatbreads as needed.
How do I prevent the rice from getting mushy?
Rinse rice thoroughly and soak briefly before cooking to remove excess surface starch. Use a 1:2 rice-to-water ratio for basmati and allow the rice to rest covered off heat for five minutes after cooking.
Can I prepare keema ahead for guests?
Prepare keema a day ahead and chill; the flavors often improve after resting overnight. Reheat gently on the stovetop and finish with fresh lemon and herbs just before serving.
What spices should I always keep stocked for keema?
Keep ground coriander, turmeric, red chili powder, and whole cumin seeds on hand, plus a jar of garam masala for finishing. Fresh ginger and garlic are essential aromatics for authenticity and depth.
With these steps and adjustments, you can make a dependable, flavorful beef keema that performs well on weeknights and impresses at a dinner. Enjoy building your version and refining spice ratios to match personal taste.

See also: Beef Keema


