

In fermentation, an airlock does the essential job of letting carbon dioxide leave while keeping oxygen and contaminants out. A properly used airlock preserves flavor, controls microbial activity, and reduces the risk of spoilage. This guide focuses on practical, tested techniques that work for home and small-batch fermenters.
- make the most of Airlocks in Fermentation
- Prep, Timing, Yield and Difficulty
- Ingredients & Tools for Your Airlock Setup
- Step-by-Step Instructions
- Monitoring and Troubleshooting
- Chef’s Notes: Tips for Success
- Common Issues and Fixes
- Serving Suggestions
- Airlock Types at a Glance
- Science Notes
- FAQ
- What exactly does an airlock do?
- How much liquid should I use in the airlock?
- Do I need to sanitize an airlock every time?
- Can I ferment without an airlock?
- What if my ferment stops bubbling?
- Wrapping Up
- Airlock function: vents CO2 and prevents oxygen entry.
- Seal integrity: a tight grommet or stopper matters more than airlock type.
- Hygiene: clean and sanitize the airlock before each use.
- Monitoring: bubbles are helpful but not the only success indicator.
make the most of Airlocks in Fermentation
An airlock creates an anaerobic zone that encourages desired microbes to flourish while keeping unwanted organisms at bay. This controlled atmosphere supports both yeast-driven and bacterial fermentations by maintaining a low-oxygen environment.
Fermentation science explains why: microbial pathways shift in low-oxygen conditions, favoring lactic acid bacteria for vegetables and yeasts for alcohols. See general fermentation principles on fermentation for background and practical context.
Prep, Timing, Yield and Difficulty
Preparation and setup: most airlock installs take under 30 minutes, including sanitizing. Fermentation duration varies widely—some ferments finish in a day while others need weeks.
Yield depends on vessel size; a single jar can handle 1 quart while crocks take multiple gallons. This guide suits beginners and intermediate fermenters upgrading their equipment.
Ingredients & Tools for Your Airlock Setup
Choose a food-grade fermentation vessel with a compatible lid or stopper and a clean airlock. Use either water or a no-rinse sanitizer in the chamber to form the liquid barrier that prevents oxygen ingress.
Common airlock styles include S-shaped, three-piece bubbler, and twin-bubble designs; pick the style that best fits your cleaning and monitoring needs. For microbial focus, learn about common organisms such as yeast and lactic acid bacteria to match airlock practice with fermentation type.
Step-by-Step Instructions
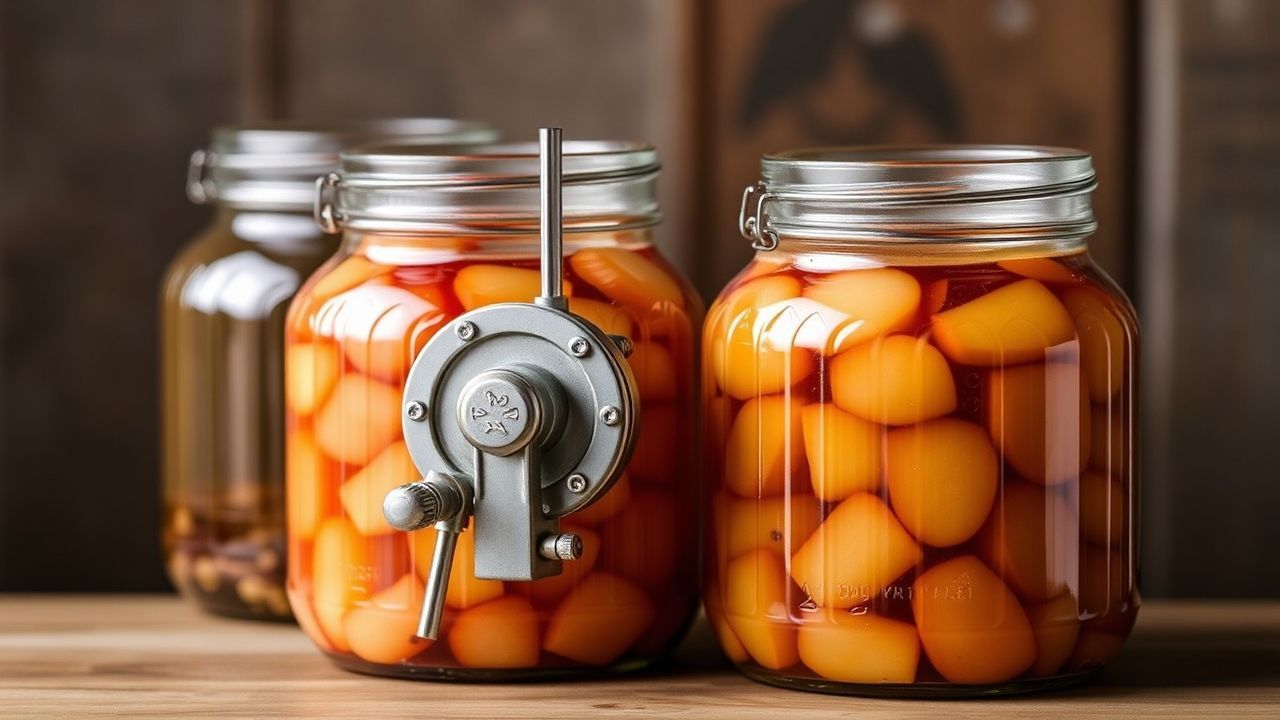
1. Select the right airlock: the three-piece bubbler disassembles for thorough cleaning, the S-shaped is compact, and twin-bubble types help visual monitoring. Match the airlock to the ferment length: longer ferments benefit from easily cleaned designs.
2. Clean and sanitize: wash all components in hot, soapy water, then sanitize with a no-rinse sanitizer or boiling water. Proper sanitation reduces the chance of spoilage organisms outcompeting beneficial microbes.
Filling the Airlock
Fill the chamber with filtered water or a recommended sanitizing solution to the manufacturer fill line—typically one-third to one-half full. That liquid forms the one-way gas barrier and prevents oxygen from entering while allowing CO2 to escape.
Avoid overfilling; too much liquid can cause backflow into the ferment. Replace water every 5–7 days for long ferments to reduce discoloration or microbial buildup.
Sealing and Installing
Use a snug rubber grommet or silicone stopper to secure the airlock. A slight leak around the lid will let oxygen in and weaken the anaerobic environment, so test the seal by gently pressing the lid and watching for escapes.
Set the airlock upright and ensure the vessel sits on a stable surface away from direct sunlight and large temperature swings. Consistent temperature improves predictability in fermentation progress.
Monitoring and Troubleshooting
Watch for steady bubbling as one indicator of gas production, but evaluate smell, texture, and pH alongside bubble activity. Some ferments generate little visible CO2 yet still progress normally, especially at lower temperatures.
If bubbling stops or water splashes from the lock, check seals and refill the chamber. For pressure relief, slightly loosen the lid or remove the airlock briefly; do so away from your face and over a sink.
Maintain a regular inspection schedule: check water level every few days and top up as needed. Replace the airlock if it cracks or shows permanent discoloration.
Chef’s Notes: Tips for Success
For long-term ferments, change airlock water weekly and inspect for cloudiness. Sanitized vegetable oil can work as a barrier in some setups when water quality is a concern, but oil behaves differently and can trap smells.
Keep spare grommets and an extra airlock on hand; small equipment failures are common and cheap to fix. Store spares in a sealed bag with a light sanitizer to keep them ready for use.
When troubleshooting odors or unexpected textures, measure pH. A downward trend in pH is a strong sign that lactic fermentation proceeds even if gas production slows. Pair this practice with taste tests when safe and appropriate.
Common Issues and Fixes
Leaks: tighten the seal and inspect for hairline cracks in the stopper. Use food-grade silicone grease sparingly if seating remains poor after cleaning.
Dry airlock: top up the liquid barrier promptly. If the airlock dries repeatedly, raise ambient humidity or move the ferment to a less-dry location.
Serving Suggestions
Present ferments in clear jars to show off color and texture; glass also helps you inspect the ferment without opening it. Fresh herbs and simple spice pairings highlight the acids and aromatics formed during fermentation.
Use fermented vegetables as condiments, side dishes, or ingredients in composed salads and sandwiches. For recipe inspiration, visit internal guides such as our guide to fermentation vessels and fermentation recipes to match vessel, technique, and flavor goals.
Airlock Types at a Glance
The table below helps you choose the right airlock for your purpose. Consider ease of cleaning, monitoring needs, and budget when selecting hardware.
| Airlock Type | Ease of Cleaning | Best For | Price Range |
|---|---|---|---|
| S-Shaped | Moderate | Small-batch ferments, beginners | $5–$10 |
| Three-Piece Bubblers | Easy | Long-term and large batches | $7–$15 |
| Twin Bubble | Moderate | Visual fermentation monitoring | $6–$12 |
Science Notes
Airlocks support anaerobic pathways that many beneficial microbes prefer. When oxygen is excluded, lactic acid bacteria convert sugars into acids, lowering pH and preserving the food.
For mechanistic reading, see anaerobic respiration which explains cellular energy processes relevant to fermentations. This background helps troubleshoot slow or stalled batches.
FAQ
What exactly does an airlock do?
An airlock vents carbon dioxide while blocking oxygen and airborne contaminants. It preserves an anaerobic environment that favors beneficial yeast and bacteria, reducing spoilage risk.
How much liquid should I use in the airlock?
Fill between one-third and one-half of the chamber, following the airlock maker’s guideline. That range prevents backflow while maintaining a reliable barrier.
Do I need to sanitize an airlock every time?
Yes. Clean and sanitize before each use to remove residual microbes and residues. Proper sanitation cuts infection risk and maintains flavor integrity.
Can I ferment without an airlock?
You can use a breathable cloth or loose lid, but that exposes the ferment to more oxygen and airborne microbes. For most controlled results, an airlock provides a safer, more repeatable environment.
What if my ferment stops bubbling?
Check temperature, salt levels, and pH; some ferments slow naturally at lower temperatures. Use smell and pH tests to assess progress rather than relying solely on visible bubbles.
Wrapping Up
Using an airlock is a practical, low-cost way to control fermentation outcomes. Focus on seal quality, cleanliness, and consistent monitoring to get reliable results.
Pair these techniques with a solid understanding of the microbes involved and consistent process control. Over time, you will fine-tune practices to match your flavor goals and vessel choices.
Further recommended reading: human-friendly summaries on sourdough and organism-specific entries for deeper context. Apply those insights when you scale recipes or change fermentation targets.
See also: airlocks


