

There’s a secret in professional kitchens and home pots alike: searing meat before stewing unlocks concentrated, savory flavor and improves texture. When you brown meat properly, the stew gains depth, complexity, and an irresistible aroma that slow cooking alone cannot match.
- Unlock Bold Flavors: Mastering Searing for Delectable Stews
- Why Searing Works (Science and Sensory)
- Technique: Step-by-Step Searing and Stewing
- Chef’s Notes: Tips for Success
- Serving Suggestions
- Q&A
- What is searing meat, and how does it differ from simply cooking it?
- Why is searing important before stewing?
- Does searing lock in juices as many believe?
- Can I skip searing for a quicker or leaner stew?
- Does searing benefit all stewed meats?
- In Summary
- FAQ
- Builds flavor: Browning creates compounds that enrich the broth.
- Improves texture: A seared crust adds contrast to tender meat.
- Maximizes fond: Deglazing lifts concentrated flavors into the sauce.
- Works for most proteins: Beef, lamb, pork, and heartier poultry benefit most.
Unlock Bold Flavors: Mastering Searing for Delectable Stews
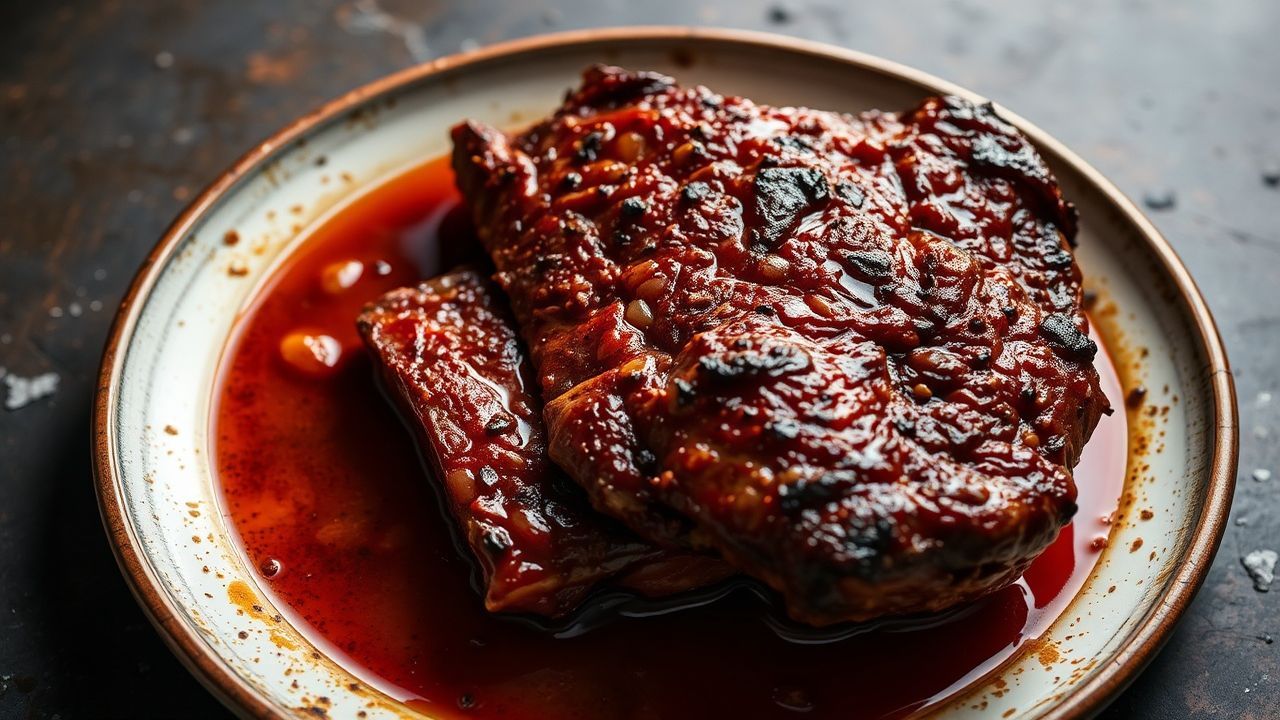
Searing is a targeted, high-heat step designed to develop a flavorful crust and concentrated savory notes. Performed correctly, it creates aromatic compounds that later dissolve into the stew liquid.
Moreover, searing gives you control. You concentrate flavor at the start, then coax tenderness through long, low heat during braising or stewing. That combination yields a dish with both richness and succulence.
Why Searing Works (Science and Sensory)
At high temperatures, amino acids and reducing sugars react to form browned, flavorful compounds known as the Maillard reaction. This chemistry produces dozens of volatile molecules that our senses register as roasted, nutty, and savory.
Additionally, the browned surface produces fond: concentrated caramelized bits that, when deglazed, become the backbone of an enriched stew. Together, these effects increase perceived umami and overall mouthfeel.
Expert Insight: Texture and Collagen
Long, slow cooking breaks down collagen into gelatin, yielding a silky mouthfeel. However, searing ensures the exterior remains flavorful and adds slight chew for contrast.
Therefore, both processes—searing and slow cooking—work in concert: one builds surface flavor, the other transforms tough connective tissue into tenderness.
Technique: Step-by-Step Searing and Stewing
Follow a clear sequence to get predictable results. First, prep and dry the meat; second, brown in high heat without overcrowding; third, deglaze and simmer gently until tender.
Use a heavy-bottomed skillet or Dutch oven so heat distributes evenly. This minimizes hot spots and ensures consistent browning across pieces.
Prep and Cook Time
Preparation: ~20 minutes. Trim, cube, and pat dry the meat to remove surface moisture that inhibits browning.
Cooking: 2–2.5 hours total, including searing and stewing. Timing varies by cut and pot temperature.
Yield
Serves 6 hearty portions when using the standard quantities below.
Adjust portioning as needed for family size or meal planning.
Difficulty Level
Medium. The method requires attention during searing but relies on low-maintenance simmering afterward.
With practice, searing becomes a fast, reliable technique that yields professional-level flavor.
Ingredients
- 2 lbs beef chuck, cut into 1.5-inch cubes
- 2 tbsp vegetable oil (or another high smoke-point oil)
- 1 large onion, finely chopped
- 3 cloves garlic, minced
- 2 carrots, sliced diagonally
- 2 celery stalks, chopped
- 1 cup dry red wine (optional; useful for deglazing)
- 4 cups beef broth
- 2 bay leaves
- 1 tsp dried thyme
- Salt and freshly ground black pepper, to taste
Note: For dietary adjustments, replace oil with a light spray and use lower-sodium broth.
Instructions
1. Dry and season: Pat the beef dry with paper towels. Season generously with salt and pepper to promote surface browning.
2. Heat the pot: Warm a heavy pot over medium-high heat until shimmering. Add oil and let it heat until it slightly ripples across the surface.
3. Sear in batches: Place beef cubes in a single layer and do not overcrowd. Allow each side to develop a deep brown crust, about 3–4 minutes per side.
Avoid moving pieces prematurely. When the crust releases easily, it’s ready to turn; rushing produces steam instead of a crust.
4. Set meat aside: Transfer seared pieces to a resting plate. Reduce heat to medium for the aromatics.
5. Sauté aromatics: In the same pot, add onion, garlic, carrots, and celery. Cook until softened, about 4–6 minutes, scraping fond from the bottom.
6. Deglaze: Pour in wine or a splash of broth and scrape the pan to lift browned bits. Let the liquid reduce for 2–4 minutes to concentrate flavor.
7. Simmer: Add beef broth, bay leaves, thyme, and return seared meat to the pot. Bring to a gentle simmer, then cover and stew on low for 2–2.5 hours.
8. Finish and season: Taste and adjust salt and pepper. Remove bay leaves before serving to avoid sharp, bitter notes.
Finally, skim excess fat if desired and rest the stew for 10 minutes to let flavors integrate further.
Chef’s Notes: Tips for Success
Choosing the right cut matters: choose beef chuck, brisket, or other cuts with connective tissue. These cuts soften and become unctuous after long cooking.
Drying your meat ensures a proper crust. Even slight surface moisture will steam and prevent ideal browning.
- Don’t overcrowd: Overcrowding drops pan temperature and produces steam, not a crust.
- Moderate oil: Use just enough oil to coat the pan; excess oil inhibits crust formation.
- High smoke point oils: Prefer vegetable, canola, or refined avocado oil for stable heat.
Deglazing is non-negotiable. The liquid lifts the fond into solution and creates a deeper, more integrated sauce. Use wine, stock, or even a splash of vinegar for brightness.
If you wish to reduce oil, sear with less fat and finish in the oven at high heat briefly, or use a heavy non-stick pan to limit fat absorption.
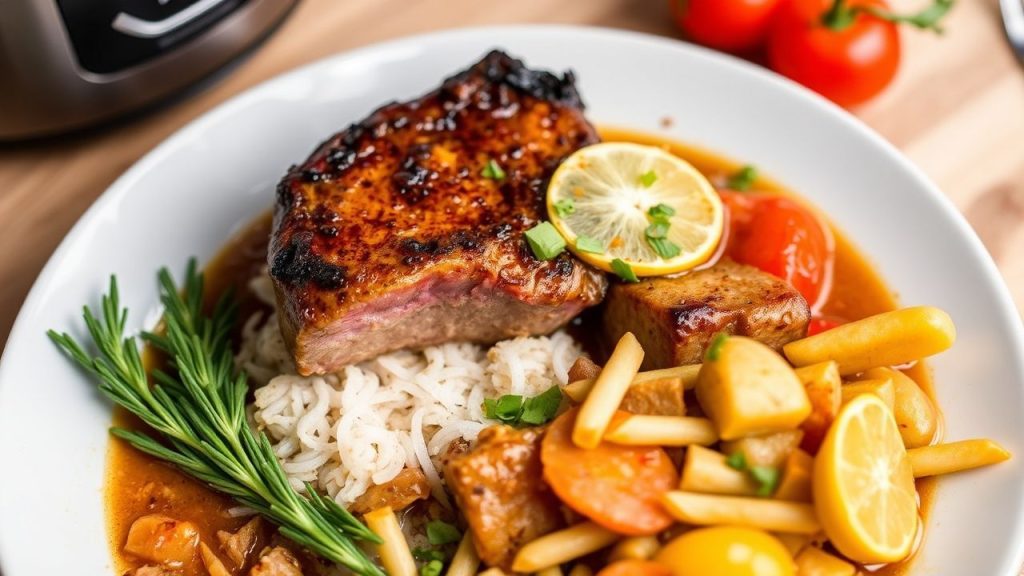
Serving Suggestions
Serve the stew in a wide bowl, garnished with fresh parsley or thyme sprigs for color and aromatics. The herb garnish brightens the deep, savory profile.
Pair with creamy mashed potatoes, buttered egg noodles, or crusty bread to soak up the sauce. A simple green vegetable balances richness and adds texture contrast.
| Nutrient | Per Serving |
|---|---|
| Calories | 420 kcal |
| Protein | 35 g |
| Carbohydrates | 12 g |
| Fat | 22 g |
Discover more techniques on slow cooking meat and how time deepens flavor. Additionally, see best cuts for stew to match cooking method with the right protein.

Q&A
Q&A: Unlock Bold Flavors – Why Searing Meat Before Stewing Matters
What is searing meat, and how does it differ from simply cooking it?
Searing is the rapid browning of a meat’s surface at high heat to develop a caramelized crust. In contrast, simple cooking at lower temperatures does not create the same Maillard-driven flavor compounds.
Therefore, searing adds a concentrated layer of taste that complements the long, slow cooking that follows.
Why is searing important before stewing?
Searing generates flavor through the Maillard reaction and creates fond on the pan surface. Deglazing then captures those compounds and folds them into the stew liquid.
Consequently, a seared-and-deglazed base produces a richer, more complex broth than unseared meat alone.
Does searing lock in juices as many believe?
The old notion that searing “seals in” juices is misleading. Searing primarily develops flavor rather than preventing moisture loss.
However, when combined with proper low-temperature simmering, searing contributes to a final dish that tastes juicier and more savory.
Can I skip searing for a quicker or leaner stew?
You can skip searing to save time or limit oil, but expect a noticeable difference in flavor depth. If short on time, sear at least a portion of the meat or use a quick pan-roast to capture some browning.
Alternatively, use a hot oven roast or torch for spot browning, but these techniques still aim to produce Maillard compounds rather than preserve juices.
Does searing benefit all stewed meats?
Most hearty proteins—beef, lamb, pork, and robust poultry—gain from searing. Delicate fish and very lean cuts may not respond well and can dry out under high heat.
Match the method to the protein. When in doubt, use smaller test batches to evaluate texture and flavor before committing to the full cook.
In Summary
Searing meat before stewing is a proven technique to concentrate flavor, create textural contrast, and produce a richer sauce. Practically, it requires little extra time but returns substantial sensory benefits.
For consistent results, dry your meat, use high heat, avoid overcrowding, and always deglaze the pan. These steps convert surface caramelization into lasting, integrated flavor in the finished stew.
FAQ
How long should I sear each piece?
Sear pieces about 3–4 minutes per side on medium-high heat until a deep brown crust forms. Timing varies with pan temperature and piece size.
Remember: the crust should release easily when it is properly seared—forced movement often tears the surface.
Can I brown meat in the oven instead?
Yes. High-heat roasting on a preheated sheet can brown large quantities at once. Finish liquid steps on the stovetop to deglaze and build the stew base.
However, stovetop searing gives more direct control and faster fond formation for deglazing.
What if I have leftover stew—does flavor improve?
Flavors often deepen after resting overnight in the refrigerator because aromatics and fat integrate more fully. Reheat gently to avoid overcooking the meat.
Also, chilled stew can be defatted easily by skimming solidified surface fat before reheating.
Which herbs and aromatics pair best with seared stews?
Classic pairings include bay leaves, thyme, rosemary, and whole peppercorns. Use fresh parsley at the end for brightness and contrast to the rich base.
Finally, acids like a splash of vinegar or lemon can brighten the final bowl without overpowering the Maillard-derived richness.
Where can I read more about the chemistry behind browning?
For a reliable overview, consult the Maillard reaction entry and the browning (cooking) article on Wikipedia for accessible, referenced explanations.
These sources clarify why searing produces flavor compounds and how they influence the final dish.
See also: Searing meat


