Layers of Flavor: The Ultimate Roasted Vegetable Lasagna Guide invites you on a culinary journey where simple vegetables transcend their humble origins to deliver a symphony of tastes, textures, and aromas. This recipe celebrates the art of roasting vegetables to intensify their natural sweetness and earthiness, harmonizing perfectly with layers of creamy béchamel and rich, tangy tomato sauce. Imagine tender zucchini, robust eggplant, and vibrant bell peppers, each caramelized to perfection, bringing depth and warmth that elevate classic lasagna into a vegetarian masterpiece.
Prep and Cook Time
- Preparation: 30 minutes
- Roasting: 40 minutes
- Assembly: 20 minutes
- Baking: 35 minutes
- Total Time: 1 hour 55 minutes
Yield
Serves 8 generous portions, ideal for family dinners or delightful gatherings.
Difficulty Level
Intermediate – Perfect for confident home cooks looking to refine their roasting and layering techniques.
Ingredients
- 2 medium zucchinis, sliced into 1/4-inch rounds
- 2 medium eggplants, sliced into 1/4-inch rounds
- 2 large red bell peppers, quartered and seeded
- 1 large yellow onion, thinly sliced
- 4 cloves garlic, minced
- 4 cups crushed tomatoes
- 2 tablespoons olive oil
- 1 teaspoon dried oregano
- 1 teaspoon dried basil
- Salt and freshly ground black pepper, to taste
- 12 no-boil lasagna noodles
- 3 cups whole milk
- 4 tablespoons unsalted butter
- 1/4 cup all-purpose flour, sifted
- 2 cups shredded mozzarella cheese
- 1 cup grated Parmesan cheese
- Fresh basil leaves, for garnish
Instructions
- Preheat your oven to 425°F (220°C). Place the zucchini, eggplant, and bell peppers on a large baking sheet. Drizzle with olive oil and season generously with salt, pepper, and half the dried oregano and basil. Roast vegetables for 35-40 minutes, turning halfway, until edges are caramelized and golden. Remove from oven and let cool slightly.
- While vegetables roast, prepare the tomato sauce. In a large saucepan over medium heat, sauté the minced garlic and onion in 1 tablespoon olive oil until translucent and fragrant, about 5 minutes. Stir in crushed tomatoes, remaining oregano and basil, salt, and pepper. Simmer gently for 20 minutes, stirring occasionally to deepen flavors.
- Next, craft the béchamel sauce. Melt butter in a medium saucepan over medium heat. Whisk in the sifted flour and cook for 2 minutes to form a roux, stirring constantly to avoid lumps. Gradually whisk in warm milk, continuing to stir until the sauce thickens and coats the back of a spoon, about 7-10 minutes. Season with salt and pepper to taste.
- Lower oven temperature to 375°F (190°C) to prepare for baking. In a large lasagna dish, spread a thin layer of tomato sauce on the bottom. Arrange 3 noodles over the sauce-no need to boil no-boil noodles ahead.
- Layer roasted vegetables evenly over noodles. Spoon on more tomato sauce and drizzle béchamel sauce atop. Sprinkle a generous handful of mozzarella and a light dusting of Parmesan. Repeat layers twice more, finishing with noodles topped by béchamel and the remaining cheeses.
- Cover the dish with foil and bake for 25 minutes. Remove foil and bake an additional 10 minutes until the top is bubbly and golden brown. For a beautifully browned crust, broil for 1-2 minutes, watching carefully to avoid burning.
- Let the lasagna rest for 15 minutes before serving. This resting time allows the layers to settle, making it easier to cut clean slices and ensuring that every bite is moist and flavorful.
Tips for Success
- Roasting vegetables: Cut vegetables evenly for uniform roasting. Turning them halfway through ensures caramelization on all sides, which boosts natural umami.
- Tomato sauce: Fresh garlic and slow simmering coax out complexity-avoid rushing this step.
- Béchamel tips: Use warm milk to prevent lumps and whisk continuously; patience here rewards you with luscious creaminess.
- Assembling: No-boil noodles save time, but if preferred, boil and cool them as a backup option.
- Advance prep: Roast vegetables and prepare sauces up to 24 hours ahead, then assemble just before baking for ease and enhanced melding of flavors.
- Customization: Swap in seasonal veggies like butternut squash or mushrooms to keep the flavor profile exciting year-round.
Serving Suggestions
Serve your roasted vegetable lasagna warm, garnished with fresh basil leaves and a light drizzle of good-quality extra virgin olive oil to add an herbaceous finish. Pair with a crisp green salad tossed in lemon vinaigrette to balance richness. For an inviting presentation, slice generously and plate with a sprinkle of extra Parmesan and a few cracked black pepper flakes. Enjoy with crusty rustic bread to soak up every luscious bite.
| Nutrient | Amount per Serving |
|---|---|
| Calories | 385 kcal |
| Protein | 18 g |
| Carbohydrates | 44 g |
| Fat | 15 g |
Learn more about the origins of lasagna and how this layered dish became a worldwide favorite. For more vegetable roasting tips, check out our Ultimate Guide to Roasting Vegetables.

Q&A
Q&A: Layers of Flavor – The Ultimate Roasted Vegetable Lasagna Guide
Q1: What makes roasted vegetable lasagna different from traditional lasagna?
A1: Unlike classic lasagna, which often relies heavily on meat and ricotta, roasted vegetable lasagna celebrates the deep, caramelized sweetness of perfectly roasted veggies. This technique adds layers of smoky, concentrated flavor that transform each bite into a complex, mouthwatering experience-making it just as satisfying for vegetarians and carnivores alike.
Q2: Which vegetables are best for roasting in this lasagna?
A2: The magic lies in root vegetables like sweet potatoes, carrots, and beets, alongside hearty options like zucchini, bell peppers, and eggplant. Roasting brings out their natural sugars and tender textures, creating a rich tapestry of flavor and color that shines between the sheets of pasta.
Q3: How do you roast vegetables to maximize flavor for the lasagna?
A3: Start by cutting vegetables into uniform pieces to ensure even cooking. Toss them lightly in olive oil, salt, and herbs like thyme or rosemary, then roast at a high temperature (around 425°F/220°C) until edges are caramelized and centers tender. This Maillard reaction is what unlocks the savory, almost sweet depths of flavor essential to the dish.
Q4: Can the sauce be adapted for a vegetarian-friendly lasagna?
A4: Absolutely! A classic tomato sauce enriched with garlic, onions, and fresh basil works beautifully. For creaminess, consider a ricotta and spinach mixture or a béchamel sauce with nutmeg. These layers add luscious texture and balance the roasted vegetables’ earthiness, creating a harmonious symphony of taste.
Q5: How do you assemble the layers to ensure every bite is balanced?
A5: Think of lasagna layering as building edible architecture: start with a thin layer of sauce to prevent sticking, then noodles, a hearty spread of roasted veggies, dollops of cheese or béchamel, and repeat. The key is moderation in each layer to keep the integrity of flavors distinct yet complementary-no one ingredient should overpower.
Q6: Any tips for baking the perfect roasted vegetable lasagna?
A6: Cover the lasagna with foil for the first 30-40 minutes to trap moisture and heat evenly, then remove it for the last 10-15 minutes to achieve a golden, bubbling cheese crust. Let it rest before cutting to allow flavors to meld and layers to set-patience here yields a perfectly cohesive slice.
Q7: Can this recipe be prepared ahead of time?
A7: Yes! Lasagna is a superb make-ahead dish. Assemble it a day in advance and refrigerate. When ready, bake it a bit longer than usual to ensure it’s heated through. This resting time often enhances flavor melding, making the roasted vegetable layers even more vibrant and irresistible.
Q8: What wine pairing would elevate the roasted vegetable lasagna experience?
A8: A bright, medium-bodied red like Chianti or a fruity Pinot Noir complements the earthy, caramelized notes of the roasted veggies without overshadowing them. For white wine lovers, a buttery Chardonnay or a dry, herbaceous Sauvignon Blanc can also enhance the dish’s complexity.
Elevate your next meal with this roasted vegetable lasagna-a dish where every layer tells a flavorful story, from the oven to your plate.
Closing Remarks
As the final forkful of this roasted vegetable lasagna melts on your tongue, you’ll savor not just a meal but a tapestry woven from caramelized sweetness, herbaceous whispers, and rich, creamy layers. Each slice tells a story of thoughtful roasting, careful seasoning, and the joyful layering of textures and tastes that transform humble vegetables into a show-stopping centerpiece. Whether you’re a seasoned chef or a home-cooking enthusiast, embracing the art of layering flavors elevates your lasagna beyond the ordinary-turning every bite into a celebration of fall’s bounty and the simple magic of patience. So next time you crave comfort food with a fresh twist, remember: the secret lies in the layers, waiting to be discovered, shared, and savored.
Mastering the Art of Selecting the Ideal Mushrooms for Deep Flavor
The Ultimate Guide to Perfectly Creamy Mushroom Risotto begins with choosing mushrooms that infuse the dish with rich, earthy complexity. Opt for a medley of wild mushrooms like cremini, shiitake, and porcini-each lending unique umami notes and texture. Fresh mushrooms with firm caps and minimal bruising provide the best foundation. Dry-packed porcini rehydrated in warm broth add an intense depth, while baby bella mushrooms contribute a meaty bite. Avoid watery varieties that release too much moisture, as they can dilute the risotto’s creamy consistency and subtle flavors.
Unlocking the Secret to Achieving That Silky Creamy Texture
Silky, creamy risotto texture is an orchestration of ingredients and techniques. Begin by gently toasting the rice to create a slightly nutty undertone while keeping the grains intact. Slow, gradual addition of warm broth invites the rice to release its starches evenly, building that luscious creaminess without the need for cream. Using unsalted butter and a touch of finely grated Parmigiano-Reggiano, stirred in just before serving, amplifies the velvety mouthfeel. Avoid rushing the process-patience is your culinary ally here.
Choosing the Right Rice and Broth for Ultimate Absorption
Selecting the perfect rice shapes the risotto’s character. Arborio is the classic choice, renowned for its balance of starch and structure, but Carnaroli often steals the spotlight for ultimate creaminess and resilience through repeated stirring. Both cereals absorb broth beautifully and develop the signature tender chew. For broth, a homemade vegetable stock or mushroom-infused broth heightens the mushroom notes. The broth should be aromatic but not overpowering, and must always be kept warm during cooking to maintain temperature consistency and incorporation efficiency.
Expert Tips on Stirring Techniques and Timing for Perfect Consistency
Precision in stirring and timing crafts the risotto’s flawless texture. Stir erratically but consistently in the early stage, to toast the rice evenly without mushiness. Once broth is introduced, shift to gentle, circular motions to coax starch out steadily-this slow coaxing creates the risotto’s hallmark creaminess. Ladle broth just as the previous addition is almost absorbed; over- or underwatering can lead to grainy or soupy results. Be attentive-the rice should be al dente with a silky coating, not mushy.
Prep and Cook Time
- Preparation: 15 minutes
- Cooking: 35 minutes
- Total: 50 minutes
Yield
Serves 4 generously
Difficulty Level
Medium – requires attention to stirring and timing, but rewarding for all home cooks
Ingredients
- 1 ½ cups Arborio rice
- 4 cups warm mushroom or vegetable broth
- 1 cup mixed mushrooms (cremini, shiitake, dried porcini rehydrated), sliced
- 1 small onion, finely chopped
- 3 cloves garlic, minced
- 3 tablespoons unsalted butter
- 2 tablespoons olive oil
- ½ cup freshly grated Parmigiano-Reggiano cheese
- Salt and freshly ground black pepper, to taste
- Fresh parsley, chopped, for garnish
Instructions
- Prepare broth and mushrooms: Warm the broth in a saucepan over low heat. Rehydrate dried porcini in hot broth for 10 minutes, then strain, reserving both mushrooms and broth.
- Sauté mushrooms: Heat 1 tablespoon olive oil and 1 tablespoon butter in a heavy skillet over medium heat. Add sliced mushrooms, a pinch of salt, and sauté until golden brown and moisture evaporates, about 6 minutes. Set aside.
- Sauté aromatics: In a large pan, warm the remaining olive oil and butter. Add chopped onion and garlic; cook gently until translucent, about 5 minutes.
- Toast the rice: Add Arborio rice to the aromatics; stir continuously for 2 minutes until edges become translucent, and rice is lightly toasted.
- Add broth gradually: Pour in a ladle of warm broth, stirring constantly until almost absorbed. Continue adding broth one ladle at a time, stirring gently and frequently, allowing the rice to absorb before adding more.
- Incorporate mushrooms: When rice is halfway cooked (about 15 minutes in), fold sautéed mushrooms into the risotto. Continue ladling broth and stirring until al dente.
- Finish risotto: Remove from heat when rice is tender with a slight bite and the mixture is creamy. Stir in Parmigiano-Reggiano and adjust seasoning with salt and black pepper.
- Rest and serve: Let the risotto rest for 2 minutes. Garnish with fresh parsley and an extra drizzle of olive oil if desired before serving.
Tips for Success
- Use warm broth to keep the cooking temperature consistent, which enables even starch release.
- Do not rush adding broth; gradual absorption is key to creamy texture.
- For a dairy-free option, replace butter with extra olive oil and use a plant-based parmesan alternative.
- Leftover risotto can be refrigerated and gently reheated with a splash of broth or cream to restore creaminess.
- Try adding fresh thyme or sage infused into the broth for additional aromatic layers.
- Over-stirred risotto can become gluey-maintain a gentle stir once broth is halfway absorbed.
Serving Suggestions
Present your perfectly creamy mushroom risotto in warmed shallow bowls, allowing the luxurious silkiness to shine. Sprinkle fresh herbs like parsley or chives on top to add brightness and color contrast. A final grating of Parmigiano or a few shavings of aged pecorino introduces a nutty accent. For elegance, serve alongside a crisp green salad with a lemon vinaigrette or roasted seasonal vegetables. Enjoy alongside a robust herbal tea or a glass of non-alcoholic mushroom broth for a harmonious meal.
| Nutrient | Per Serving |
|---|---|
| Calories | 370 kcal |
| Protein | 11 g |
| Carbohydrates | 55 g |
| Fat | 9 g |

For further exploration of rice varieties and cooking techniques, visit our Comprehensive Rice Varieties Guide. Expert insights on mushroom nutrition and varieties can be found at Mushroom Council.
Q&A
Q&A: The Ultimate Guide to Perfectly Creamy Mushroom Risotto
Q1: What makes mushroom risotto so special compared to other risotto varieties?
A1: Mushroom risotto stands out for its earthy, umami-rich flavor, which mushrooms contribute generously. Unlike simpler risottos, the mushrooms add depth, texture, and a natural creaminess that melds beautifully with the starchy, velvety rice.
Q2: How do you achieve that signature creamy consistency in risotto?
A2: The secret lies in the type of rice and the cooking technique. Arborio or Carnaroli rice are the go-to varieties because of their high starch content. Slowly adding warm broth, stirring constantly, and allowing the rice to release its starch creates that luscious, creamy texture without any cream added.
Q3: Can I use any type of mushrooms, or are some better than others?
A3: While common button mushrooms work fine, a mix of wild mushrooms like cremini, shiitake, or porcini elevates the dish with complex flavors. Porcini, especially dried porcini soaked in warm water, bring an intense, smoky earthiness that’s hard to beat.
Q4: Is it necessary to use white wine in mushroom risotto?
A4: White wine isn’t mandatory, but it adds a subtle acidity that balances the richness of the mushrooms and cheese. If you prefer not to use wine, you can substitute with a splash of lemon juice or an extra ladle of broth.
Q5: How important is the broth or stock in this recipe?
A5: The broth is the backbone of your risotto’s flavor. A well-made mushroom or vegetable stock intensifies the umami notes. Avoid plain water-it won’t infuse those rich, savory undertones that make your risotto unforgettable.
Q6: Can I make mushroom risotto vegan and still keep it creamy?
A6: Absolutely! Swap butter for olive oil and use nutritional yeast or a vegan cheese alternative in place of Parmesan for that cheesy, nutty finish. Loading up on rich mushrooms and stirring patiently creates natural creaminess without any dairy.
Q7: How do you know when the risotto is perfectly cooked?
A7: Perfect risotto is tender but still slightly al dente-the grains should have a slight bite in the center. It should be creamy but not soupy or sticky, and it should flow gently on the plate, almost like a thick sauce.
Q8: What’s the best way to garnish mushroom risotto?
A8: Fresh herbs like thyme or parsley add brightness, while a drizzle of truffle oil or a shaving of Parmesan can turn your dish into a luxurious celebration. For a bit of texture contrast, sprinkle toasted pine nuts or crispy shallots on top.
Q9: Can mushroom risotto be made ahead of time?
A9: Risotto is best served fresh, but you can prepare it slightly undercooked, then cool and refrigerate. To reheat, gently warm it with a splash of broth, stirring to revive the creamy consistency. Just note, it won’t be quite as luscious as fresh off the stove.
Q10: What’s the most common mistake to avoid when making mushroom risotto?
A10: The biggest pitfall is rushing-whether it’s pouring all the broth at once or skipping the stirring. Patience is key: slow, steady broth additions and constant stirring coax out the starch naturally and build the creaminess that defines a perfect risotto.
Perfecting mushroom risotto is an art-and with these insights, you’re well on your way to creating a dish that’s velvet-smooth, richly flavored, and utterly irresistible every time. Bon appétit!
To Wrap It Up
As the final grains of arborio dissolve into that luscious, velvety creaminess, you’ll realize that mastering mushroom risotto isn’t just about the recipe-it’s about patience, care, and a touch of culinary intuition. With this guide in hand, you now hold the key to transforming humble ingredients into a dish that’s rich in flavor and comfort. So, whether you’re cooking for a quiet night in or impressing guests at a dinner party, let your risotto be a celebration of technique and taste. Here’s to many perfectly creamy, mushroom-infused moments ahead-buon appetito!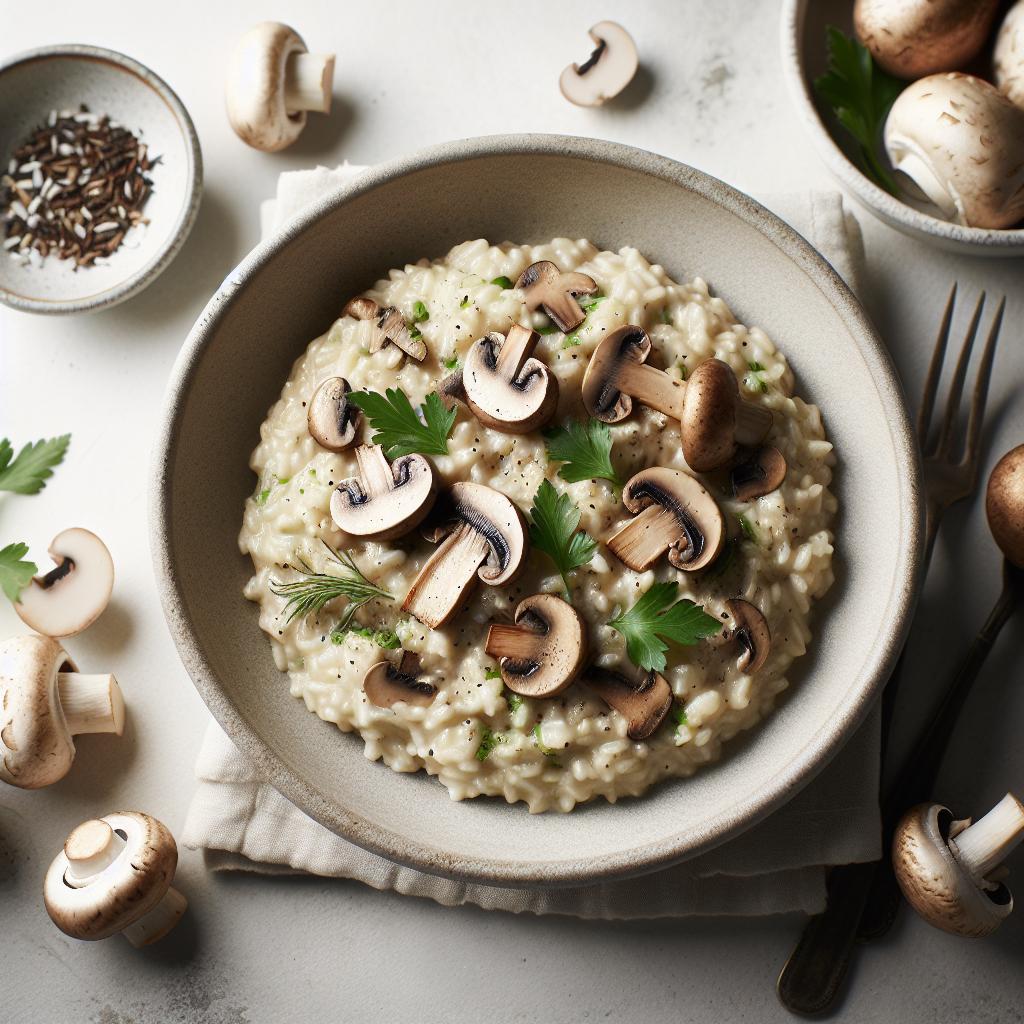
Discovering the Rich Aromatics Behind the Ultimate Beef Keema
Savor the Flavors: Ultimate Beef Keema with Rice Recipe awakens your senses with an intoxicating blend of spices that have their roots in the bustling spice markets of South Asia. The mélange of freshly ground coriander, cumin, and warming garam masala, combined with nutty turmeric and a hint of smoky chili, creates an orchestral harmony that rounds out each savory bite. Adding ginger and garlic paste at the start releases a fragrant foundation, while tomatoes and green chilies build layers of tangy heat and freshness that balance the richness of the minced beef. This dish isn’t merely cooked-it’s crafted, with every aromatic puff transporting you to a vibrant kitchen where tradition and flavor meet.
Mastering the Perfect Rice Pairing for Balanced Flavors
Pairing your beef keema with the right rice is just as essential as nailing the spices. For a truly balanced experience, opt for long-grain Basmati rice, prized for its fluffy texture and fragrant nutty aroma that complements the keema without overpowering it. Rinsing the rice several times until the water runs clear removes excess starch, preventing clumping and allowing each grain to remain distinct. Cooking the rice with a pinch of salt and a few whole spices like cardamom pods or a cinnamon stick subtly echoes the complex notes in the keema, creating synergy on the plate. The cool, delicate rice neutralizes the deep savory intensity of the beef, delivering a satisfying, well-rounded meal that’s both hearty and elegant.
Essential Spices and Ingredients to Elevate Your Keema Experience
- 500g minced beef (preferably lean for a moist texture)
- 2 tbsp vegetable oil or ghee for sautéing
- 1 large onion, finely chopped
- 2 tsp ginger-garlic paste (freshly made if possible)
- 2 medium tomatoes, finely chopped or pureed
- 1 green chili, slit or finely chopped
- 1 tsp cumin seeds
- 1 tsp coriander powder
- 1 tsp garam masala
- 1/2 tsp turmeric powder
- 1/2 tsp red chili powder, adjust to taste
- 1/4 cup green peas (optional, for sweetness and color)
- Salt to taste
- Fresh cilantro, chopped (for garnish)
- Juice of half a lemon (to brighten flavors)
- 1 cup Basmati rice, rinsed and soaked for 30 minutes
- 2 cups water (for rice)
- Whole spices for rice (optional): 2 cardamom pods, 1 small cinnamon stick
Step-by-Step Tips for Achieving Authentic Texture and Taste
- Prepare the base: Heat oil in a heavy-bottomed skillet over medium heat. Add cumin seeds and wait for them to crackle-this releases their essential oils.
- Sauté onions: Add chopped onions and cook until golden brown, about 8-10 minutes, stirring frequently. This caramelization adds natural sweetness and depth.
- Add ginger-garlic paste: Stir in and cook for 2 minutes until fragrant but not burnt. This step ensures your keema has a robust aromatic foundation.
- Introduce tomatoes and spices: Add chopped tomatoes, turmeric, coriander powder, red chili powder, and salt. Cook down until oil separates from the masala, about 8 minutes, stirring occasionally.
- Brown the beef: Crumble the minced beef into the pan, mixing thoroughly. Cook on medium-high heat until meat is no longer pink, breaking lumps with a spatula for even cooking and texture.
- Simmer: Lower heat and add garam masala, green chilies, and peas. Cover and simmer for 10-15 minutes, allowing spices to infuse the beef and moisture to mellow.
- Finish and garnish: Stir in lemon juice and fresh cilantro just before serving for a bright, fresh contrast to the rich meat.
- Cook the rice: Bring 2 cups of water to a boil with optional whole spices. Drain soaked rice and add to boiling water. Cover and simmer on low for 15 minutes or until rice is fluffy and water absorbed. Remove spices before serving.
Prep and Cook Time
- Prep Time: 20 minutes
- Cook Time: 40 minutes
Yield
Serves 4 hearty portions.
Difficulty Level
Medium – ideal for cooks eager to master layering of complex spices and perfect rice techniques.
Chef’s Notes: Tips for Success
- Beef selection: Choose lean minced beef to avoid greasy textures while retaining juiciness. If unavailable, grass-fed beef adds a richer flavor.
- Heat control: Adjust red chili and green chili according to your taste preference. Removing seeds reduces heat.
- Make-ahead: Keema tastes even better the next day after flavors mature. Refrigerate and gently reheat.
- Vegetarian option: Substitute minced beef with minced mushrooms or crumbled paneer for a plant-friendly twist.
- Rice alternatives: Try quinoa or cauliflower rice for a low-carb pairing without sacrificing the dish’s vibrant flavor balance.
Serving Suggestions
Serve your beef keema in rustic bowls alongside fluffy saffron-infused basmati rice. Garnish with a sprinkle of freshly chopped cilantro, a wedge of lemon, and thinly sliced red onions to add freshness and a subtle crunch. Accompany this with a cooling cucumber raita or tangy mango chutney for a meal that dances between spicy, savory, and refreshingly crisp. For a touch of indulgence, a dollop of thick Greek yogurt offsets the warm spices beautifully.

| Nutrient | Per Serving |
|---|---|
| Calories | 480 kcal |
| Protein | 35 g |
| Carbohydrates | 42 g |
| Fat | 18 g |
For more tips on cooking with spices and rice pairings, check out our Mastering Spice Blends guide. To dive deeper into the health benefits of spices used in this recipe, visit Healthline’s authoritative spice guide.
Q&A
Q&A: Savor the Flavors – Ultimate Beef Keema with Rice Recipe
Q1: What makes this beef keema recipe stand out from other versions?
A1: This ultimate beef keema recipe balances bold spices with a rich, hearty texture that melts in your mouth. Unlike simpler recipes, it uses a symphony of aromatic ingredients-cumin, garam masala, fresh ginger, and a hint of garlicky warmth-that elevate the dish from everyday to extraordinary. Paired with perfectly steamed rice, the flavors marry beautifully for a comforting yet exciting meal.
Q2: Can I customize the spice level in this recipe?
A2: Absolutely! One of the beauties of keema is its adaptability. Begin with moderate amounts of chili powder or fresh green chilies and adjust to your taste. If you prefer a milder dish, use smoked paprika instead of chili powder, or skip the chilies altogether. The warmth comes from the spices and aromatics, so you won’t lose depth with a gentler heat.
Q3: What type of rice pairs best with beef keema?
A3: While classic basmati rice is the quintessential match for keema-its long grains and subtle fragrance complement the rich meat-feel free to try jasmine rice for a slightly floral note or even a nutty brown rice for a wholesome twist. The rice acts as a fluffy canvas absorbing the keema’s luscious gravy, making each bite satisfying.
Q4: How can I make this dish more nutritious without sacrificing flavor?
A4: Incorporate veggies like peas, spinach, or finely chopped carrots directly into the keema while it simmers. These not only boost vitamins and fiber but also add layers of texture and sweetness that enhance the overall experience. Using lean ground beef and minimal oil keeps the dish hearty but balanced.
Q5: Is this recipe suitable for meal prepping?
A5: Definitely! Beef keema’s flavors deepen beautifully when refrigerated overnight, making it a perfect candidate for advance cooking. Portion it with rice in airtight containers, and you’ve got a ready-to-go meal that reheats wonderfully without losing its vibrant taste or texture.
Q6: What are some creative serving suggestions for this beef keema?
A6: Serve the keema over rice for the classic experience, or try it as a taco filling topped with fresh cilantro and a squeeze of lime. It also shines stuffed inside pita bread with cooling cucumber raita or dolloped onto crispy naan for an irresistible snack. The possibilities are as rich as the flavors themselves!
Q7: Can I substitute beef with other proteins?
A7: Yes! Ground lamb, chicken, or even turkey work well and bring their own unique tastes. Vegetarian options using crumbled tofu, lentils, or textured vegetable protein are fantastic too, especially when you replicate the spice profile thoughtfully to maintain that signature keema flavor.
Dive in and savor every spoonful of this ultimate beef keema with rice-a dish where tradition meets tantalizing taste!
In Summary
As the final grain of rice meets the last morsel of spiced beef keema on your plate, you’ll realize this recipe is more than just a meal-it’s a celebration of bold flavors and comforting aromas. Whether you’re cooking for a festive gathering or a cozy night in, this ultimate beef keema with rice promises to delight your taste buds and elevate your dinner table. So, gather your spices, embrace the sizzle, and let each bite transport you to a world where tradition meets irresistible taste. Happy savoring!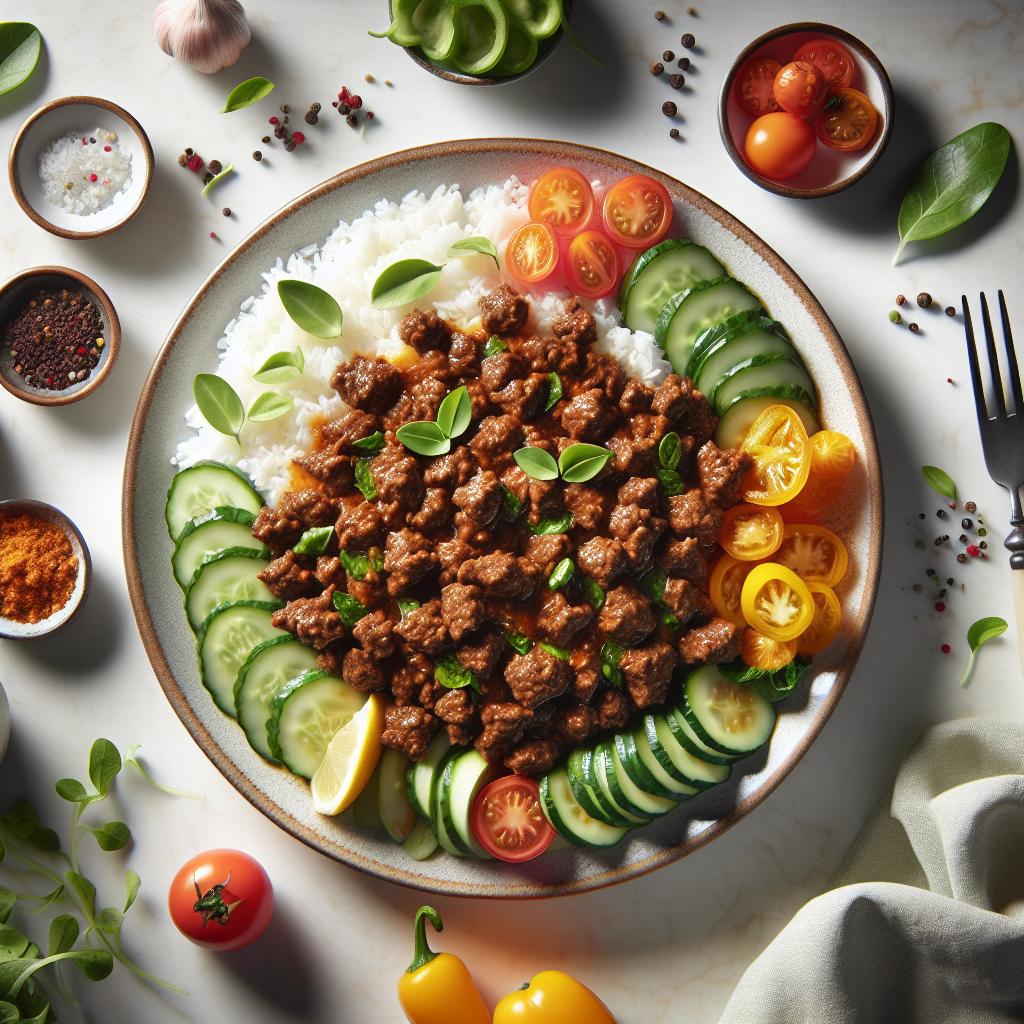
Sweet & Savory baked honey chicken wings have a way of captivating the senses with their perfect harmony of sugary glaze balanced by a tantalizing hint of heat. Whether you’re entertaining friends or indulging in a cozy night in, these wings bring an irresistible combination of flavors that elevate the humble chicken wing to a gourmet treat. Originating from a fusion of Southern-style sweet glazes and Asian-inspired spice blends, this recipe unlocks a whole new world of taste and texture, delivering crispy, juicy wings coated in a luscious honey glaze that dance on your palate.
Prep and Cook Time
- Preparation Time: 15 minutes
- Marinating Time: 1 hour (optional but recommended)
- Cooking Time: 40 minutes
- Total Time: 1 hour 55 minutes
Yield
Serves 4-6 people (approximately 20 wings)
Difficulty Level
Easy to Medium – Perfect for ambitious beginners and weeknight cooks alike
Ingredients
- 2 lbs chicken wings, tips removed and split into drumettes and flats
- 1/4 cup honey (raw or wildflower honey preferred for depth of flavor)
- 3 tbsp soy sauce (low sodium for a balanced saltiness)
- 1 tbsp apple cider vinegar for brightness
- 2 cloves garlic, minced
- 1 tsp smoked paprika to add subtle smokiness
- 1 tsp chili flakes or adjust to taste for gentle heat
- 1/2 tsp freshly ground black pepper
- 1/2 tsp kosher salt
- 2 tbsp olive oil
- 1 tsp cornstarch (optional for extra crispiness)
- Chopped fresh parsley or scallions for garnish
Instructions
- Preheat your oven to 400°F (200°C) and line a large baking tray with parchment paper or a wire rack for even airflow around the wings.
- In a large bowl, combine honey, soy sauce, minced garlic, apple cider vinegar, smoked paprika, chili flakes, salt, and pepper. Whisk until smooth.
- Add the chicken wings to the marinade. Toss thoroughly to coat each piece. For a deeper flavor, cover and refrigerate for at least 1 hour or overnight.
- Optional: For extra crispy skin, sprinkle cornstarch over the wings and toss before baking to create a delicate crust.
- Arrange the wings in a single layer on the prepared tray, ensuring they are spaced evenly. Drizzle the olive oil over the wings to help crisp the skin during baking.
- Bake in the preheated oven for 25 minutes. Then carefully flip the wings and bake for an additional 15 minutes, or until edges are crisp and the internal temperature reaches 165°F (74°C).
- For an irresistible glaze, brush the wings with remaining honey marinade and broil on high for 2-3 minutes, watching closely so they don’t burn but develop a caramelized finish.
- Remove from oven and let rest for 5 minutes. Garnish with fresh parsley or scallions for a pop of color and freshness.
Tips for Success
- Marinating overnight enhances the depth of flavor and tenderizes the wings, but if pressed for time, 30 minutes still packs a punch.
- Using a wire rack inside your baking tray allows heat circulation under the wings, resulting in a crispier texture.
- Don’t crowd the wings-overlapping causes steam, which wilts the skin and prevents crispiness.
- Adjust the spice level by varying the chili flakes or adding a dash of cayenne for a bolder kick.
- Make-ahead suggestion: Cook wings through step 6, cool completely, then refrigerate. Reheat and glaze under the broiler just before serving for fresh-out-of-the-oven taste.
Serving Suggestions
Serve these baked honey chicken wings as the star of your gathering or as a tantalizing appetizer. Pair them with crunchy celery and carrot sticks, alongside a cooling yogurt-based dip or ranch dressing to complement the heat. A sprinkle of toasted sesame seeds and a wedge of lime adds a delightful contrast, enhancing the sweet & savory profile. For a hearty meal, accompany with garlic mashed potatoes or a crisp Asian-style slaw for vibrant texture and balance.
| Nutrient | Per Serving (4 wings) |
|---|---|
| Calories | 280 kcal |
| Protein | 24 g |
| Carbohydrates | 14 g |
| Fat | 12 g |
Discover more crispy baked chicken wing recipes and broaden your wing mastery. For understanding the chemistry behind perfect wing crispiness, Serious Eats’ detailed guide is an essential read.

Q&A
Q&A: Sweet & Savory – The Ultimate Baked Honey Chicken Wings Guide
Q1: What makes baked honey chicken wings the ultimate crowd-pleaser?
A1: Baked honey chicken wings strike the perfect balance between sticky sweetness and savory depth, delivering that irresistible glaze without the oiliness of frying. They’re crispy on the outside, tender and juicy inside, making them a guilt-conscious but utterly delicious favorite for any occasion.
Q2: How do you achieve crispy skin on baked honey chicken wings without deep-frying?
A2: The key lies in a hot oven (around 425°F/220°C) and a light coating of baking powder mixed with your seasoning. Baking powder helps draw out moisture from the skin, enabling maximum crispness. Placing the wings on a wire rack allows hot air to circulate, crisping every nook without sogginess.
Q3: What’s the secret behind the perfect honey glaze?
A3: A harmonious blend of honey, soy sauce, garlic, and a splash of apple cider vinegar or lemon juice creates depth and brightness. The honey provides natural sweetness while the acid balances it, cutting through the richness of the wings. A pinch of chili flakes can add a gentle kick, swirling between sweet and savory sensations.
Q4: Can you customize the flavor profile of honey chicken wings?
A4: Absolutely! The beauty lies in versatility. Swap soy sauce for tamari for a gluten-free twist, add ginger for an Asian zing, or toss in smoky paprika and cayenne for a BBQ-inspired version. Drizzle with fresh herbs like thyme or rosemary before baking for an aromatic punch.
Q5: How long should you bake the wings for optimal texture and flavor?
A5: Typically, 40-45 minutes is ideal, turning halfway through for even crispiness. Start at a higher temperature to crisp the skin, then reduce slightly if they’re browning too fast. Always check internal temperature to ensure they reach 165°F (74°C) for safe eating.
Q6: What sides pair best with sweet and savory baked honey chicken wings?
A6: Crisp veggie sticks like celery and carrot add refreshing crunch, while a creamy dip such as blue cheese or ranch complements the glaze’s sweetness. For heartier fare, roasted potatoes or a tangy coleslaw create a perfect balance of textures and flavors.
Q7: Are baked honey chicken wings suitable for meal prepping?
A7: Yes! These wings reheat beautifully without losing their sticky charm. Store them in an airtight container and refresh in a hot oven or air fryer for a few minutes to revive crispiness. They make for quick lunches, game-day snacks, or dinner star players.
Q8: What makes honey a better choice than sugar or syrup in wing recipes?
A8: Honey offers complex floral notes and a natural viscosity that caramelizes beautifully while imparting subtle depth. Unlike refined sugar, honey contains trace enzymes and minerals, enriching both flavor and nutritional value, making your wings not just tastier, but a bit more wholesome.
Embrace the ultimate harmony of sweet and savory-your baked honey chicken wings journey starts now!
Key Takeaways
As the tantalizing aroma of golden, honey-glazed wings fills your kitchen, you’ve unlocked the perfect harmony of sweet and savory in every bite. Whether you’re hosting a casual get-together or craving a comforting weeknight treat, these baked honey chicken wings offer an irresistible twist that’s both simple and spectacular. Armed with this ultimate guide, you’re now ready to elevate your wing game-no deep fryer needed. So go ahead, savor the sticky sweetness and bold seasonings, and let each wing be a delicious invitation to an unforgettable flavor adventure. Happy baking!
Wholesome & Smooth: The Ultimate Creamy White Chicken Chili Guide invites you into a world where wholesome ingredients create a luxurious, velvety texture balanced with hearty chunks of chicken and beans. This soulwarming chili combines creamy goodness with robust flavors, delivering a satisfying bowl of comfort perfect for any season. Drawing inspiration from Southwestern culinary traditions, this white chicken chili stands apart with its rich, creamy broth enhanced by fresh aromatics, tender chicken, and gentle heat.
Prep and Cook Time
- Preparation: 15 minutes
- Cooking: 40 minutes
- Total Time: 55 minutes
Yield
- Serves 6 generously
Difficulty Level
- Easy to Medium – perfect for home cooks seeking effortless depth of flavor
Ingredients for Wholesome & Smooth White Chicken Chili
- 2 tablespoons olive oil, extra virgin for richness
- 1 medium yellow onion, finely diced
- 3 cloves garlic, minced
- 2 jalapeño peppers, seeded and finely chopped (adjust for heat preference)
- 1 1/2 teaspoons ground cumin, toasted for enhanced aroma
- 1 teaspoon dried oregano
- 1/2 teaspoon smoked paprika, adds subtle smokiness
- 4 cups low-sodium chicken broth, homemade or high-quality store-bought
- 2 (15-ounce) cans white beans (cannellini or great northern), drained and rinsed
- 2 cups cooked white chicken breast, shredded or diced
- 1 cup crème fraîche or sour cream, for the signature creaminess
- 1/4 cup all-purpose flour, sifted for thickening
- 1 cup sharp white cheddar cheese, shredded (optional for extra creaminess)
- Fresh lime juice, from 1 lime
- Salt and freshly ground black pepper, to taste
- Fresh cilantro, chopped, for garnish
- Optional toppings: diced avocado, sliced green onions, tortilla strips
Step-by-Step Instructions for an Irresistibly Creamy White Chicken Chili
- Heat olive oil in a large Dutch oven or deep skillet over medium heat. Add the diced onion and sauté until translucent and slightly golden, about 5 minutes. Stir occasionally to ensure even cooking without browning.
- Add minced garlic and chopped jalapeños. Cook for another 1-2 minutes until fragrant, careful not to burn the garlic.
- Sprinkle cumin, oregano, and smoked paprika over the mixture. Toast the spices gently for 30 seconds to unleash their aromatic oils.
- Stir in the flour to create a roux, cooking for 2 minutes while stirring constantly. This will give the chili its indulgent, creamy texture without using heavy cream.
- Slowly pour in the chicken broth while whisking the roux to prevent lumps. Bring the mixture to a gentle simmer and cook until it slightly thickens, about 8-10 minutes.
- Add white beans and shredded chicken. Simmer for 15 minutes, allowing all flavors to meld and the chicken to soak up the spiced broth.
- Reduce heat to low and gently fold in the crème fraîche or sour cream, stirring carefully until smooth and fully incorporated without breaking the texture.
- Season generously with salt, pepper, and fresh lime juice to brighten the flavors. Taste and adjust seasoning as needed to balance the creaminess and spice.
- If desired, stir in the shredded cheddar cheese for an extra creamy layer. Melt completely before serving.
Tips for Success: Elevate Your White Chicken Chili
- For a deeper flavor, toast your spices in a dry pan before adding to the chili.
- Use shredded rotisserie chicken for a quick shortcut without compromising flavor.
- To ensure your chili remains creamy and smooth, add the crème fraîche at the very end off the heat to avoid curdling.
- For a lighter version, substitute Greek yogurt for crème fraîche; add just before serving.
- Make-ahead tip: This chili tastes even better the next day after the flavors have fully developed. Store in an airtight container in the refrigerator for up to 3 days.
- Adjust thickness by adding more broth if the chili becomes too thick when reheated.
Serving Suggestions to Impress
Serve this creamy white chicken chili steaming hot in rustic bowls with a sprinkle of fresh cilantro and a few squeezes of lime for a refreshing finish. Crisp tortilla strips or crumbled tortilla chips add delightful texture against the creamy base. For added richness, top with diced avocado and a scattering of sliced green onions. A mild shredded cheese or dollop of sour cream on top will elevate the warmth and creaminess even further. Pair with warm cornbread or a simple green salad to make it a complete, nourishing meal.
| Nutrient | Per Serving |
|---|---|
| Calories | 350 kcal |
| Protein | 32 g |
| Carbohydrates | 28 g |
| Fat | 12 g |

Discover more hearty and wholesome recipes to complement your kitchen repertoire in our Healthy Chicken Recipes collection. For additional ingredient insights and cooking science, explore Serious Eats, a trusted gastronomic resource.
Q&A
Q&A for “Wholesome & Smooth: The Ultimate Creamy White Chicken Chili Guide”
Q1: What makes white chicken chili different from traditional chili?
A: Unlike traditional red chili, white chicken chili features a creamy, mild base made with white beans, chicken, and often green chilies or poblano peppers. It’s lighter in color and flavor but no less hearty – perfect for those who crave warmth without the intense heat.
Q2: How do you achieve that perfectly creamy texture in white chicken chili?
A: The secret lies in slow cooking the beans until tender and then blending part of the mixture to create a smooth, velvety consistency. Adding ingredients like cream cheese, Greek yogurt, or a touch of milk can also enhance the luscious creaminess without overpowering the delicate flavors.
Q3: Can I make white chicken chili ahead of time?
A: Absolutely! White chicken chili tastes even better the next day, as the flavors meld beautifully overnight. Simply store it in an airtight container in the fridge and reheat gently before serving. It’s a wholesome meal waiting to warm your soul on busy days.
Q4: What are some creative toppings to elevate white chicken chili?
A: Let your imagination run wild! Classic toppings include shredded Monterey Jack cheese, fresh cilantro, lime wedges, avocado slices, and crunchy tortilla strips. For an extra punch, a drizzle of chipotle crema or a sprinkle of smoked paprika can add exciting depth.
Q5: Is white chicken chili healthy?
A: Yes, it can be! Packed with lean protein from chicken and fiber from white beans, it’s a balanced meal that keeps you full and satisfied. Using low-fat dairy or dairy alternatives and reducing sodium can make it even more wholesome without sacrificing flavor.
Q6: Can I substitute ingredients to suit dietary preferences?
A: Definitely! For a dairy-free version, swap cream cheese with coconut cream. Vegetarians can replace chicken with hearty mushrooms or tofu and use veggie broth instead of chicken stock. The beauty of white chicken chili is its versatility – feel free to tailor it to your needs!
Q7: What pairs well with creamy white chicken chili?
A: Cornbread, tortilla chips, or a simple green salad complement the chili wonderfully. A crisp, citrusy drink like lime-infused sparkling water or a zesty margarita can also brighten the meal and balance the creaminess.
Q8: Any tips for making white chicken chili in a slow cooker?
A: Layer ingredients starting with beans and broth on the bottom, then chicken and seasonings on top to ensure even cooking. Avoid adding cream or milk at the beginning – stir them in near the end to prevent curdling. Slow cooking yields a deliciously tender, harmonious dish with minimal hands-on time.
Q9: How spicy is white chicken chili typically?
A: It’s generally mild and creamy but can be adjusted to your spice tolerance. Use mild green chilies for gentle warmth or add jalapeños and cayenne if you want a fiery kick. The creamy base helps mellow the spice, making it a crowd-pleaser for many tastes.
Q10: Why should I try making white chicken chili at home?
A: Because it’s comfort in a bowl – creamy, nourishing, and endlessly adaptable. Making it at home lets you control ingredients, texture, and spice levels, crafting a dish that’s perfect for family dinners or cozy solo nights. Plus, it’s a delicious way to explore a different spin on a classic favorite!
Final Thoughts
As the comforting aroma of creamy white chicken chili fills your kitchen, you’ve unlocked a world where wholesome meets smooth in every luscious bite. This guide has been your trusted companion on a flavorful journey, blending tender chicken, velvety cream, and subtle spices into a harmonious bowl of warmth. Whether you’re serving up a weeknight dinner or impressing guests with soul-soothing sophistication, this ultimate recipe proves that comfort food can be both nourishing and indulgently smooth. So grab your favorite toppings, dig in, and savor the satisfying simplicity of white chicken chili-because sometimes, the most delightful meals are the ones that wrap you in a creamy embrace. Happy cooking!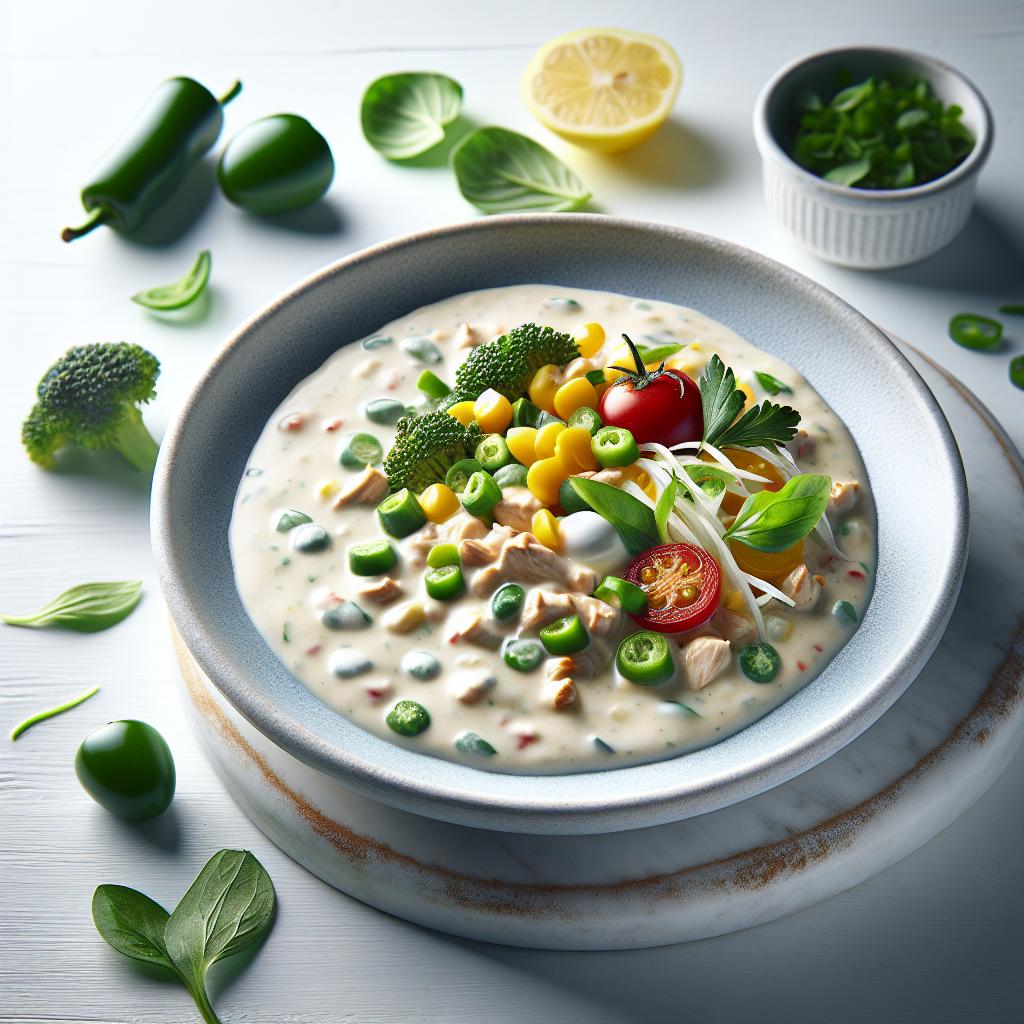
Savor the Flavor: Ultimate Guide to Teriyaki Beef Bowls brings the exquisite balance of sweet, savory, and umami directly to your kitchen. Teriyaki beef bowls hail from Japanese comfort cuisine but have become a global favorite for their rich, caramelized sauce paired with tender beef and fresh vegetables. Whether this is your first time crafting homemade teriyaki sauce or you want to elevate your bowl with expert technique, this guide will inspire confidence and delight in each bite.
Prep and Cook Time
- Preparation: 15 minutes
- Cooking: 20 minutes
- Total: 35 minutes
Yield
Serves 4 hearty bowls
Difficulty Level
Easy to Medium – perfect for aspiring home chefs
Ingredients
- 500g flank steak, thinly sliced against the grain
- 1/2 cup soy sauce (use low sodium for balanced saltiness)
- 1/4 cup mirin (Japanese sweet rice wine substitute: sweet cooking sake)
- 3 tbsp brown sugar, packed
- 2 tbsp fresh ginger, finely grated
- 3 cloves garlic, minced
- 1 tbsp sesame oil
- 1 tbsp cornstarch mixed with 2 tbsp cold water (slurry)
- 2 cups cooked jasmine or short-grain rice
- 1 cup baby spinach
- 1 medium carrot, julienned
- 2 scallions, thinly sliced for garnish
- 1 tbsp toasted sesame seeds
Instructions
- Prepare the teriyaki sauce: In a small saucepan over medium heat, combine soy sauce, mirin, brown sugar, ginger, and garlic. Stir until the sugar dissolves, then simmer gently for 5-7 minutes until slightly thickened.
- Thicken the sauce: Whisk in the cornstarch slurry and continue cooking for another 2 minutes until glossy and coats the back of a spoon. Remove from heat and set aside.
- Sear the beef: Heat sesame oil in a large skillet or wok over high heat. Add the sliced flank steak in a single layer, searing until browned but still tender, about 2-3 minutes per side depending on thickness. Avoid overcrowding the pan – work in batches if needed.
- Combine beef and sauce: Lower heat to medium and pour the prepared teriyaki sauce over the beef, tossing gently to coat each piece generously and heat through for a minute.
- Prepare vegetables: Quickly sauté the baby spinach and carrots in a separate pan for 1-2 minutes until just tender but still vibrant. Season lightly with salt if desired.
- Assemble the bowl: Spoon jasmine rice into individual bowls, top with the teriyaki-glazed beef and a nest of sautéed vegetables.
- Garnish: Sprinkle sliced scallions and toasted sesame seeds over the top for texture and bright bursts of flavor.
Chef’s Notes
- Flank steak is ideal for its flavor and texture but can be swapped with sirloin or ribeye for a juicier option.
- To inject extra depth, marinate the beef for 30 minutes in half of the teriyaki sauce before cooking.
- For a gluten-free version, substitute soy sauce with tamari.
- Reserve a tablespoon of mirin to drizzle on the final bowl for authentic aromatic sweetness.
- Make the sauce in advance and refrigerate for up to 3 days; gently reheat before combining with beef.
Serving Suggestions
Serve your teriyaki beef bowl immediately for best textures: glossy, sticky sauce hugging tender beef on steaming rice. Accompany with pickled ginger or kimchi for tang and a refreshing contrast. A side of steamed edamame or a refreshing cucumber salad complements the bowl’s richness perfectly. For an elegant touch, drizzle with a few drops of chili oil or scatter finely chopped fresh cilantro to brighten the plate.
| Nutrient | Per Serving |
|---|---|
| Calories | 420 kcal |
| Protein | 38 g |
| Carbohydrates | 35 g |
| Fat | 12 g |

Looking to expand your Asian-inspired flavors? Check out our Ultimate Guide to Chicken Teriyaki for another delicious variation. For a deep dive into Japanese ingredients, visit Japanese Cooking 101.
Q&A
Q&A: Savor the Flavor – Ultimate Guide to Teriyaki Beef Bowls
Q1: What makes a teriyaki beef bowl so special compared to other beef dishes?
A1: Teriyaki beef bowls are a harmonious blend of tender, savory-sweet beef glazed with that iconic teriyaki sauce, served over a bed of fluffy rice. The magic lies in the balance of flavors-umami-rich soy, sugary mirin, and a hint of ginger-creating a comfort dish that feels both indulgent and fresh. It’s the perfect marriage of Japanese technique with everyday simplicity.
Q2: What’s the secret to making teriyaki sauce truly authentic?
A2: For genuine teriyaki sauce, it’s all about quality ingredients and slow caramelization. Use a good soy sauce, fresh mirin or a sweet rice wine, sake if you can, and some brown sugar to sweeten. Simmer gently until thickened, so each bite of beef is coated in a luscious glaze that sings with balanced sweetness and savory depth.
Q3: How should the beef be prepared to maximize flavor and texture?
A3: Choosing the right cut-like skirt steak or ribeye-makes a big difference. Thinly slice the beef against the grain for tenderness. Marinate it briefly in the teriyaki sauce to infuse every morsel. Then, high-heat cooking-whether on a grill or skillet-seals in the juices and caramelizes the marinade, giving the beef that irresistible charred glaze.
Q4: What are some recommended toppings to elevate a teriyaki beef bowl?
A4: Think beyond the basics! Add crunchy scallions, toasted sesame seeds for nuttiness, and pickled ginger for a zingy contrast. A soft-poached egg or a handful of steamed broccoli brings lush texture and color, turning your bowl into a vibrant symphony of taste and nutrients.
Q5: Can teriyaki beef bowls be adapted for different dietary preferences?
A5: Absolutely! For a gluten-free twist, swap traditional soy sauce with tamari. Vegetarians can replace beef with marinated tofu or hearty mushrooms, still bathed in that luscious teriyaki glaze. And for lower-carb options, try cauliflower rice instead of white rice to keep things light without sacrificing flavor.
Q6: What sides or drinks pair best with teriyaki beef bowls?
A6: Crisp, refreshing cucumber salad or miso soup make excellent accompaniments. For drinks, green tea’s earthy notes or a chilled sake perfectly complement the richness of teriyaki beef, enhancing the dining experience without overpowering the dish.
Q7: How can beginners simplify the recipe without losing the essence of the dish?
A7: Start with a pre-made teriyaki sauce from a reputable brand and a tender cut of beef that’s easy to cook, like sirloin strips. Cook the beef on medium-high heat for just a few minutes, then pour on the sauce to thicken quickly. Serve over steamed rice and garnish with scallions. Simple, quick, and delicious. As you gain confidence, experiment with homemade sauces and fresh toppings!
Discovering the soul of teriyaki beef bowls is about savoring every step-from selecting ingredients to plating your creation. Whether you’re a seasoned chef or a curious kitchen explorer, this guide helps you unlock the rich flavors and comforting charm of one of Japan’s favorite dishes. Happy cooking!
The Conclusion
As the savory aroma of teriyaki beef bowls lingers in your kitchen memories, you now hold the ultimate recipe to recreate this delicious harmony of flavors anytime you desire. From tender, marinated beef glazed in sweet and tangy teriyaki sauce to perfectly steamed rice and vibrant vegetable accompaniments, each element plays its part in crafting a bowl of comfort and delight. Whether you’re a seasoned home cook or a curious foodie, savoring the flavors of this classic dish is more than just a meal-it’s an experience that brings warmth and satisfaction to your table. So go ahead, gather your ingredients, and let the rich, glossy essence of teriyaki transport your taste buds on a delightful journey. Your perfect beef bowl awaits.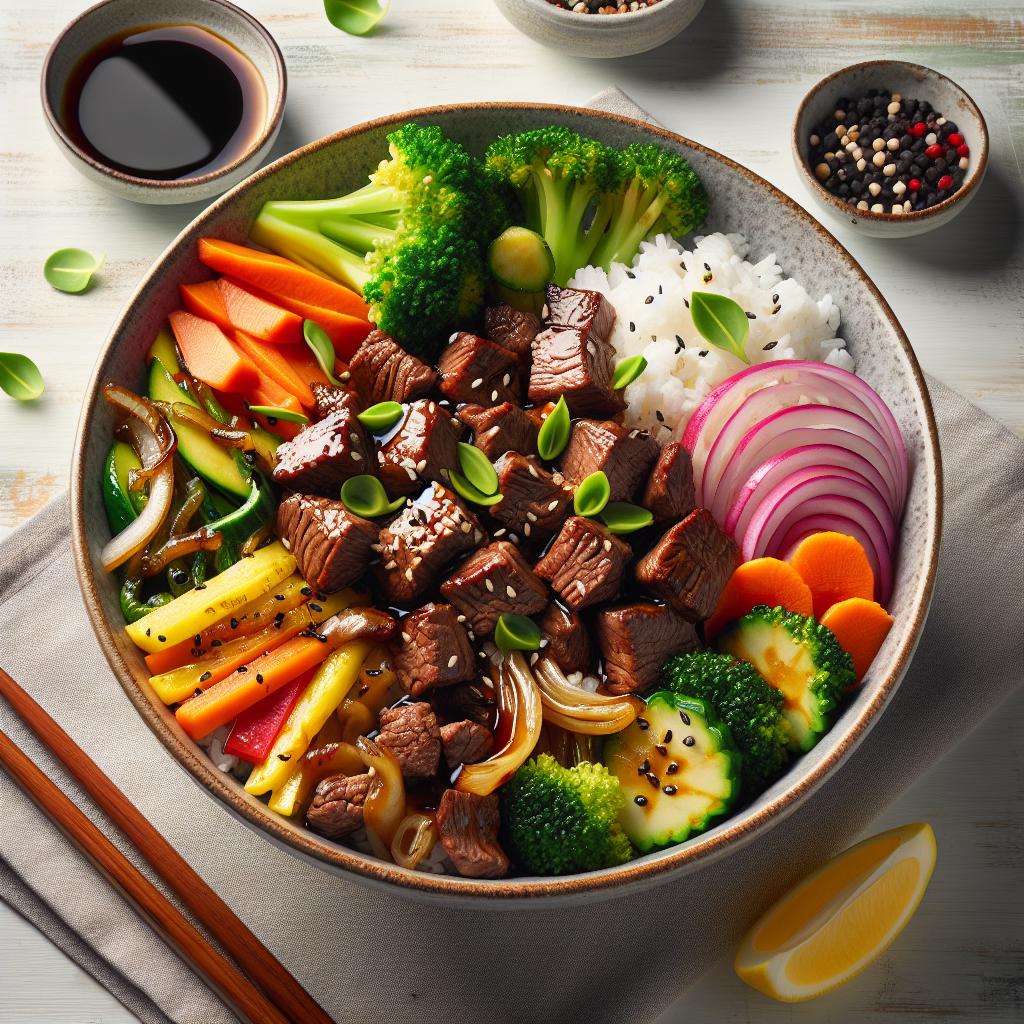
Savor the Flavors: Ultimate Guide to Chicken Souvlaki Pita
Savor the flavors of the Mediterranean with chicken souvlaki pita, a celebrated Greek street food that brings vibrant, fresh tastes right to your kitchen table. This dish combines tender, marinated chicken grilled to perfection, paired with fluffy pita bread and crisp, colorful toppings-a harmony of textures and tastes inspired by warm island breezes and lively coastal markets. Whether you’re new to Greek cuisine or searching to elevate your grilling game, mastering these essential components will help you craft an unforgettable meal.
Prep and Cook Time
- Prep Time: 20 minutes (plus 2 hours marinating)
- Cook Time: 15 minutes
- Total Time: 2 hours 35 minutes
Yield
Serves 4 generously filled pita sandwiches
Difficulty Level
Medium – Ideal for home cooks ready to embrace grilling techniques and layered flavor building
Ingredients
- For the Chicken Marinade:
- 1.5 lbs boneless, skinless chicken thighs, cut into 1-inch cubes
- 3 tbsp extra virgin olive oil
- 3 tbsp freshly squeezed lemon juice
- 4 garlic cloves, minced
- 1 tbsp dried oregano
- 1 tsp smoked paprika
- 1 tsp sea salt
- ½ tsp freshly cracked black pepper
- 1 tsp honey or agave syrup (optional, for subtle sweetness)
- For the Pita and Toppings:
- 4 large Greek-style pita breads
- 1 cup diced cucumber
- 1 cup halved cherry tomatoes
- ¼ cup thinly sliced red onion
- ½ cup chopped fresh parsley
- ½ cup crumbled feta cheese (optional)
- Fresh lemon wedges, for garnish
- For the Traditional Tzatziki Sauce:
- 1 cup Greek yogurt, strained
- ½ cucumber, grated and drained
- 2 garlic cloves, finely minced
- 1 tbsp fresh dill, chopped
- 1 tbsp fresh lemon juice
- Salt and pepper, to taste
- Prepare the Chicken Marinade: In a large bowl, whisk together olive oil, lemon juice, garlic, oregano, smoked paprika, salt, pepper, and honey. Add the cubed chicken and toss to coat evenly. Cover and refrigerate for at least 2 hours, allowing the flavors to infuse deeply into the meat.
- Make the Tzatziki Sauce: In a separate bowl, combine Greek yogurt, drained grated cucumber, garlic, dill, and lemon juice. Stir well and season with salt and pepper as needed. Chill until ready to serve, letting the flavors meld.
- Preheat and Prepare Grill: Heat your grill to medium-high. Oil the grates lightly to prevent sticking and ensure those classic char marks.
- Grill the Chicken: Thread the marinated chicken cubes onto skewers, leaving a small gap between each piece for even cooking. Grill 3-4 minutes per side or until the internal temperature reaches 165°F (75°C). Monitor closely to keep the chicken juicy and develop a beautiful caramelized crust.
- Warm the Pita Bread: Just before the chicken is done, place pita breads on the grill for 1-2 minutes, flipping once, until they are pliable and lightly toasted.
- Assemble the Souvlaki Pita: Spread a generous spoonful of tzatziki on each pita. Layer grilled chicken, chopped cucumber, cherry tomatoes, red onion, parsley, and a sprinkle of feta if using. Garnish with a squeeze of fresh lemon juice.
- Serve immediately for the best contrast of warm, smoky meat and cool, creamy sauce.
- For the most tender chicken, opt for thighs instead of breast, which stay juicy when grilled.
- If you don’t have skewers, grill the chicken cubes loose in a grill basket, turning frequently.
- To avoid soggy pita, serve toppings and sauces on the side if preparing ahead, letting guests build their own.
- Experiment with fresh herbs like mint or oregano in your tzatziki to customize flavors.
- Leftover chicken is perfect chopped into a salad or as a protein-packed pita topping the next day.
Instructions
Tips for Success
Serving Suggestions
Present your chicken souvlaki pita wrapped lightly in parchment paper or traditional grape leaves for authentic flair. Serve alongside Greek lemon potatoes or a light tabbouleh salad for balanced sides. Garnish plates with vibrant edible flowers or fresh herbs to enhance the Mediterranean feel. A cold glass of sparkling water with a lemon wedge complements these bold, bright flavors beautifully.
| Nutrition per Serving | Calories | Protein | Carbs | Fat |
|---|---|---|---|---|
| Chicken Souvlaki Pita | 450 kcal | 38g | 30g | 18g |

For further inspiration on Greek culinary classics, explore our in-depth guide on Fresh and Flavorful Greek Salads. Also, learn more about the health benefits of olive oil at the Olive Oil Source.
Q&A
Q&A: Savor the Flavors – Ultimate Guide to Chicken Souvlaki Pita
Q1: What is Chicken Souvlaki Pita?
A: Chicken Souvlaki Pita is a delicious Greek street food classic featuring tender, marinated chicken pieces grilled to perfection, tucked inside a soft pita bread, and topped with fresh veggies and creamy tzatziki sauce. It’s a handheld flavor explosion with roots in ancient Mediterranean traditions!
Q2: What makes chicken souvlaki different from other grilled chicken dishes?
A: Unlike typical grilled chicken, souvlaki is marinated in a vibrant blend of herbs, lemon juice, garlic, and olive oil, infusing each bite with a Mediterranean sun-kissed zest. The grilling method adds a smoky char, while the pita and tzatziki create the perfect balance of texture and flavor.
Q3: How do you properly marinate chicken for souvlaki?
A: The secret is in the marinade! Combine olive oil, fresh lemon juice, garlic, oregano, salt, pepper, and a touch of smoked paprika. Let the chicken pieces soak up this mixture for at least 2 hours, or overnight if you want that deeper, more aromatic punch.
Q4: What vegetables and toppings traditionally accompany chicken souvlaki pita?
A: The classics include crisp tomatoes, thinly sliced onions, crunchy cucumbers, and sometimes fresh parsley. These fresh, vibrant toppings add refreshing contrast to the warm spiced chicken and creamy tzatziki.
Q5: Can I make tzatziki sauce at home?
A: Absolutely! Homemade tzatziki is fresh, tangy, and so worth the effort. Combine Greek yogurt, grated cucumber (squeezed to remove excess water), minced garlic, lemon juice, dill, olive oil, and a pinch of salt. Chill it for a couple of hours to let the flavors meld beautifully.
Q6: What’s the best way to grill the chicken for souvlaki?
A: Use skewers! Thread marinated chicken cubes onto metal or soaked wooden skewers and grill over medium-high heat for about 10-12 minutes, turning occasionally. The skewers help achieve even cooking and those signature grill marks.
Q7: How do you assemble the perfect chicken souvlaki pita?
A: Warm the pita bread until soft and pliable. Load it with a generous portion of grilled chicken, then pile on fresh veggies. Dollop plenty of tzatziki and finish with a sprinkle of fresh herbs or a squeeze of lemon for brightness.
Q8: Are there any variations of chicken souvlaki pita I can try?
A: Definitely! Try swapping the chicken for lamb or pork, adding pickled peppers, or even tossing in some feta cheese for extra tang. For a healthier twist, swap pita for lettuce wraps or whole wheat flatbreads.
Q9: What sides complement chicken souvlaki pita?
A: Traditional sides include Greek lemon potatoes, a simple village salad (horiatiki), or crispy fried zucchini. Light wines like Assyrtiko or a cold Mythos beer also pair beautifully with this meal.
Q10: Why should chicken souvlaki pita be on my must-try food list?
A: Because it’s a perfect marriage of juicy, smoky grilled meat, fresh vegetables, tangy sauces, and soft bread – a little bite of Greece that’s simple, soulful, and utterly satisfying. Whether for a quick lunch or festive gathering, it’s a crowd-pleaser worth savoring!
In Retrospect
As you take your final bite of this crispy, juicy chicken souvlaki pita, let the medley of vibrant flavors linger-a testament to the rich culinary heritage that has made this dish a timeless favorite. From the smoky char of the grilled chicken to the tangy kiss of tzatziki, every element plays its part in a harmonious dance of taste and texture. Whether you’re a seasoned foodie or a curious home cook, this ultimate guide has hopefully sparked your passion to recreate and savor the magic of chicken souvlaki pita in your own kitchen. So, go ahead-embrace the blend of simplicity and boldness, and let every bite transport you straight to the sunny streets of Greece. Your next unforgettable meal awaits!
Harvest Glow: Selecting the Perfect Sweet Potatoes for Maximum Flavor
When it comes to crafting a show-stopping roasted sweet potato salad, the secret truly begins at the source. The right sweet potatoes can transform this humble root into a glowing centerpiece bursting with caramelized sunshine. For vibrant flavor, seek out sweet potatoes with firm, smooth skin that feels heavy for their size-this signals dense flesh packed with natural sugars ready to roast into golden perfection. Avoid any with soft spots or cracks that hint at age or dryness, as freshness is key to unlocking that coveted melt-in-your-mouth sweetness.
Prep and Cook Time
- Preparation: 15 minutes
- Roasting: 30-35 minutes
- Total: 50 minutes
Yield
Serves 4-6 as a vibrant, flavorful side or light main dish.
Difficulty Level
Easy – Perfect for all skill levels, with room to personalize your flavors.
Ingredients
- 4 medium sweet potatoes (about 2 pounds), peeled and cut into 1-inch cubes
- 3 tablespoons extra-virgin olive oil
- 1 teaspoon smoked paprika
- 1 teaspoon sea salt
- ½ teaspoon freshly ground black pepper
- 1 cup cooked quinoa (optional, for added texture)
- 1/2 cup toasted pecans
- 1 small red onion, thinly sliced
- 1/2 cup dried cranberries
- 2 cups baby arugula
Instructions: Mastering the Art of Roasting for a Caramelized Crust
- Preheat your oven to 425°F (220°C). High heat encourages caramelization without steaming the sweet potatoes.
- Toss the cubed sweet potatoes with olive oil, smoked paprika, salt, and pepper in a large mixing bowl until each piece glistens evenly.
- Arrange sweet potatoes in a single layer on a rimmed baking sheet lined with parchment paper or a silicone mat to prevent sticking and promote even browning.
- Roast for 30-35 minutes, gently flipping with a spatula halfway through. Look for a deeply caramelized, golden crust with tender interiors.
- Remove from the oven and let cool slightly. This step enhances texture and helps sweet potatoes cling to the dressing flavors.
- In a large bowl, combine quinoa, toasted pecans, red onion, dried cranberries, and arugula. Add the roasted sweet potatoes last to preserve their crisp edges.
Creative Ingredient Pairings to Elevate Your Sweet Potato Salad
Bringing textural contrast and complementary flavors heightens every bite of this Harvest Glow creation. The smoky paprika and caramelized crisp of the sweet potatoes find perfect balance with the peppery arugula, while toasted pecans introduce satisfying crunch. Dried cranberries offer mouthwatering bursts of tart sweetness that brighten the dish. Adding quinoa provides a gentle nuttiness and makes the salad nourishing and hearty. Feel free to experiment with fresh herbs like thyme or rosemary for a rustic twist.
Dressing Decisions That Balance Sweetness and Tang
The dressing plays a starring role, harmonizing the sweet potatoes’ natural sugars with vibrant acidity. A simple vinaigrette crafted from fresh lemon juice, honey, Dijon mustard, and extra-virgin olive oil delivers the ideal balance. The lemon creates a crisp tang cutting through richness, while honey amplifies the caramel notes naturally found in roasted sweet potatoes. Dijon mustard adds subtle zing and smooths the flavors into a cohesive whole.
- 3 tablespoons extra-virgin olive oil
- 1 ½ tablespoons fresh lemon juice
- 1 teaspoon honey
- 1 teaspoon Dijon mustard
- Salt and pepper, to taste
Whisk these ingredients vigorously until emulsified, then gently fold into the salad just before serving for a luminous and balanced final result.
Chef’s Notes for Flawless Harvest Glow Sweet Potato Salad
- Sweet potato variety: Garnet or Jewel varieties work wonderfully for roasting, thanks to their deep sweetness and creamy texture.
- Ingredient swaps: Substitute toasted walnuts or pumpkin seeds for pecans, or swap dried cranberries with tart cherries or chopped dried apricots.
- Make-ahead tip: Roast sweet potatoes a day in advance, store tightly covered, and assemble just before serving for ease.
- Roasting tip: Avoid crowding the pan to prevent steaming; if needed, roast in two batches for perfect caramelization.
- Vegan option: Replace honey with maple syrup for a plant-based dressing.
Serving Suggestions
This salad shines as a vibrant side for autumn gatherings or a hearty, healthy lunch. Serve atop a rustic wooden platter, garnished with a sprinkle of fresh chopped parsley or cilantro for a burst of green freshness. Pair with warm, crusty bread or grilled seasonal vegetables to complete a soul-warming meal that celebrates the colors and flavors of harvest season.

| Nutrient | Per Serving |
|---|---|
| Calories | 310 |
| Protein | 6g |
| Carbohydrates | 45g |
| Fat | 12g |
Explore more vibrant salads in our Seasonal Harvest Salad Collection and for tips on pairing ingredients for autumn dishes visit WHFoods Sweet Potato Nutrition.
Q&A
Q&A: Harvest Glow – The Ultimate Roasted Sweet Potato Salad Guide
Q1: What makes roasted sweet potatoes the star ingredient in this salad?
A1: Roasted sweet potatoes bring a radiant caramelized sweetness and tender texture that act as the glowing heart of the salad. Their natural sugars intensify with roasting, creating a warm, earthy foundation that pairs beautifully with crisp greens and tangy dressings.
Q2: Which varieties of sweet potatoes work best for roasting?
A2: While all sweet potatoes roast beautifully, the classic orange-fleshed varieties shine brightest for this salad. Their vibrant color adds visual warmth, and their creamy flesh achieves a perfect balance of soft and slightly crispy edges when roasted.
Q3: How do I achieve that perfect roasted texture?
A3: For that golden, slightly crisp exterior with a melt-in-your-mouth center, roast sweet potato chunks at around 425°F (220°C) on a single layer. Tossing them in olive oil, a sprinkle of salt, and warming spices like smoked paprika or cinnamon before roasting enhances both texture and flavor.
Q4: What flavor profiles complement roasted sweet potatoes in this salad?
A4: Think a symphony of sweet, tangy, and savory. Ingredients like tart cranberries or pomegranate seeds, creamy goat cheese or feta, crunchy toasted pecans or pumpkin seeds, and a zesty citrus vinaigrette all dance in harmony with the mellow sweetness of the potatoes.
Q5: Can this salad be made ahead of time?
A5: Absolutely! Roast your sweet potatoes in advance and store them separately. Assemble the salad just before serving to keep the greens crisp. The flavors meld beautifully when the roasted potatoes warm the toppings slightly, creating a cozy, harvest-inspired dish.
Q6: Is this salad suitable for special diets?
A6: With simple swaps, yes! It’s naturally gluten-free and can easily be made vegan by skipping the cheese or replacing it with a plant-based alternative. The nutrient-rich sweet potatoes and wholesome mix-ins make it a nourishing choice for many dietary preferences.
Q7: What occasions is the Harvest Glow salad perfect for?
A7: From festive fall gatherings to light weeknight dinners, this salad’s vibrant colors and heartwarming flavors make it a versatile crowd-pleaser. It’s an inviting side or a satisfying main that embodies the cozy spirit of the harvest season.
Let Harvest Glow guide you on a culinary journey where sweet potatoes transform into a radiant celebration of autumn’s bounty!
The Conclusion
As the final leaves of autumn flutter down and the harvest season reaches its peak, there’s no better time to embrace the warm, earthy magic of roasted sweet potatoes. With their caramelized edges and tender, buttery interiors, they transform any salad into a vibrant celebration of fall’s bounty. Whether you’re a seasoned salad artist or a curious kitchen adventurer, the secrets within this guide will help you craft your very own Harvest Glow-a dish that’s as comforting as a crisp autumn breeze and as dazzling as the season’s golden light. So gather your ingredients, turn up the oven, and let the sweet potato’s glow brighten your table and nourish your soul all season long.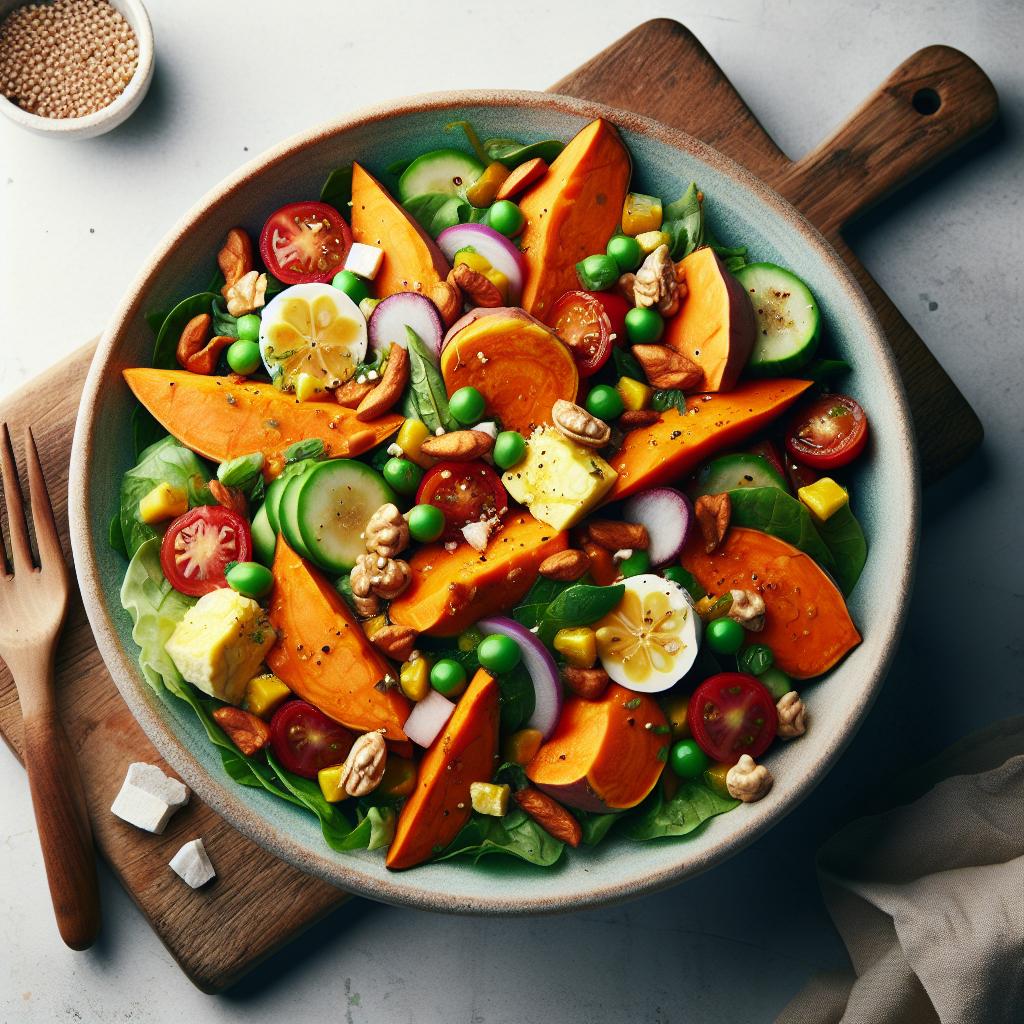
Crisp & Flavorful Roasted Cauliflower Salad: Mastering Texture and Taste
Crisp & Flavorful roasted cauliflower salad is not just a dish; it’s a celebration of texture and vibrant taste, an art form that transforms humble florets into a golden, crunchy masterpiece. Rooted in simple, rustic cooking traditions yet elevated by modern culinary creativity, this dish invites you into a world of richly spiced, perfectly crisped cauliflower balanced with the fresh brightness of herbs and dressings. The secret lies in executing the roast with precision and pairing ingredients that enhance-not overpower-the naturally sweet, nutty notes of cauliflower.
Prep and Cook Time
- Preparation: 15 minutes
- Roasting: 30-35 minutes
- Total Time: 45-50 minutes
Yield
Serves 4 as a hearty side or light main course.
Difficulty Level
Easy to Medium – perfect for home cooks eager to impress with minimal fuss.
Ingredients
- 1 large head cauliflower, cut into medium florets
- 3 tbsp extra-virgin olive oil
- 1 tsp smoked paprika
- 1/2 tsp ground cumin
- 1/2 tsp garlic powder
- Salt and freshly ground black pepper, to taste
- 1/4 cup fresh parsley, finely chopped
- 2 tbsp fresh mint leaves, torn
- 1/4 cup toasted pine nuts or slivered almonds
- Juice of 1 lemon
- 1 tbsp honey or maple syrup (optional, for balance)
- 2 tbsp tahini or Greek yogurt for dressing
- 1 small shallot, finely minced
Instructions
- Preheat your oven to 425°F (220°C). This higher heat is crucial for developing maximum crispness on your cauliflower.
- Prepare the cauliflower florets: Spread the cut florets in a single layer on a large rimmed baking sheet lined with parchment paper for easy cleanup.
- Toss with olive oil, smoked paprika, cumin, garlic powder, salt, and black pepper. Ensure each floret is evenly coated-this spice blend will create a deeply aromatic crust.
- Arrange florets with some space between them. Overcrowding will trap steam and prevent crispness. Roasting in a hot oven for 30-35 minutes, turning halfway, helps them roast evenly and develop golden edges.
- Prepare the dressing: In a bowl, whisk together lemon juice, honey or maple syrup, tahini (or Greek yogurt), minced shallot, and a pinch of salt until smooth and tangy.
- Once the cauliflower is deeply golden and tender, remove from the oven and let cool slightly. Toss florets gently with the lemon-herb dressing.
- Finish by folding in fresh parsley, mint, and toasted pine nuts. These elements add fresh aroma, crunchy texture, and a nutty counterpoint to the warm spices and roasted flavor.
- Serve immediately for best texture, garnished with a sprinkle of additional fresh herbs and a light drizzle of olive oil.
Tips for Success and Meal Prep
- Maximizing crispness: Pat cauliflower dry before tossing with oil and spices to avoid steaming.
- Herbs: Add fresh herbs just before serving to preserve their vibrant flavor and color.
- Make-ahead: Roast cauliflower up to 24 hours in advance and store airtight in the fridge. Reheat in a hot oven at 400°F (200°C) for 5-7 minutes to restore crisp edges.
- Dressing variations: Swap tahini for a tangy yogurt-based dressing or a zesty citrus vinaigrette depending on mood and season.
- Ingredient swaps: Swap pine nuts with toasted walnuts or pumpkin seeds for different crunch profiles.
- Salad bases: For a heartier meal, serve over quinoa, baby arugula, or mixed greens.
Serving Suggestions
Present your salad vibrant and inviting on a large platter. Drizzle a little extra virgin olive oil or a touch of pomegranate molasses for a sweet-tart finish. Garnish with edible flowers or thinly sliced radish for visual contrast. This roasted cauliflower salad pairs beautifully with grilled chicken or as a complement to Mediterranean mezze spreads.
| Nutrient | Per Serving |
|---|---|
| Calories | 210 kcal |
| Protein | 6 g |
| Carbohydrates | 14 g |
| Fat | 16 g |
Explore more crisp and flavorful vegetable roasting techniques in our Ultimate Guide to Roasting Vegetables. For further insight on cauliflower nutrition, consult Healthline’s comprehensive breakdown.

Q&A
Q&A: Crisp & Flavorful – The Ultimate Roasted Cauliflower Salad Guide
Q1: What makes roasted cauliflower the star of a salad?
A1: Roasted cauliflower transforms from a humble vegetable into a golden, slightly caramelized delight with crispy edges and a tender bite. This texture and flavor boost creates a satisfying crunch and a nutty, savory base that elevates any salad from ordinary to extraordinary.
Q2: How do you achieve that perfect crispy texture when roasting cauliflower?
A2: The secret lies in high heat and a light coating of oil. Roast at around 425°F (220°C) to encourage browning without steaming. Make sure the cauliflower florets are dry before oiling and avoid overcrowding the pan to ensure even crisping. Flipping halfway through roasting helps all sides get that irresistible crunch.
Q3: What seasonings work best to complement roasted cauliflower in a salad?
A3: Roasted cauliflower is like a blank canvas for flavor. Classic choices include garlic powder, smoked paprika, cumin, and a touch of turmeric for color and earthiness. Fresh herbs like parsley or cilantro added after roasting brighten the dish, while a squeeze of lemon juice adds a zesty contrast.
Q4: Can roasted cauliflower be paired with other ingredients to enhance a salad’s nutrition and taste?
A4: Absolutely! Roasted cauliflower pairs beautifully with crunchy nuts like toasted almonds or walnuts, tangy feta or goat cheese, sweet dried cranberries or pomegranate seeds, and hearty greens such as arugula or kale. Adding grains like quinoa or farro turns the salad into a filling, nutrient-packed meal.
Q5: How can I dress a roasted cauliflower salad without overpowering its natural flavors?
A5: Keep dressings bright and balanced to complement rather than mask the roasted notes. A simple lemon-tahini dressing, balsamic vinaigrette, or a drizzle of honey-mustard creates harmony. Use just enough to coat lightly so each bite remains crisp and flavorful.
Q6: Is this roasted cauliflower salad suitable for special diets?
A6: Definitely! It’s naturally gluten-free, vegetarian, and can be vegan with the right toppings and dressings. It’s also low-carb and packed with fiber, vitamins, and antioxidants, making it a wholesome choice for a variety of eating plans.
Q7: What’s the best way to store leftover roasted cauliflower salad?
A7: Store components separately if possible – keep roasted cauliflower in an airtight container and salad greens in another. Combine just before serving to maintain crispness. Leftovers typically last 2-3 days refrigerated but are best enjoyed fresh for maximum texture and flavor.
Embrace the magic of roasting to unlock cauliflower’s full potential, and turn simple ingredients into a vibrant, crunchy salad worth savoring!
Final Thoughts
As you savor each crunchy, tender bite of this roasted cauliflower salad, you’ll discover that simple ingredients combined with thoughtful technique can transform a humble vegetable into a vibrant culinary masterpiece. Whether you’re seeking a nutritious lunch, a colorful side dish, or a crowd-pleasing option for your next gathering, this guide equips you with everything you need to create crisp, flavorful delights every time. Embrace the magic of roasting, the zest of fresh herbs, and the harmony of balanced dressings-and watch your salad bowl come alive with taste and texture. Here’s to turning cauliflower into your new favorite obsession!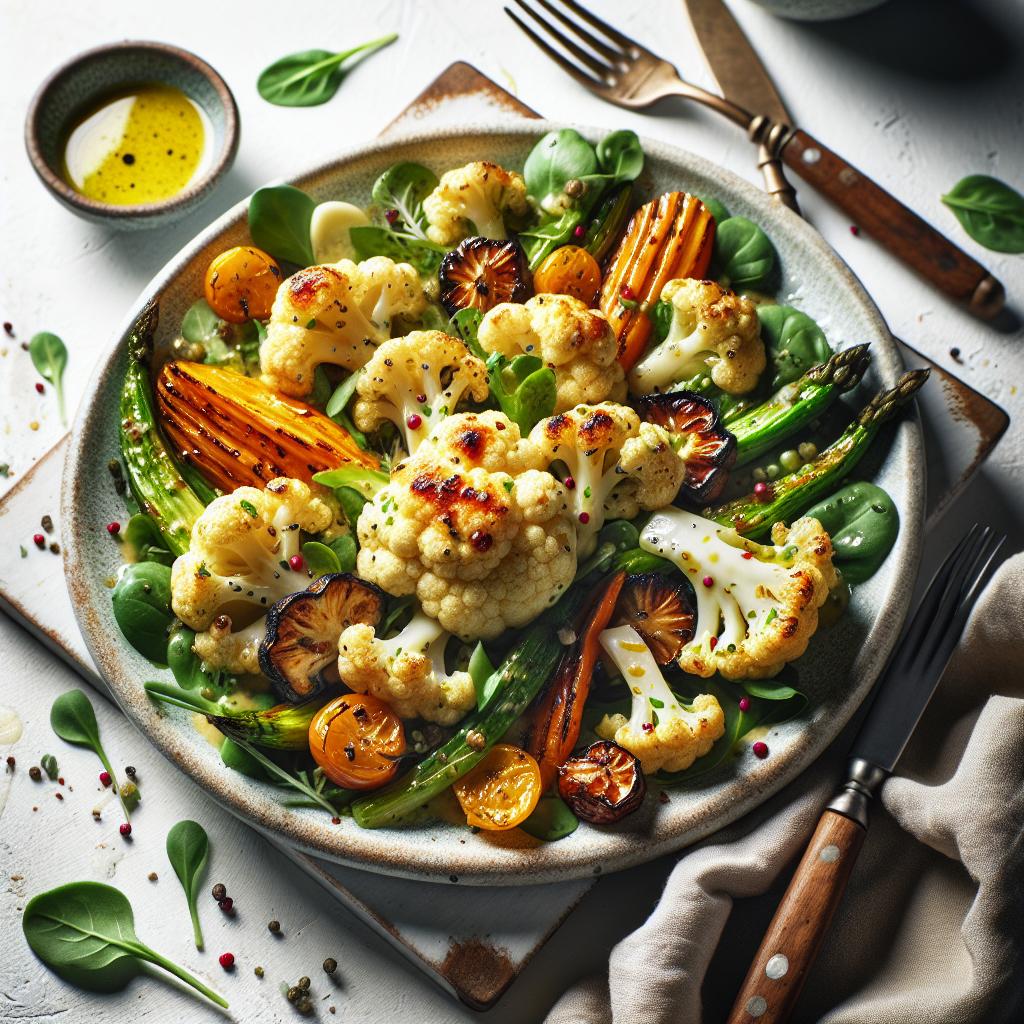
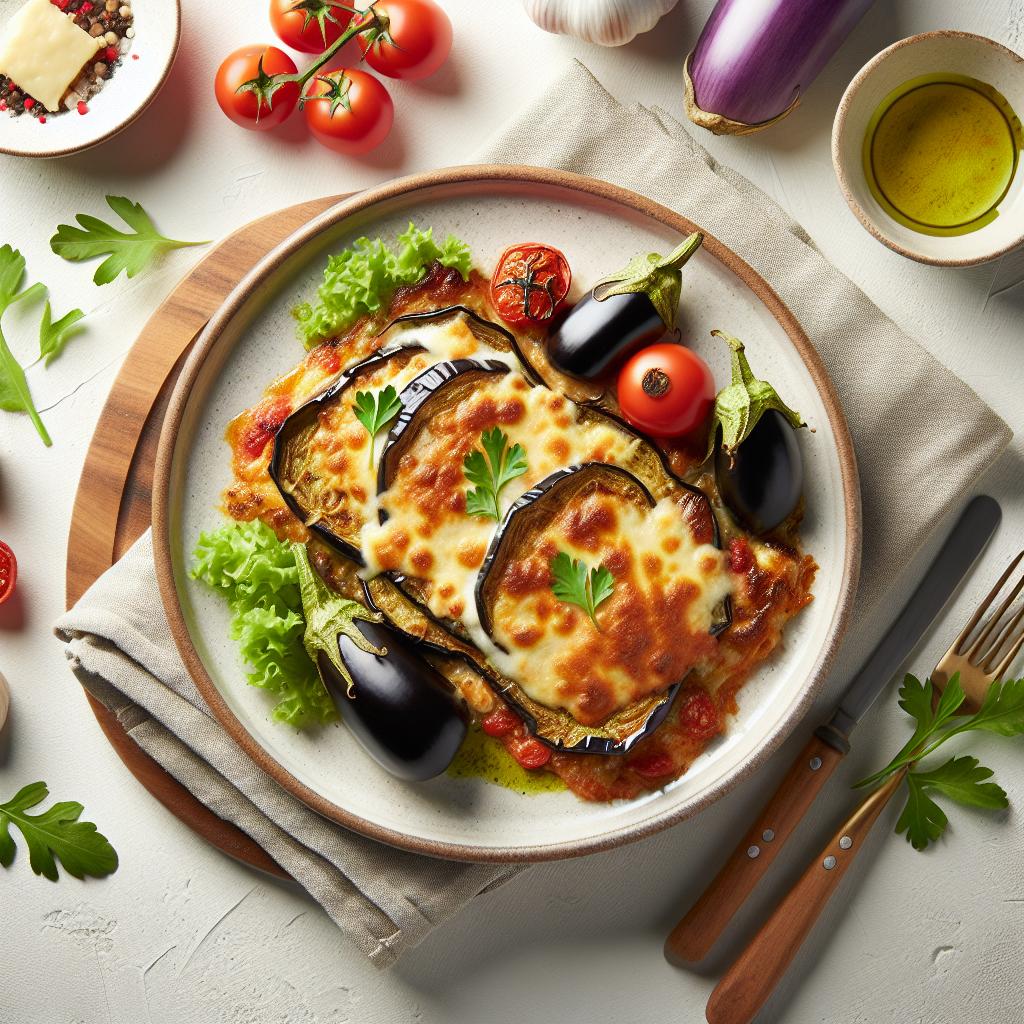
Crispy & Creamy: The Ultimate Baked Eggplant Parmesan Guide
Mastering the art of Crispy & Creamy eggplant Parmesan is like unlocking a culinary treasure chest. This dish, rooted in Italian-American heritage, perfectly balances a golden, crunchy crust with layers of luscious, melted cheeses and tangy tomato sauce. I remember the first time I achieved this harmony: a delicate crunch that gave way to creamy richness-each bite whispering stories of slow-simmered sauces and fresh herbs. Whether you’re a seasoned cook or a passionate beginner, this guide will take you step-by-step to create an unforgettable eggplant Parmesan that shines with both texture and flavor.
Prep and Cook Time
- Preparation: 30 minutes
- Cooking: 45 minutes
- Total Time: 1 hour 15 minutes
Yield
Serves 6 generous portions
Difficulty Level
Medium – approachable for home cooks ready to up their eggplant game
Ingredients
- 2 medium eggplants (about 1½ pounds), sliced into ½-inch thick rounds
- 1 cup all-purpose flour, sifted
- 3 large eggs, lightly beaten
- 1½ cups panko breadcrumbs (for crisp texture)
- ½ cup finely grated Parmesan cheese, divided
- 2 cups shredded mozzarella cheese, preferably whole milk
- 1 cup ricotta cheese, whole milk variety for creaminess
- 4 cups homemade or good-quality marinara sauce
- ½ teaspoon garlic powder
- ½ teaspoon dried oregano
- Salt and freshly ground black pepper, to taste
- Olive oil, for brushing and frying
- Fresh basil leaves, for garnish
Instructions
- Preheat your oven to 375°F (190°C). Prepare a large baking sheet lined with parchment paper for the coated eggplant slices.
- Salt the eggplant slices on both sides and place them on a cooling rack over a tray to sweat for 20 minutes. This reduces bitterness and moisture.
- Pat the eggplant dry with paper towels. Set up a dredging station with three shallow bowls: one with flour, one with beaten eggs, and one combining panko breadcrumbs with ¼ cup Parmesan, garlic powder, oregano, salt, and pepper.
- Coat each eggplant slice in flour, shaking off excess, then dip into the eggs, and finally press firmly into the breadcrumb mixture ensuring an even, generous coating.
- Arrange the coated slices on the baking sheet and lightly brush both sides with olive oil. Bake for 20 minutes, flipping halfway until golden and crisp to the touch.
- Spread a thin layer of marinara sauce on the bottom of a 9×13-inch baking dish. Layer half of the baked eggplant slices in a single layer.
- Dollop half the ricotta evenly over the eggplant, then sprinkle with half the mozzarella and ¼ cup Parmesan. Spoon a generous amount of marinara on top.
- Repeat layering with remaining eggplant, ricotta, mozzarella, Parmesan, and finish with marinara sauce on the very top.
- Cover loosely with foil and bake for 20 minutes. Remove foil and bake an additional 10-15 minutes, until bubbly and golden on top.
- Let rest for 10 minutes before slicing. Garnish with torn fresh basil leaves for freshness and color.
Tips for Success
- Eggplant Prep: Salting and resting is key to reducing bitterness and improving texture; don’t skip this step.
- Crust Crunch: Use panko breadcrumbs mixed with Parmesan for a crunchy, flavorful coating that holds up beautifully during baking.
- Cheese Choices: Combining creamy ricotta with melty mozzarella and sharp Parmesan layers texture and depth, so stick to fresh, whole milk cheeses for the best melt.
- Sauce Tip: Use a rich, low-acid marinara-homemade or a trusted brand-to complement rather than overwhelm your layers.
- Make-Ahead: Assemble the dish a day in advance, refrigerate covered, and bake just before serving for stress-free entertaining.
Serving Suggestions and Pairings
Serve slices warm alongside a crisp green salad dressed with lemon vinaigrette to cut through the richness. Crusty garlic bread or a rosemary focaccia adds a rustic touch. For beverages, a sparkling water with citrus or a bold black coffee enhances this dish’s savory layers. Garnish with freshly chopped parsley or basil for a burst of herbaceous brightness. A light drizzle of high-quality extra virgin olive oil just before serving elevates both aroma and flavor.
| Nutrient | Per Serving |
|---|---|
| Calories | 420 kcal |
| Protein | 22 g |
| Carbohydrates | 28 g |
| Fat | 24 g |
Discover our top tomato sauce recipes to pair perfectly with this Crispy & Creamy eggplant Parmesan. For a deeper dive into eggplant varieties and preparation tips, the Serious Eats guide is an excellent resource.

Q&A
Q&A: Crispy & Creamy – The Ultimate Baked Eggplant Parmesan Guide
Q1: What makes eggplant Parmesan both crispy and creamy?
A: The magic lies in the perfect balance of textures. The eggplant slices are first breaded and baked to achieve a golden, crispy crust. Meanwhile, layering them with luscious marinara sauce and generous amounts of melted mozzarella and creamy ricotta cheese creates that irresistibly smooth and gooey bite. Together, crisp meets cream in every forkful!
Q2: Why bake eggplant Parmesan instead of frying it?
A: Baking is a game-changer for both health and flavor. It reduces oil absorption, making the dish lighter without sacrificing the coveted crispy exterior. Plus, it’s less messy and easier to prepare, with the oven doing most of the work. The result: an indulgent dish that’s a bit kinder to your waistline.
Q3: How do I ensure the eggplant slices don’t get soggy?
A: Start by salting the sliced eggplant and letting it rest for 20-30 minutes. This draws out excess moisture and bitterness. Then, pat them dry thoroughly before breading. Also, don’t overcrowd the baking dish-space helps maintain crispness. Using panko breadcrumbs instead of regular ones adds extra crunch.
Q4: Can I make this dish ahead of time?
A: Absolutely! You can assemble your eggplant Parmesan in advance, cover it tightly, and refrigerate for up to 24 hours. Bake it straight from the fridge, adding a few extra minutes to ensure the cheese is bubbling and the outside stays crisp. It’s a fantastic make-ahead meal for busy weeknights or entertaining guests.
Q5: What variations can I try to customize this classic?
A: The beauty of eggplant Parmesan is its versatility. Swap in a mix of cheeses like provolone or fontina for different flavors. Spice up the sauce with fresh basil or red pepper flakes. For a twist, layer in grilled zucchini or mushrooms. Or go vegan by using plant-based cheeses and almond milk for a dairy-free delight.
Q6: Any tips for perfect homemade marinara sauce?
A: Simple is best! Use crushed San Marzano tomatoes, garlic, onions, a pinch of sugar, fresh basil, and a splash of olive oil. Simmer slowly to develop deep, rich flavors. Fresh herbs added at the end keep the sauce bright and vibrant, perfectly complementing the rich eggplant layers.
Q7: How do I serve baked eggplant Parmesan for maximum wow factor?
A: Presentation is key! Serve hot and bubbling straight from the oven with a sprinkle of fresh basil or parsley on top. Pair it with a crisp green salad or garlic bread for contrast. A glass of Italian red wine, like Chianti or Sangiovese, completes the experience beautifully.
Dive into this crispy & creamy baked eggplant Parmesan and transform your kitchen into an Italian trattoria where every bite carries love, texture, and flavor!
In Summary
As the golden layers of crispy breadcrumbs and velvety cheese meld with tender, oven-roasted eggplant, you’ve unlocked the secret to the ultimate baked Eggplant Parmesan experience. This dish isn’t just a recipe-it’s a celebration of textures and flavors, where every bite tells a story of culinary patience and passion. Whether you’re a seasoned chef or a kitchen novice, mastering this guide will bring a comforting, satisfying masterpiece to your table. So next time you crave something crispy and creamy, remember: perfection is just a bake away. Happy cooking!