

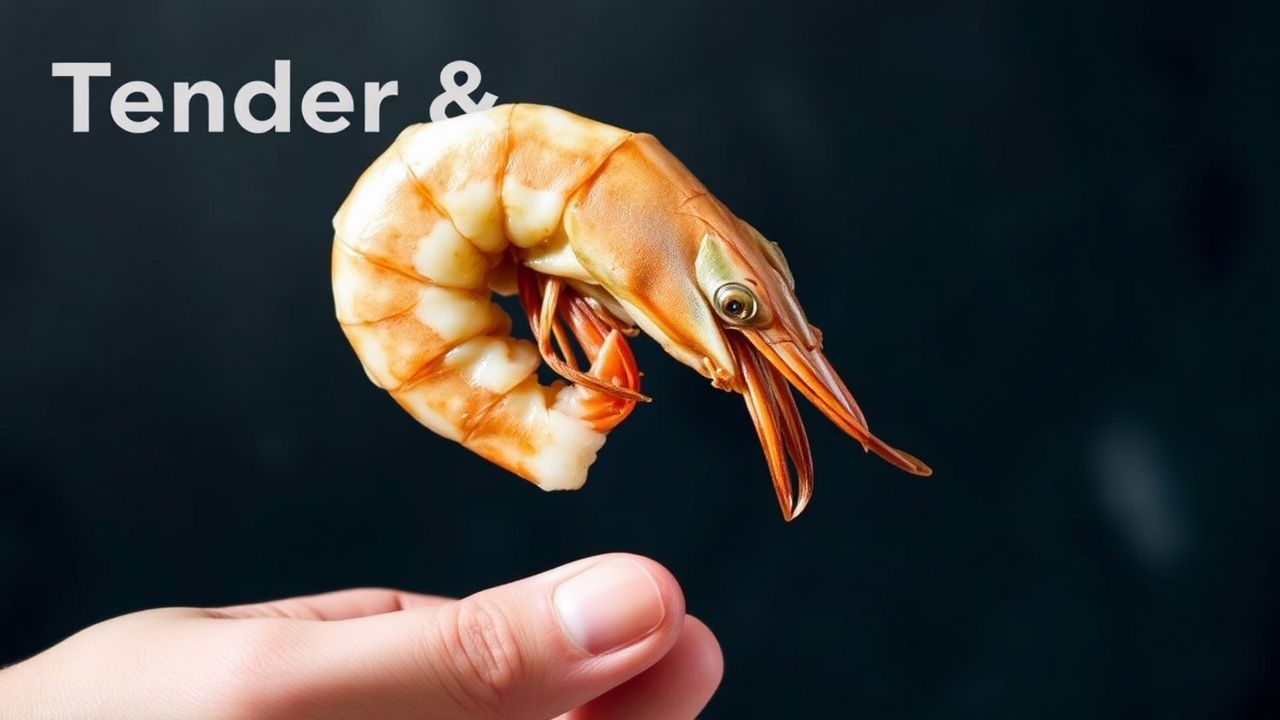
There is nothing better than a perfectly tender, juicy shrimp that snaps just right and tastes of the sea. This guide gives precise, actionable steps to help you boil shrimp to the ideal texture every time.
- Why proper technique matters
- Prep and cook time
- Ingredients at a glance
- Step-by-step instructions
- Tips for consistent results
- Serving suggestions
- Storage and make-ahead
- Common troubleshooting
- FAQ
- How long should I boil shrimp?
- Should I peel shrimp before boiling?
- Does brining make a difference?
- How do I avoid rubbery shrimp?
- Can I reuse the poaching water?
- Final notes
- Timing is key: 2–3 minutes in boiling water for large shrimp.
- Brine first: A short salt soak plumps flesh and locks moisture.
- Shock in ice: An ice bath stops carryover cooking instantly.
- Season the liquid: Poaching water builds flavor into the meat.
Why proper technique matters
Shrimp cook very quickly and their proteins tighten as they heat. Therefore, slight timing or temperature errors cause rubbery or underdone results.
Good technique focuses on even heat, the right salt level, and a fast chill after cooking. These three controls deliver consistent, tender meat.
Prep and cook time
Preparation: 15 minutes. Cooking: 2–3 minutes active boiling for large shrimp; 5–7 minutes total including warm-up and shock.
Adjust time for shrimp size: smaller shrimp need less time and jumbo shrimp may take up to 4 minutes. Always measure by visual cues and a timer.
Ingredients at a glance
Use a clean list of aromatics and salt to flavor the poaching liquid. Fresh lemon, crushed garlic, whole peppercorns, a bay leaf, and a full teaspoon of a seafood blend or Old Bay work well.
Buy firm, translucent shrimp with no ammonia smell and uniform size for even cooking. For background on shrimp biology and types, see Shrimp.
- 1 lb large shrimp (16–20), peeled and deveined, tails on
- 6 cups cold water
- 1 lemon, halved, plus wedges
- 3 garlic cloves, crushed
- 1 tbsp kosher salt
- 1 tsp whole peppercorns
- 1 bay leaf
- 1 tsp seafood seasoning
- Fresh parsley for garnish
Step-by-step instructions
Rinse shrimp briefly under cold water and pat dry to remove excess moisture. Prepare a large pot with cold water and add the aromatics and salt to start the poaching liquid.
Bring the liquid to a steady rolling boil, then add the shrimp in a single layer. Set a timer for 2 minutes, check for opaque flesh and a bright pink color, then allow one extra minute only if shrimp are large.
- Build the broth: Combine cold water, salt, garlic, lemon halves, peppercorns, bay leaf, and seasoning. Bring to a rolling boil over high heat.
- Add shrimp: Spread shrimp evenly, then reduce slightly to maintain a gentle boil so water still moves but does not overflow.
- Time precisely: Cook 2–3 minutes until shrimp turn opaque and form a loose “C”. Avoid tight curls.
- Ice shock: Transfer shrimp immediately to an ice bath to stop cooking and set texture.
- Peel and finish: Peel when cool, leaving tails if desired. Serve chilled or gently warmed with sauces.
Tips for consistent results
Selecting shrimp: Choose shrimp with firm flesh, a mild sea scent, and consistent size for even cooking. Ask your fishmonger about catch date and storage.
Starting cold: Begin with cold water to let shrimp heat through evenly; this prevents a cooked outside with a raw center. For technical context on heat transfer and boiling, reference Boiling.
Brining and timing
A short brine of about 1 tablespoon kosher salt per cup of water for 15–30 minutes firms and plumps the meat. Rinse briefly after brining to remove surface salt before poaching.
Use a reliable kitchen timer and check the first shrimp at 90 seconds to learn how your stove and pot behave. Then adjust for future batches.
Also, use a wide pot so shrimp lay in a single layer; overcrowding lowers the water temperature and changes cook time. If you must cook large amounts, work in batches to preserve consistent results.
Seasoning the poach
Season the water boldly because shrimp absorb flavor during poaching. Add citrus, herbs, and whole spices rather than heavy salt alone for a balanced profile.
Reserve the strained poaching liquid as a stock for soups, risottos, or sauces; it concentrates shrimp flavor. For more on seafood types and handling, see Seafood.
Serving suggestions
Chilled boiled shrimp make an elegant appetizer with a classic cocktail sauce or aioli. Arrange on a platter with lemon wedges and fresh herbs for contrast and aroma.
Warm shrimp pair well with pasta, grain bowls, or tacos; toss briefly in melted garlic butter or a bright vinaigrette to enliven the flavor. Also, serve with crusty bread to soak up any juices.
Storage and make-ahead
Cool shrimp in the ice bath, drain well, and store in an airtight container for up to 48 hours in the refrigerator. Keep them chilled on ice when serving to maintain texture and safety.
For long-term storage, freeze cooled shrimp on a tray, then transfer to a sealed bag. Label with date and use within three months to preserve quality.
Common troubleshooting
If shrimp taste rubbery, you likely overcooked them or used water that was too hot before adding shrimp. Reheating cooked shrimp also dries them quickly, so rewarm gently or serve chilled.
If shrimp smell off or have a strong ammonia odor, discard them and choose a different batch. Freshness matters for both flavor and safety when cooking shellfish.
FAQ
How long should I boil shrimp?
Cook large shrimp for 2–3 minutes in gently boiling water, counting from the moment they enter the pot. Use visual cues: opaque flesh and a loose “C” shape signal doneness.
Should I peel shrimp before boiling?
Boiling with shells on preserves flavor and moisture, so many chefs leave the shells during cooking. Peel after chilling for easier handling and presentation.
Does brining make a difference?
Yes. A short brine firms the flesh and enhances juiciness by increasing water retention inside the meat. Rinse briefly after brining to balance surface salt.
How do I avoid rubbery shrimp?
Time precisely, use a rolling but not violent boil, and shock shrimp in ice immediately after cooking. Those three steps prevent overcooking and preserve tenderness.
Can I reuse the poaching water?
Absolutely. Strain and refrigerate the poaching liquid; use it as a flavorful stock for soups, chowders, or sauces. It concentrates shrimp essence and reduces waste.
Final notes
Mastering boiled shrimp relies on a few repeatable controls: uniform size, proper salt, precise timing, and an ice shock. Focus on these areas and you will produce tender, juicy shrimp consistently.
Keep experimenting with aromatics and seasoning levels to match your palate. With practice, you will learn how small adjustments affect texture and flavor for perfect results every time.
See also: boiled shrimp


