

Unlocking Flavor: Mastering Dry-Aging Meat
Dry-aging converts basic primal cuts into concentrated, tender steaks through controlled time, temperature, humidity, and airflow. The process relies on predictable biochemical changes rather than tricks of the trade.
- Key takeaway: Enzymes and moisture loss drive flavor concentration.
- Key takeaway: Precise environment prevents spoilage while enabling crust formation.
- Key takeaway: Proper trimming preserves yield and adds stock-making value.
The remainder of this guide breaks the science into actionable steps a kitchen professional can apply. Read on for controlled methods, safety checkpoints, and chef-level finishing tips.
The Science Behind Dry-Aging
Dry-aging works by two main mechanisms: enzymatic proteolysis and controlled dehydration. Enzymes naturally present in muscle break down structural proteins, which increases tenderness and releases free amino acids that contribute savory taste.
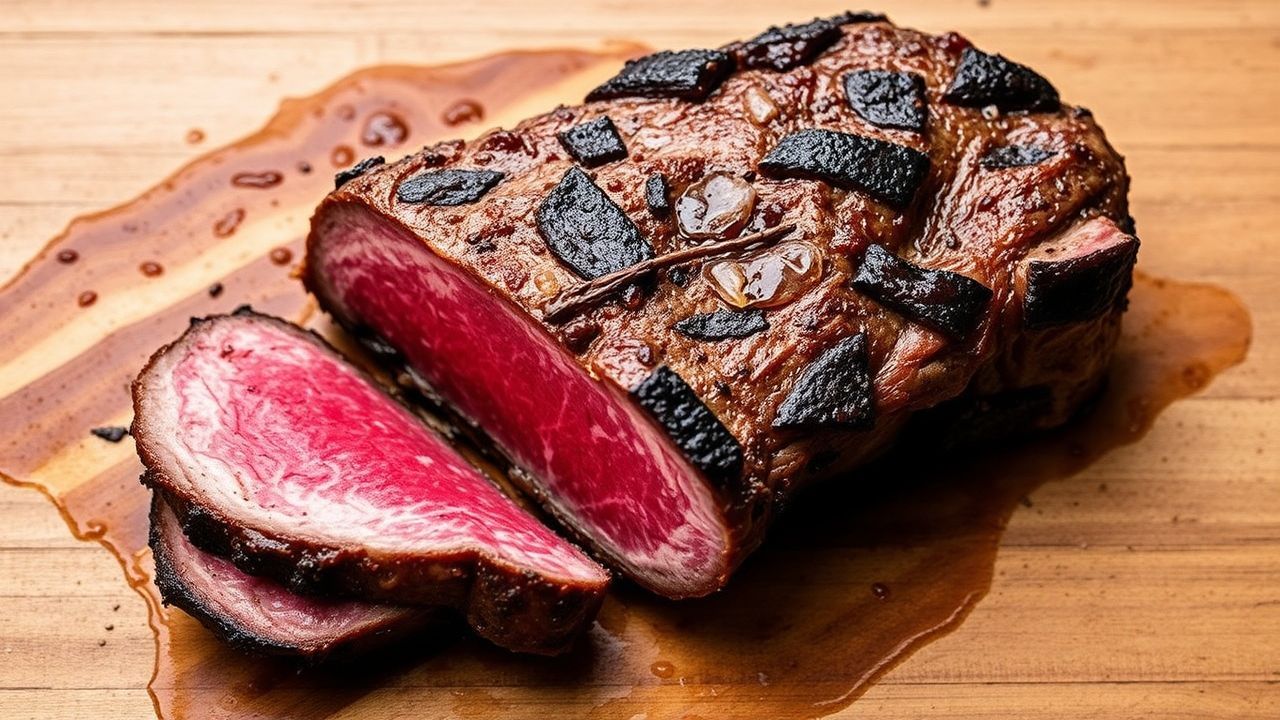
Simultaneously, moisture evaporates from the meat surface, concentrating flavor compounds and producing a distinctive nutty note. The outer crust that develops protects the interior and concentrates aroma while later being trimmed away.
Enzymes and Flavor Development
Proteolytic enzymes such as calpains and cathepsins cleave myofibrillar proteins and connective tissue. This biochemical activity converts tough structures into smaller peptides and amino acids that enhance umami.
For technical context, see enzyme profiles and activity ranges when you plan aging durations.
Microbial Ecology and Safe Crust Formation
Beneficial surface molds and dry crust microbiota create complex aroma precursors while limiting spoilage organisms. These communities form under low-temperature, moderate-humidity conditions.
Read the general biology of molds at mold (fungus) for a practical overview of which species commonly grow on cured surfaces.
Preparing Your Environment
Dry-aging requires a dedicated, controllable space. Use a small refrigeration unit or cabinet where you can hold temperature and humidity steady without frequent door openings.
Control of both humidity and air movement prevents unwanted microbial growth and ensures an even crust. Consistency matters more than ultra-low temperatures.
Temperature, Humidity, Airflow
Target a stable temperature between 34–38°F (1–3°C). This range slows pathogenic growth while allowing enzymatic activity to proceed at a useful rate.
Maintain relative humidity around 75–82% and circulate air gently with a small fan. Learn more about the physics at relative humidity and why it matters for evaporation.
Equipment and Setup
Use a wire rack to allow airflow on all sides and a tray to catch drips. Avoid stacking cuts; expose large surfaces to circulating air.
Consider a dedicated temperature data logger for continuous records. For refrigeration principles, consult refrigeration basics to size your unit correctly.
Step-by-Step Dry-Aging Process
Follow these steps to dry-age a whole primal cut like ribeye or strip loin. Each step balances biological reaction rates, moisture loss, and food-safety controls.
Keep daily logs of temperature and humidity and inspect for unexpected odors or gross discoloration.
Prep and Cook Time
- Preparation Time: 5 minutes (initial setup)
- Dry-Aging Duration: 21–45 days (adjust based on desired flavor intensity)
- Cook Time: 15–20 minutes (post-aging, for searing and finishing)
Yield and Difficulty
Yield: Serves 2–4 depending on steak size. Expect weight loss from evaporation—plan accordingly for cost and portioning.
Difficulty: Advanced. The process demands environmental control, vigilant monitoring, and trimming skill.
Ingredients and Tools
Main ingredient: 1 whole primal cut of beef (ribeye or strip loin), 10–15 lbs, bone-in preferred for flavor and protection.
Also: coarse sea salt, freshly ground black pepper, high-smoke-point oil for searing, wire racks, dedicated refrigeration, temperature/humidity monitor.
Instructions
- Set environment: Hold 34–38°F (1–3°C); RH ~80%; gentle airflow via small fan.
- Select and prep cut: Choose well-marbled meat; leave fat cap intact to protect muscle.
- Light seasoning: Rub surface lightly with coarse salt to aid controlled moisture extraction.
- Position on rack: Allow air circulation on all sides; place a drip tray below.
- Age undisturbed: 21–45 days depending on desired profile; inspect daily for environment and safety.
- Trim and portion: Remove the hard outer crust and trim for service; reserve trimmings for stocks.
- Sear and finish: Sear in a very hot pan with high-smoke-point oil; finish to medium-rare for best texture; rest 8–12 minutes before slicing.
Chef’s Notes and Practical Tips
Choose large, well-marbled sections such as prime rib or strip loin for predictable results. Fat and connective tissue buffer the interior from over-drying and support enzyme action.
Trim judiciously; the hard crust contains concentrated flavor and can be used to enrich stocks and sauces. Save every trimmed piece for secondary use.
When home dry-aging is impractical, select professionally aged product from reputable purveyors. Professional facilities maintain validated controls and traceability.
Safety Considerations
Harmful bacteria grow when temperatures and humidity fall outside target ranges. Use a dedicated data-logger and log readings daily to establish a safety record.
Proper hygiene and dedicated equipment cut cross-contamination risks. Train staff on trimming and smell/visual checks before portioning for sale or service.
Serving and Pairing
Serve simply to highlight the concentrated beef character: flaky salt, freshly cracked black pepper, and a neutral butter or herb sauce. Let aged beef carry the plate.
Pair with full-bodied red wines such as Cabernet Sauvignon or Malbec to complement the intensified savory and nutty notes. Classic sides include roasted garlic potatoes and charred seasonal vegetables.
Further Reading and Internal Resources
For comparisons of aging methods, consult our internal primer on wet-aging versus dry-aging at Wet-Aging vs Dry-Aging Guide. That page contrasts enzymatic timelines, yield loss, and flavor profiles.
Explore recommended equipment and safety checklists at Dry-Aging Equipment & Safety to choose appropriate refrigeration and monitoring tools for professional kitchens.
FAQ
What is dry-aging?
Dry-aging is the controlled maturation of large beef cuts where time and environment change texture and flavor. Enzymes break down proteins; moisture loss concentrates taste and aroma.
The process differs from wet-aging because it exposes meat to air rather than vacuum packaging, which yields distinct flavor and crust formation.
How long should I dry-age beef?
Common windows are 21–45 days. Shorter times yield subtle change; 30–35 days produce a well-rounded nutty profile. Longer aging intensifies character but raises yield loss and cost.
Balance culinary goals against economics when selecting a timeline.
Does dry-aging make meat safer?
Dry-aging does not inherently make meat safer. It requires proper temperature and humidity control to limit pathogen growth. Follow documented safety parameters and monitor conditions.
Rely on validated refrigeration equipment and daily checks rather than guesswork.
Can I dry-age at home?
Home dry-aging is possible with a dedicated, well-sealed fridge and reliable monitoring. However, the margin for error tightens—professionally dry-aged beef remains the safer and more predictable option.
If you try at home, do so with small test cuts and invest in a quality temperature/humidity logger.
Which cuts work best?
Large, well-marbled primal cuts—ribeye, strip loin, and sirloin—yield the best results. Fat cover and bone help preserve interior juiciness during the aging window.
Lean or small cuts generally do not benefit from dry-aging because they lack the fat and size needed to form the protective crust and concentrate flavor effectively.
See also: Dry-Aging

