


There’s something almost magical about a perfectly puffed pita bread-a warm, golden pocket that invites you to fill it with your favorite flavors. But achieving that signature puff, with its airy interior and tender crust, isn’t just luck or a special ingredient. It’s all about harnessing the secret power of high heat. In this article, we’ll dive into the science and art behind why soaring oven temperatures transform simple dough into those soft, billowing pitas we crave. Get ready to uncover how the blistering heat unlocks steam pockets, creates that irresistible texture, and turns humble bread into a culinary marvel.
Why High Heat is the Secret to Puffy, Perfect Pita Bread becomes instantly clear the moment your dough strikes a searing-hot surface. This intense heat triggers a fascinating transformation, causing water trapped inside the dough to vaporize rapidly and expand, creating those iconic, delicate pockets. Originating from Middle Eastern kitchens where wood-fired ovens blaze fiercely hot, this technique elevates humble pita into airy, golden rounds with irresistible puff and texture.
Prep and Cook Time
- Preparation: 15 minutes
- Proofing: 1 to 1.5 hours
- Cooking: 10 minutes
- Total Time: Approximately 1 hour 45 minutes
Yield
8 medium-sized pitas (about 6-7 inches in diameter)
Difficulty Level
Medium – Requires attention to heat control and dough handling but highly rewarding
Ingredients
- 2 ¼ teaspoons (1 packet) active dry yeast
- 1 ¼ cups warm water (110°F/43°C)
- 3 cups all-purpose flour, sifted
- 1 teaspoon salt
- 1 tablespoon olive oil, plus extra for coating
- 1 teaspoon sugar or honey (optional for yeast activation)
Instructions
- Activate the yeast: In a small bowl, combine warm water and sugar or honey. Sprinkle yeast over top and let stand for 5 minutes until foamy and bubbly.
- Mix the dough: In a large bowl, whisk together flour and salt. Make a well in the center, then pour in the yeast mixture and olive oil. Stir with a wooden spoon until the dough begins to come together.
- Knead the dough: Turn the dough out onto a lightly floured surface. Knead vigorously for 8-10 minutes until smooth, elastic, and slightly tacky. Add flour sparingly if too sticky.
- First rise: Lightly oil a clean bowl, place the dough inside and cover with a damp towel or plastic wrap. Let rise in a warm environment for 1 to 1.5 hours until doubled in size.
- Preheat your cooking surface: For authentic puffy pita, heat a cast-iron skillet, heavy-duty griddle, or stone at the highest possible temperature (ideally 500°F/260°C) on your stovetop or oven. Preheating for 30 minutes ensures the surface can instantly trigger the pita to puff.
- Shape the pitas: Punch down the dough and divide into 8 equal balls. On a lightly floured surface, roll each ball into a ⅛-inch thick circle, about 6-7 inches in diameter. Cover with a towel to prevent drying.
- Cook the pitas: Carefully place one round on the hot surface. Cook for about 1-2 minutes until bubbles form and the bottom is golden brown. Flip and cook another 1-2 minutes. Watch closely as rapid steam forms inside, puffing the pita into a perfect pocket. If it doesn’t puff immediately, gently press down on bubbles until a pocket forms.
- Keep warm: Transfer cooked pitas to a clean, dry towel and cover to keep warm and soft. Repeat with remaining dough.
Tips for Success
- Use high-protein flour: Bread or all-purpose flour with higher gluten content ensures elasticity needed for pocket formation.
- Maintain intense heat: Replicating commercial oven conditions at home means preheating your pan thoroughly. If your stovetop won’t reach very high heat, broiling on a pizza stone inside the oven is a great alternative.
- Don’t roll dough too thin: Around ⅛-inch thickness balances puffing with structural integrity.
- Let your dough relax: Resting the dough for at least an hour improves texture and encourages puffing.
- Work quickly: Once shaped, cook pita without delay so moisture remains trapped within.
- Experiment with hydration: Slightly wetter doughs can steam better but are trickier to handle.
Serving Suggestions
Serve these puffy pitas warm alongside classic Mediterranean dishes such as creamy hummus or vibrant tzatziki. Slice in half to reveal the perfect pocket and fill with grilled meats, falafel, or fresh veggies for an authentic wrap. Garnish with a drizzle of olive oil, a sprinkle of za’atar, or fresh herbs like parsley or mint to enhance the flavors and add striking color contrasts.

| Nutritional Information (per pita) | Amount |
|---|---|
| Calories | 170 kcal |
| Protein | 5 g |
| Carbohydrates | 34 g |
| Fat | 2 g |
For deeper insight into the science behind baking techniques, the Science Daily article on dough steam formation offers detailed explanations that elevate your understanding of how high heat works its magic.
Mastering these high heat techniques transforms the simplest dough into airy, elegant pockets ready to elevate any meal.
Q&A
Q: Why does pita bread puff up perfectly in high heat?
A: High heat causes the water inside the dough to instantly turn into steam. This rapid steam expansion creates a pressure pocket that pushes the dough outward, forming the iconic puff or “pocket” of pita bread. Essentially, the oven’s intense heat gives the dough a quick puff of life!
Q: Can you achieve a perfect pita pocket without very high temperatures?
A: It’s tough! Lower temperatures don’t generate enough steam fast enough, so the dough won’t separate into that signature hollow center. Instead, you get a flatter, denser bread. For that perfect pita pocket, the heat has to be both sudden and scorching.
Q: What temperature range is ideal for baking pita bread?
A: Typically, pita bread needs to be baked at around 450-500°F (232-260°C). This super-hot environment ensures the water trapped inside the dough instantly vaporizes, creating the puff just seconds after placing the dough in the oven.
Q: Does the type of oven affect pita puffing?
A: Definitely! Traditional stone ovens and pizza stones hold and radiate heat evenly, giving pita that rapid, high-temperature burst it needs. Regular home ovens can work if preheated thoroughly and if you use a preheated baking stone or steel for that extra heat punch.
Q: What role does dough hydration play in pita puffing?
A: Hydration is crucial because more moisture in the dough means more steam can build up during baking. The water inside the dough rapidly turns to vapor, inflating the dough like a balloon. A well-hydrated dough is puff-ready!
Q: Can the thickness of the dough affect the puff?
A: Yes! Rolling the dough thin enough lets the steam expand quickly and uniformly, creating a full, airy pocket. If the dough is too thick, the steam can’t separate the layers efficiently, resulting in a flatter pita.
Q: Is there a secret beyond high heat for perfect pita?
A: High heat is the main magic maker, but quick baking times (usually only a couple of minutes) and proper dough shaping also play big roles. The dough needs to be evenly round and rested, ready to puff right when it hits that hot oven.
Q: Why is understanding heat important for home bakers?
A: Knowing why high heat matters empowers home bakers to adjust their techniques-like preheating stones, thinning dough properly, and using hot oven settings-to unlock that bakery-quality puff at home. That sizzling burst of steam is the secret ingredient to perfect pitas!
Insights and Conclusions
In the world of baking, few secrets are as transformative as the power of high heat when it comes to pita bread. That sudden burst of intense temperature is what ignites the magical puff, creating the iconic pocket that holds so much promise. Understanding this fiery dance not only elevates your pita but also connects you to a timeless tradition baked into every warm, pillowy bite. So next time you fire up your oven or skillet, remember: it’s the heat that unlocks perfection, turning simple dough into a puffy masterpiece worthy of sharing.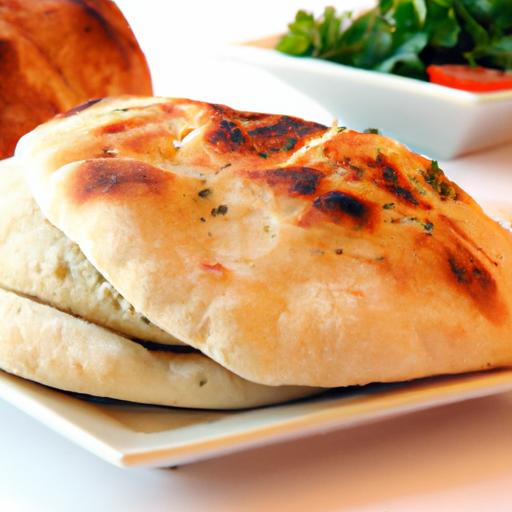


